2016 JEEP GRAND CHEROKEE wipers
[x] Cancel search: wipersPage 282 of 723
Rotate the center portion of the lever upward to
the first detent for intermittent operation and to
the second detent for continuous rear wiper operation.
Rotating the center portion upward once more
will activate the washer pump which will con-
tinue to operate as long as the switch is held. Upon release of the switch, the wipers will resume the continu-
ous rear wiper operation. When this rotary control is in
the OFF position, rotating it downward will activate the
rear washer pump which will continue to operate as long
as the switch is held. Once the switch is released it will
return to the OFF position and the wipers will cycle
several times before returning to the parked position.
NOTE:
As a protective measure, the pump will stop if the
switch is held for more than 20 seconds. Once the switch
is released the pump will resume normal operation.
If the rear wiper is operating when the ignition is turned
OFF, the wiper will automatically return to the “park”
position.
Rear Window Defroster
The rear window defroster button is located on
the climate control panel. Push this button to turn
on the rear window defroster and the heated outside
Rear Wiper/Washer Control
280 UNDERSTANDING THE FEATURES OF YOUR VEHICLE
Page 361 of 723
“Parkview Backup camera Delay” button on the touch-
screen to turn the ParkView Delay ON or OFF.
•Rain Sensing Auto Wipers
When this feature is selected, the system will automati-
cally activate the windshield wipers if it senses moisture
on the windshield. To make your selection, press the
“Rain Sensing” button on the touchscreen, until a check-
mark appears next to setting, indicating that the setting
had been selected.
• Hill Start Assist — If Equipped
When this feature is selected, the Hill Start Assist (HSA)
system is active. Refer to “Electronic Brake Control
System” in “Starting And Operating” for system function
and operating information. To make your selection, press
the “Hill Start Assist” button on the touchscreen, until a
check-mark appears next to setting, indicating that the
setting had been selected.Lights
After pressing the Lights button on the touchscreen the
following settings will be available.
• Headlight Off Delay
When this feature is selected, it allows adjustment of the
amount of time the headlights remain on after the engine
is shut off. To change the Headlights Off Delay setting,
press the “+” or “–” button on the touchscreen to select
your desired time interval, and choose either 0 sec, 30 sec,
60 sec or 90 seconds.
• Headlight Illumination On Approach
When this feature is selected, the headlights will activate
and remain on for 0, 30, 60, or 90 seconds when the doors
are unlocked with the Remote Keyless Entry (RKE) Key
Fob. To change the Illuminated Approach status, press
the “+” or “–” button on the touchscreen to select your
desired time interval.
4
UNDERSTANDING YOUR INSTRUMENT PANEL 359
Page 362 of 723
•Headlights With Wipers — If Equipped
When this feature is selected, and the headlight switch is
in the AUTO position, the headlights will turn on ap-
proximately 10 seconds after the wipers are turned on.
The headlights will also turn off when the wipers are
turned off if they were turned on by this feature. To make
your selection, press the Headlights With Wipers button
on the touchscreen, until a check-mark appears next to
setting, showing that setting has been selected.
• Auto Dim High Beams — If Equipped
When this feature is selected, the high beam headlights
will activate/deactivate automatically under certain con-
ditions. To make your selection, press the “Auto High
Beams” button on the touchscreen, until a check-mark
appears next to setting, showing that setting has been
selected. Refer to “Automatic High Beam Headlamp
Control — If Equipped” in “Understanding The Features
Of Your Vehicle” for further information. •
Daytime Running Lights — If Equipped
When this feature is selected, the headlights will turn on
whenever the vehicle is set in motion. To make your
selection, press the “Daytime Running Lights” button on
the touchscreen, until a check-mark appears next to
setting, showing that setting has been selected.
• Flash Lights With Lock
When this feature is selected, the exterior lights will flash
when the doors are locked or unlocked with the RKE Key
Fob. This feature may be selected with or without the
sound horn on lock feature selected. To make your
selection, press the “Flash Lights with Lock” button on
the touchscreen, until a check-mark appears next to
setting, showing that setting has been selected.
Doors & Locks
After pressing the Doors & Locks button on the touch-
screen the following settings will be available.
360 UNDERSTANDING YOUR INSTRUMENT PANEL
Page 516 of 723

follow the trailer tongue weight recommendations. Refer
to “Trailer Towing” in this section for further informa-
tion.
When TSC is functioning, the “ESC Activation/
Malfunction Indicator Light” will flash, the engine power
may be reduced and you may feel the brakes being
applied to individual wheels to attempt to stop the trailer
from swaying. TSC is disabled when the ESC system is in
the “Partial Off” or “Full Off” modes.
WARNING!
If TSC activates while driving, slow the vehicle
down, stop at the nearest safe location, and adjust the
trailer load to eliminate trailer sway.
Ready Alert Braking (RAB)
Ready Alert Braking may reduce the time required to
reach full braking during emergency braking situations.It anticipates when an emergency braking situation may
occur by monitoring how fast the throttle is released by
the driver. The EBC will prepare the brake system for a
panic stop.
Rain Brake Support (RBS)
Rain Brake Support may improve braking performance
in wet conditions. It will periodically apply a small
amount of brake pressure to remove any water buildup
on the front brake rotors. It functions when the wind-
shield wipers are in LO or HI speed. When Rain Brake
Support is active, there is no notification to the driver and
no driver interaction is required.
Dynamic Steering Torque (DST)
Dynamic Steering Torque is a feature of the ESC and EPS
modules that provides torque at the steering wheel for
certain driving conditions in which the ESC module is
detecting vehicle instability. The torque that the steering
wheel receives is only meant to help the driver realize
514 STARTING AND OPERATING
Page 631 of 723
9. Push the door to the near closed position to reengagethe glove compartment travel stops.
NOTE: Ensure the glove compartment door hinges and
glove compartment travel stops are fully engaged.
Body Lubrication
Locks and all body pivot points, including such items as
seat tracks, door hinge pivot points and rollers, liftgate,
tailgate, decklid, sliding doors and hood hinges, should
be lubricated periodically with a lithium based grease,
such as MOPAR Spray White Lube to assure quiet, easy
operation and to protect against rust and wear. Prior to
the application of any lubricant, the parts concerned
should be wiped clean to remove dust and grit; after
lubricating excess oil and grease should be removed.
Particular attention should also be given to hood latching
components to ensure proper function. When performing
other underhood services, the hood latch, release mecha-
nism and safety catch should be cleaned and lubricated. The external lock cylinders should be lubricated twice a
year, preferably in the Fall and Spring. Apply a small
amount of a high quality lubricant, such as MOPAR Lock
Cylinder Lubricant directly into the lock cylinder.
Windshield Wiper Blades
Clean the rubber edges of the wiper blades and the
windshield periodically with a sponge or soft cloth and a
mild nonabrasive cleaner. This will remove accumula-
tions of salt or road film.
Operation of the wipers on dry glass for long periods
may cause deterioration of the wiper blades. Always use
washer fluid when using the wipers to remove salt or dirt
from a dry windshield.
Avoid using the wiper blades to remove frost or ice from
the windshield. Keep the blade rubber out of contact with
petroleum products such as engine oil, gasoline, etc.
7
MAINTAINING YOUR VEHICLE 629
Page 635 of 723
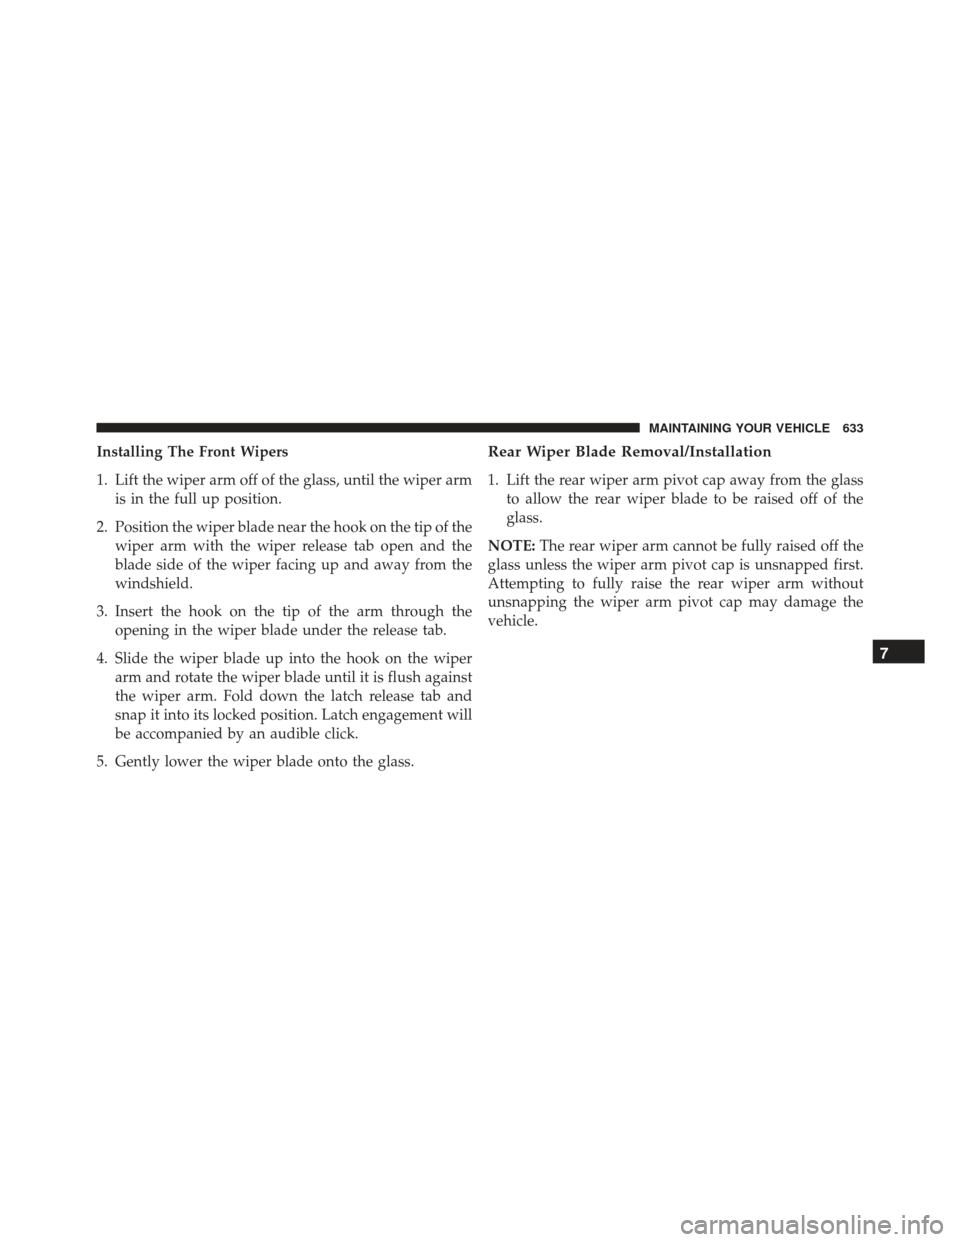
Installing The Front Wipers
1. Lift the wiper arm off of the glass, until the wiper armis in the full up position.
2. Position the wiper blade near the hook on the tip of the wiper arm with the wiper release tab open and the
blade side of the wiper facing up and away from the
windshield.
3. Insert the hook on the tip of the arm through the opening in the wiper blade under the release tab.
4. Slide the wiper blade up into the hook on the wiper arm and rotate the wiper blade until it is flush against
the wiper arm. Fold down the latch release tab and
snap it into its locked position. Latch engagement will
be accompanied by an audible click.
5. Gently lower the wiper blade onto the glass.Rear Wiper Blade Removal/Installation
1. Lift the rear wiper arm pivot cap away from the glass to allow the rear wiper blade to be raised off of the
glass.
NOTE: The rear wiper arm cannot be fully raised off the
glass unless the wiper arm pivot cap is unsnapped first.
Attempting to fully raise the rear wiper arm without
unsnapping the wiper arm pivot cap may damage the
vehicle.
7
MAINTAINING YOUR VEHICLE 633
Page 662 of 723
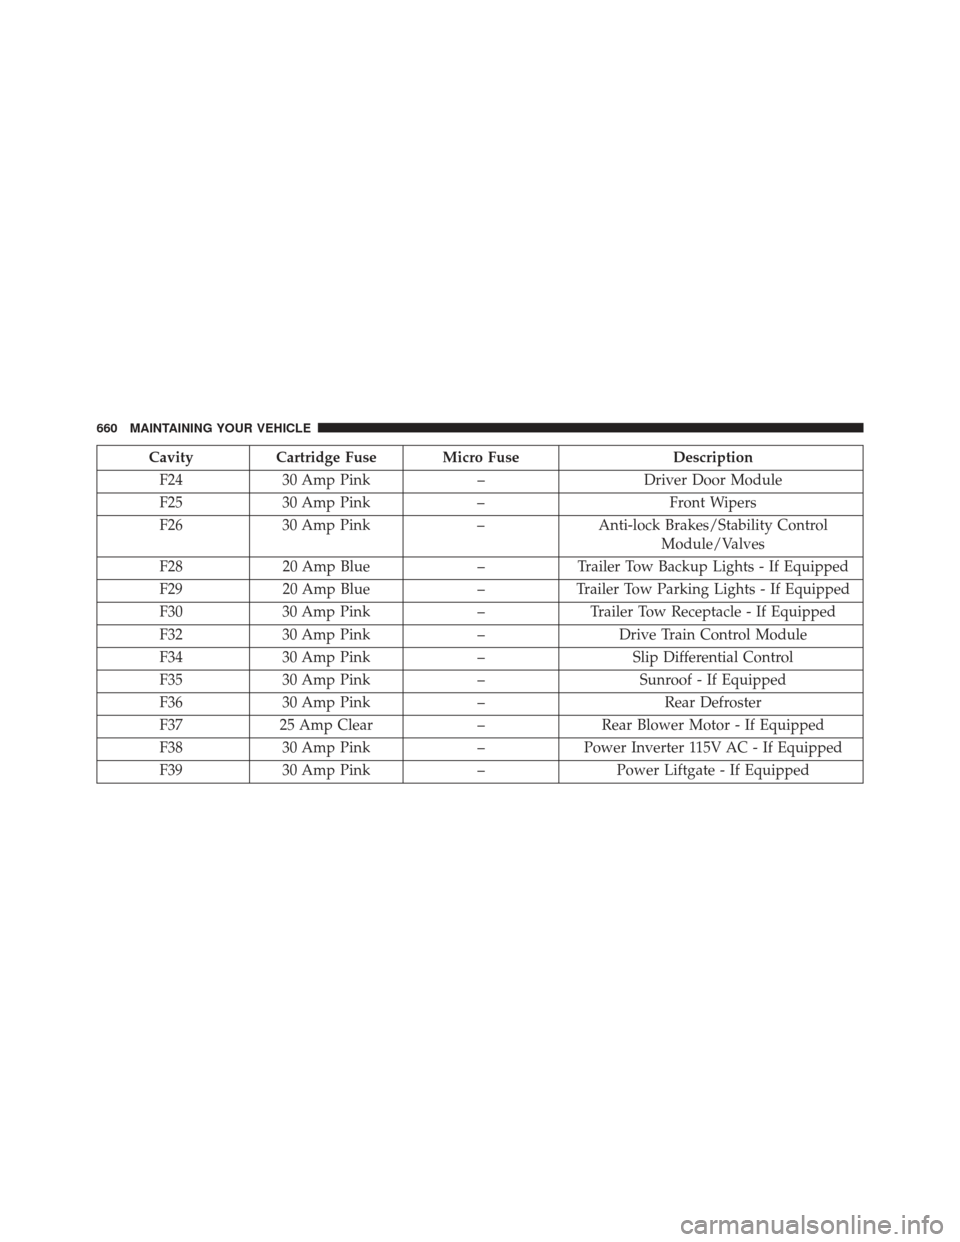
CavityCartridge Fuse Micro Fuse Description
F24 30 Amp Pink –Driver Door Module
F25 30 Amp Pink –Front Wipers
F26 30 Amp Pink –Anti-lock Brakes/Stability Control
Module/Valves
F28 20 Amp Blue –Trailer Tow Backup Lights - If Equipped
F29 20 Amp Blue –Trailer Tow Parking Lights - If Equipped
F30 30 Amp Pink –Trailer Tow Receptacle - If Equipped
F32 30 Amp Pink –Drive Train Control Module
F34 30 Amp Pink –Slip Differential Control
F35 30 Amp Pink –Sunroof - If Equipped
F36 30 Amp Pink –Rear Defroster
F37 25 Amp Clear –Rear Blower Motor - If Equipped
F38 30 Amp Pink –Power Inverter 115V AC - If Equipped
F39 30 Amp Pink –Power Liftgate - If Equipped
660 MAINTAINING YOUR VEHICLE
Page 709 of 723
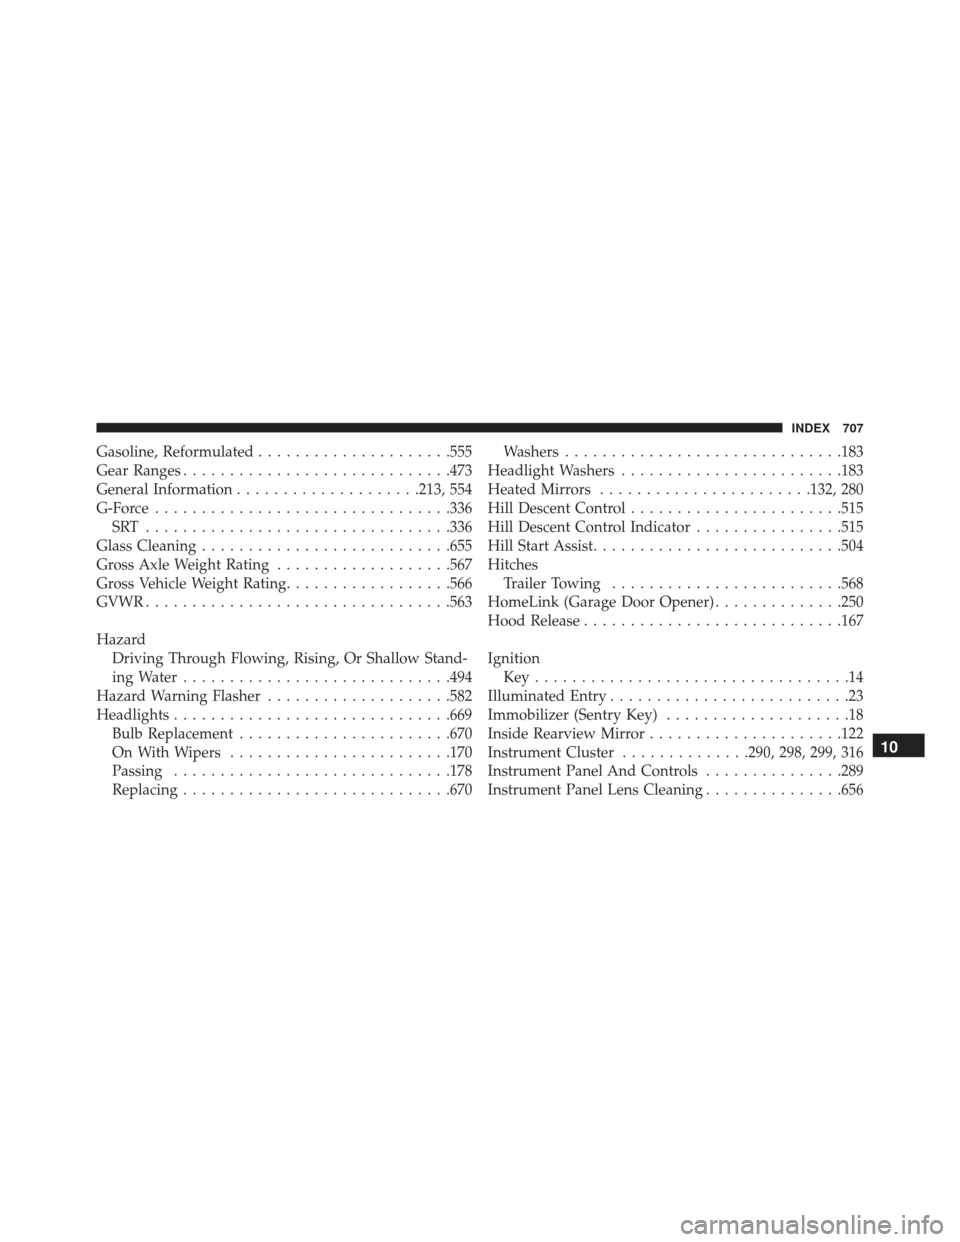
Gasoline, Reformulated.....................555
Gear Ranges ............................ .473
General Information ....................213, 554
G-Force ............................... .336
SRT ................................ .336
Glass Cleaning .......................... .655
Gross Axle Weight Rating ...................567
Gross Vehicle Weight Rating ..................566
GVWR ................................ .563
Hazard Driving Through Flowing, Rising, Or Shallow Stand-
ing Water ............................ .494
Hazard Warning Flasher ....................582
Headlights ............................. .669
Bulb Replacement ...................... .670
On With Wipers ....................... .170
Passing ............................. .178
Replacing ............................ .670Washers
............................. .183
Headlight Washers ....................... .183
Heated Mirrors ...................... .132, 280
Hill Descent Control ...................... .515
Hill Descent Control Indicator ................515
Hill Start Assist .......................... .504
Hitches Trailer Towing ........................ .568
HomeLink (Garage Door Opener) ..............250
Hood Release ........................... .167
Ignition Key..................................14
Illuminated Entry ..........................23
Immobilizer (Sentry Key) ....................18
Inside Rearview Mirror .....................122
Instrument Cluster ..............290, 298, 299, 316
Instrument Panel And Controls ...............289
Instrument Panel Lens Cleaning ...............656
10
INDEX 707