Page 170 of 723
CAUTION!
To prevent possible damage, do not slam the hood to
close it. Use a firm downward push at the front center
of the hood to ensure that both latches engage.
WARNING!
Be sure the hood is fully latched before driving your
vehicle. If the hood is not fully latched, it could open
when the vehicle is in motion and block your vision.
Failure to follow this warning could result in serious
injury or death.
LIGHTS
Headlight Switch
The headlight switch is located on the left side of the
instrument panel, next to the steering wheel. The head-
light switch controls the operation of the headlights,
parking lights, instrument panel lights, cargo lights and
fog lights (if equipped).
168 UNDERSTANDING THE FEATURES OF YOUR VEHICLE
Page 175 of 723
Fog Lights — If Equipped
The fog lights are turned on by rotating the headlight
switch to the parking light or headlight position and
pushing in the headlight rotary control.
The fog lights will operate only when the parking lights
are on or when the vehicle headlights are on low beam.An indicator light located in the instrument cluster will
illuminate when the fog lights are on. The fog lights will
turn off when the switch is pushed a second time, when
the headlight switch is rotated to the off position, or the
high beam is selected.
Interior Lights
Courtesy and dome lights are turned on when the front
doors are opened or when the dimmer control (rotating
wheel on the right side of the headlight switch) is rotated
to its farthest upward position. If your vehicle is
equipped with Remote Keyless Entry (RKE) and the
UNLOCK button is pushed on the RKE Key Fob, the
courtesy and dome lights will turn on. When a door is
open and the interior lights are on, rotating the dimmer
control all the way down, to the OFF detent, will cause all
the interior lights to go out. This is also known as the
Fog Light Operation
3
UNDERSTANDING THE FEATURES OF YOUR VEHICLE 173
Page 180 of 723

NOTE:If either light remains on and does not flash, or
there is a very fast flash rate, check for a defective outside
light bulb. If an indicator fails to light when the lever is
moved, it would suggest that the indicator bulb is
defective.
Lane Change Assist
Tap the lever up or down once, without moving beyond
the detent, and the turn signal (right or left) will flash
three times then automatically turn off.
Flash-To-Pass
You can signal another vehicle with your headlights by
partially pulling the multifunction lever toward the steer-
ing wheel. This will cause the high beam headlights to
turn on until the lever is released.
High/Low Beam Switch
Push the multifunction lever toward the instrument
panel to switch the headlights to high beams. Pulling the
multifunction back toward the steering wheel will turn
the low beams back on, or shut the high beams off.
WINDSHIELD WIPERS AND WASHERS
The windshield wiper/washer controls are located on the
multifunction lever on the left side of the steering col-
umn. The front wipers are operated by rotating a switch,
located on the end of the lever. For information on the
rear wiper/washer, refer to “Rear Window Features” in
“Understanding The Features Of Your Vehicle”.
178 UNDERSTANDING THE FEATURES OF YOUR VEHICLE
Page 182 of 723
CAUTION!(Continued)
turned off, and the blades cannot return to the “park”
position, damage to the wiper motor may occur.
Intermittent Wiper System
Use one of the four intermittent wiper settings when
weather conditions make a single wiping cycle, with a
variable delay between cycles, desirable. At driving
speeds above 10 mph (16 km/h), the delay can be
regulated from a maximum of approximately 18 seconds
between cycles (first detent), to a cycle every one second
(fourth detent).
NOTE:If the vehicle is moving less than 10 mph
(16 km/h), delay times will be doubled.
Windshield Washer Operation
To use the washer, push on the end of the lever (toward
the steering wheel) and hold while spray is desired. If the
Intermittent Wiper Operation
180 UNDERSTANDING THE FEATURES OF YOUR VEHICLE
Page 187 of 723
NOTE:For vehicles equipped with Driver Memory Seat,
you can use your Remote Keyless Entry (RKE) Key Fob
or the memory switch on the driver’s door trim panel to
return the tilt/telescopic steering column to pre-
programmed positions. Refer to “Driver Memory Seat”
in this section for further information.
WARNING!
Do not adjust the steering column while driving.
Adjusting the steering column while driving or driv-
ing with the steering column unlocked, could cause
the driver to lose control of the vehicle. Failure to
follow this warning may result in serious injury or
death.
HEATED STEERING WHEEL — IF EQUIPPED
The steering wheel contains a heating element that helps
warm your hands in cold weather. The heated steering
wheel has only one temperature setting. Once the heated
steering wheel has been turned on it will operate for up
to 80 minutes before automatically shutting off. The
heated steering wheel can shut off early or may not turn
on when the steering wheel is already warm.
The heated steering wheel control button is located
within the Uconnect system. You can gain access to the
control button through the climate screen or the controls
screen.
• Press the heated steering wheel button
once to
turn the heating element ON.
• Press the heated steering wheel buttona second
time to turn the heating element OFF. 3
UNDERSTANDING THE FEATURES OF YOUR VEHICLE 185
Page 188 of 723
NOTE:The engine must be running for the heated
steering wheel to operate.
Vehicles Equipped With Remote Start
On models that are equipped with remote start, the
heated steering wheel can be programmed to come on
during a remote start through the Uconnect system. Refer
to “Uconnect Settings” in “Understanding Your Instru-
ment Panel” for further information.
WARNING!
• Persons who are unable to feel pain to the skin
because of advanced age, chronic illness, diabetes,
spinal cord injury, medication, alcohol use, exhaus-
tion, or other physical conditions must exercise
(Continued)
WARNING! (Continued)
care when using the steering wheel heater. It may
cause burns even at low temperatures, especially if
used for long periods.
• Do not place anything on the steering wheel that
insulates against heat, such as a blanket or steering
wheel covers of any type and material. This may
cause the steering wheel heater to overheat.
ELECTRONIC SPEED CONTROL — IF EQUIPPED
When engaged, the Electronic Speed Control takes over
accelerator operations at speeds greater than 25 mph
(40 km/h).
The Electronic Speed Control buttons are located on the
right side of the steering wheel.
186 UNDERSTANDING THE FEATURES OF YOUR VEHICLE
Page 195 of 723
WARNING!(Continued)
brakes must be applied manually. An audible
chime will sound when the brakes are released.
You should switch off the ACC system:
• When driving in fog, heavy rain, heavy snow, sleet,
heavy traffic, and complex driving situations (i.e.,
in highway construction zones).
• When entering a turn lane or highway off ramp;
when driving on roads that are winding, icy, snow-
covered, slippery, or have steep uphill or downhill
slopes.
• When towing a trailer up or down steep slopes.
• When circumstances do not allow safe driving at a
constant speed.
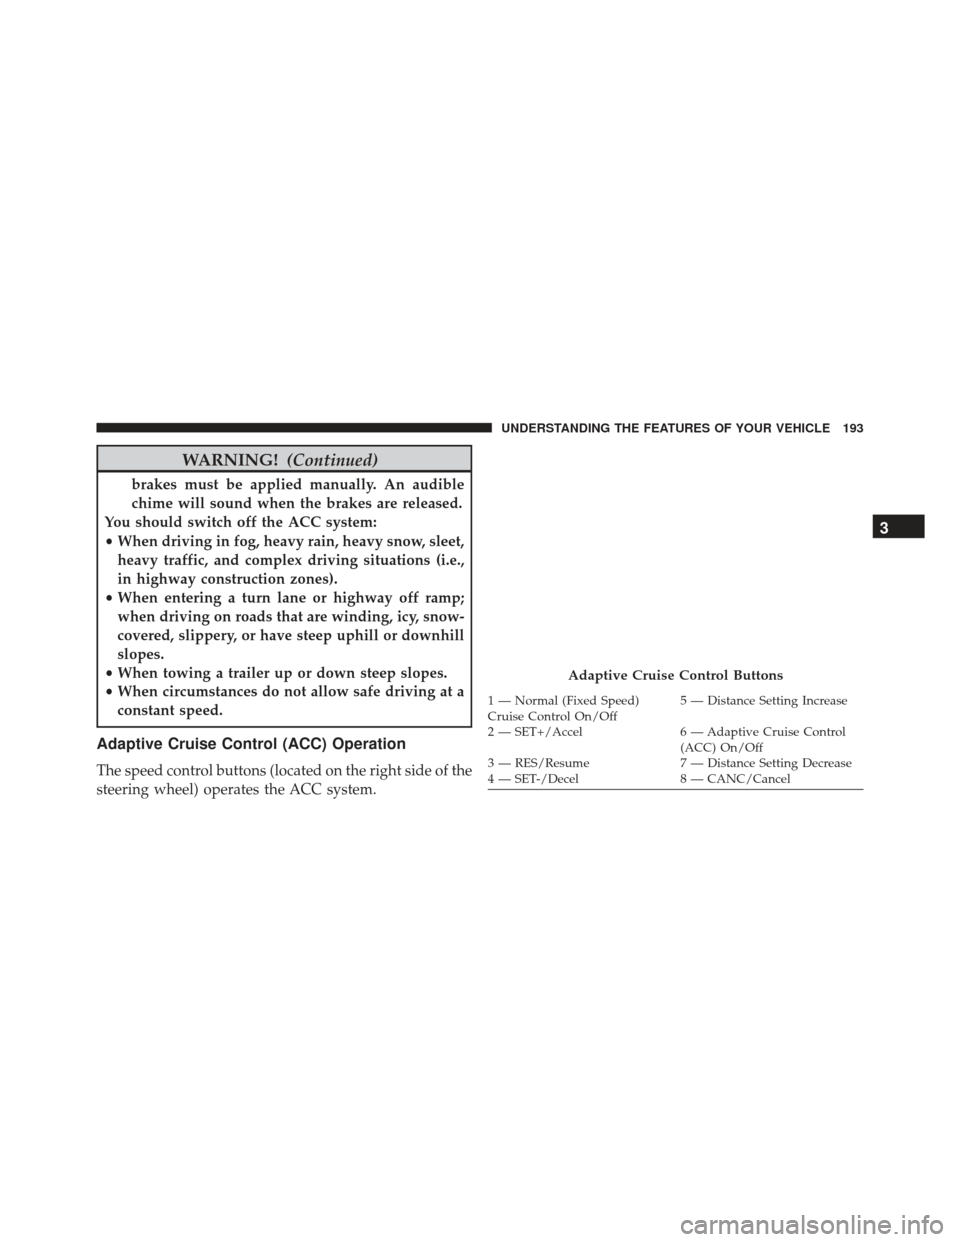
Adaptive Cruise Control (ACC) Operation
The speed control buttons (located on the right side of the
steering wheel) operates the ACC system.
Adaptive Cruise Control Buttons
1 — Normal (Fixed Speed)
Cruise Control On/Off 5 — Distance Setting Increase
2 — SET+/Accel 6 — Adaptive Cruise Control (ACC) On/Off
3 — RES/Resume 7 — Distance Setting Decrease
4 — SET-/Decel 8 — CANC/Cancel
3
UNDERSTANDING THE FEATURES OF YOUR VEHICLE 193
Page 196 of 723
NOTE:Any chassis/suspension or tire size modifications
to the vehicle will effect the performance of the Adaptive
Cruise Control and Forward Collision Warning System.
Activating Adaptive Cruise Control (ACC)
You can only engage ACC if the vehicle speed is above
0 mph (0 km/h).
The minimum Set Speed for the ACC system is 20 mph
(32 km/h).
When the system is turned on and in the READY state,
the Driver Information Display (DID) displays “ACC
Ready.”
When the system is OFF, the DID displays “Adaptive
Cruise Control (ACC) Off.”
NOTE: You cannot engage ACC under the following
conditions:
• When in Four-Wheel Drive Low. •
When you apply the brakes.
• When the parking brake is set.
• When the automatic transmission is in PARK, RE-
VERSE or NEUTRAL.
• When the Vehicle speed is outside of the speed range.
• When the brakes are overheated.
• When the driver door is open.
• When the driver seat belt is unbuckled.
To Activate/Deactivate
Push and release the Adaptive Cruise Control (ACC)
ON/OFF button. The ACC menu in the DID displays
“ACC Ready.”
194 UNDERSTANDING THE FEATURES OF YOUR VEHICLE