Page 127 of 723
9-1-1 Call
1. Push the 9-1-1 Call button on the Rearview Mirror.
NOTE:In case the 9-1-1 Call button is pushed in error,
there will be a 10 second delay before the 9-1-1 Call
system initiates a call to a 9-1-1 operator. To cancel the
9-1-1 Call connection, push the 9-1-1 Call button on the
Rearview Mirror or press the cancellation button on the
Device Screen. Termination of the 9-1-1 Call will turn off
the green LED light on the Rearview Mirror.
2. The LED light located between the ASSIST and 9-1-1 buttons on the Rearview Mirror will turn green once a
connection to a 9-1-1 operator has been made.
3. Once a connection between the vehicle and a 9-1-1 operator is made, the 9-1-1 Call system may transmit
the following important vehicle information to a 9-1-1
operator:
• Indication that the occupant placed a 9-1-1 Call. •
The vehicle brand.
• The last known GPS coordinates of the vehicle.
4. You should be able to speak with the 9-1-1 operator through the vehicle audio system to determine if
additional help is needed.
WARNING!
ALWAYS obey traffic laws and pay attention to the
road. Some Uconnect Access services, including 9-1-1
and Assist, will NOT work without an operable 1X
(voice/data) or 3G (data) network connection.
3
UNDERSTANDING THE FEATURES OF YOUR VEHICLE 125
Page 129 of 723
WARNING!(Continued)
electrical equipment to the vehicle’s electrical sys-
tem. This may prevent your vehicle from sending a
signal to initiate an emergency call. To avoid inter-
ference that can cause the 9-1-1 Call system to fail,
never add aftermarket equipment (e.g., two-way
mobile radio, CB radio, data recorder, etc.) to your
vehicle’s electrical system or modify the antennas
on your vehicle. IF YOUR VEHICLE LOSES BAT-
TERY POWER FOR ANY REASON (INCLUDING
DURING OR AFTER AN ACCIDENT), THE
UCONNECT FEATURES, APPS AND SERVICES,
AMONG OTHERS, WILL NOT OPERATE.
• Modifications to any part of the 9-1-1 Call system
could cause the air bag system to fail when you
need it. You could be injured if the air bag system
is not there to help protect you. 9-1-1 Call System Limitations
Vehicles sold in Canada and Mexico
DO NOThave 9-1-1
Call system capabilities.
9-1-1 or other emergency line operators in Canada and
Mexico may not answer or respond to 9-1-1 system calls.
If the 9-1-1 Call system detects a malfunction, any of the
following may occur at the time the malfunction is
detected, and at the beginning of each ignition cycle:
• The Rearview Mirror light located between the ASSIST
and 9-1-1 buttons will continuously be illuminated
red.
• The Device Screen will display the following message
“Vehicle device requires service. Please contact your
dealer.”
• An In-Vehicle Audio message will state “Vehicle de-
vice requires service. Please contact your dealer.”
3
UNDERSTANDING THE FEATURES OF YOUR VEHICLE 127
Page 231 of 723
NOTE:ParkSense will reduce the volume of the radio, if
on, when the system is sounding an audio tone.
Adjustable Chime Volume Settings
Rear chime volume settings can be selected from the
Customer-Programmable Features section of the
Uconnect System, refer to “Uconnect Settings” in “Un-
derstanding Your Instrument Panel” for further informa-
tion.
The chime volume settings include LOW, MEDIUM, and
HIGH. The factory default volume setting is MEDIUM.
ParkSense will retain its last known configuration state
through ignition cycles.Enabling And Disabling ParkSense
ParkSense can be enabled and disabled with the
ParkSense switch.
When the ParkSense switch is pushed to dis-
able the system, the instrument cluster will
display the “PARKSENSE OFF” message for
approximately five seconds. Refer to “Driver
Information Display (DID)” in “Understanding Your
Instrument Panel” for further information. When the
gear selector is moved to REVERSE and the system is
disabled, the DID will display the “PARKSENSE OFF”
message for as long as the vehicle is in REVERSE.
The ParkSense switch LED will be ON when ParkSense is
disabled or requires service. The ParkSense switch LED
will be OFF when the system is enabled. If the ParkSense
switch is pushed, and the system requires service, the
ParkSense switch LED will blink momentarily, and then
the LED will be ON.
3
UNDERSTANDING THE FEATURES OF YOUR VEHICLE 229
Page 243 of 723
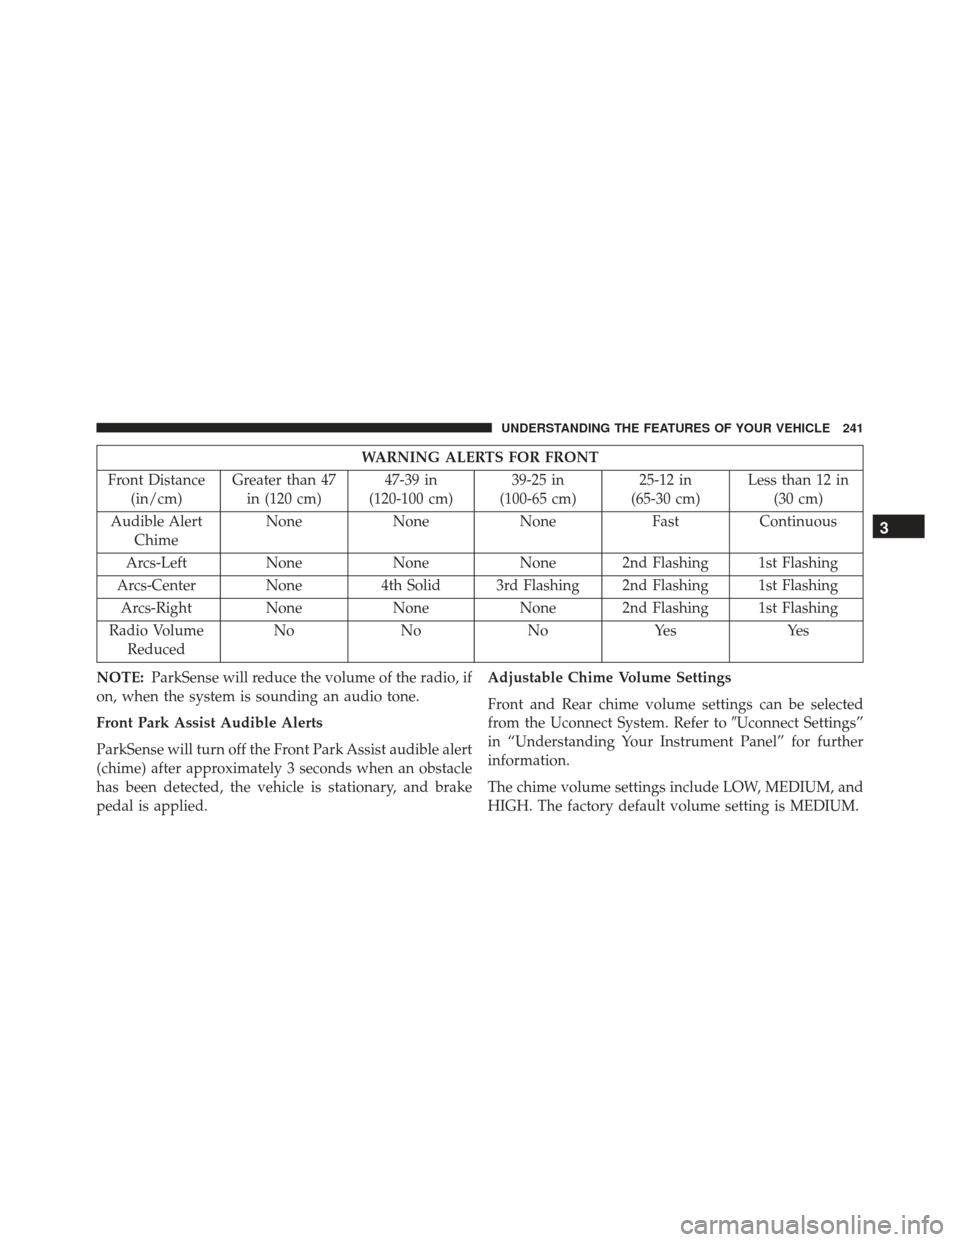
WARNING ALERTS FOR FRONT
Front Distance (in/cm) Greater than 47
in (120 cm) 47-39 in
(120-100 cm) 39-25 in
(100-65 cm) 25-12 in
(65-30 cm) Less than 12 in
(30 cm)
Audible Alert Chime None
NoneNone FastContinuous
Arcs-Left NoneNoneNone 2nd Flashing 1st Flashing
Arcs-Center None 4th Solid 3rd Flashing 2nd Flashing 1st Flashing
Arcs-Right None NoneNone 2nd Flashing 1st Flashing
Radio Volume Reduced No
NoNoYes Yes
NOTE: ParkSense will reduce the volume of the radio, if
on, when the system is sounding an audio tone.
Front Park Assist Audible Alerts
ParkSense will turn off the Front Park Assist audible alert
(chime) after approximately 3 seconds when an obstacle
has been detected, the vehicle is stationary, and brake
pedal is applied. Adjustable Chime Volume Settings
Front and Rear chime volume settings can be selected
from the Uconnect System. Refer to
�Uconnect Settings”
in “Understanding Your Instrument Panel” for further
information.
The chime volume settings include LOW, MEDIUM, and
HIGH. The factory default volume setting is MEDIUM.
3
UNDERSTANDING THE FEATURES OF YOUR VEHICLE 241
Page 248 of 723
PARKVIEW REAR BACK UP CAMERA — IF
EQUIPPED
Your vehicle may be equipped with the ParkView Rear
Back Up Camera that allows you to see an on-screen
image of the rear surroundings of your vehicle whenever
the gear selector is put into REVERSE. The image will be
displayed on the Navigation/Multimedia radio display
screen along with a caution note to “check entire sur-
roundings” across the top of the screen. After five sec-
onds this note will disappear. The ParkView camera is
located on the rear of the vehicle above the rear License
plate.
When the vehicle is shifted out of REVERSE (with camera
delay turned OFF), the rear camera mode is exited and
the navigation or audio screen appears again.
When the vehicle is shifted out of REVERSE (with camera
delay turned ON), the rear view image with dynamic
grid lines will be displayed for up to 10 seconds aftershifting out of
�REVERSE�unless the forward vehicle
speed exceeds 8 mph (13 km/h), the transmission is
shifted into �PARK�or the ignition is switched to the OFF
position.
NOTE: The ParkView Rear Back Up Camera has pro-
grammable modes of operation that may be selected
through the Uconnect System. Refer to “Uconnect Set-
tings” in “Understanding Your Instrument Panel” for
further information.
When enabled, active guide lines are overlaid on the
image to illustrate the width of the vehicle and its
projected backup path based on the steering wheel
position. A dashed center line overlay indicates the center
of the vehicle to assist with parking or aligning to a
hitch/receiver. �Different colored zones indicate the dis-
tance to the rear of the vehicle.� The following table
shows the approximate distances for each zone:
246 UNDERSTANDING THE FEATURES OF YOUR VEHICLE
Page 289 of 723

�STEERING WHEEL AUDIO CONTROLS — IF
EQUIPPED .......................... .421
▫ Radio Operation ..................... .422
▫ CD Player .......................... .423
� CD/DVD DISC MAINTENANCE ...........423
� RADIO OPERATION AND MOBILE PHONES . .424
▫ Regulatory And Safety Information .........424
� CLIMATE CONTROLS ...................425
▫ General Overview .....................426
▫ Climate Control Functions ...............431
▫ Automatic Temperature Control (ATC) ......433
▫ Operating Tips ...................... .434
� PERSONALIZED MENU BAR ..............438�
UCONNECT VOICE RECOGNITION
QUICK TIPS ......................... .438
▫ Introducing Uconnect ...................438
▫ Get Started ......................... .439
▫ Basic Voice Commands ..................441
▫ Radio ............................. .442
▫ Media ............................. .442
▫ Phone ............................. .443
▫ Voice Text Reply ..................... .444
▫ Climate (8.4A/8.4AN) ..................446
▫ Navigation (8.4A/8.4AN) ................447
▫ Uconnect Access (8.4A/8.4AN) ............448
▫ Vehicle Health Alert ...................449
4
UNDERSTANDING YOUR INSTRUMENT PANEL 287
Page 325 of 723
DRIVER INFORMATION DISPLAY (DID)
The Driver Information Display (DID) features a driver-
interactive display that is located in the instrument
cluster.
The DID Menu items consists of the following:•
Speedometer Main Gauge
• Vehicle Info
• SRT Performance Pages
• Terrain — If Equipped
• Driver Assist
• Fuel Economy
• Trip
• Audio
• Navigation — If Equipped
• Stored Messages
• Screen Setup
• Diagnostic Codes
• Speed Warning — If Equipped
Driver Information Display (DID) Location
4
UNDERSTANDING YOUR INSTRUMENT PANEL 323
Page 341 of 723
Audio
Push and release theUPorDOWNar-
row button until the Audio Menu icon/title
is highlighted in the DID.
Navigation — If Equipped
Push and release the UPorDOWNar-
row button until the Navigation Menu icon/
title is highlighted in the DID. This feature
allows you to see the turn-by-turn display
when destination is set in Head Unit.
Stored Messages
Push and release the UPorDOWNar-
row button until the Messages Menu icon/
title is highlighted in the DID. This feature shows the number of stored warning messages. Push-
ing the
RIGHT
arrow button will allow you to see
what the stored messages are.
Screen Setup
Push and release the UPorDOWNar-
row button until the Screen Setup Menu
icon/title is highlighted in the DID. Push
and release the OKbutton to enter the
submenus and follow the prompts on the screen as
needed. The Screen Setup feature allows you to
change what information is displayed in the instru-
ment cluster as well as the location that information is
displayed.4
UNDERSTANDING YOUR INSTRUMENT PANEL 339