Page 173 of 745

through the Uconnect system screen. Refer to “Uconnect
Settings” in “Understanding Your Instrument Panel” for
further information.
If your vehicle is equipped with a “Rain Sensitive Wiper
System” and it is activated, the headlights will automati-
cally turn on after the wipers complete five wipe cycles
within approximately one minute, and they will turn off
approximately four minutes after the wipers completely
stop. Refer to “Windshield Wipers And Washers” in this
section for further information.
NOTE:When your headlights come on during the day-
time, the instrument panel lights will automatically dim
to the lower nighttime intensity.
Automatic High Beam — If Equipped
The Automatic High Beam Headlamp Control system
provides increased forward lighting at night by auto-
mating high beam control through the use of a digital camera mounted on the inside rearview mirror. This
camera detects vehicle specific light and automatically
switches from high beams to low beams until the ap-
proaching vehicle is out of view.
NOTE:
•
The Automatic High Beam Headlamp Control can be
turned on or off using the Uconnect System. Refer to
“Uconnect Settings” in “Understanding Your Instru-
ment Panel” for further information.
• Broken, muddy, or obstructed headlights and taillights
of vehicles in the field of view will cause headlights to
remain on longer (closer to the vehicle). Also, dirt, film,
and other obstructions on the windshield or camera
lens will cause the system to function improperly.
• To opt out of the Advanced Auto High-Beam Sensitiv-
ity Control (default) and enter Reduced High-Beam
3
UNDERSTANDING THE FEATURES OF YOUR VEHICLE 171
Page 174 of 745

Sensitivity Control (not recommended), toggle high-
beam lever 6 full on/off cycles within 10 seconds of
ignition ON. System will return to default setting upon
ignition off.
If the windshield or Automatic High Beam Headlamp
Control mirror is replaced, the mirror must be re-aimed
to ensure proper performance. See your local authorized
dealer.
Daytime Running Lights — If Equipped
The Daytime Running Lights (low intensity) come on
whenever the engine is running, and the transmission is
not in the PARK position. The lights will remain on until
the ignition is switched to the OFF or ACC position or the
parking brake is engaged. NOTE:
•
If a turn signal is activated, the DRL lamp on the same
side of the vehicle will turn off for the duration of the
turn signal activation. Once the turn signal is no longer
active, the DRL lamp will illuminate.
• The DRL function may be disabled through the
Uconnect system. Refer to “Uconnect Settings” in
“Understanding Your Instrument Panel” for further
information.
The headlight switch must be used for normal nighttime
driving.
172 UNDERSTANDING THE FEATURES OF YOUR VEHICLE
Page 175 of 745
Automatic Headlight Leveling — HID Headlights
Only
This feature prevents the headlights from interfering
with the vision of oncoming drivers. Headlight leveling
automatically adjusts the height of the headlight beam in
reaction to changes in vehicle pitch.
Headlight Delay
To aid in your exit, your vehicle is equipped with a
headlight delay that will leave the headlights on for
approximately up to 90 seconds. This delay is initiated
when the ignition is turned OFF while the headlight
switch is on, and then the headlight switch is cycled off.
Headlight delay can be cancelled by either turning the
headlight switch on then off, or by turning the ignition
ON.NOTE:
If your vehicle is equipped with a touchscreen,
this feature can be programmed through the Uconnect
system. Refer to “Uconnect Settings” in “Understanding
Your Instrument Panel” for further information.
If your vehicle is not equipped with a touchscreen, this
feature can be programmed through the Driver Informa-
tion Display (DID). Refer to “Driver Information Display
(DID)” in “Understanding Your Instrument Panel” for
further information.
Parking Lights And Panel Lights
To turn on the parking lights and instrument
panel lights, rotate the headlight switch clockwise.
To turn off the parking lights, rotate the headlight switch
back to the O (Off) position.
3
UNDERSTANDING THE FEATURES OF YOUR VEHICLE 173
Page 190 of 745
Vehicles Equipped With Remote Start
On models that are equipped with remote start, the
heated steering wheel can be programmed to come on
during a remote start through the Uconnect system. Refer
to “Uconnect Settings” in “Understanding Your Instru-
ment Panel” for further information.
WARNING!
•Persons who are unable to feel pain to the skin
because of advanced age, chronic illness, diabetes,
spinal cord injury, medication, alcohol use, exhaus-
tion, or other physical conditions must exercise
care when using the steering wheel heater. It may
cause burns even at low temperatures, especially if
used for long periods.
(Continued)
WARNING! (Continued)
•Do not place anything on the steering wheel that
insulates against heat, such as a blanket or steering
wheel covers of any type and material. This may
cause the steering wheel heater to overheat.
ELECTRONIC SPEED CONTROL — IF EQUIPPED
When engaged, the Electronic Speed Control takes over
accelerator operations at speeds greater than 25 mph
(40 km/h).
The Electronic Speed Control buttons are located on the
right side of the steering wheel.
188 UNDERSTANDING THE FEATURES OF YOUR VEHICLE
Page 223 of 745
WARNING!
Forward Collision Warning (FCW) is not intended to
avoid a collision on its own, nor can FCW detect
every type of potential collision. The driver has the
responsibility to avoid a collision by controlling the
vehicle via braking and steering. Failure to follow
this warning could lead to serious injury or death.
Turning FCW ON Or OFF
NOTE:The default status of FCW is “On”, this allows
the system to warn you of a possible collision with the
vehicle in front of you.
The forward collision button is located in the Uconnect
display in the controls settings.
To turn the FCW system OFF, press the forward collision
button once to turn the system OFF. To turn the FCW system back ON, press the forward
collision button again to turn the system ON.
Changing the FCW status to “OFF” prevents the system
from warning you of a possible collision with the vehicle
in front of you.
NOTE:
The FCW system state is kept in memory from
one ignition cycle to the next. If the system is turned OFF,
it will remain off when the vehicle is restarted.
Changing FCW And Active Braking Status
The FCW Sensitivity And Active Braking Settings are
programmable through the Uconnect System. Refer to
“Uconnect Settings” in “Understanding Your Instrument
Panel” for further information.
The default status of FCW is the “Medium” setting and
the Active Braking is in the “On” setting. This allows the
3
UNDERSTANDING THE FEATURES OF YOUR VEHICLE 221
Page 227 of 745
ParkSense can be active only when the gear selector is in
REVERSE. If ParkSense is enabled at this gear selector
position, the system will remain active until the vehicle
speed is increased to approximately 7 mph (11 km/h) or
above. When in REVERSE and above the system’s oper-
ating speed, a warning will appear within the Driver
Information Display (DID) indicating the vehicle speed is
too fast. The system will become active again if the
vehicle speed is decreased to speeds less than approxi-
mately 6 mph (9 km/h).
ParkSense Sensors
The four ParkSense sensors, located in the rear fascia/
bumper, monitor the area behind the vehicle that is
within the sensors’ field of view. The sensors can detect
obstacles from approximately 12 in (30 cm) up to 79 in
(200 cm) from the rear fascia/bumper in the horizontal
direction, depending on the location, type and orienta-
tion of the obstacle.
ParkSense Warning Display
The ParkSense Warning screen will only be displayed if
Sound and Display is selected from the Customer -
Programmable Features section of the Uconnect System.
Refer to�Uconnect Settings” in “Understanding Your
Instrument Panel” for further information.
The ParkSense Warning screen is located within the DID.
It provides visual warnings to indicate the distance
between the rear fascia/bumper and the detected ob-
stacle. Refer to “Driver Information Display (DID)” for
further information.
3
UNDERSTANDING THE FEATURES OF YOUR VEHICLE 225
Page 233 of 745
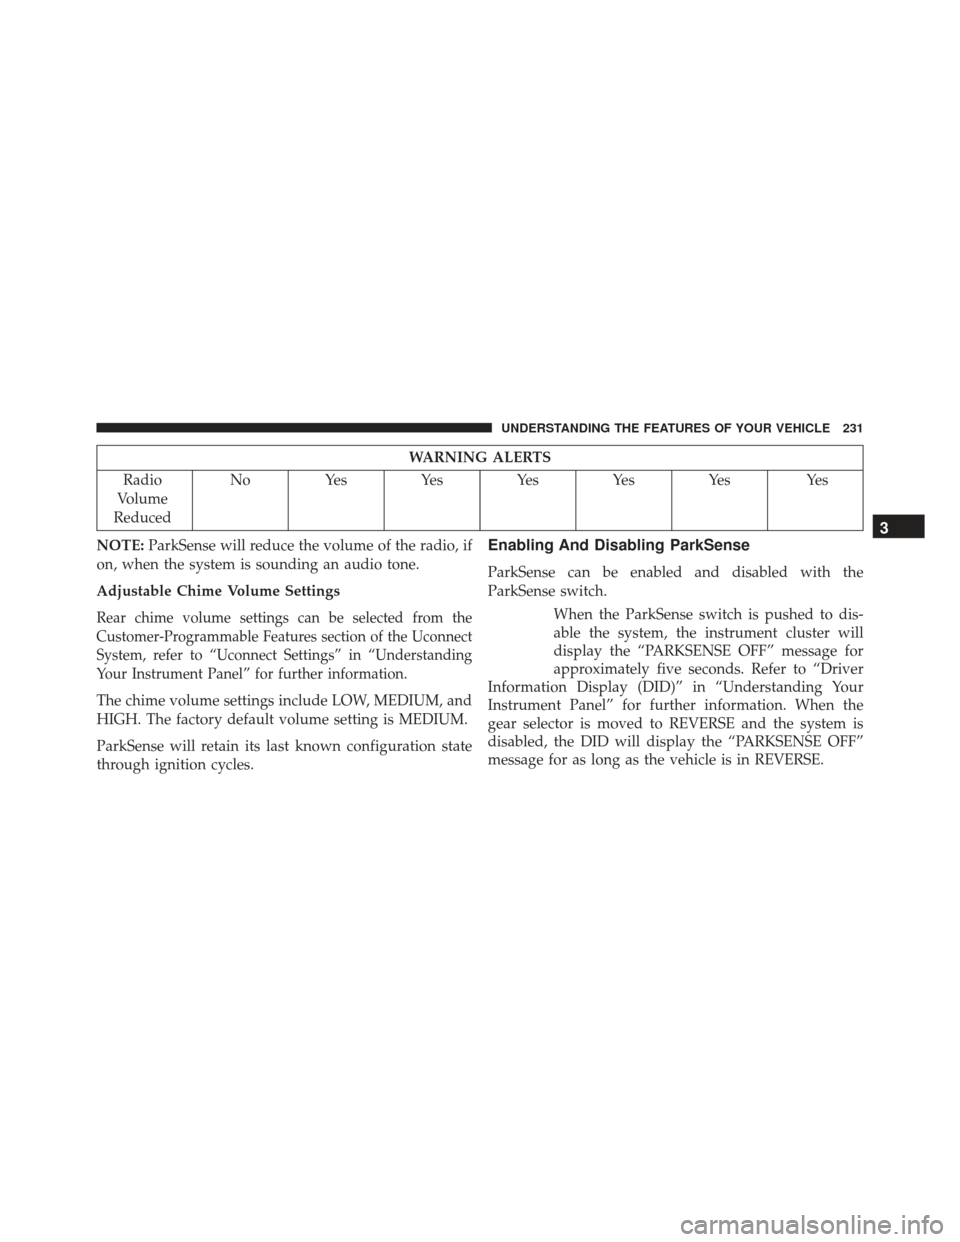
WARNING ALERTS
Radio
Volume
Reduced No Yes Yes Yes Yes Yes Yes
NOTE: ParkSense will reduce the volume of the radio, if
on, when the system is sounding an audio tone.
Adjustable Chime Volume Settings
Rear chime volume settings can be selected from the
Customer-Programmable Features section of the Uconnect
System, refer to “Uconnect Settings” in “Understanding
Your Instrument Panel” for further information.
The chime volume settings include LOW, MEDIUM, and
HIGH. The factory default volume setting is MEDIUM.
ParkSense will retain its last known configuration state
through ignition cycles.
Enabling And Disabling ParkSense
ParkSense can be enabled and disabled with the
ParkSense switch.
When the ParkSense switch is pushed to dis-
able the system, the instrument cluster will
display the “PARKSENSE OFF” message for
approximately five seconds. Refer to “Driver
Information Display (DID)” in “Understanding Your
Instrument Panel” for further information. When the
gear selector is moved to REVERSE and the system is
disabled, the DID will display the “PARKSENSE OFF”
message for as long as the vehicle is in REVERSE.
3
UNDERSTANDING THE FEATURES OF YOUR VEHICLE 231
Page 240 of 745
ParkSense Sensors
The four ParkSense sensors, located in the rear fascia/
bumper, monitor the area behind the vehicle that is
within the sensors’ field of view. The sensors can detect
obstacles from approximately 12 in (30 cm) up to 79 in
(200 cm) from the rear fascia/bumper in the horizontal
direction, depending on the location, type and orienta-
tion of the obstacle.
The six ParkSense sensors, located in the front fascia/
bumper, monitor the area in front of the vehicle that is
within the sensors’ field of view. The sensors can detect
obstacles from approximately 12 in (30 cm) up to 47 in
(120 cm) from the front fascia/bumper in the horizontal
direction, depending on the location, type and orienta-
tion of the obstacle.
ParkSense Warning Display
The ParkSense Warning screen will only be displayed if
Sound and Display is selected from the Customer -
Programmable Features section of the Uconnect System.
Refer to�Uconnect Settings” in “Understanding Your
Instrument Panel” for further information.
The ParkSense Warning screen is located within the
Driver Information Display (DID). It provides visual
warnings to indicate the distance between the rear
fascia/bumper and/or front fascia/bumper and the de-
tected obstacle. Refer to “Driver Information Display
(DID)” for further information.
238 UNDERSTANDING THE FEATURES OF YOUR VEHICLE