2016 JEEP CHEROKEE radio
[x] Cancel search: radioPage 128 of 236

Mobile App (8.4A/8.4AN)
You’re only a few steps away from using remote commands and playing your favorite
music in your vehicle.
To link your internet radio accounts:
1. Download theUconnect Access App on
your device.
2. Press the Via Mobile icon on the navi- gation bar at the bottom of the app.
3. Press the app you’d like to connect to your vehicle.
4. Enter your login information for the selected app and press Link.
5. Next time you’re in your vehicle, en- able Bluetooth, pair your device and
select the Via Mobile app you want to
play from the Uconnect touchscreen
to stream your personalized music.
NOTE:
•
You can also complete this process on the web. Simply visitmoparownerconnect.com
log in and click Set Up Via Mobile Profile (under Quick Links).
• Once you download the app to your compatible device, you will also be able to start your vehicle and lock/unlock its doors from virtually anywhere.
Mobile App
ELECTRONICS
126
Page 132 of 236

Additional Information
© 2015 FCA US LLC. All rights reserved. Mopar, Mopar Owner Connect and Uconnect
are registered trademarks of FCA US LLC. Android is a trademark of Google Inc.
SiriusXM and all related marks and logos are trademarks of SiriusXM Radio Inc. Yelp,
Yelp logo, Yelp burst and related marks are registered trademarks of Yelp.
Uconnect System Support:
• U.S. residents visit DriveUconnect.com or call: 1-877-855-8400 (24 hours a day
7 days a week)
• Canadian residents visit DriveUconnect.ca or call: 1-800-465-2001 (English) or1-800-387-9983 (French)
Mon. – Fri., 8:00 am – 8:00 pm, ET
Sat., 9:00 am – 5:00 pm, ET
Sun., Closed
Uconnect Access Services Support: 1-855-792-4241. Please have your Uconnect
Security PIN ready when you call.
ELECTRONICS
130
Page 135 of 236
If the Uconnect Phone Buttonexists on your steering wheel, you then have the
Uconnect Phone features.
Refer to the Understand The Features Of Your Vehicle section of your vehicle's Owner's
Manual on the DVD for further details.
NOTE:
• The Uconnect Phone requires a mobile phone equipped with the Bluetooth Hands-Free Profile, Version 1.0 or higher.
• Most mobile phones/devices are compatible with the Uconnect system, however some mobile phones/devices may not be equipped with all of the required features
to utilize all of the Uconnect system features.
• For Uconnect Customer Care: • U.S. residents visit UconnectPhone.com or call 1-877-855-8400.
• Canadian Residents visit UconnectPhone.com or call, 1-800-465-2001(English) or 1-800-387-9983 (French).
Pairing (Wirelessly Connecting) Your Mobile Phone To The Uconnect System
Mobile phone pairing is the process of establishing a wireless connection between a
cellular phone and the Uconnect system.
NOTE:
• To use the Uconnect Phone feature, you first must determine if your mobilephone and software are compatible with the Uconnect system. Please visit
UconnectPhone.com for complete mobile phone compatibility information.
• Mobile phone pairing is not available while the vehicle is in motion.
• A maximum of 10 mobile phones can be paired to the Uconnect system.
Start Pairing Procedure On The Radio
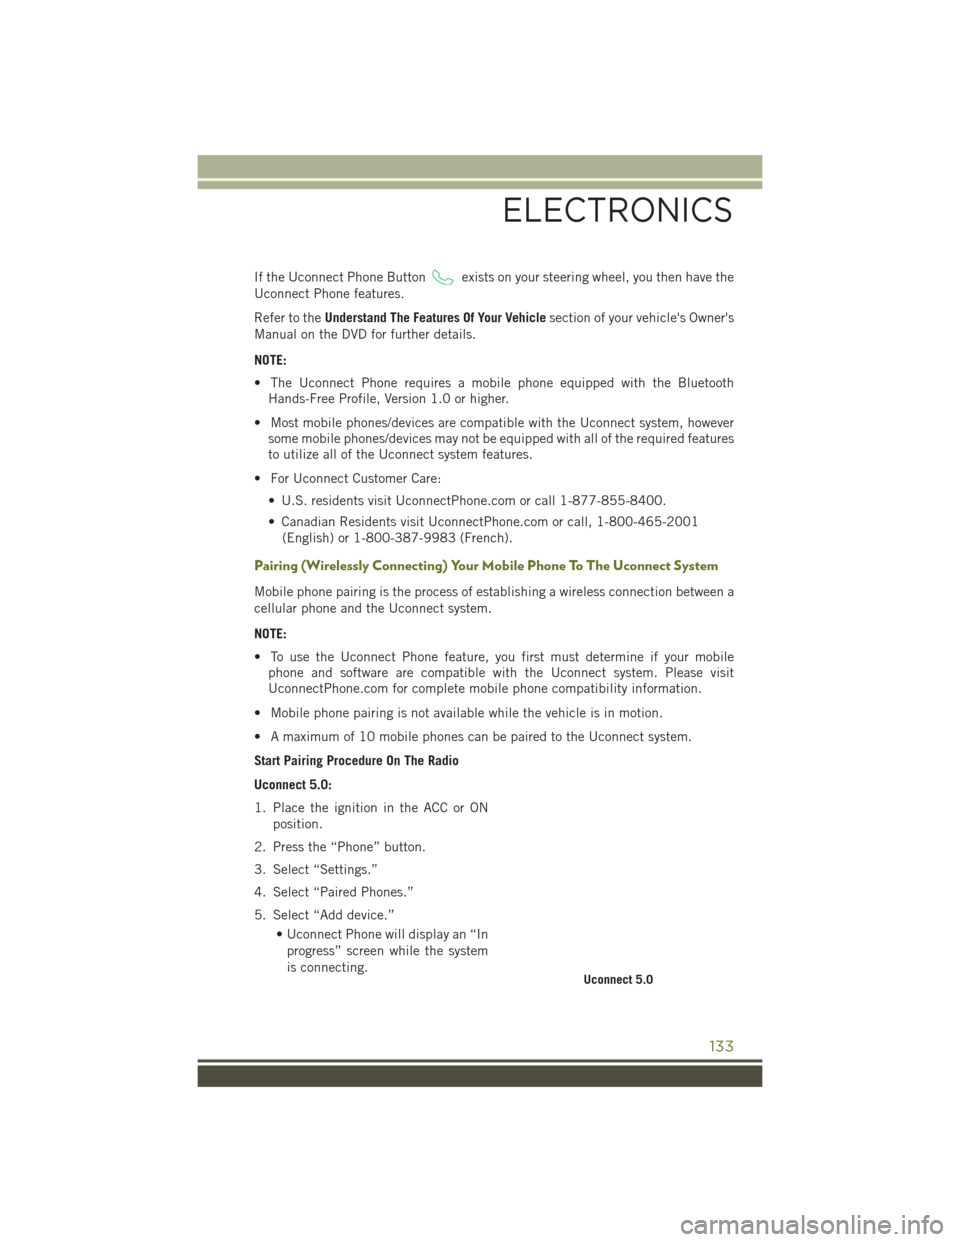
Uconnect 5.0:
1. Place the ignition in the ACC or ON position.
2. Press the “Phone” button.
3. Select “Settings.”
4. Select “Paired Phones.”
5. Select “Add device.” • Uconnect Phone will display an “Inprogress” screen while the system
is connecting.
Uconnect 5.0
ELECTRONICS
133
Page 139 of 236
Voice Command Tips
• Speaking complete names (i.e; Call John Doe vs. Call John) will result in greatersystem accuracy.
• You can “link” commands together for faster results. Say “Call John Doe, mobile,” for example.
• If you are listening to available voice command options, you do not have to listen to the entire list. When you hear the command that you need, push the
button on the steering wheel, wait for the beep and say your command.
Changing The Volume
• Start a dialogue by pushing the Phone button, then say a command for
example - "Help".
• Use the radio VOLUME/MUTE rotary knob to adjust the volume to a comfortable level while the Uconnect system is speaking. Please note the volume setting for
Uconnect is different than the audio system.
NOTE:
To access help, push the Uconnect Phone button
on the steering wheel and say
"help." Push the Uconnect Phone Pickup button
or the VR buttonand say
"cancel" to cancel the help session.
Using Do Not Disturb
With Do Not Disturb, you can disable notifications from incoming calls and texts,
allowing you to keep your eyes on the road and hands on the wheel. For your
convenience there is a counter display to keep track of your missed calls and text
messages while you were using Do Not Disturb.
Do Not Disturb can automatically reply with a text message, a call or both, when
declining an incoming call and send it to voicemail.
Automatic reply messages can be:
• “I am driving right now, I will get back to you shortly.”
• Create a custom auto reply message up to 160 characters.
While in Do Not Disturb, Conference Call can be selected so you can still place a
second call without being interrupted by incoming calls.
NOTE:
• Only the beginning of your custom message will be seen on the touchscreen.
• Reply with text message is not compatible with iPhones.
• Auto reply with text message is only available on phones that supporting Bluetooth MAP.
ELECTRONICS
137
Page 144 of 236
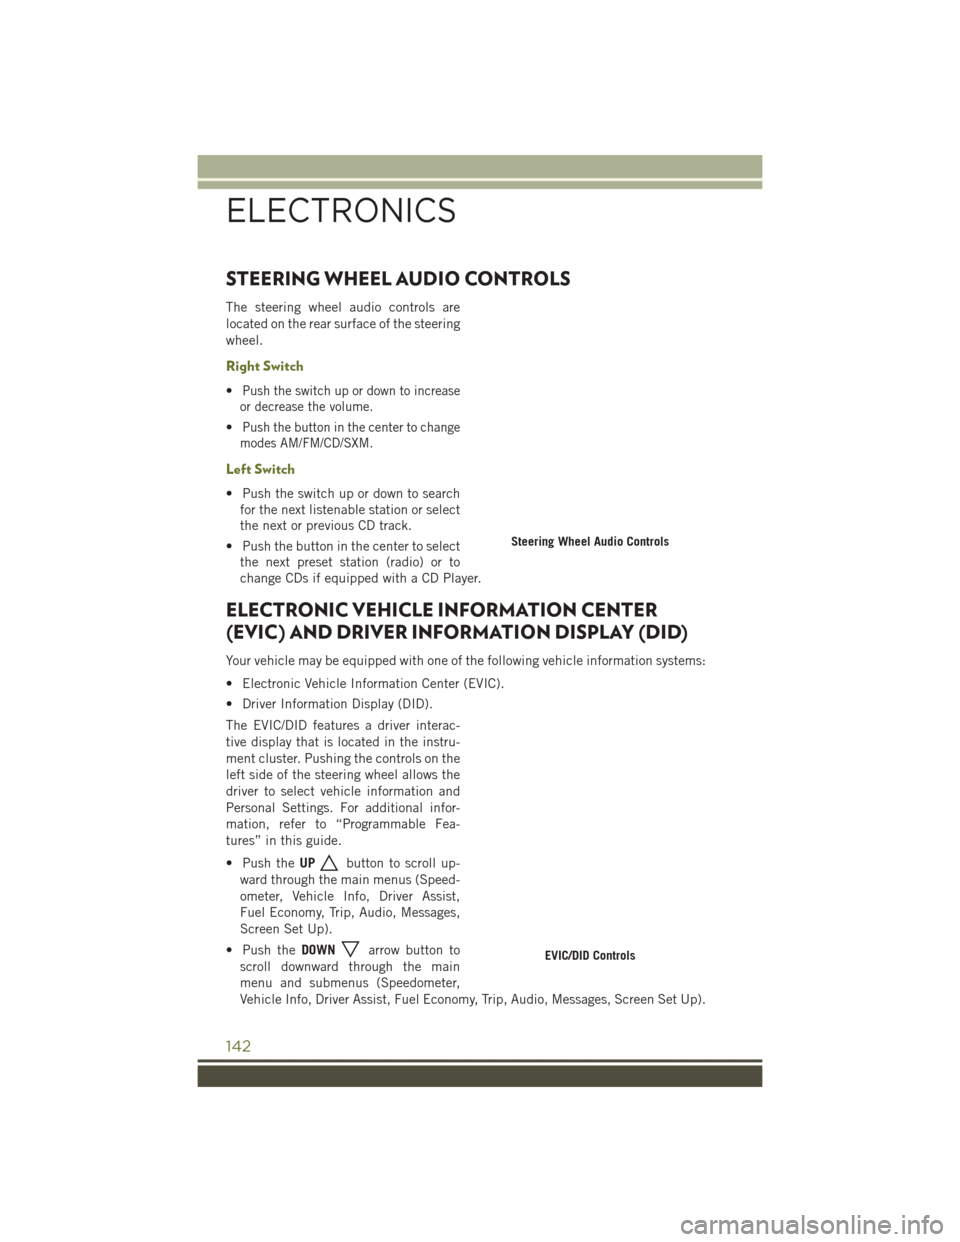
STEERING WHEEL AUDIO CONTROLS
The steering wheel audio controls are
located on the rear surface of the steering
wheel.
Right Switch
•Push the switch up or down to increase
or decrease the volume.
•Push the button in the center to change
modes AM/FM/CD/SXM.
Left Switch
• Push the switch up or down to search for the next listenable station or select
the next or previous CD track.
• Push the button in the center to select the next preset station (radio) or to
change CDs if equipped with a CD Player.
ELECTRONIC VEHICLE INFORMATION CENTER
(EVIC) AND DRIVER INFORMATION DISPLAY (DID)
Your vehicle may be equipped with one of the following vehicle information systems:
• Electronic Vehicle Information Center (EVIC).
• Driver Information Display (DID).
The EVIC/DID features a driver interac-
tive display that is located in the instru-
ment cluster. Pushing the controls on the
left side of the steering wheel allows the
driver to select vehicle information and
Personal Settings. For additional infor-
mation, refer to “Programmable Fea-
tures” in this guide.
• Push the UP
button to scroll up-
ward through the main menus (Speed-
ometer, Vehicle Info, Driver Assist,
Fuel Economy, Trip, Audio, Messages,
Screen Set Up).
• Push the DOWN
arrow button to
scroll downward through the main
menu and submenus (Speedometer,
Vehicle Info, Driver Assist, Fuel Economy, Trip, Audio, Messages, Screen Set Up).
Steering Wheel Audio Controls
EVIC/DID Controls
ELECTRONICS
142
Page 146 of 236
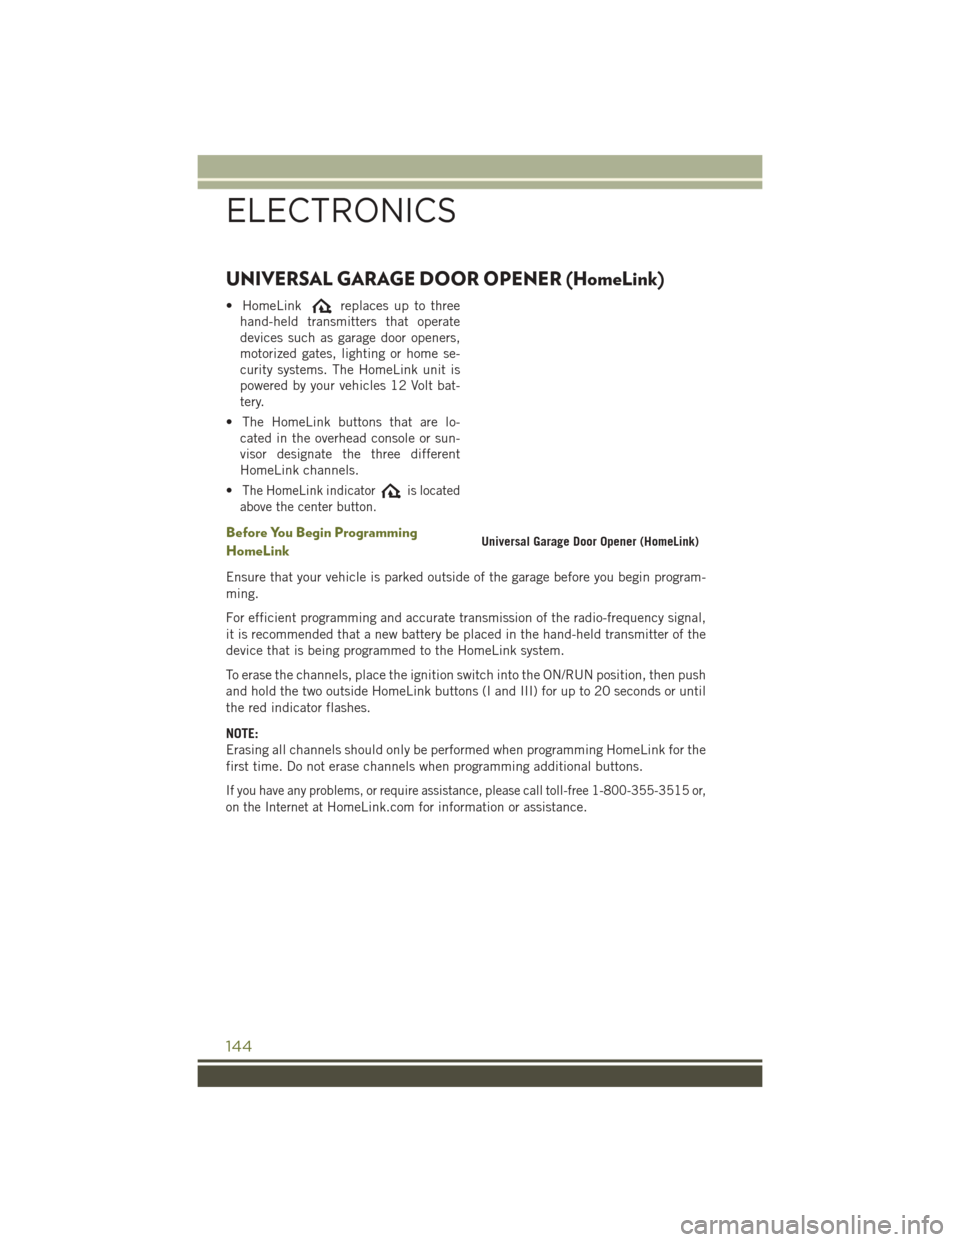
UNIVERSAL GARAGE DOOR OPENER (HomeLink)
• HomeLinkreplaces up to three
hand-held transmitters that operate
devices such as garage door openers,
motorized gates, lighting or home se-
curity systems. The HomeLink unit is
powered by your vehicles 12 Volt bat-
tery.
• The HomeLink buttons that are lo- cated in the overhead console or sun-
visor designate the three different
HomeLink channels.
•
The HomeLink indicatoris located
above the center button.
Before You Begin Programming
HomeLink
Ensure that your vehicle is parked outside of the garage before you begin program-
ming.
For efficient programming and accurate transmission of the radio-frequency signal,
it is recommended that a new battery be placed in the hand-held transmitter of the
device that is being programmed to the HomeLink system.
To erase the channels, place the ignition switch into the ON/RUN position, then push
and hold the two outside HomeLink buttons (I and III) for up to 20 seconds or until
the red indicator flashes.
NOTE:
Erasing all channels should only be performed when programming HomeLink for the
first time. Do not erase channels when programming additional buttons.
If you have any problems, or require assistance, please call toll-free 1-800-355-3515 or,
on the Internet at
HomeLink.com for information or assistance.
Universal Garage Door Opener (HomeLink)
ELECTRONICS
144
Page 189 of 236
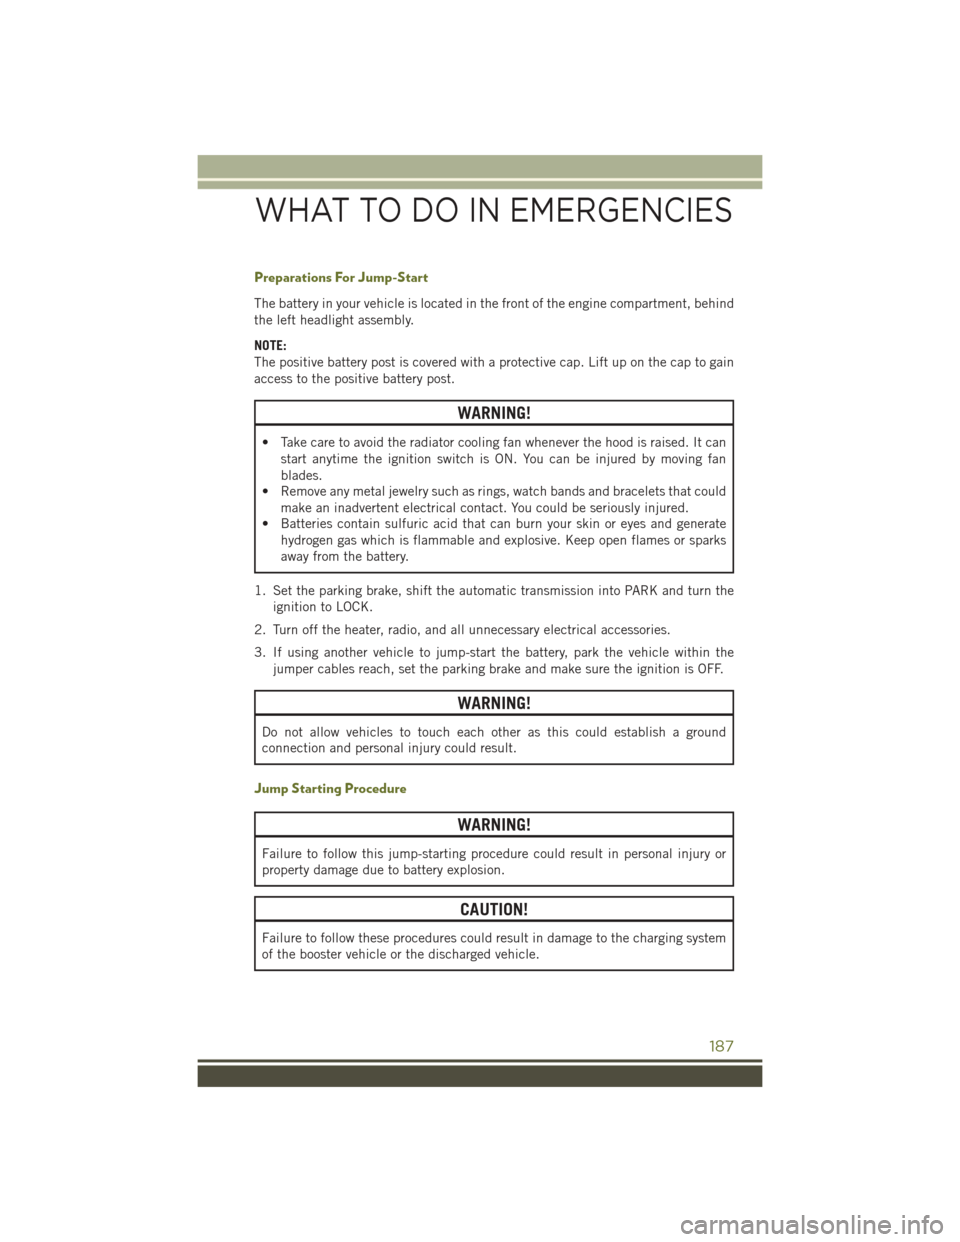
Preparations For Jump-Start
The battery in your vehicle is located in the front of the engine compartment, behind
the left headlight assembly.
NOTE:
The positive battery post is covered with a protective cap. Lift up on the cap to gain
access to the positive battery post.
WARNING!
• Take care to avoid the radiator cooling fan whenever the hood is raised. It canstart anytime the ignition switch is ON. You can be injured by moving fan
blades.
• Remove any metal jewelry such as rings, watch bands and bracelets that could
make an inadvertent electrical contact. You could be seriously injured.
• Batteries contain sulfuric acid that can burn your skin or eyes and generate
hydrogen gas which is flammable and explosive. Keep open flames or sparks
away from the battery.
1. Set the parking brake, shift the automatic transmission into PARK and turn the ignition to LOCK.
2. Turn off the heater, radio, and all unnecessary electrical accessories.
3. If using another vehicle to jump-start the battery, park the vehicle within the jumper cables reach, set the parking brake and make sure the ignition is OFF.
WARNING!
Do not allow vehicles to touch each other as this could establish a ground
connection and personal injury could result.
Jump Starting Procedure
WARNING!
Failure to follow this jump-starting procedure could result in personal injury or
property damage due to battery explosion.
CAUTION!
Failure to follow these procedures could result in damage to the charging system
of the booster vehicle or the discharged vehicle.
WHAT TO DO IN EMERGENCIES
187
Page 209 of 236
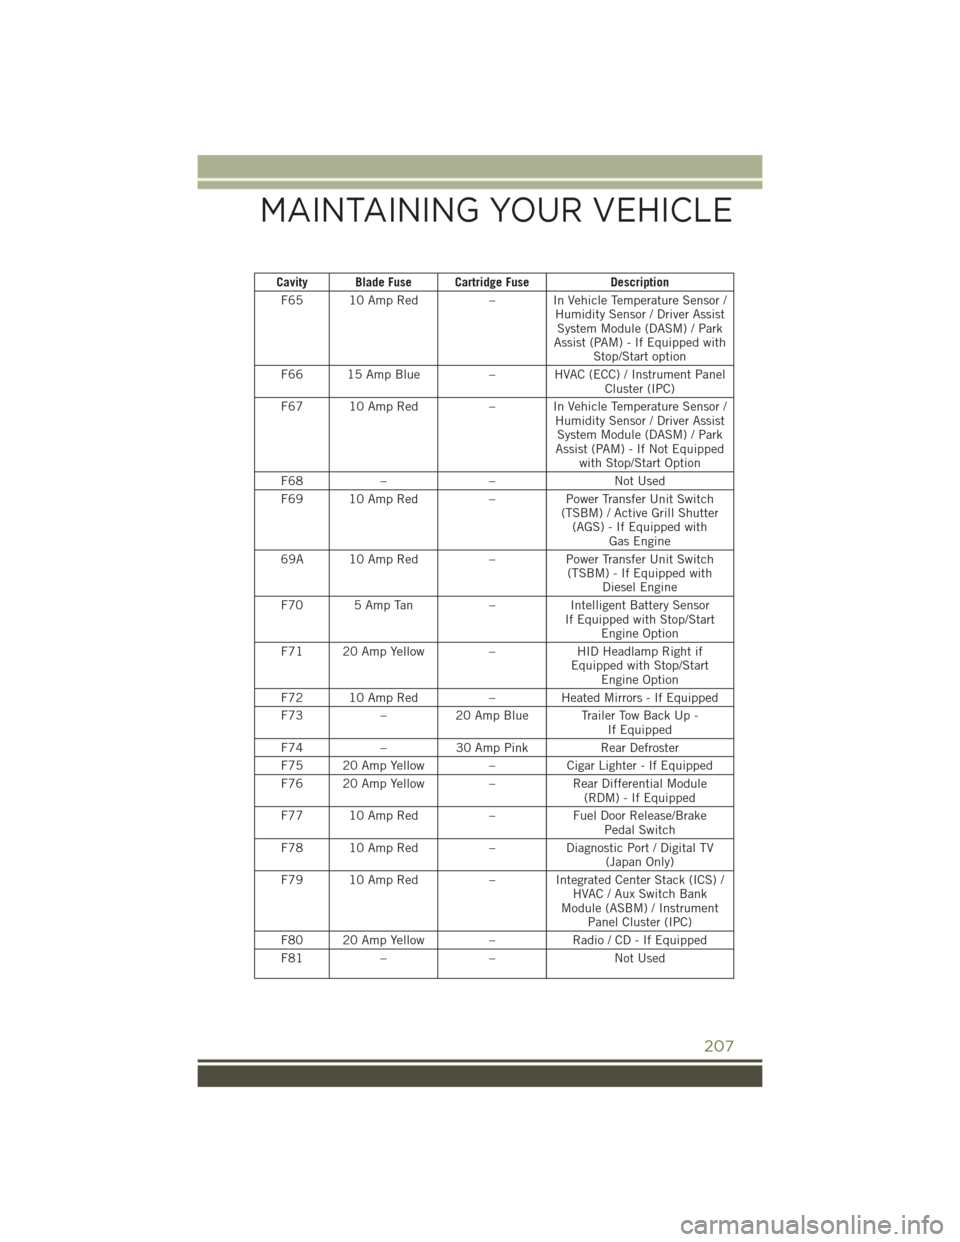
Cavity Blade Fuse Cartridge FuseDescription
F65 10 Amp Red – In Vehicle Temperature Sensor /
Humidity Sensor / Driver AssistSystem Module (DASM) / Park
Assist (PAM) - If Equipped with Stop/Start option
F66 15 Amp Blue – HVAC (ECC) / Instrument Panel
Cluster (IPC)
F67 10 Amp Red – In Vehicle Temperature Sensor /
Humidity Sensor / Driver AssistSystem Module (DASM) / Park
Assist (PAM) - If Not Equipped with Stop/Start Option
F68 – – Not Used
F69 10 Amp Red –Power Transfer Unit Switch
(TSBM) / Active Grill Shutter (AGS) - If Equipped with Gas Engine
69A 10 Amp Red –Power Transfer Unit Switch
(TSBM) - If Equipped with Diesel Engine
F70 5 Amp Tan –Intelligent Battery Sensor
If Equipped with Stop/Start Engine Option
F71 20 Amp Yellow –HID Headlamp Right if
Equipped with Stop/Start Engine Option
F72 10 Amp Red –Heated Mirrors - If Equipped
F73 –20 Amp Blue Trailer Tow Back Up -
If Equipped
F74 –30 Amp Pink Rear Defroster
F75 20 Amp Yellow –Cigar Lighter - If Equipped
F76 20 Amp Yellow –Rear Differential Module
(RDM) - If Equipped
F77 10 Amp Red –Fuel Door Release/Brake
Pedal Switch
F78 10 Amp Red –Diagnostic Port / Digital TV
(Japan Only)
F79 10 Amp Red – Integrated Center Stack (ICS) /
HVAC / Aux Switch Bank
Module (ASBM) / Instrument Panel Cluster (IPC)
F80 20 Amp Yellow –Radio / CD - If Equipped
F81 – – Not Used
MAINTAINING YOUR VEHICLE
207