2016 JAGUAR F TYPE change language
[x] Cancel search: change languagePage 14 of 16

NAVIGATION
14
PHONE
Touch screen navigation See page 2, item 26
Country selection
On initial activation, make sure
that both the correct country
and search area have been
selected.
For more information, refer to
the Navigation section of the
Owner’s Handbook.
Note: To access navigation, press either the N AV hard
key or touch the Nav icon on the Home menu.
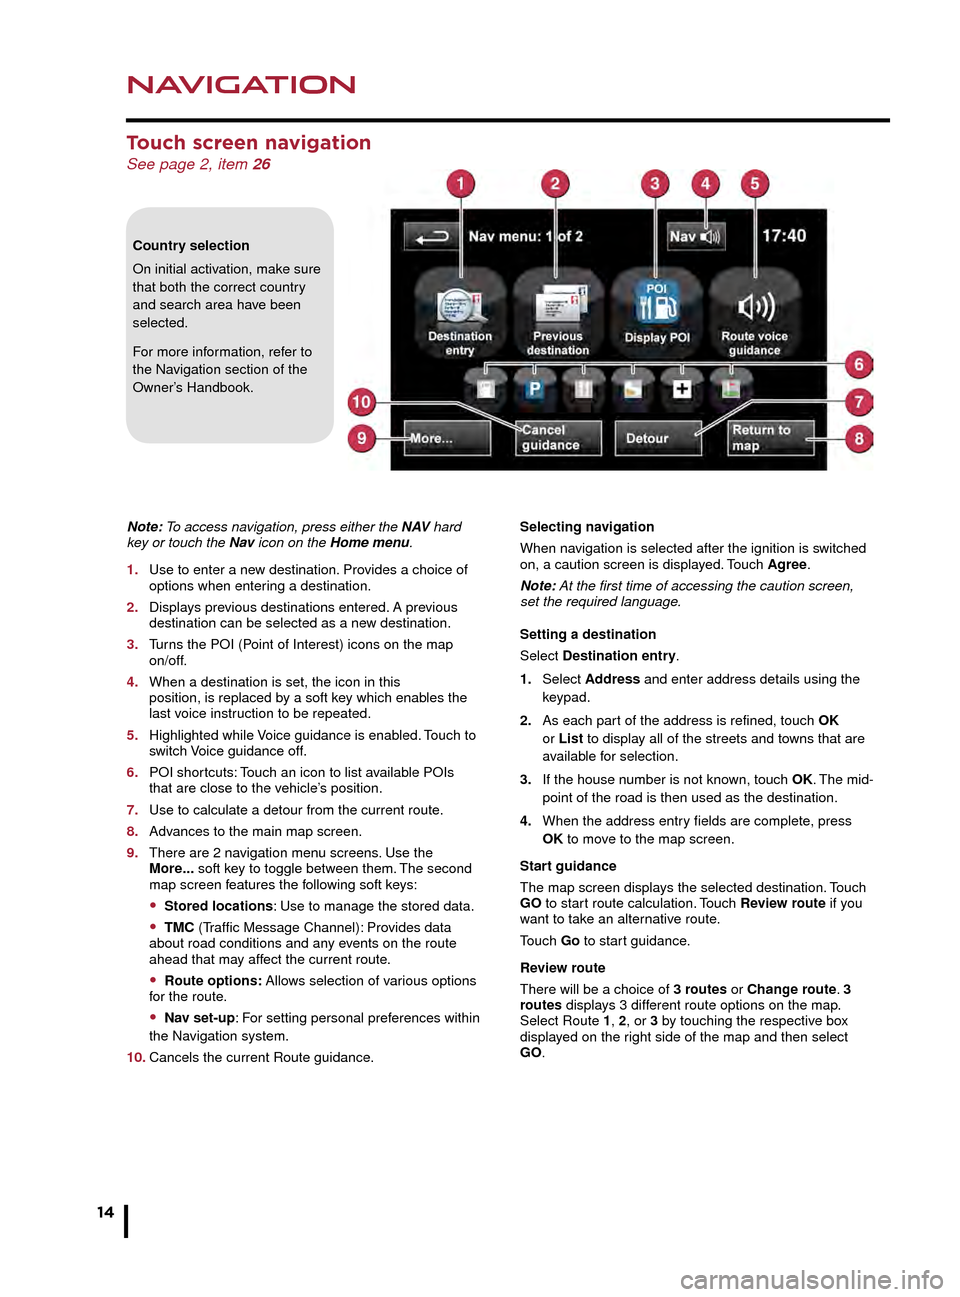
1. Use to enter a new destination. Provides a choice of options when enter ing a destination.
2. Displays previous destinations entered. A previous destination can be selected as a ne w destination.
3. Turns the POI (Point of Interest) icons on the map on/off.
4. When a destination is set, the icon in this position, is replaced by a soft key which enables the last voice instruction to be repeated.
5. Highlighted while Voice guidance is enabled. Touch to switch Voice guidance off.
6. POI shortcuts: Touch an icon to list available POIs that are close to the vehicle’s position.
7. Use to calculate a detour from the current route.
8. Advances to the main map screen.
9. There are 2 navigation menu screens. Use the More... soft key to toggle between them. The second map screen features the following soft keys:
• Stored locations: Use to manage the stored data.
• TMC (Traffic Message Channel): Provides data
about road conditions and any events on the route
ahead that may affect the current route.
• Route options: Allows selection of various options
for the route.
• Nav set-up: For setting personal preferences within
the Navigation system.
10. Cancels the current Route guidance. Selecting navigation
When navigation is selected after the ignition is switched
on, a caution screen is displayed. Touch Agree.
Note: At the first time of accessing the caution screen,
set the required language.
Setting a destination
Select Destination entry.
1. Select Address and enter address details using the keypad.
2. As each part of the address is refined, touch OK or List to display all of the streets and towns that are available for selection.
3. If the house number is not known, touch OK. The mid- point of the road is then used as the destination.
4. When the address entry fields are complete, press OK to move to the map screen.
Start guidance
The map screen displays the selected destination. Touch
GO to start route calculation. Touch Review route if you
want to take an alternative route.
Touch Go to start guidance.
Review route
There will be a choice of 3 routes or Change route. 3
routes displays 3 different route options on the map.
Select Route 1, 2, or 3 by touching the respective box
displayed on the right side of the map and then select
GO.
Bluetooth® wireless technology
devices
See page 2, items 7, 25 and 43
Connection must be made with the ignition on or with the
engine running.
Use the following procedure in conjunction with your
phone manufacturer’s instructions.
Pairing and connecting using your phone
Note: The process of pairing and connecting a phone
to the vehicle will vary, depending on the type of phone
used.
1. Switch the ignition on and make sure that the Touch screen is active.
2. From the Home menu, select Phone.
3. If no phone is connected, select Search new, otherwise, select Change phone and then select Search new.
4. Select the Device to vehicle option.
Note: The vehicle’s Bluetooth wireless technology
system is discoverable for only 3 minutes.
5. Using your phone, search for Bluetooth wireless technology devices. On some phones, this is referred to as a new paired device. See your phone’s operating instructions for further information.
6. When the vehicle’s system is discovered, begin the pairing process and follow the on-screen instructions.
7. When requested, enter a PIN of your choice into your phone and the vehicle’s system. Select OK.
8. When your phone is paired and connected, a confirmation message is displayed.
Note: Some phones require the pairing to be set as
‘authorised’ or ‘trusted’ in order to automatically connect.
Please refer to your phone’s operating instructions for
further information.
Downloading phonebook entries
When a phone with phonebook download capability is
paired and connected, its phonebook directory can be
automatically downloaded to the vehicle’s system.
See PHONEBOOK in the Owner’s Handbook for more
information.
Bluetooth Connectivity
For the latest compatibility information, go online to
www.jaguar.com and search for Bluetooth.
JJM189635161.indd 1404/11/2014 13:31:30
Page 15 of 16

NAVIGATIONPHONE
15
Telephone echo
If echo is experienced when using the phone, reduce
the volume during the call.
Calls via the Touch screen
With a paired and active phone, press the PHONE button
to the right of the Touch screen.
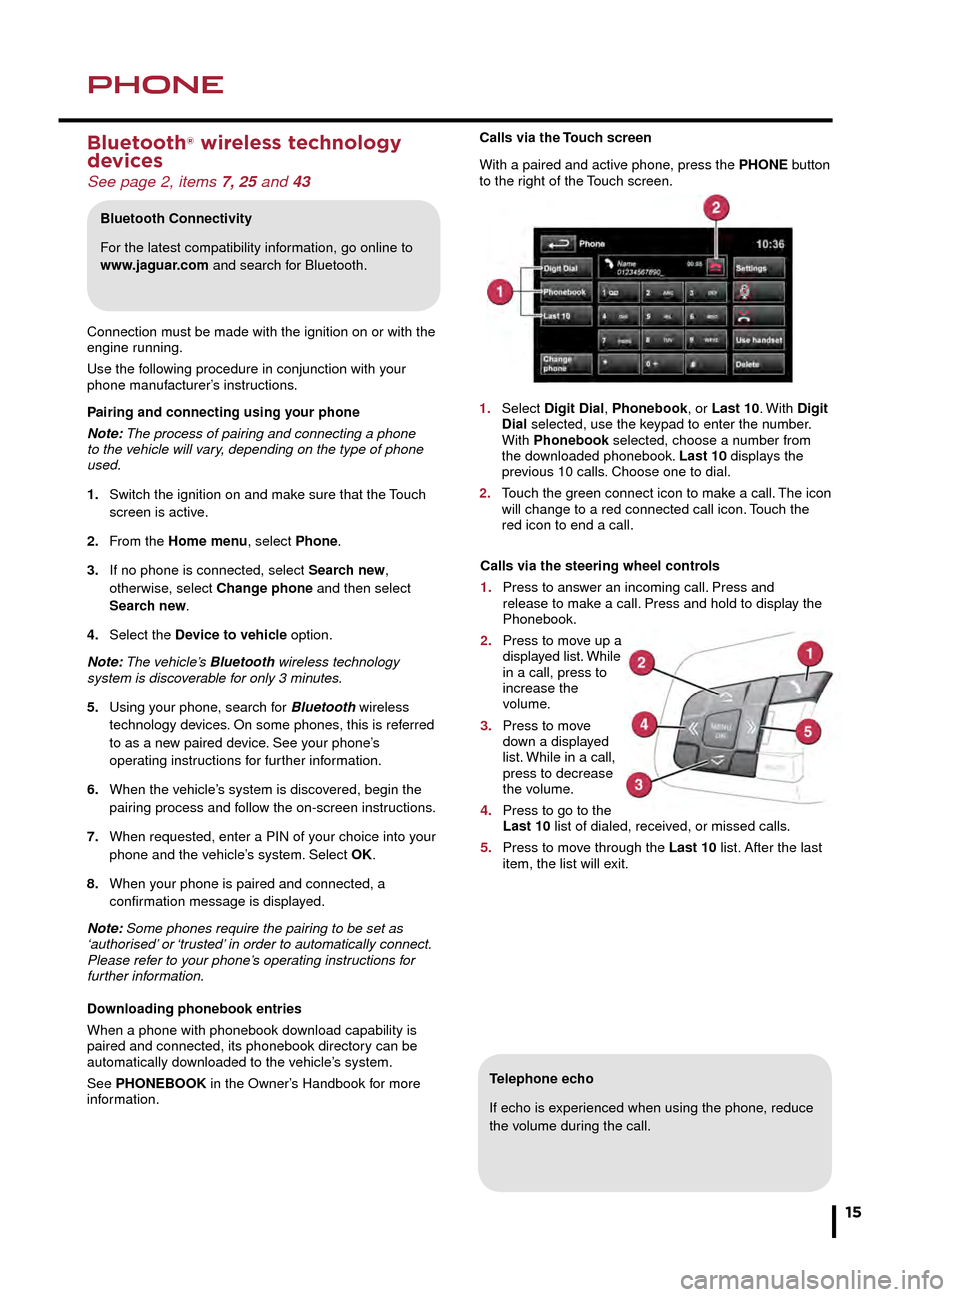
1. Select Digit Dial, Phonebook, or Last 10. With Digit Dial selected, use the keypad to enter the number. With Phonebook selected, choose a number from the downloaded phonebook. Last 10 displays the previous 10 calls. Choose one to dial.
2. Touch the green connect icon to make a call. The icon will change to a red connected call icon. Touch the red icon to end a call.Selecting navigation
When navigation is selected after the ignition is switched
on, a caution screen is displayed. Touch Agree.
Note: At the first time of accessing the caution screen,
set the required language.
Setting a destination
Select Destination entry.
1. Select Address and enter address details using the keypad.
2. As each part of the address is refined, touch OK or List to display all of the streets and towns that are available for selection.
3. If the house number is not known, touch OK. The mid- point of the road is then used as the destination.
4. When the address entry fields are complete, press OK to move to the map screen.
Start guidance
The map screen displays the selected destination. Touch
GO to start route calculation. Touch Review route if you
want to take an alternative route.
Touch Go to start guidance.
Review route
There will be a choice of 3 routes or Change route. 3
routes displays 3 different route options on the map.
Select Route 1, 2, or 3 by touching the respective box
displayed on the right side of the map and then select
GO.
Bluetooth® wireless technology
devices
See page 2, items 7, 25 and 43
Connection must be made with the ignition on or with the
engine running.
Use the following procedure in conjunction with your
phone manufacturer’s instructions.
Pairing and connecting using your phone
Note: The process of pairing and connecting a phone
to the vehicle will vary, depending on the type of phone
used.
1. Switch the ignition on and make sure that the Touch screen is active.
2. From the Home menu, select Phone.
3. If no phone is connected, select Search new, otherwise, select Change phone and then select Search new.
4. Select the Device to vehicle option.
Note: The vehicle’s Bluetooth wireless technology
system is discoverable for only 3 minutes.
5. Using your phone, search for Bluetooth wireless technology de vices. On some phones, this is referred to as a new paired device. See your phone’s operating instructions for further information.
6. When the vehicle’s system is discovered, begin the pairing process and follow the on-screen instructions.
7. When requested, enter a PIN of your choice into your phone and the vehicle’s system. Select OK.
8. When your phone is paired and connected, a confirmation message is displayed.
Note: Some phones require the pairing to be set as
‘authorised’ or ‘trusted’ in order to automatically connect.
Please refer to your phone’s operating instructions for
further information.
Downloading phonebook entries
When a phone with phonebook download capability is
paired and connected, its phonebook directory can be
automatically downloaded to the vehicle’s system.
See PHONEBOOK in the Owner’s Handbook for more
information.
Bluetooth Connectivity
For the latest compatibility information, go online to
www.jaguar.com and search for Bluetooth.
Calls via the steering wheel controls
1. Press to answer an incoming call. Press and release to make a call. Press and hold to display the Phonebook.
2. Press to move up a displayed list. While in a call, press to increase the volume.
3. Press to move down a displayed list. While in a call, press to decrease the volume.
4. Press to go to the Last 10 list of dialed, received, or missed calls.
5. Press to move through the Last 10 list. After the last item, the list will exit.
JJM189635161.indd 1504/11/2014 13:31:30