2016 INFINITI QX80 ECO mode
[x] Cancel search: ECO modePage 5 of 32

3
essential information
Tire Pressure Monitoring System (TPMS) with Tire Inflation Indicator
A CHECK TIRE PRESSURE warning message will appear in the vehicle information display 1 and the low tire pressure warning light 2 will illuminate when one or more tires are
low in pressure and air is needed.
• The tire pressures should be checked
when the tires are cold. The tires are
considered cold after the vehicle has
been parked for 3 hours or more or
driven less than 1 mi (1.6 km) at
moderate speeds.
When adding air to an under-inflated tire, the TPMS with Tire Inflation \
Indicator provides visual and audible signals to help you inflate the ti\
re
to the recommended COLD tire pressure.
To use the Tire Inflation Indicator:
1. Move the shift lever to the P (PARK) position and apply the parking brake.
2. Place the ignition switch in the ON position. Do not start the engine.
3. Add air to the under-inflated tire, and within a few seconds, the hazard\
warning lights
will start flashing.
4. When the designated tire pressure is reached, the horn will beep once an\
d the hazard
warning flashers will stop.
5. Repeat this procedure for any additional under-inflated tires.
After tire pressures are adjusted, drive the vehicle at speeds above 16 \
mph (25 km/h).
The CHECK TIRE PRESSURE warning message and low tire pressure warning light 2
will extinguish.
When the low tire pressure warning light 2 flashes for approximately 1 minute and then
remains on, the TPMS is not functioning properly. Have the system checke\
d by an
INFINITI retailer.
Tire pressure rises and falls depending on the heat caused by the vehicl\
e’s operation and
the outside temperature. Low outside temperature can lower the temperatu\
re of the air
inside the tire, which can cause a lower tire inflation pressure. This m\
ay cause the low tire
pressure warning light
2 to illuminate. If the warning light illuminates, check the tire
pressure in your tires.
• Check the tire pressure (including the spare tire) often and always pr\
ior to long
distance trips.
The Tire and Loading Information label contains valuable information. Pl\
ea se refer to the
“Technical and consumer information (section 9)” of your Owner’\
s Manual for the location
of the Tire and Loading Information label.
For more information, refer to the “Instruments and controls (section 2)”, the “Starting and driving (section 5)” and the
“Maintenance and do-it-yourself (section 8)” of your Owner’s Manual.
1
2
Page 10 of 32

8
first drive features
Theater Package (if so equipped)
With this entertainment system, you can play video
files via a DVD or CD, providing images and sound
both from the front and rear display screens.
WATCHING A DVD
1. Insert a DVD into the DVD slot 1.
2. The DVD will play automatically.
• To watch or control videos on the front display,
make sure the vehicle is in the P (PARK) position
and the parking brake is applied.
REAR DISPLAYS
To turn the rear displays on or off from the
front seats:
1. Press the SETTING button 2 on the
control panel.
2. Select the “Rear Display” key on the display.
3. Toggle the “L” (Left) or “R” (Right) Display 3 on or off.
To access standard DVD controls on the front
display while playing a DVD on the rear display, press the DISC•AUX
button on the control panel while the vehicle is in the P (PARK)
position and the parking brake is applied.
To turn the rear displays on or off from the rear seats:
1. Select the desired seat by sliding the DISPLAY SELECT switch
4 on the remote control to the L (Left) or R (Right) position.
2. Press the POWER button 5 on the remote control.
To control the DVD from the rear seats, use the
remote control.
OPERATING TIPS
You can also connect auxiliary devices, such as
video games, camcorders or portable video players,
to the auxiliary jacks. (Your device will be controlled
through its own control panel.)
Rear Auxiliary Mode allows rear seat passengers
to independently display different sources on
each screen.
Use the headphones, also provided with the system,
to listen to audio wirelessly and independently.
For the best audio sound quality, please make sure
you are facing the monitor directly in front of you.
To reduce driver distraction, movies will not be
shown on the front display while the vehicle is in
any drive position.
For more information, refer to the “Monitor, climate, audio, phone and voice recognition systems (secti\
on 4)” of your
Owner’s Manual.
5 4
1
2
3
Page 11 of 32
9
INFINITI Intelligent Key System
The INFINITI Intelligent Key system allows you to lock
or unlock your vehicle, open your liftgate and start the
engine. It is important to make sure the Intelligent Key
is with you (that is, in your pocket or purse).
LOCKING AND UNLOCKING YOUR VEHICLE
The operating range of the Intelligent Key is within
31.5 in (80 cm) from each request switch.
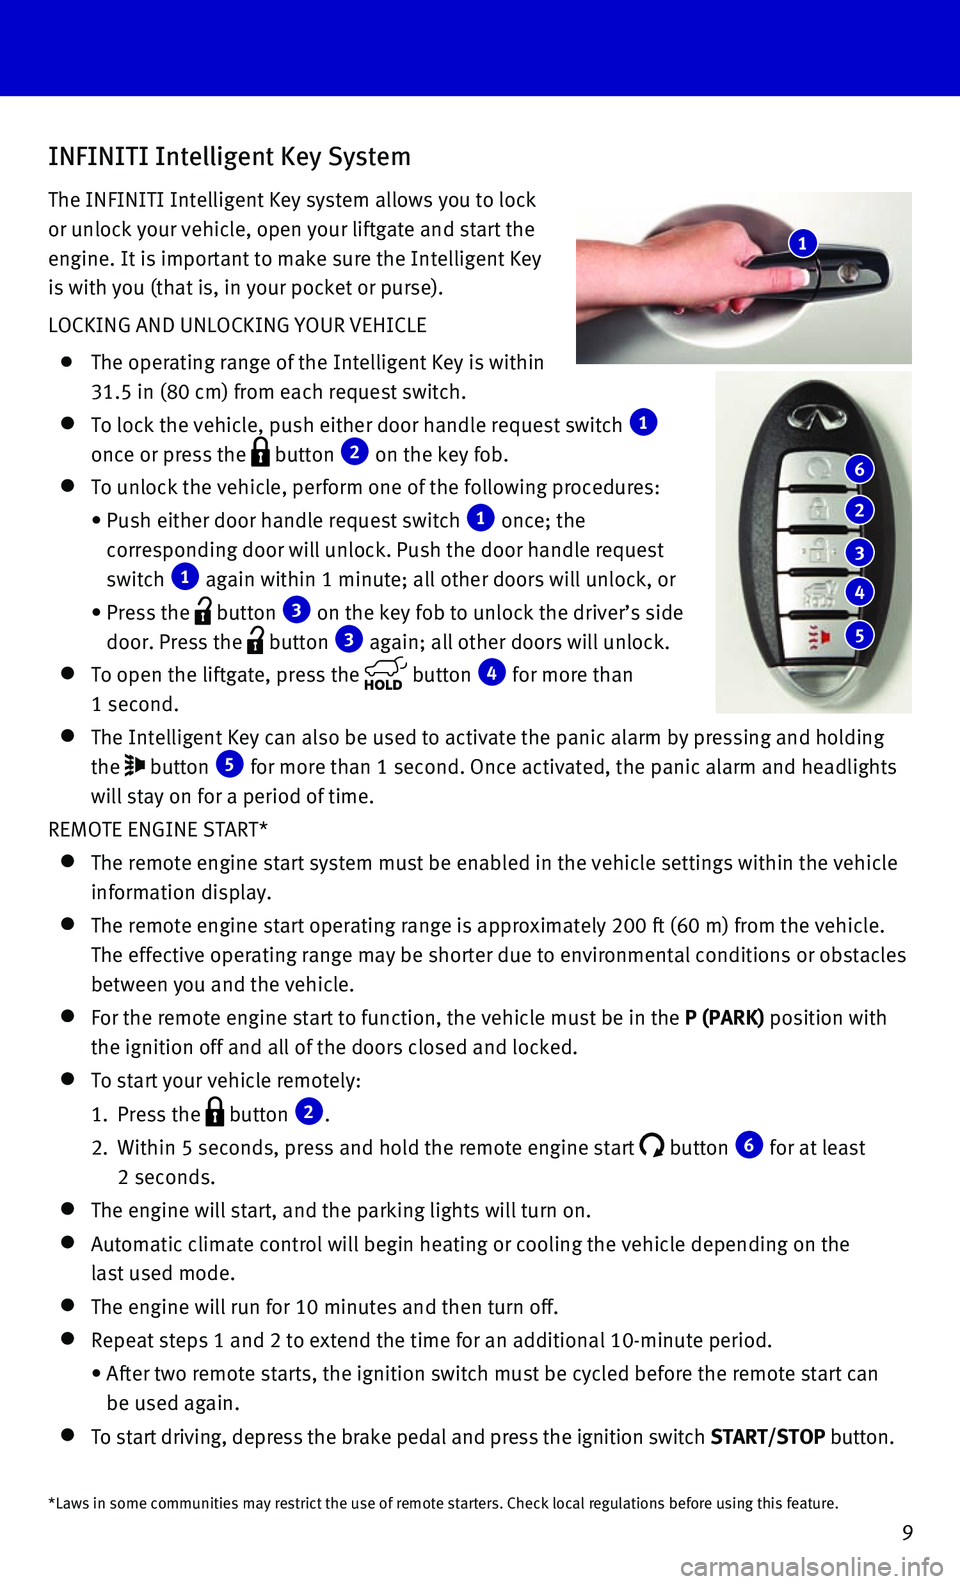
To lock the vehicle, push either door handle request switch 1
once or press the button 2 on the key fob.
To unlock the vehicle, perform one of the following procedures:
• Push either door handle request switch 1 once; the
corresponding door will unlock. Push the door handle request
switch 1 again within 1 minute; all other doors will unlock, or
• Press the button 3 on the key fob to unlock the driver’s side
door. Press the button 3 again; all other doors will unlock.
To open the liftgate, press the button 4 for more than
1 second.
The Intelligent Key can also be used to activate the panic alarm by pres\
sing and holding
the button 5 for more than 1 second. Once activated, the panic alarm and headlights \
will stay on for a period of time.
REMOTE ENGINE START*
The remote engine start system must be enabled in the vehicle settings w\
i thin the vehicle
information display.
The remote engine start operating range is approximately 200 ft (60 m)\
fro m the vehicle.
The effective operating range may be shorter due to environmental condit\
ions or obstacles
between you and the vehicle.
For the remote engine start to function, the vehicle must be in the P (PARK) position with
the ignition off and all of the doors closed and locked.
To start your vehicle remotely:
1. Press the button 2.
2. Within 5 seconds, press and hold the remote engine start button 6 for at least
2 seconds.
The engine will start, and the parking lights will turn on.
Automatic climate control will begin heating or cooling the vehicle depe\
nd ing on the
last used mode.
The engine will run for 10 minutes and then turn off.
Repeat steps 1 and 2 to extend the time for an additional 10-minute peri\
od .
• After two remote starts, the ignition switch must be cycled before the r\
emote start can
be used again.
To start driving, depress the brake pedal and press the ignition switch \
START/STOP button.
1
6
2
3
4
5
*Laws in some communities may restrict the use of remote starters. Check\
local regulations before using this feature.
Page 20 of 32
18
first drive features
7 AUTOMATIC INTAKE AIR CONTROL
In the automatic mode, air intake will be controlled automatically.
This mode helps to adjust the inside vehicle temperature more effectivel\
y.
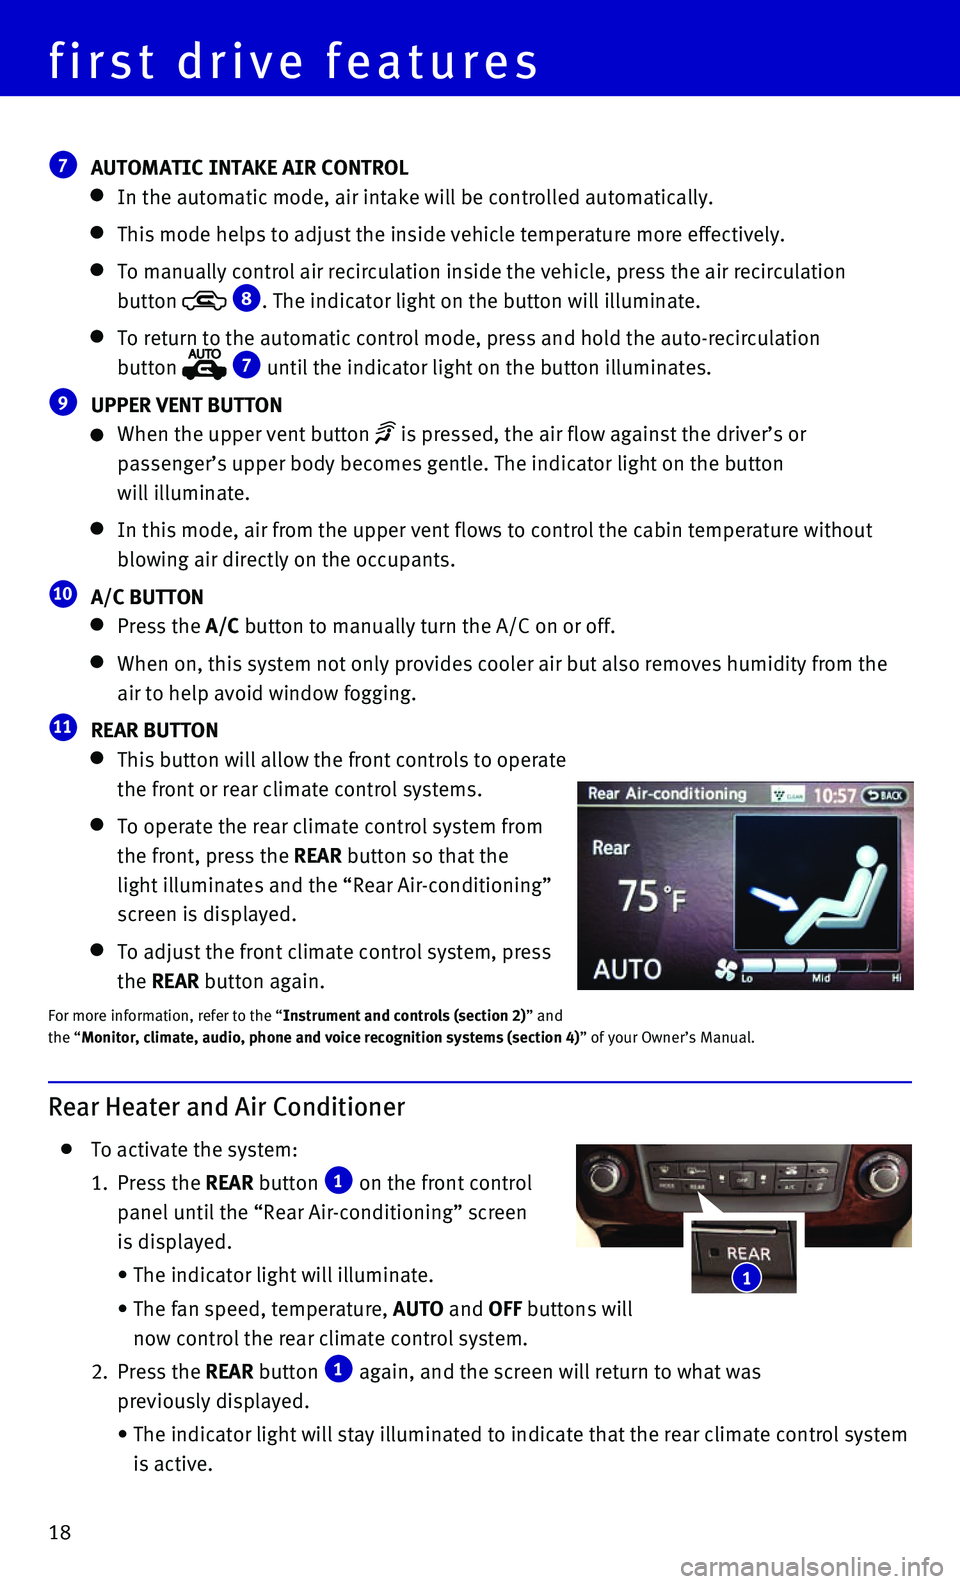
To manually control air recirculation inside the vehicle, press the air \
recirculation
button
8. The indicator light on the button will illuminate.
To return to the automatic control mode, press and hold the auto-recircu\
lat ion
button
7 until the indicator light on the button illuminates.
9 UPPER VENT BUTTON
When the upper vent button is pressed, the air flow against the driver’s or
passenger’s upper body becomes gentle. The indicator light on the but\
ton
will illuminate.
In this mode, air from the upper vent flows to control the cabin tempera\
ture without
blowing air directly on the occupants.
10 A/C BUTTON
Press the A/C button to manually turn the A/C on or off.
When on, this system not only provides cooler air but also removes humid\
i ty from the
air to help avoid window fogging.
11 REAR BUTTON
This button will allow the front controls to operate
the front or rear climate control systems.
To operate the rear climate control system from
the front, press the REAR button so that the
light illuminates and the “Rear Air-conditioning”
screen is displayed.
To adjust the front climate control system, press
the REAR button again.
For more information, refer to the “Instrument and controls (section 2)” and
the “Monitor, climate, audio, phone and voice recognition systems (section 4\
) ” of your Owner’s Manual.
Rear Heater and Air Conditioner
To activate the system:
1. Press the REAR button 1 on the front control
panel until the “Rear Air-conditioning” screen
is displayed.
• The indicator light will illuminate.
• The fan speed, temperature, AUTO and OFF buttons will
now control the rear climate control system.
2. Press the REAR button 1 again, and the screen will return to what was
previously displayed.
• The indicator light will stay illuminated to indicate that the rear clim\
ate control system
is active.
1
Page 21 of 32
19
FM/AM/SiriusXM®* Satellite Radio with CD/DVD Player
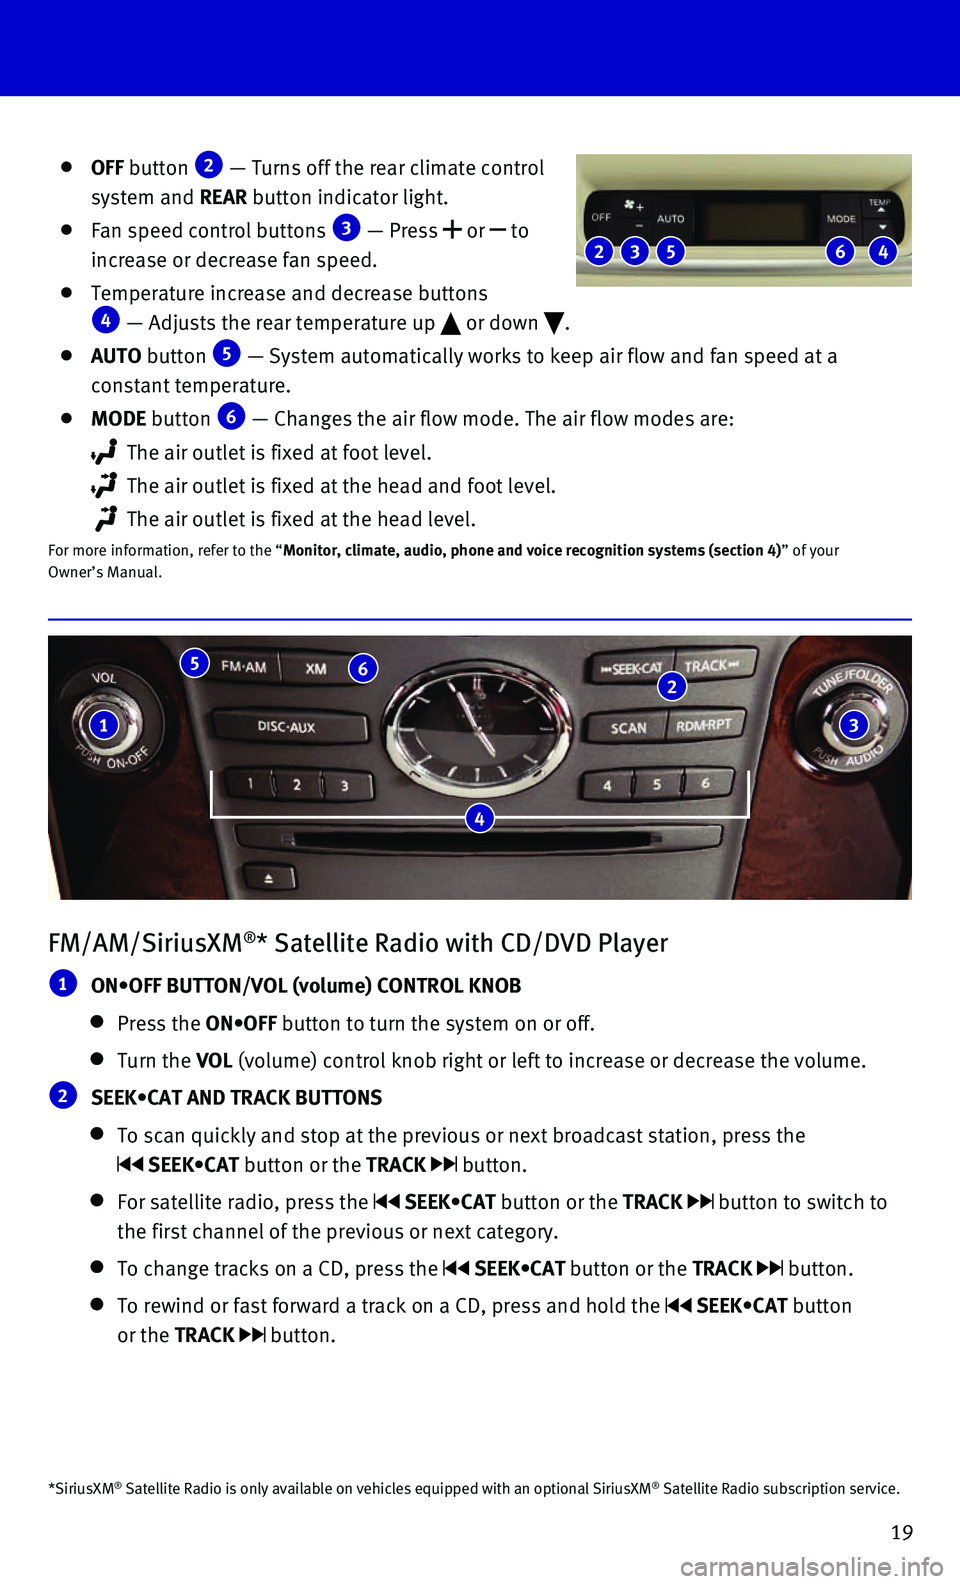
1 ON•OFF BUTTON/VOL (volume) CONTROL KNOB
Press the ON•OFF button to turn the system on or off.
Turn the VOL (volume) control knob right or left to increase or decrease the volum\
e.
2 SEEK•CAT AND TRACK BUTTONS
To scan quickly and stop at the previous or next broadcast station, pres\
s the
SEEK•CAT button or the TRACK button.
For satellite radio, press the SEEK•CAT button or the TRACK button to switch to
the first channel of the previous or next category.
To change tracks on a CD, press the SEEK•CAT button or the TRACK button.
To rewind or fast forward a track on a CD, press and hold the SEEK•CAT button
or the TRACK
button.
4
1
5 6 2
3
OFF button 2 — Turns off the rear climate control
system and REAR button indicator light.
Fan speed control buttons 3 — Press or to
increase or decrease fan speed.
Temperature increase and decrease buttons 4 — Adjusts the rear temperature up or down .
AUTO button 5 — System automatically works to keep air flow and fan speed at a
constant temperature.
MODE button 6 — Changes the air flow mode. The air flow modes are:
The air outlet is fixed at foot level.
The air outlet is fixed at the head and foot level.
The air outlet is fixed at the head level.
For more information, refer to the “Monitor, climate, audio, phone and voice recognition systems (section 4\
) ” of your
Owner’s Manual.
2 5 3 4 6
*SiriusXM® Satellite Radio is only available on vehicles equipped with an optional\
SiriusXM® Satellite Radio subscription service.
Page 23 of 32
21
Intelligent Cruise Control (ICC) (if so equipped)
The ICC automatically maintains a selected distance
from the vehicle traveling in front of you according
to that vehicle’s speed (up to the set speed) or the
set speed when the road ahead is clear.
This system may not function properly due to
road conditions when direct sunlight, rain, mud,
snow or other road spray causes the sensor to
become blocked.
VEHICLE-TO-VEHICLE DISTANCE CONTROL MODE
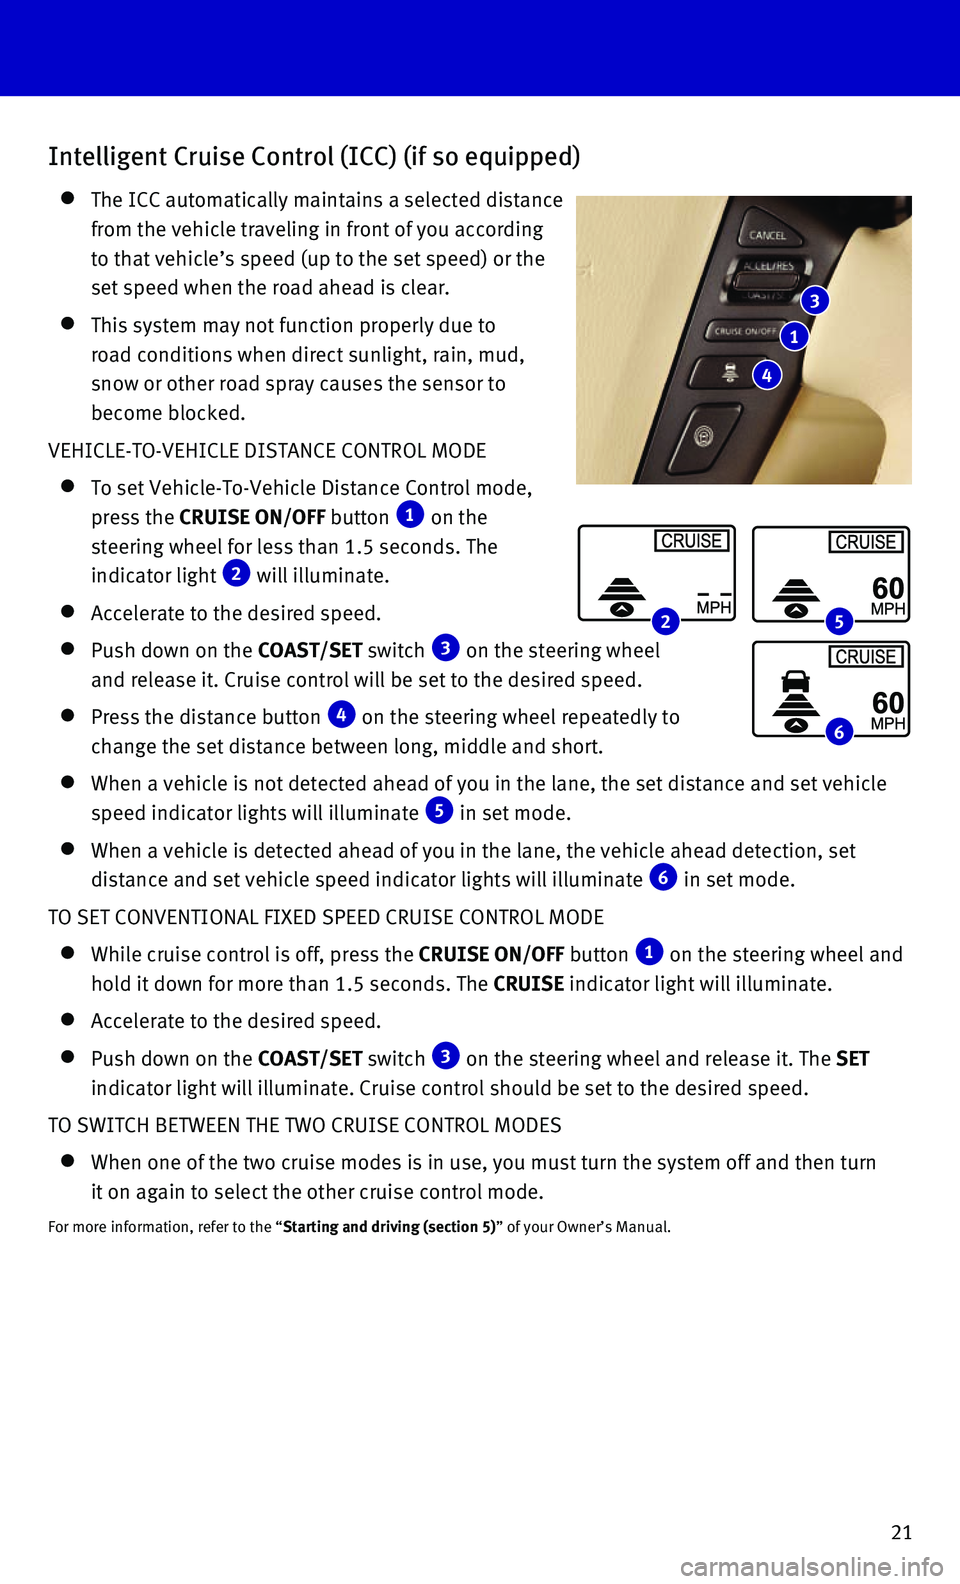
To set Vehicle-To-Vehicle Distance Control mode,
press the CRUISE ON/OFF button 1 on the
steering wheel for less than 1.5 seconds. The
indicator light 2 will illuminate.
Accelerate to the desired speed.
Push down on the COAST/SET switch 3 on the steering wheel
and release it. Cruise control will be set to the desired speed.
Press the distance button 4 on the steering wheel repeatedly to
change the set distance between long, middle and short.
When a vehicle is not detected ahead of you in the lane, the set distanc\
e a nd set vehicle
speed indicator lights will illuminate 5 in set mode.
When a vehicle is detected ahead of you in the lane, the vehicle ahead d\
etection, set
distance and set vehicle speed indicator lights will illuminate 6 in set mode.
TO SET CONVENTIONAL FIXED SPEED CRUISE CONTROL MODE
While cruise control is off, press the CRUISE ON/OFF button 1 on the steering wheel and
hold it down for more than 1.5 seconds. The CRUISE indicator light will illuminate.
Accelerate to the desired speed.
Push down on the COAST/SET switch 3 on the steering wheel and release it. The SET
indicator light will illuminate. Cruise control should be set to the des\
ired speed.
TO SWITCH BETWEEN THE TWO CRUISE CONTROL MODES
When one of the two cruise modes is in use, you must turn the system off\
a nd then turn
it on again to select the other cruise control mode.
For more information, refer to the “Starting and driving (section 5)” of your Owner’s Manual.
3
1
4
2 5
6
Page 24 of 32
22
system guide
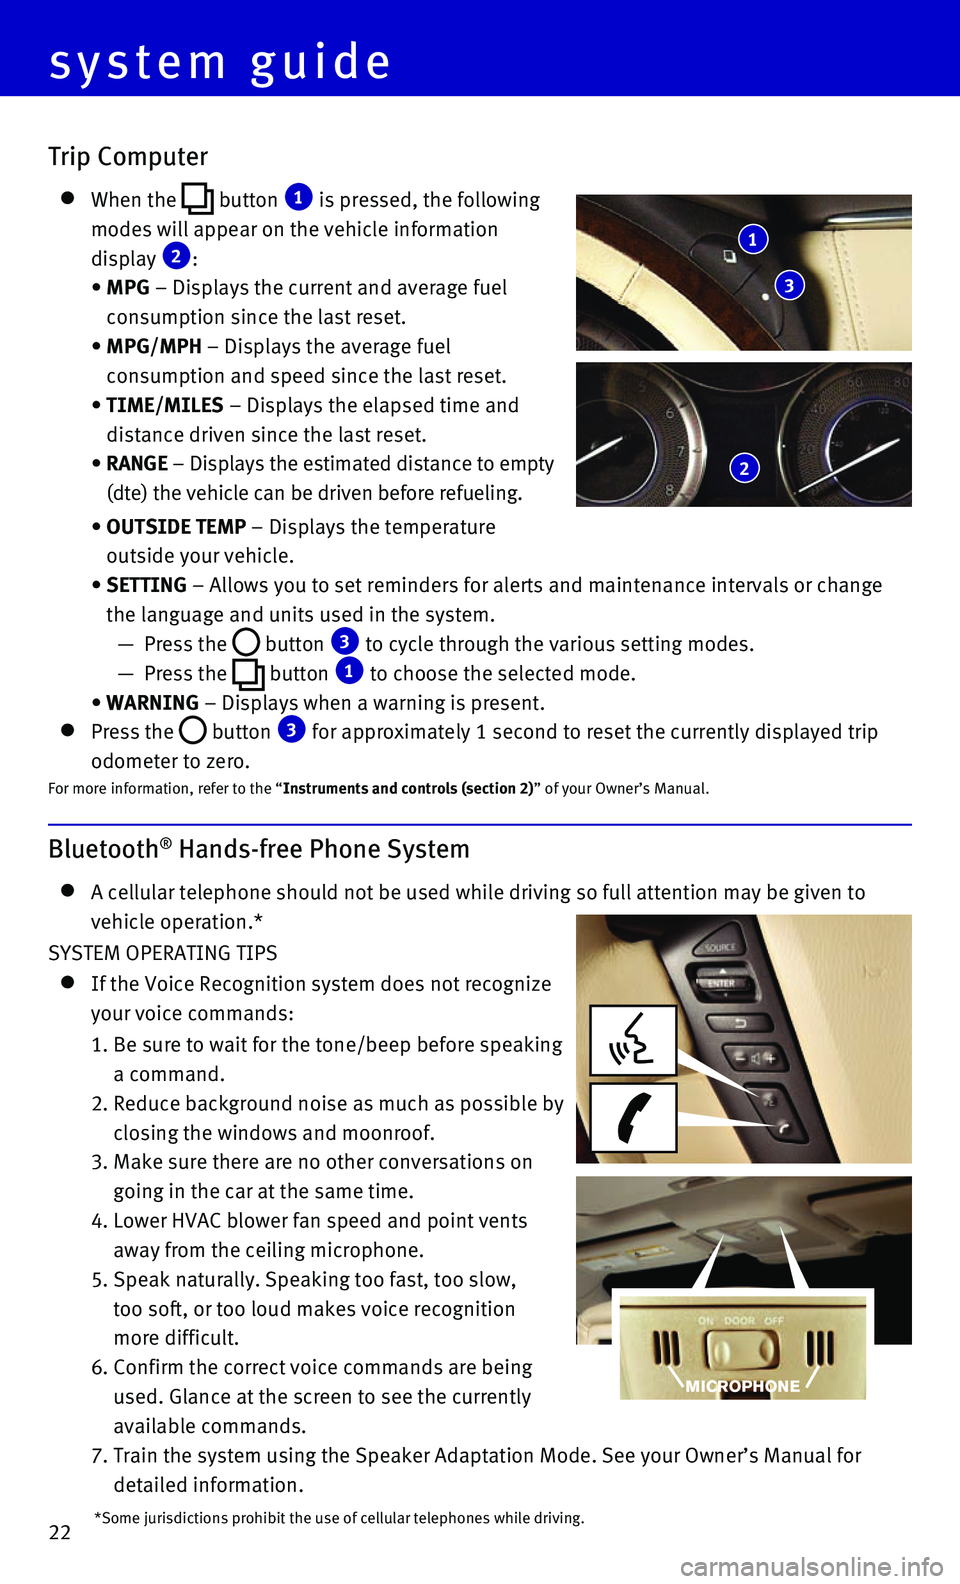
Bluetooth® Hands-free Phone System
A cellular telephone should not be used while driving so full attention \
may be given to
vehicle operation.*
SYSTEM OPERATING TIPS
If the Voice Recognition system does not recognize
your voice commands:
1. Be sure to wait for the tone/beep before speaking
a command.
2. Reduce background noise as much as possible by
closing the windows and moonroof.
3. Make sure there are no other conversations on
going in the car at the same time.
4. Lower HVAC blower fan speed and point vents
away from the ceiling microphone.
5. Speak naturally. Speaking too fast, too slow,
too soft, or too loud makes voice recognition
more difficult.
6. Confirm the correct voice commands are being
used. Glance at the screen to see the currently
available commands.
7. Train the system using the Speaker Adaptation Mode. See your Owner’s \
Manual for
detailed information.
Trip Computer
When the button 1 is pressed, the following
modes will appear on the vehicle information
display 2:
• MPG – Displays the current and average fuel
consumption since the last reset.
• MPG/MPH – Displays the average fuel
consumption and speed since the last reset.
• TIME/MILES – Displays the elapsed time and
distance driven since the last reset.
• RANGE – Displays the estimated distance to empty
(dte) the vehicle can be driven before refueling.
• OUTSIDE TEMP – Displays the temperature
outside your vehicle.
• SETTING – Allows you to set reminders for alerts and maintenance intervals o\
r change
the language and units used in the system.
— Press the button 3 to cycle through the various setting modes.
— Press the button 1 to choose the selected mode.
• WARNING – Displays when a warning is present.
Press the button 3 for approximately 1 second to reset the currently displayed trip
odometer to zero.For more information, refer to the “Instruments and controls (section 2)” of your Owner’s Manual.
1
3
2
*Some jurisdictions prohibit the use of cellular telephones while drivin\
g.
Page 25 of 32
23
Press the button on the steering wheel to interrupt the voice prompts at any time\
and
speak a command after the tone.
This system has an “Alternate Command Mode” setting that allows th\
e total number and
length of prompts to be reduced. When activated, you may speak second le\
vel commands
with the main menu command. For example, press the
button on the steering wheel,
and after the tone, say “Call” followed by a stored name. Refer to\
the “Voice recognition
(section 9)” of your Navigation System Owner’s Manual for more information.
The “Help” command can be used to hear a list of available command\
s at any time.
When speaking phonebook names, please be aware some cellular phones require the last
name to be spoken before the first name. For example, “Michael Smith”\
may be spoken as
“Smith Michael”.
To cancel a Voice Recognition session, simply wait 5 seconds, say “Ca\
ncel” or “Quit” or
press and hold the button on the steering wheel for 5 seconds.
For more detailed information and instructions, refer to your cellular p\
hone’s Owner’s
Manual and visit www.InfinitiUSA.com/bluetooth.
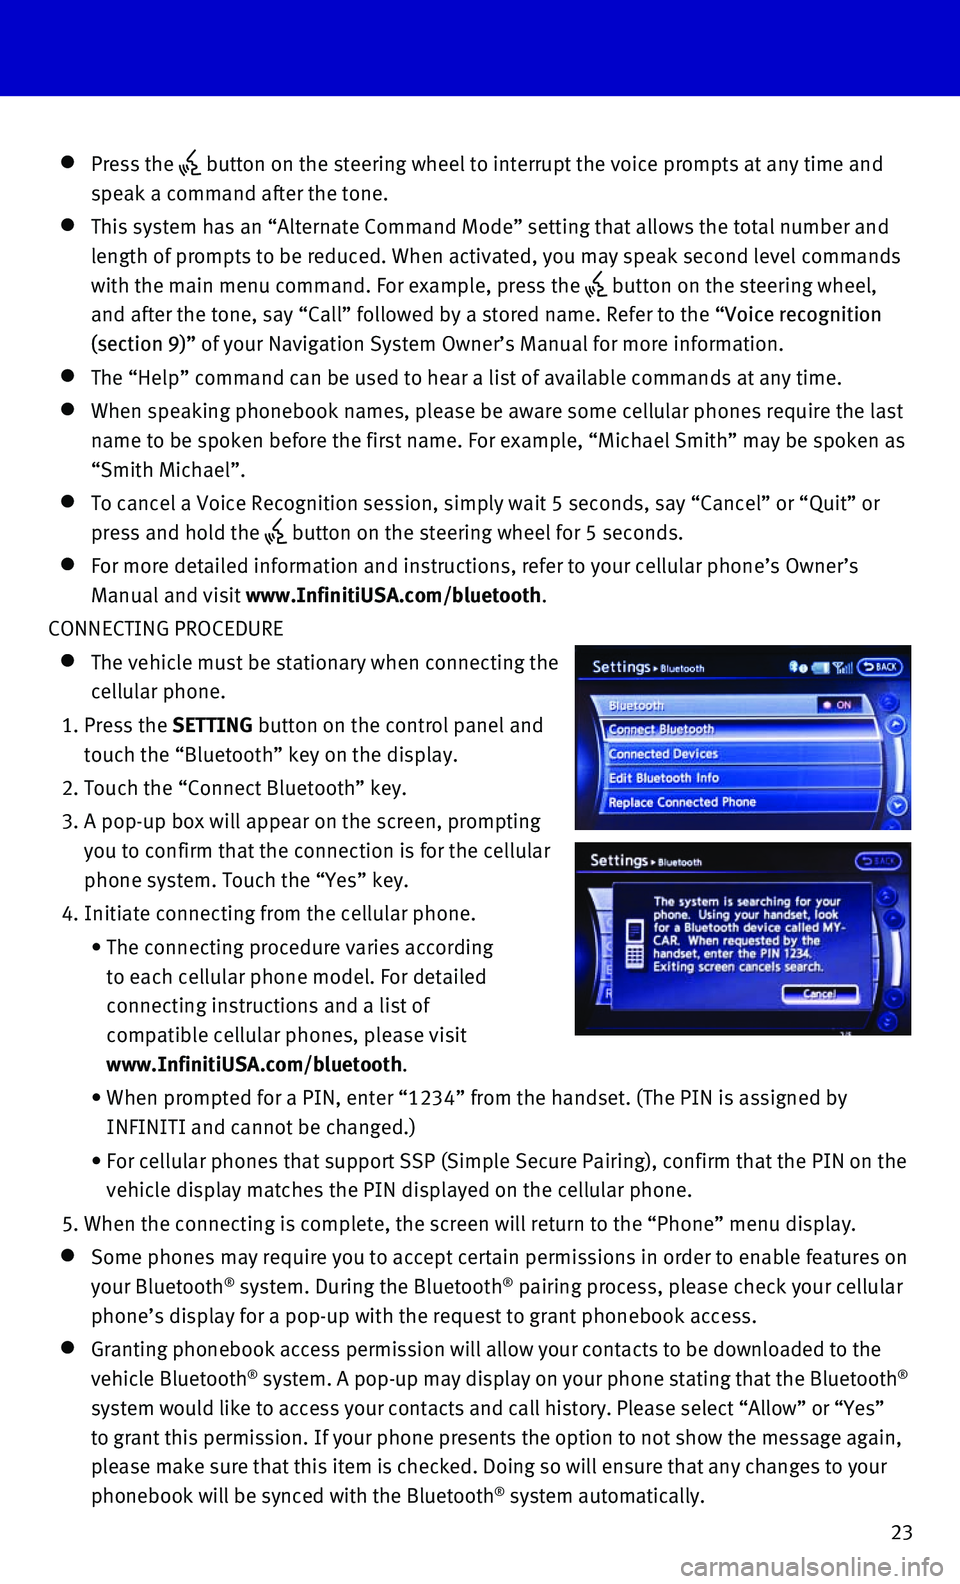
CONNECTING PROCEDURE
The vehicle must be stationary when connecting the
cellular phone.
1. Press the SETTING button on the control panel and
touch the “Bluetooth” key on the display.
2. Touch the “Connect Bluetooth” key.
3. A pop-up box will appear on the screen, prompting
you to confirm that the connection is for the cellular
phone system. Touch the “Yes” key.
4. Initiate connecting from the cellular phone.
• The connecting procedure varies according
to each cellular phone model. For detailed
connecting instructions and a list of
compatible cellular phones, please visit
www.InfinitiUSA.com/bluetooth.
• When prompted for a PIN, enter “1234” from the handset. (The PIN \
is assigned by
INFINITI and cannot be changed.)
• For cellular phones that support SSP (Simple Secure Pairing), confirm \
that the PIN on the
vehicle display matches the PIN displayed on the cellular phone.
5. When the connecting is complete, the screen will return to the “Phone\
” menu display.
Some phones may require you to accept certain permissions in order to en\
able features on
your Bluetooth® system. During the Bluetooth® pairing process, please check your cellular
phone’s display for a pop-up with the request to grant phonebook acce\
ss.
Granting phonebook access permission will allow your contacts to be down\
loaded to the
vehicle Bluetooth® system. A pop-up may display on your phone stating that the Bluetooth®
system would like to access your contacts and call history. Please selec\
t “Allow” or “Yes”
to grant this permission. If your phone presents the option to not show \
the message again,
please make sure that this item is checked. Doing so will ensure that an\
y changes to your
phonebook will be synced with the Bluetooth
® system automatically.