2016 INFINITI QX80 key
[x] Cancel search: keyPage 13 of 32
11
Front Seat Adjustments
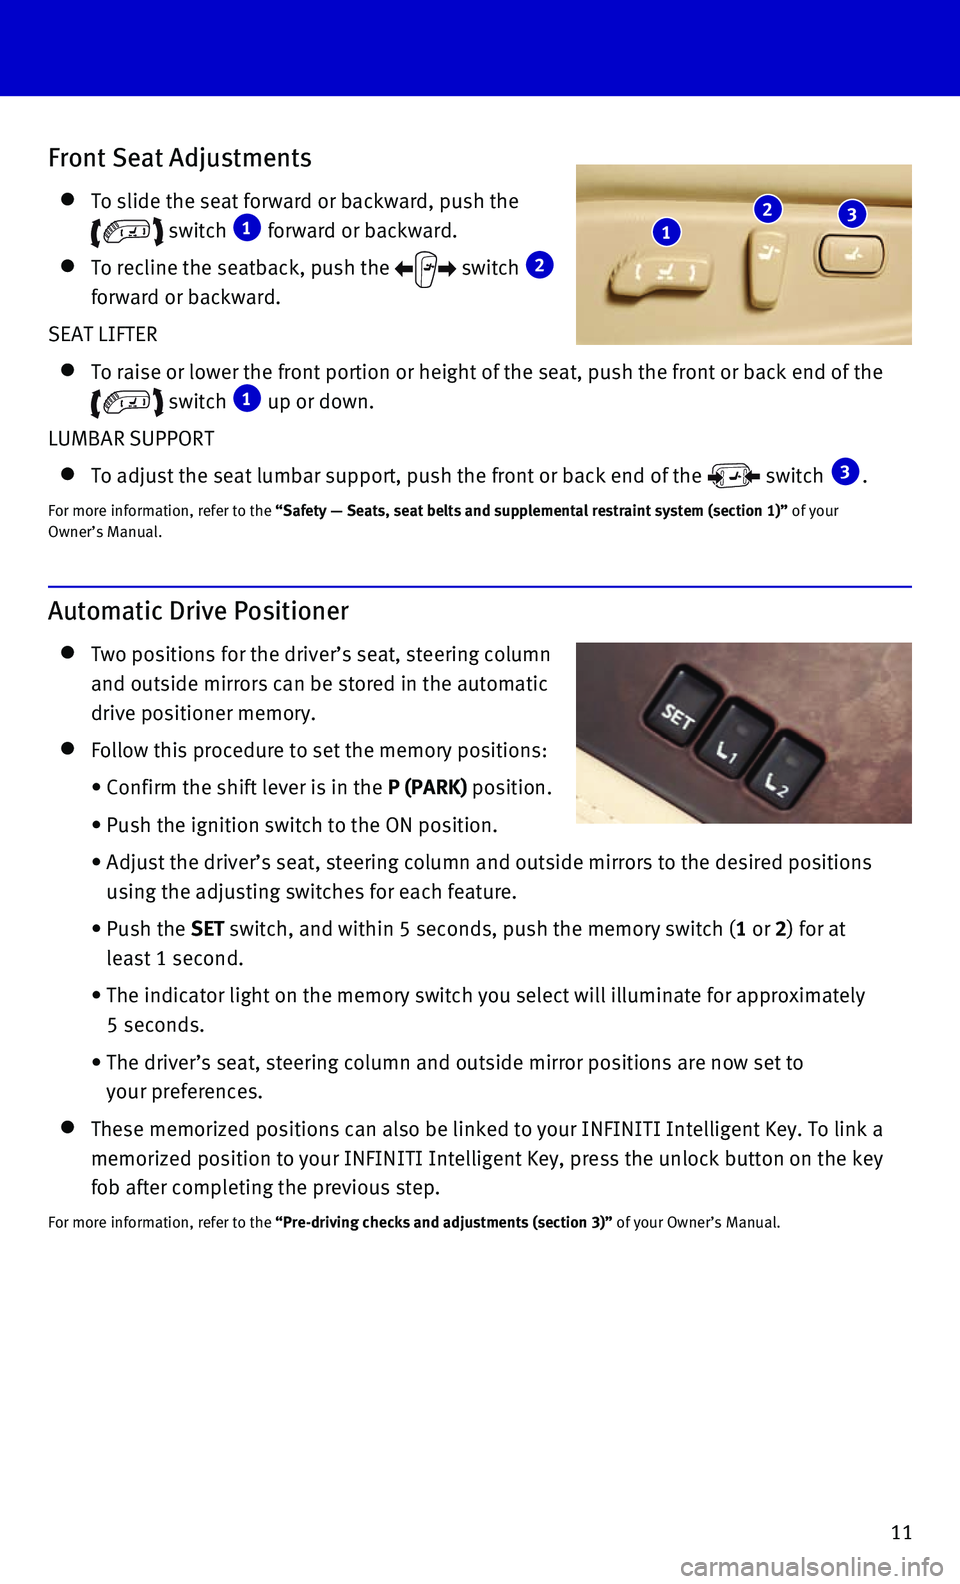
To slide the seat forward or backward, push the
switch 1 forward or backward.
To recline the seatback, push the switch 2
forward or backward.
SEAT LIFTER
To raise or lower the front portion or height of the seat, push the fron\
t or ba ck end of the
switch 1 up or down.
LUMBAR SUPPORT
To adjust the seat lumbar support, push the front or back end of the switch 3.
For more information, refer to the “Safety — Seats, seat belts and supplemental restraint system (s\
ection 1)” of your
Owner’s Manual.
1 2 3
Automatic Drive Positioner
Two positions for the driver’s seat, steering column
and outside mirrors can be stored in the automatic
drive positioner memory.
Follow this procedure to set the memory positions:
• Confirm the shift lever is in the P (PARK) position.
• Push the ignition switch to the ON position.
• Adjust the driver’s seat, steering column and outside mirrors to the \
desired positions
using the adjusting switches for each feature.
• Push the SET switch, and within 5 seconds, push the memory switch (1 or 2) for at
least 1 second.
• The indicator light on the memory switch you select will illuminate for \
approximately
5 seconds.
• The driver’s seat, steering column and outside mirror positions are n\
ow set to
your preferences.
These memorized positions can also be linked to your INFINITI Intelligen\
t Key. To link a
memorized position to your INFINITI Intelligent Key, press the unlock bu\
tton on the key
fob after completing the previous step.
For more information, refer to the “Pre-driving checks and adjustments (section 3)” of your Owner’s Manual.
Page 15 of 32

13
3rd Row Power Folding Seats
The 3rd row seats can be folded flat for maximum
cargo hauling or extra storage space.
Before folding down the 3rd row seats:
• Apply the parking brake.
• The shift lever must be in the P (PARK)
or N (NEUTRAL) position.
• Place the seat belt buckles in the storage of the
seat cushion 1 to avoid dropping them under
the seat cushion or causing damage to your
leather seats.
• Disconnect and secure the center seat belt and
tongues into the retractor base 2.
1. To release the seat belt connector tongue, insert
a suitable tool (a key, for example) into the
opening on the side of the connector buckle.
2. Retract the seat belt up to the retractor base
located in the rear ceiling storage area.
3. Insert the seat belt tongue into the fabric
sleeve so that it will lay flat.
4. Secure the connector tongue into the
retractor base.
5. Always reconnect the center seat belt when the
seat is returned to the upright position.
• Make sure that there are no objects on the
seat cushion.
• Lower the 3rd row head restraints.
To lower the seat, push and hold the front portion 3 of the right or left 3rd row power
folding seat switch.
To return the seat to an upright position, push the back portion 4 of the right or left 3rd
row power folding seat switch.
For more information, refer to the “Safety — Seats, seat belts and supplemental restraint system (sectio\
n 1) ” of
your Owner’s Manual.
1
2
3 4
Page 16 of 32

14
first drive features
Outside Mirror Control Switch
Move the control switch 1 right or left to select the
right or left side mirror.
Adjust each mirror to the desired position using the
switch 2.
Move the switch 1 to the center (neutral) position
to prevent accidentally moving the mirror.
POWER FOLDING OUTSIDE MIRRORS
To fold the outside rearview mirrors, push the switch 3 to the position. To unfold
the outside rearview mirrors, push the switch
3 to the position.
If the mirrors are manually operated or bumped, the mirror body can beco\
m e loose at the
pivot point.
To correct the electronic mirror operation, cycle mirrors by pushing the\
out side rearview
mirror folding switch 3 to the position until it is completely closed, then push the
switch 3 to the position until the mirror is completely open.
REVERSE TILT-DOWN FEATURE
When backing up the vehicle, the right or left outside mirror will turn \
down ward
automatically to provide better rear visibility.
1. Push the ignition switch to the ON position.
2. Move the shift lever to the R (REVERSE) position.
3. Choose the right or left outside mirror by operating the outside mirror \
control switch 1.
4. The outside mirror surface will move downward.
When one of the following conditions has occurred, the outside mirror su\
rf ace will return
to its original position:
• The shift lever is moved to any position other than R (REVERSE).
• The outside mirror control switch 1 is set to the center (neutral) position.
• The ignition switch is pushed to the OFF position.
For more information, refer to the “Pre-driving checks and adjustments (section 3)” of your Owner’s Manual.
Starting/Stopping the Engine
It is important to make sure the INFINITI Intelligent
Key is with you (that is, in your pocket or purse).
Depress the brake pedal.
Press the ignition switch START/STOP button to
start the engine.
TURNING THE ENGINE OFF
Move the shift lever to the P (PARK) position and apply the parking brake.
Press the ignition switch START/STOP button to turn the engine off.
For more information, refer to the “Starting and driving (section 5)” of your Owner’s Manual.
1
2
3
Page 25 of 32
23
Press the button on the steering wheel to interrupt the voice prompts at any time\
and
speak a command after the tone.
This system has an “Alternate Command Mode” setting that allows th\
e total number and
length of prompts to be reduced. When activated, you may speak second le\
vel commands
with the main menu command. For example, press the
button on the steering wheel,
and after the tone, say “Call” followed by a stored name. Refer to\
the “Voice recognition
(section 9)” of your Navigation System Owner’s Manual for more information.
The “Help” command can be used to hear a list of available command\
s at any time.
When speaking phonebook names, please be aware some cellular phones require the last
name to be spoken before the first name. For example, “Michael Smith”\
may be spoken as
“Smith Michael”.
To cancel a Voice Recognition session, simply wait 5 seconds, say “Ca\
ncel” or “Quit” or
press and hold the button on the steering wheel for 5 seconds.
For more detailed information and instructions, refer to your cellular p\
hone’s Owner’s
Manual and visit www.InfinitiUSA.com/bluetooth.
CONNECTING PROCEDURE
The vehicle must be stationary when connecting the
cellular phone.
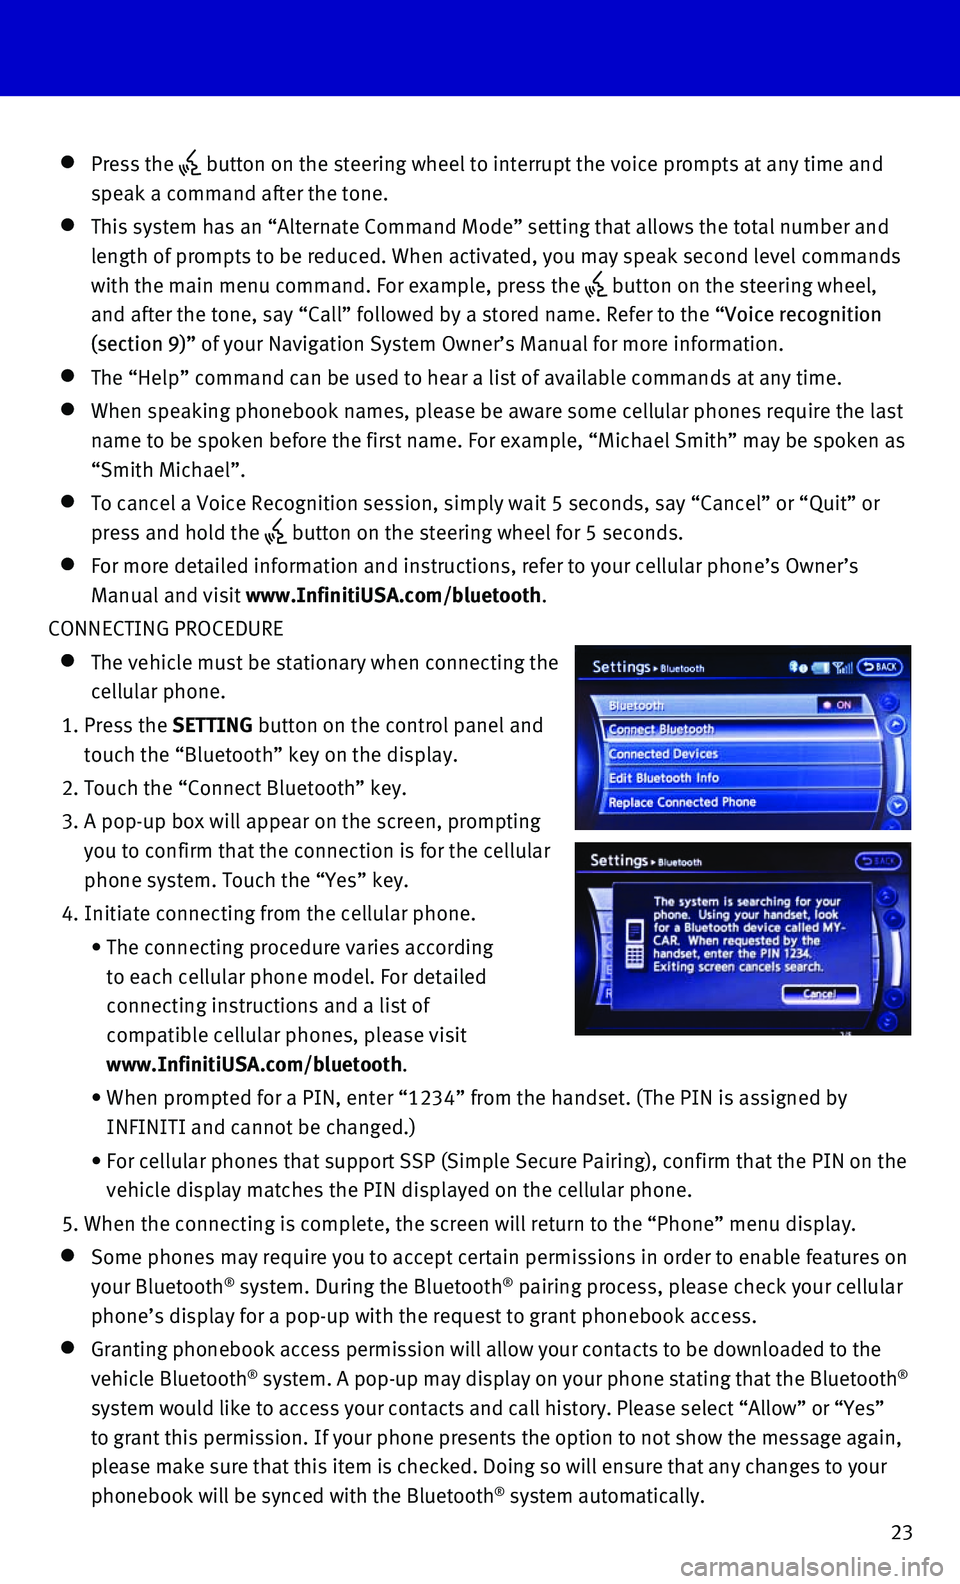
1. Press the SETTING button on the control panel and
touch the “Bluetooth” key on the display.
2. Touch the “Connect Bluetooth” key.
3. A pop-up box will appear on the screen, prompting
you to confirm that the connection is for the cellular
phone system. Touch the “Yes” key.
4. Initiate connecting from the cellular phone.
• The connecting procedure varies according
to each cellular phone model. For detailed
connecting instructions and a list of
compatible cellular phones, please visit
www.InfinitiUSA.com/bluetooth.
• When prompted for a PIN, enter “1234” from the handset. (The PIN \
is assigned by
INFINITI and cannot be changed.)
• For cellular phones that support SSP (Simple Secure Pairing), confirm \
that the PIN on the
vehicle display matches the PIN displayed on the cellular phone.
5. When the connecting is complete, the screen will return to the “Phone\
” menu display.
Some phones may require you to accept certain permissions in order to en\
able features on
your Bluetooth® system. During the Bluetooth® pairing process, please check your cellular
phone’s display for a pop-up with the request to grant phonebook acce\
ss.
Granting phonebook access permission will allow your contacts to be down\
loaded to the
vehicle Bluetooth® system. A pop-up may display on your phone stating that the Bluetooth®
system would like to access your contacts and call history. Please selec\
t “Allow” or “Yes”
to grant this permission. If your phone presents the option to not show \
the message again,
please make sure that this item is checked. Doing so will ensure that an\
y changes to your
phonebook will be synced with the Bluetooth
® system automatically.
Page 26 of 32
24 PHONEBOOK SETUP
Depending on your cellular phone, the system may
automatically download your cellular phone’s entire
phonebook to the vehicle’s Bluetooth® system.
If the phonebook does not download automatically,
1,000 entries can be individually downloaded.
To manually download entries:
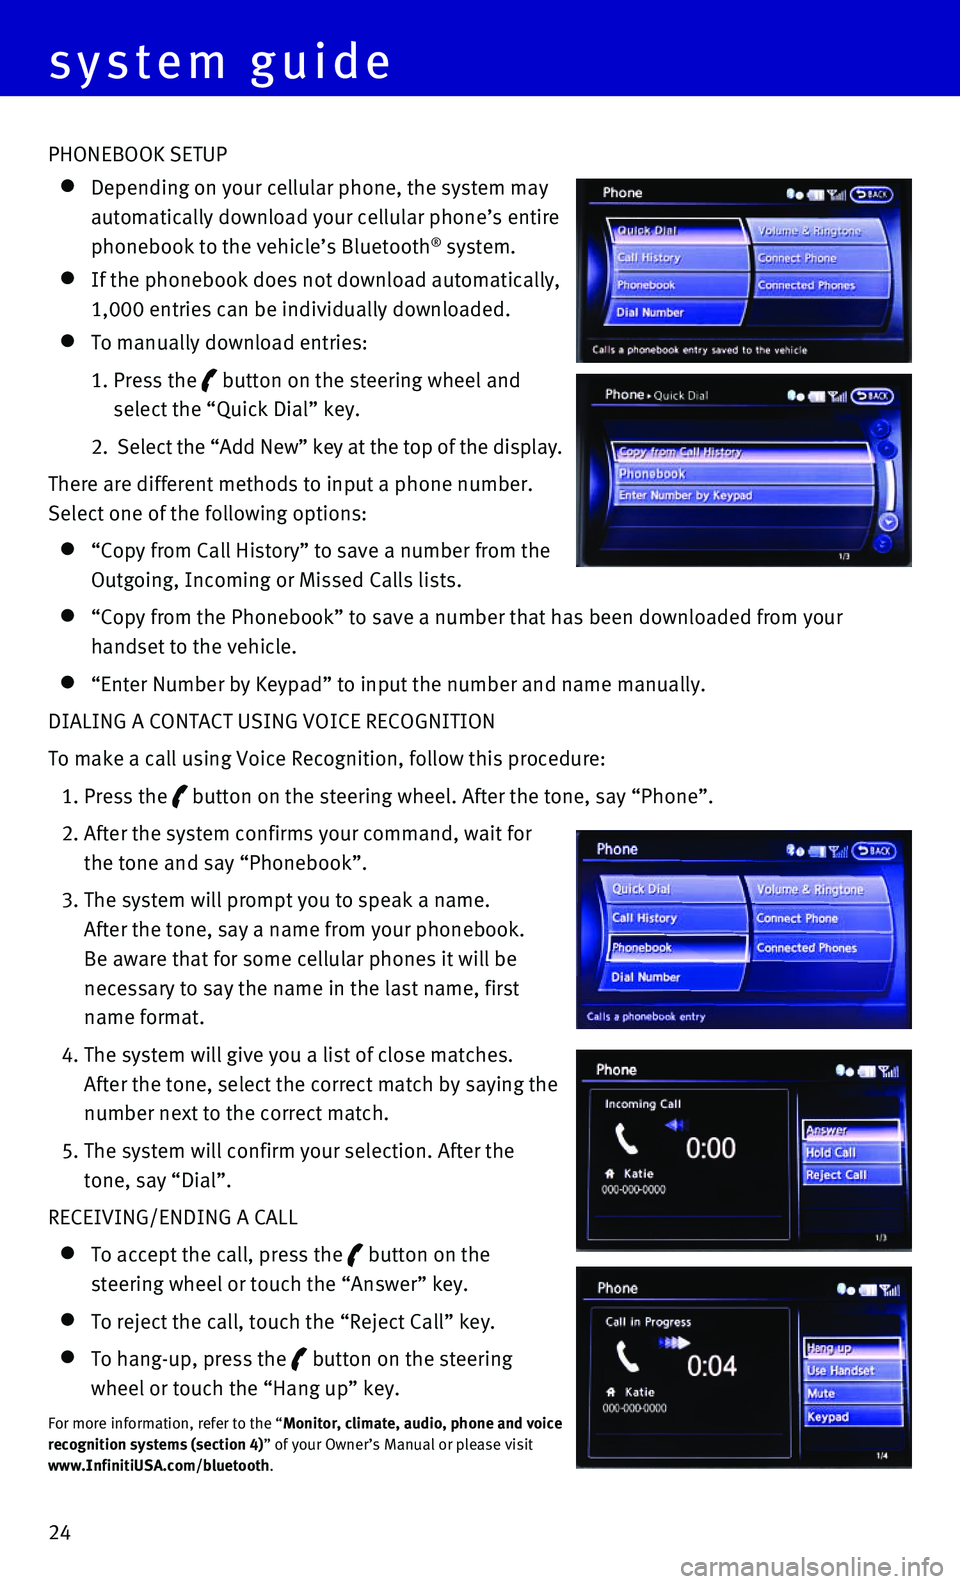
1. Press the button on the steering wheel and
select the “Quick Dial” key.
2. Select the “Add New” key at the top of the display.
There are different methods to input a phone number.
Select one of the following options:
“Copy from Call History” to save a number from the
Outgoing, Incoming or Missed Calls lists.
“Copy from the Phonebook” to save a number that has been downloade\
d from your
handset to the vehicle.
“Enter Number by Keypad” to input the number and name manually.
DIALING A CONTACT USING VOICE RECOGNITION
To make a call using Voice Recognition, follow this procedure:
1. Press the button on the steering wheel. After the tone, say “Phone”.
2. After the system confirms your command, wait for
the tone and say “Phonebook”.
3. The system will prompt you to speak a name.
After the tone, say a name from your phonebook.
Be aware that for some cellular phones it will be
necessary to say the name in the last name, first
name format.
4. The system will give you a list of close matches.
After the tone, select the correct match by saying the
number next to the correct match.
5. The system will confirm your selection. After the
tone, say “Dial”.
RECEIVING/ENDING A CALL
To accept the call, press the button on the
steering wheel or touch the “Answer” key.
To reject the call, touch the “Reject Call” key.
To hang-up, press the button on the steering
wheel or touch the “Hang up” key.
For more information, refer to the “Monitor, climate, audio, phone and voice
recognition systems (section 4)” of your Owner’s Manual or please visit
www.InfinitiUSA.com/bluetooth.
system guide
Page 27 of 32
25
Bluetooth® Streaming Audio
If you have a compatible Bluetooth® device with streaming audio (A2DP and AVRCP
profiles), you can set up the wireless connection between your Bluetoot\
h® device and your
vehicle’s audio system. This connection allows you to listen to audio\
from the Bluetooth®
device using your vehicle’s speakers.
A cellular telephone should not be used while driving so full attention \
may be given to
vehicle operation.*
To use your connected Bluetooth® device to
stream audio, it will need to be connected as an
audio device. The following procedure will initially
connect a Bluetooth
® device as an audio player and
allow you to switch between devices.
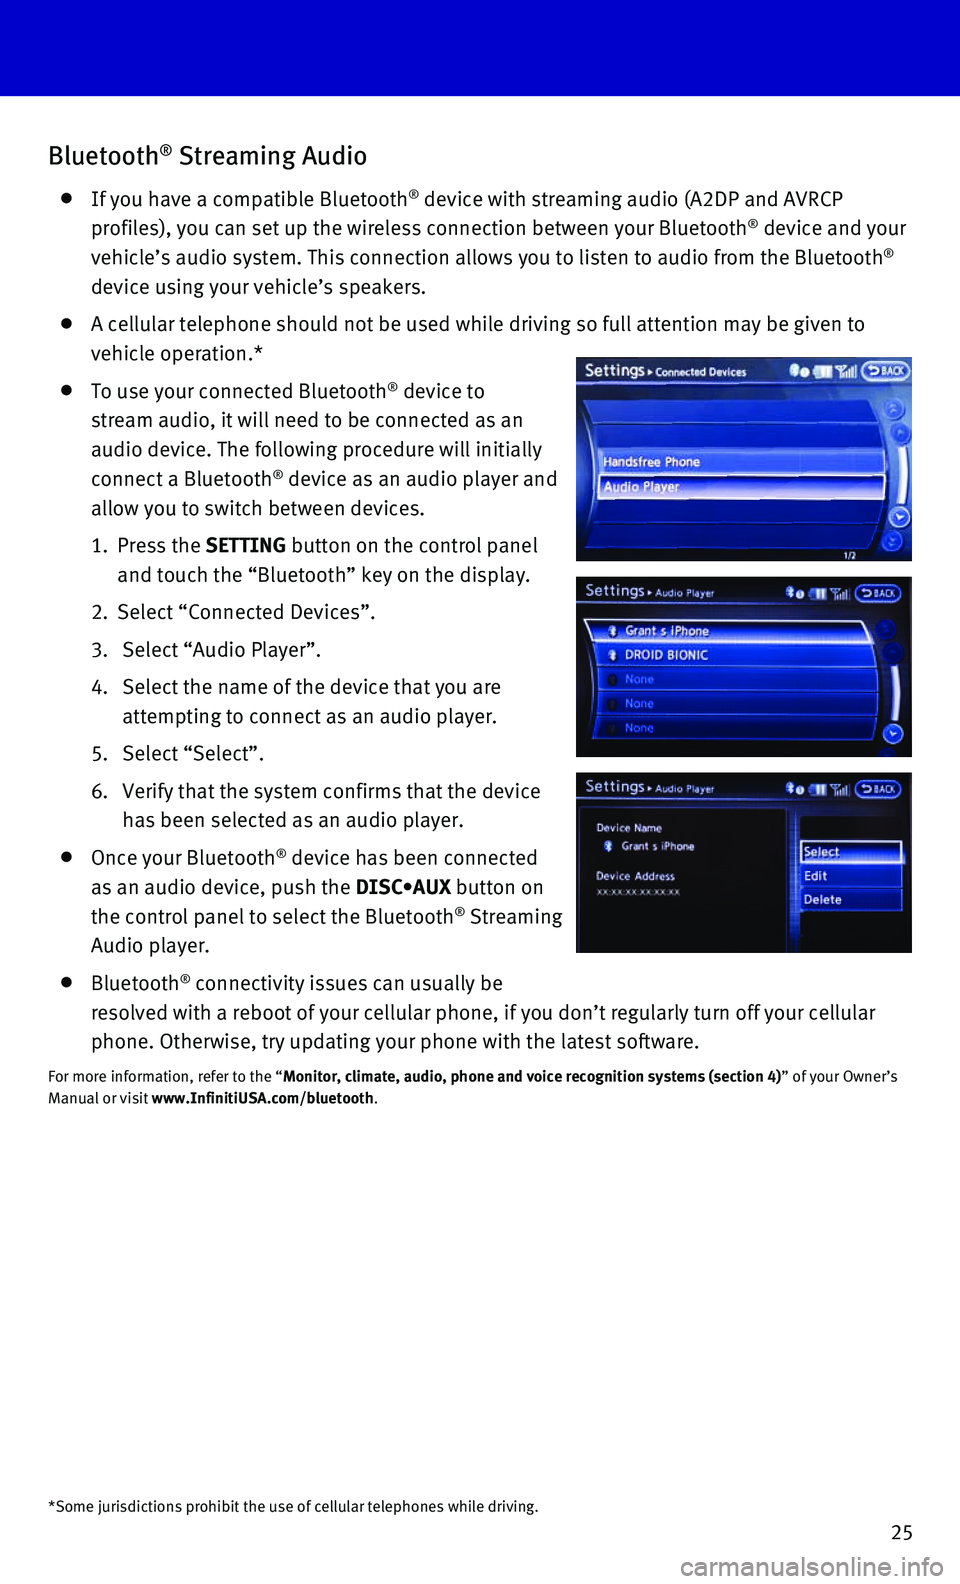
1. Press the SETTING button on the control panel
and touch the “Bluetooth” key on the display.
2. Select “Connected Devices”.
3. Select “Audio Player”.
4. Select the name of the device that you are
attempting to connect as an audio player.
5. Select “Select”.
6. Verify that the system confirms that the device
has been selected as an audio player.
Once your Bluetooth® device has been connected
as an audio device, push the DISC•AUX button on
the control panel to select the Bluetooth
® Streaming
Audio player.
Bluetooth® connectivity issues can usually be
resolved with a reboot of your cellular phone, if you don’t regularly\
turn off your cellular
phone. Otherwise, try updating your phone with the latest software.
For more information, refer to the “Monitor, climate, audio, phone and voice recognition systems (section 4\
) ” of your Owner’s
Manual or visit www.InfinitiUSA.com/bluetooth.
*Some jurisdictions prohibit the use of cellular telephones while drivin\
g.
Page 28 of 32
26
Navigation System
Your Navigation System can calculate a route from your current location \
to a preferred
destination. The real-time map display and turn-by-turn voice guidance w\
ill lead you along
the route.
The Navigation System will continually update your vehicle’s position\
. If you have deviated
from the original route, it will recalculate the route from your current\
location.
SYSTEM OPERATION
Move through the menus and on-screen keys by sliding or rotating the INF\
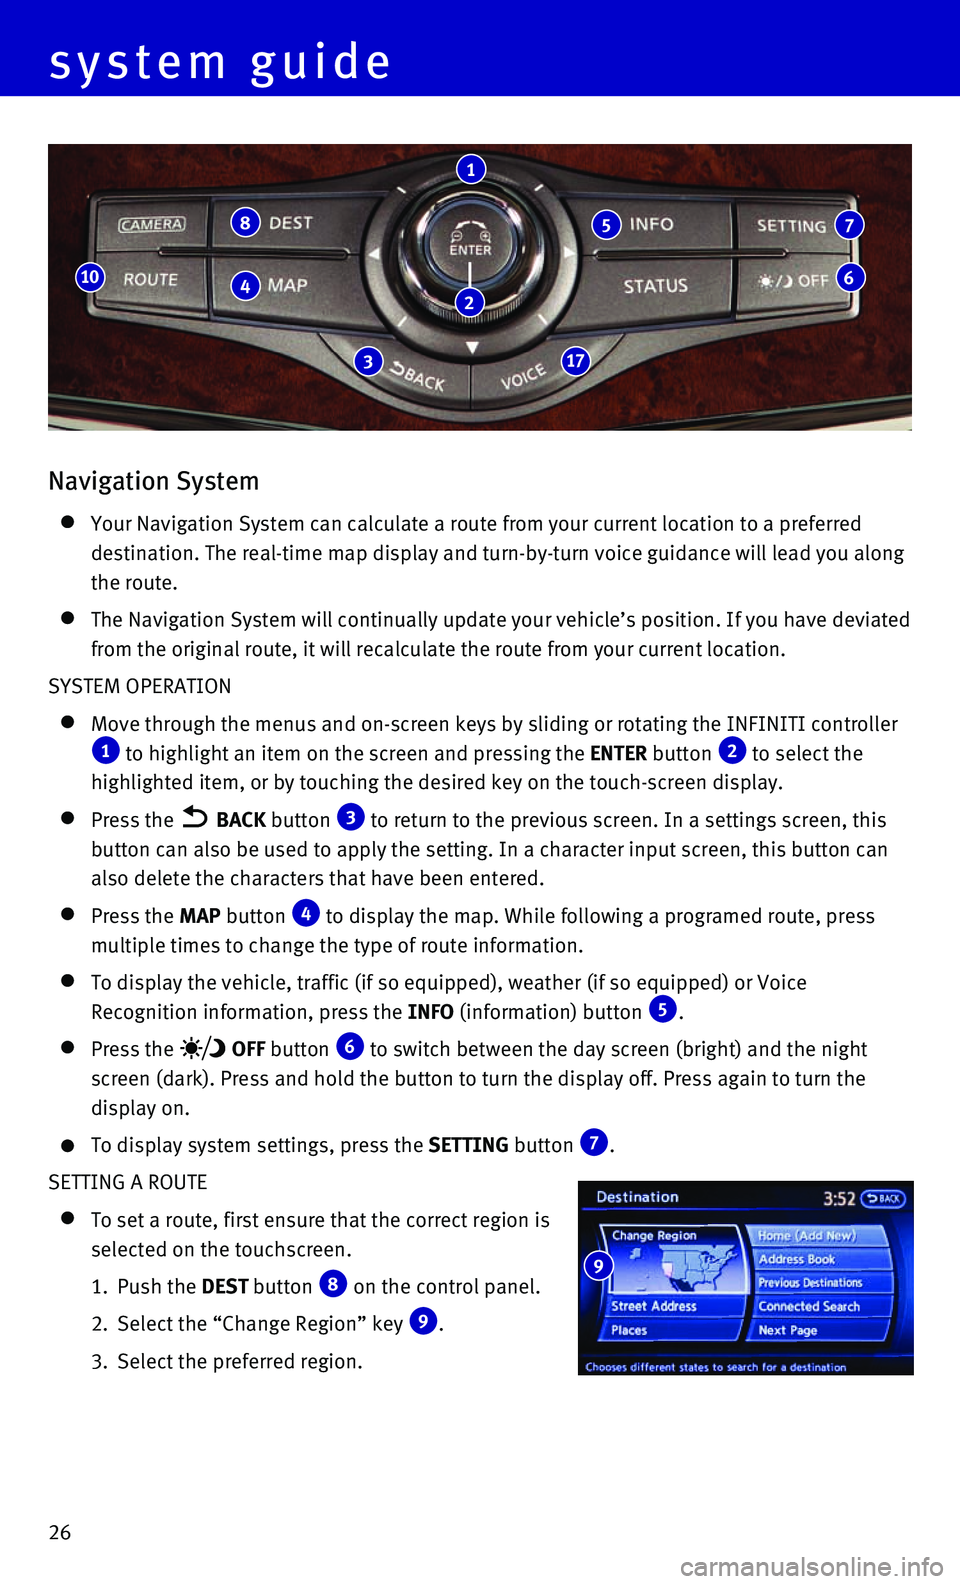
INITI controller 1 to highlight an item on the screen and pressing the ENTER button 2 to select the
highlighted item, or by touching the desired key on the touch-screen dis\
play.
Press the BACK button 3 to return to the previous screen. In a settings screen, this
button can also be used to apply the setting. In a character input scree\
n, this button can
also delete the characters that have been entered.
Press the MAP button 4 to display the map. While following a programed route, press
multiple times to change the type of route information.
To display the vehicle, traffic (if so equipped), weather (if so equi\
pped) or Voice
Recognition information, press the INFO (information) button 5.
Press the OFF button 6 to switch between the day screen (bright) and the night
screen (dark). Press and hold the button to turn the display off. Pres\
s again to turn the
display on.
To display system settings, press the SETTING button 7.
SETTING A ROUTE
To set a route, first ensure that the correct region is
selected on the touchscreen.
1. Push the DEST button 8 on the control panel.
2. Select the “Change Region” key 9.
3. Select the preferred region.
8
4
317
10
1
5 7
6
system guide
9
2
Page 29 of 32
27
Once this is complete, select your destination:
1. Push the DEST button 8 on the control panel.
2. Select the preferred destination setting method.
3. Enter the address number, street name, and city as prompted by the scree\
n.
CANCELLING A ROUTE
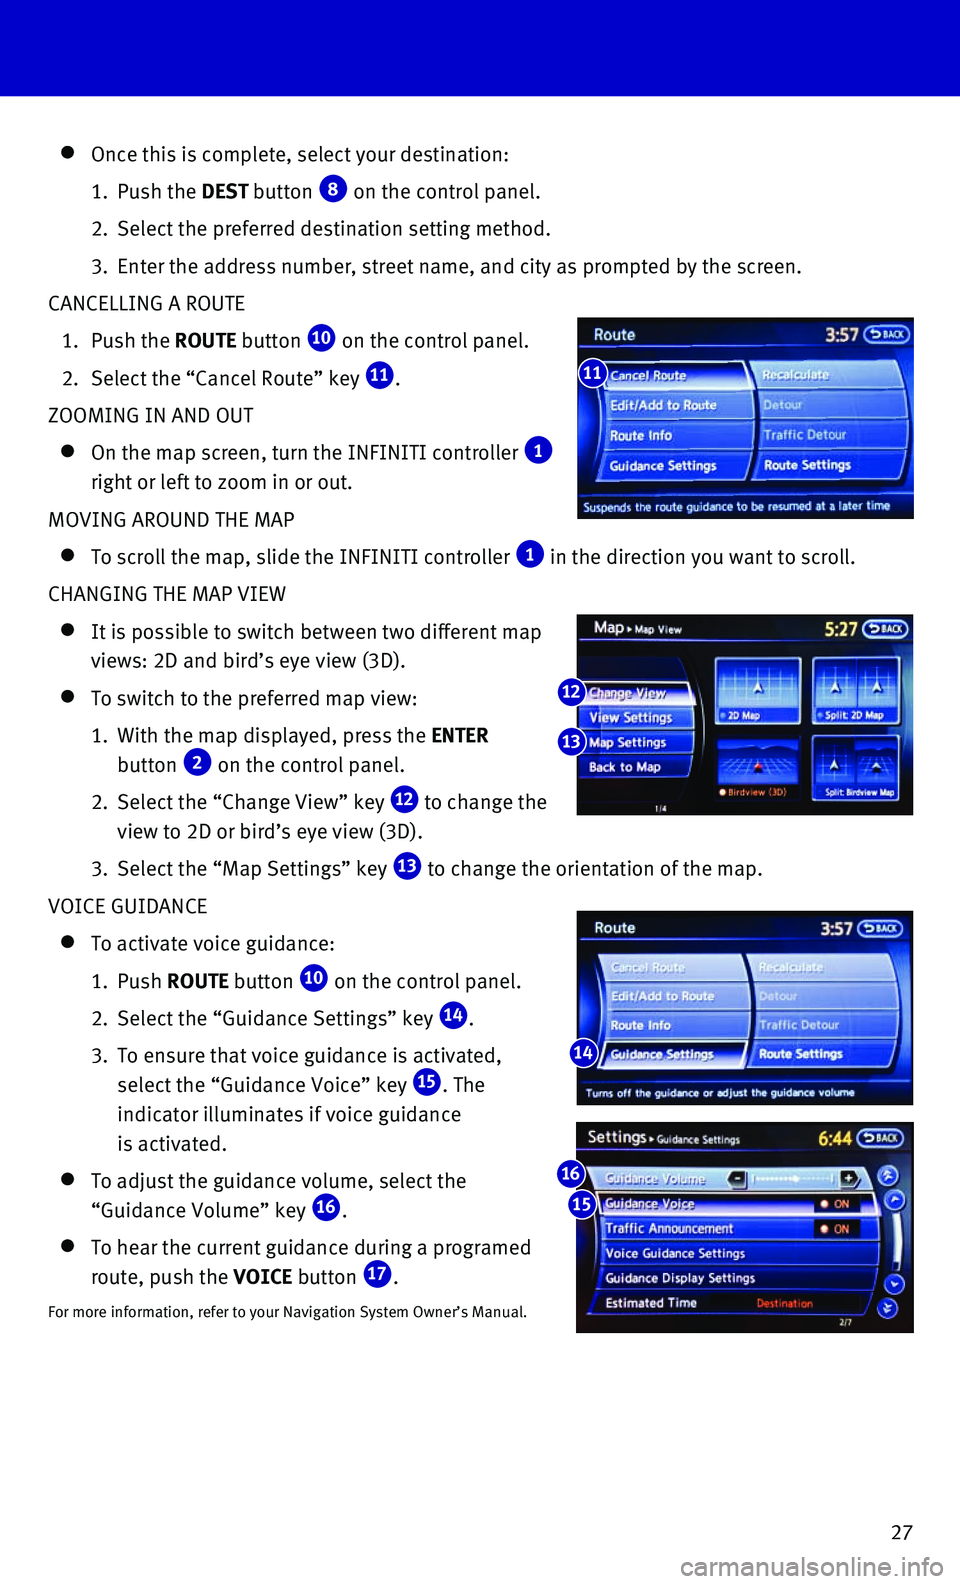
1. Push the ROUTE button 10 on the control panel.
2. Select the “Cancel Route” key 11.
ZOOMING IN AND OUT
On the map screen, turn the INFINITI controller 1
right or left to zoom in or out.
MOVING AROUND THE MAP
To scroll the map, slide the INFINITI controller 1 in the direction you want to scroll.
CHANGING THE MAP VIEW
It is possible to switch between two different map
views: 2D and bird’s eye view (3D).
To switch to the preferred map view:
1. With the map displayed, press the ENTER
button 2 on the control panel.
2. Select the “Change View” key 12 to change the
view to 2D or bird’s eye view (3D).
3. Select the “Map Settings” key 13 to change the orientation of the map.
VOICE GUIDANCE
To activate voice guidance:
1. Push ROUTE button 10 on the control panel.
2. Select the “Guidance Settings” key 14.
3. To ensure that voice guidance is activated,
select the “Guidance Voice” key 15. The
indicator illuminates if voice guidance
is activated.
To adjust the guidance volume, select the
“Guidance Volume” key 16.
To hear the current guidance during a programed
route, push the VOICE button 17.
For more information, refer to your Navigation System Owner’s Manual.\
11
14
12
13
15
16