Page 25 of 37
 wheels off the ground or
that a dolly be used as illustrated. • Never tow with the rear wheels o")
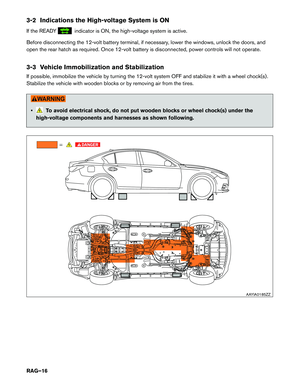
4-3.2 Towing Guidelines
Infiniti
strongly recommends that Q50 HYBRID be towed with the driving (rear) wheels off the ground or
that a dolly be used as illustrated. • Never tow with the rear wheels on the ground or four (4) wheels on the ground (forward
or
backward) , as this may cause serious and expensive damage to the motor.
• Never tow AWD models with any of the wheels on the ground as this may cause serious and expensive damage to the powertrain.
• Transport the vehicle only after turning the ignition switch OFF.
• Safety chains or cables must be attached only to the vehicle recovery hook or main structural members of the vehicle. Otherwise, the vehicle body will be damaged.
• Do not use the vehicle tie down hook to free a vehicle stuck in sand, snow, mud, etc.
• Never tow a vehicle using the vehicle tie down hook or recovery hook.
• Always pull the cable straight out from the front of the vehicle. Never pull on the vehicle at an angle.
• Pulling devices should be routed so they do not touch any part of the suspension, steering, brake, high-voltage or cooling systems.
• Pulling devices such as ropes or canvas straps are not recommended for use in vehicle towing or recovery.
RAG–25
Page 26 of 37
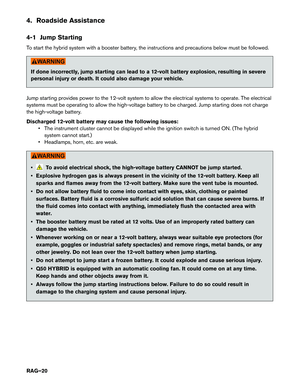
Perform vehicle towing by holding up drive (rear) wheels or on flatbed in order to prevent secondary
damage
from voltage generated by the motor. In addition, turn the ignition switch OFF when towing the
vehicle. Refer to the following illustrations:
2WD models
AWD models
NOTE:
It is also permissible to transport the Q50 facing rearward on a flatbed. If the vehicle cannot be
placed in Neutral, a P (Park) release procedure may be required. Refer to 4-1.2 Shift Selector
Lever
Lock Release (RAG–22) . AAYIA0402ZZ
AAYIA0414ZZ
RAG–26
Page 27 of 37

4-3.3 Use of Vehicle Equipped Hooks for Recovery Operations
Front
:1. Using a suitable tool wrapped with a protective cloth, remove the recovery hook cover from the bumper.
2. Securely install the recovery hook as illustrated. The recovery hook is located in the tool kit in the trunk area. Failure to securely install the recovery hook may result
in
serious personal injury or death and/or vehicle
damage.
3. Attach the winch cable securely to the recovery hook. Failure to securely attach the winch cable to the recovery hook may result in serious
personal
injury or death and/or vehicle damage.
4. Make sure the winch cable remains fully connected to the recovery hook and does not interfere with surrounding area, take up the slack from the cable.
5. Release the parking brake.
6. Place the selector lever in the N (Neutral) position. Refer to 4-1.2 Shift Selector Lever Lock
Release
(RAG–22) .
7.
Carefully pull the vehicle onto the flatbed.
8. Be careful not to pull the vehicle too close to the winch. Doing so will cause excessive downward force being
applied to the recovery hook. Too much downward force
may result in vehicle damage. Lower the flatbed and
finish rolling the vehicle forward if necessary. 1
AAYIA0415ZZ AAYIA0397ZZ
AAYIA0399ZZ
RAG–27
Page 28 of 37

9. Secure the vehicle to the flatbed by using wheel baskets
at all 4 wheel positions.
10. Make sure that the vehicle recovery hook is properly secured in its original position after use and the recovery
hook cover has been reinstalled properly.
NOTE:
To help prevent squeaks and rattles, check that
the tools are reinstalled and properly secured
in the stored place after use.
Rear Tie Down Hook:
The recovery hook is located in the tool kit in the trunk area.
Do not use the rear tie down hook for towing or vehicle recovery.
1. Using a suitable tool wrapped with a protective cloth,remove the recovery hook cover from the bumper.
2. Securely install the recovery hook (1) as illustrated.
3. Make sure that the vehicle recovery hook is properly secured in its original position after use and the recovery
hook cover has been reinstalled properly.
NOTE:
To help prevent squeaks and rattles, check that
the tools are reinstalled and properly secured
in the stored place after use. AAYIA0396ZZ
AAYIA0400ZZ
1
AAYIA0416ZZ
RAG–28
Page 29 of 37

4-4 Jacking Up the Vehicle and Changing a Tire
The
Q50 is factory equipped with run-flat tires. It is not equipped with a jack or spare tire as standard
equipment. However, the following jacking instructions apply when using the optional Infiniti jack. Always follow these instructions when jacking up the vehicle and changing a tire:
•
Never change a tire when the vehicle is on a slope, ice or slippery areas. Jack must be on
level ground.
• Make sure the parking brake is securely applied and shift selector is in P (Park) position.
• Never get under the vehicle while it is supported only by the jack. If it is necessary to work under the vehicle, support it with safety stands.
• Use the correct jack-up points. Never use any other part of the vehicle for jack support.
• Never jack up the vehicle more than necessary.
• Never use blocks on or under the jack.
• Do not start or run the engine while vehicle is on the jack. It may cause the vehicle to move. This is especially true for vehicles with limited slip differentials.
• Do not allow passengers to stay in the vehicle while it is on the jack.
• Never run the engine with a wheel(s) off the ground. It may cause the vehicle to move.
• Be sure to block the wheel diagonally opposite the wheel being removed as the vehicle may move and result in personal injury.
Failure to follow these instructions can result in serious personal injury or death and/or
vehicle damage.
1. Place the jack directly under the jack-up point as illustrated so the top of the jack contacts the
vehicle at the jack-up point. Align the jack head between the two notches in the front or the rear
as shown. Also fit the groove of the jack head between the notches as shown. The jack
should be used on level firm ground.
2. Loosen each wheel nut one or two turns by turning it counterclockwise with the wheel nut wrench. Do not remove the wheel nuts until the tire is off the ground. AAYIA0403ZZ
RAG–29
Page 30 of 37

3. To lift the vehicle, securely hold the jack lever and rod with both hands as shown. Carefully raise
the vehicle until the tire clears the ground. Remove the wheel nuts, and then remove the tire.
4. Install new or repaired tire and hand-tighten the wheel nuts with the wheel nut wrench in an alternating pattern. Always follow these instructions when changing a tire:
•
Incorrect wheel nuts or improperly tightened wheel
nuts can cause the wheel to become loose or come
off. This could cause an accident.
• Do not use oil or grease on the wheel studs or nuts. This could cause the nuts to become loose.
Failure to follow these instructions can result in serious
personal injury or death and/or vehicle damage.
5. Securely torque the wheel nuts in an alternating pattern to 80 ft-lb (108 Nm) .
6. Lower the vehicle and remove the jack and securely store the flat tire, tools and jackingequipment in the vehicle. Always follow these instructions when using the jacking equipment or after changing a tire:
•
Always make sure that the spare tire and jacking equipment are properly secured after
use. Such items can become dangerous projectiles in an accident or sudden stop.
Failure to follow these instructions can result in serious personal injury or death and/or
vehicle damage.
NOTE:
To help prevent squeaks and rattles, check that the tools are reinstalled and properly secured
in the stored place after use. AAYIA0136ZZ
B
EC DA
AAYIA0137ZZ
RAG–30
Page 31 of 37
5. Storing the Vehicle
The service plug must be removed to shut down the high-voltage system for storage.
Do
not store a vehicle inside a structure. Keep the vehicle away from other vehicles if the
high-voltage battery is severely damaged. There is possibility of delayed fire from a severely
damaged high-voltage battery.
5-1 Danger Sign Example
If the Q50 HYBRID needs to be stored or left unattended, the high-voltage system must be shut down by
removing the service plug [refer to 5-2 Remove Service Plug (RAG–33)] and a sign put on the vehicle indi-
cating
it is a hybrid vehicle with high-voltage dangers. For example:
RAG–31
Page 32 of 37


 wheels or on flatbed in order to prevent secondary
damage
from voltage generated by the motor. In addition, turn the ignition switch OFF when towing t")

