Page 163 of 406

Features of your vehicle
86 4
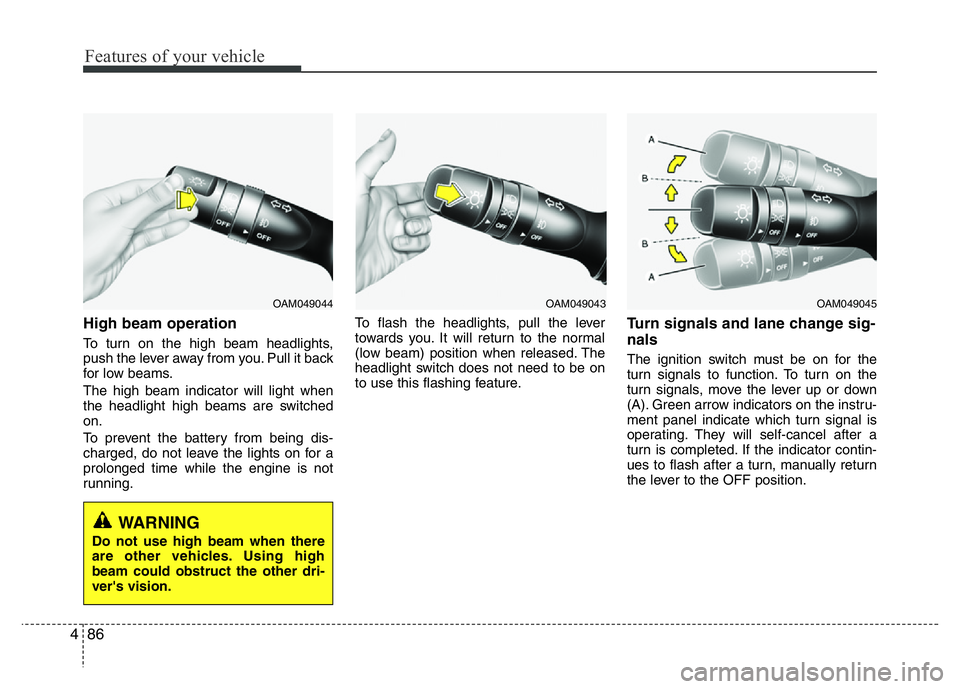
High beam operation
To turn on the high beam headlights,
push the lever away from you. Pull it back
for low beams.
The high beam indicator will light when
the headlight high beams are switched
on.
To prevent the battery from being dis-
charged, do not leave the lights on for a
prolonged time while the engine is not
running.To flash the headlights, pull the lever
towards you. It will return to the normal
(low beam) position when released. The
headlight switch does not need to be on
to use this flashing feature.
Turn signals and lane change sig-
nals
The ignition switch must be on for the
turn signals to function. To turn on the
turn signals, move the lever up or down
(A). Green arrow indicators on the instru-
ment panel indicate which turn signal is
operating. They will self-cancel after a
turn is completed. If the indicator contin-
ues to flash after a turn, manually return
the lever to the OFF position.
OAM049043OAM049044
WARNING
Do not use high beam when there
are other vehicles. Using high
beam could obstruct the other dri-
ver's vision.
OAM049045
Page 164 of 406

487
Features of your vehicle
To signal a lane change, move the turn
signal lever slightly and hold it in position
(B). The lever will return to the OFF posi-
tion when released.
If an indicator stays on and does not
flash or if it flashes abnormally, one of the
turn signal bulbs may be burned out and
will require replacement.One-touch triple turn signal
(One Touch Turn Signal) (if equipped)
To activate the one-touch lane change
function, move the turn signal lever
slightly and then release it. The lane
change signals will blink 3 (5 or 7, if
equipped) times.
You can activate/deactivate the One
Touch Turn Signal function or choose the
number of blinking (3, 5, or 7) from the
User Settings Mode on the LCD display
(if equipped).
✽NOTICE
If an indicator flash is abnormally quick
or slow, a bulb may be burned out or
have a poor electrical connection in the
circuit.
Front fog light (if equipped)
Fog lights are used to provide improved
visibility when visibility is poor due to fog,
rain or snow etc. The fog lights will turn
on when fog light switch (1) is turned to
ON after the headlights are turned on.
To turn off the fog lights, turn the switch
to OFF.
CAUTION
When in operation, the fog lights
consume large amounts of vehicle
electrical power. Only use the fog
lights when visibility is poor or
unnecessary battery and generator
drain could occur.
OAM049046
Page 203 of 406

Features of your vehicle
126 4
✽NOTICE
• If you install an after market HID
(high intensity discharge) head lamp,
your vehicle's audio and electronic
device may malfunction.
• Prevent chemicals such as perfume,
cosmetic oil, sun cream, hand cleaner,
and air freshener from contacting the
interior parts because they may cause
damage or discoloration.
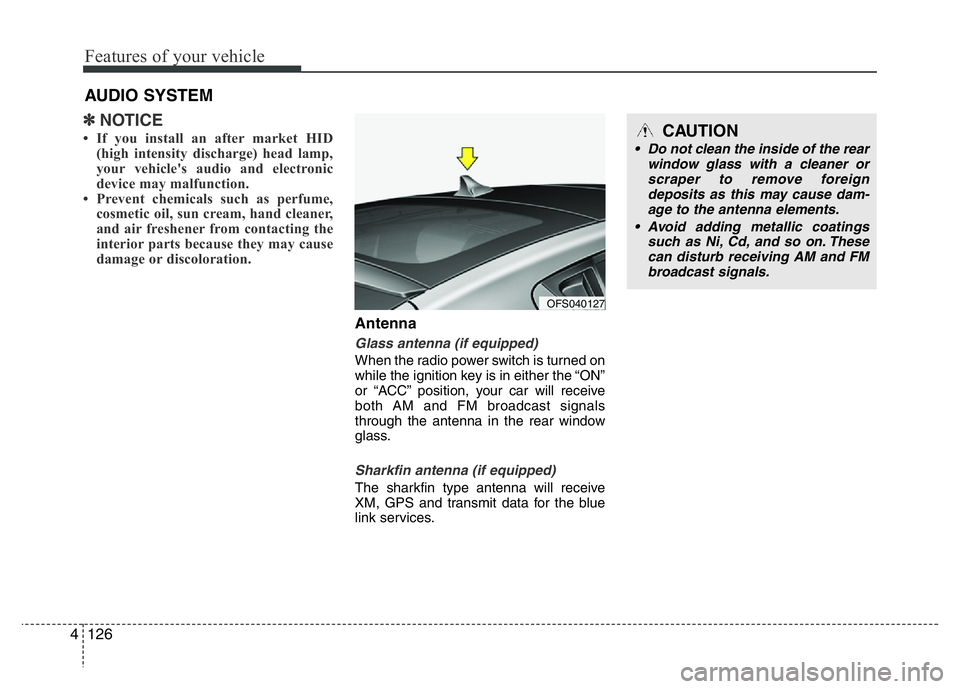
Antenna
Glass antenna (if equipped)
When the radio power switch is turned on
while the ignition key is in either the “ON”
or “ACC” position, your car will receive
both AM and FM broadcast signals
through the antenna in the rear window
glass.
Sharkfin antenna (if equipped)
The sharkfin type antenna will receive
XM, GPS and transmit data for the blue
link services.
AUDIO SYSTEM
OFS040127
CAUTION
• Do not clean the inside of the rear
window glass with a cleaner or
scraper to remove foreign
deposits as this may cause dam-
age to the antenna elements.
• Avoid adding metallic coatings
such as Ni, Cd, and so on. These
can disturb receiving AM and FM
broadcast signals.
Page 280 of 406
What to do in an emergency
2 6
ROAD WARNING
Hazard warning flasher
The hazard warning flasher serves as a
warning to other drivers to exercise
extreme caution when approaching,
overtaking, or passing your vehicle.It should be used whenever emergency
repairs are being made or when the vehi-
cle is stopped near the edge of a road-
way.
Depress the flasher switch with the igni-
tion switch in any position. The flasher
switch is located in the center console
switch panel. All turn signal lights will
flash simultaneously.
• The hazard warning flasher operates
whether your vehicle is running or not.
• The turn signals do not work when the
hazard flasher is on.
• Care must be taken when using the
hazard warning flasher while the vehi-
cle is being towed.
OFS042083N
Page 383 of 406
773
Maintenance
Headlight, position light, turn signal
light, front fog light bulb replacement
(1) Headlight (Low)
(2) Headlight (High) / DRL*
(3) Front turn signal light
(4) Position
(5) Front fog light*
(6) Side marker
* if equipped
Headlight bulb
(Continued)
• If a bulb becomes damaged or
cracked, replace it immediately
and carefully dispose of it.
• Wear eye protection when chang-
ing a bulb. Allow the bulb to cool
down before handling it.
G270A03O
WARNING- Halogen bulbs
• Halogen bulbs contain pressur-
ized gas that will produce flying
pieces of glass if broken.
• Always handle them carefully,
and avoid scratches and abra-
sions. If the bulbs are lit, avoid
contact with liquids. Never touch
the glass with bare hands.
Residual oil may cause the bulb
to overheat and burst when lit. A
bulb should be operated only
when installed in a headlight.
(Continued)
OFS072025L ■Type A
■Type B
OFS070025
Page 385 of 406

775
Maintenance
Turn signal light
1. Remove the bulb from the socket by
pressing it in and rotating it counter-
clockwise until the tabs on the bulb
align with the slots in the socket. Pull
the bulb out of the socket
2. Insert a new bulb by inserting it into
the socket and rotating it until it locks
into place.
3. Install the socket in the assembly by
aligning the tabs on the socket with the
slots in the assembly. Push the socket
into the assembly and turn the socket
clockwise.
Front fog light bulbs (if equipped)
1. Remove the under cover by rotating
the screws.
2. Reach your hand into the back of the
front bumper.
3. Disconnect the power connector from
the socket.
4. Remove the bulb-socket from the
housing by turning the socket counter
clockwise until the tabs on the socket
align with the slots on the housing.
5. Install the new bulb-socket into the
housing by aligning the tabs on the
socket with the slots in the housing.
Push the socket into the housing and
turn the socket clockwise.
6. Connect the power connector to the
socket.
Front side marker
1. Remove the bulb from socket by
pressing it in and rotating it counter-
clockwise until tabs on the bulb align
with the slots in the socket. Pull the
bulb out of the socket.
2. Insert a new bulb by inserting it into
the socket and rotating it until it locks
into place.
3. Install the socket in the assembly by
aligning the tabs on the socket with the
slots in the assembly. Push the socket
into the assembly and turn the socket
clockwise.
OFS072042L
Page 386 of 406
Maintenance
76 7
Side repeater light bulb replace-
ment
If the light bulb does not operate, have
the vehicle checked by an authorized
HYUNDAI dealer.
Rear combination light bulb
replacement
(1) Stop and tail light
(2) Back-up light
(3) Rear turn signal light
(4) Sidemarker
(5) Rear reflex reflector
Outside
1. Open the tailgate.
2. Loosen the outside light assembly
retaining screws with a cross-tip
screwdriver.
3. Remove the rear combination light
assembly from the body of the vehicle.
OFS070029
OFS070030
OFS070028OFS070027
Page 399 of 406

Specifications & Consumer information
2 8
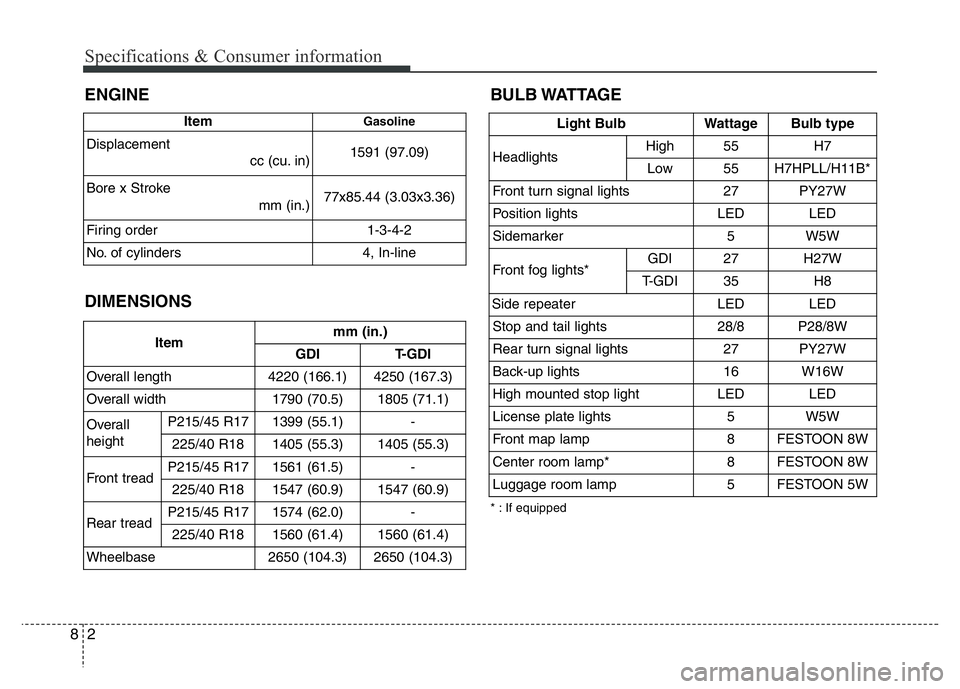
ENGINE
DIMENSIONS
ItemGasoline
Displacement
cc (cu. in) 1591 (97.09)
Bore x Stroke
mm (in.)77x85.44 (3.03x3.36)
Firing order 1-3-4-2
No. of cylinders 4, In-line
BULB WATTAGE
* : If equipped
Light BulbWattageBulb type
HeadlightsHigh55H7
Low55H7HPLL/H11B*
Front turn signal lights27PY27W
Position lightsLEDLED
Sidemarker5W5W
Front fog lights*GDI27H27W
T-GDI35H8
Side repeaterLEDLED
Stop and tail lights28/8P28/8W
Rear turn signal lights 27PY27W
Back-up lights16W16W
High mounted stop lightLEDLED
License plate lights5W5W
Front map lamp8FESTOON 8W
Center room lamp*8FESTOON 8W
Luggage room lamp5FESTOON 5W
Itemmm (in.)
GDI T-GDI
Overall length 4220 (166.1) 4250 (167.3)
Overall width 1790 (70.5) 1805 (71.1)
Overall
heightP215/45 R17 1399 (55.1) -
225/40 R18 1405 (55.3) 1405 (55.3)
Front treadP215/45 R17 1561 (61.5) -
225/40 R18 1547 (60.9) 1547 (60.9)
Rear treadP215/45 R17 1574 (62.0) -
225/40 R18 1560 (61.4) 1560 (61.4)
Wheelbase 2650 (104.3) 2650 (104.3)