2016 HYUNDAI VELOSTER TURBO check oil
[x] Cancel search: check oilPage 310 of 406

Starter won't function
Engine turns over but
will not start
Engine misfires
Engine overheats
Engine stops while
driving
Fuel consumption is
excessive
Brake pedal is spongy
Braking power is
insufficient
Steering wheel is heavy
Steering wheel shakesSteering wheel pulls to
one side while drivingVehicle pulls to one side
while braking
Tire wear is abnormalCharge warning light\
comes on while drivingWipers, horn or lights
won't funciton
Battery discharge is
excessive
Ignition circuit faulty
Ignition coil or condenser faulty
Distributor faulty
Alternator belt loose
Check fuses, bulbs or wiring
Brake dragging
Shift lever not positioned in "P" or "N" range
Frequent driving in lower gear
Air intrusion into brake lines
Brake fluid insufficient
Brake disc and pads wet
Brake pad wear
Wheel alignment incorrect
Wheel balance incorrect
Tire pressure incorrect (too low or high)
Tire size incorrect
OO
O
OO
O
O
O
O
O
OO
OO
O
O
OO
O
OO
O
OO
O O
O
O
O
O
O
OO
OO
SYMPTOM
PROBABLE CAUSE
632
What to do in an emergency
Page 314 of 406
Maintenance
4 7
The following lists are vehicle checks and
inspections that should be performed by
the owner or an authorized HYUNDAI
dealer at the frequencies indicated to
help ensure safe, dependable operation
of your vehicle.
Any adverse conditions should be
brought to the attention of your dealer as
soon as possible.
These Owner Maintenance Checks are
generally not covered by warranties and
you may be charged for labor, parts and
lubricants used.Owner maintenance schedule
When you stop for fuel:
• Check the engine oil level.
• Check coolant level in coolant reser-
voir.
• Check the windshield washer fluid
level.
• Look for low or under-inflated tires.
WARNING- Maintenance
work
• Performing maintenance work on
a vehicle can be dangerous. You
can be seriously injured while
performing some maintenance
procedures. If you lack sufficient
knowledge and experience or the
proper tools and equipment to do
the work, have it done by an
authorized HYUNDAI dealer.
• Working under the hood with the
engine running is dangerous. It
becomes even more dangerous
when you wear jewelry or loose
clothing. These can become
entangled in moving parts and
result in injury. Therefore, if you
must run the engine while work-
ing under the hood, make certain
that you remove all jewelry (espe-
cially rings, bracelets, watches,
and necklaces) and all neckties,
scarves, and similar loose cloth-
ing before getting near the
engine or cooling fans.
OWNER MAINTENANCE
WARNING
Be careful when checking your
engine coolant level when the
engine is hot. Scalding hot coolant
and steam may blow out under
pressure. This could cause burns
or other serious injury.
Page 336 of 406
Maintenance
26 7
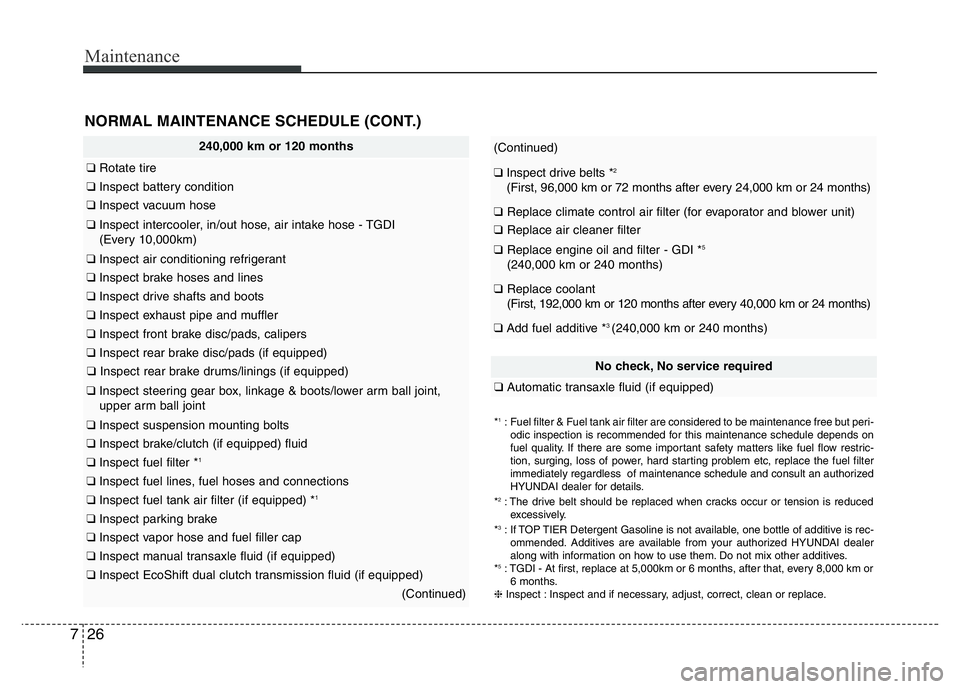
240,000 km or 120 months
❑Rotate tire
❑Inspect battery condition
❑Inspect vacuum hose
❑Inspect intercooler, in/out hose, air intake hose - TGDI
(Every 10,000km)
❑Inspect air conditioning refrigerant
❑Inspect brake hoses and lines
❑Inspect drive shafts and boots
❑Inspect exhaust pipe and muffler
❑Inspect front brake disc/pads, calipers
❑Inspect rear brake disc/pads (if equipped)
❑Inspect rear brake drums/linings (if equipped)
❑Inspect steering gear box, linkage & boots/lower arm ball joint,
upper arm ball joint
❑Inspect suspension mounting bolts
❑Inspect brake/clutch (if equipped) fluid
❑Inspect fuel filter *1
❑Inspect fuel lines, fuel hoses and connections
❑Inspect fuel tank air filter (if equipped) *1
❑Inspect parking brake
❑Inspect vapor hose and fuel filler cap
❑Inspect manual transaxle fluid (if equipped)
❑Inspect EcoShift dual clutch transmission fluid (if equipped)
(Continued)
(Continued)
❑Inspect drive belts *2
(First, 96,000 km or 72 months after every 24,000 km or 24 months)
❑Replace climate control air filter (for evaporator and blower unit)
❑Replace air cleaner filter
❑Replace engine oil and filter - GDI *5
(240,000 km or 240 months)
❑Replace coolant
(First, 192,000 km or 120 months after every 40,000 km or 24 months)
❑Add fuel additive *3 (240,000 km or 240 months)
*1: Fuel filter & Fuel tank air filter are considered to be maintenance free but peri-
odic inspection is recommended for this maintenance schedule depends on
fuel quality. If there are some important safety matters like fuel flow restric-
tion, surging, loss of power, hard starting problem etc, replace the fuel filter
immediately regardless of maintenance schedule and consult an authorized
HYUNDAI dealer for details.
*
2: The drive belt should be replaced when cracks occur or tension is reduced
excessively.
*
3: If TOP TIER Detergent Gasoline is not available, one bottle of additive is rec-
ommended. Additives are available from your authorized HYUNDAI dealer
along with information on how to use them. Do not mix other additives.
*
5: TGDI - At first, replace at 5,000km or 6 months, after that, every 8,000 km or
6 months.
❈Inspect : Inspect and if necessary, adjust, correct, clean or replace.
NORMAL MAINTENANCE SCHEDULE (CONT.)
No check, No service required
❑Automatic transaxle fluid (if equipped)
Page 338 of 406
Maintenance
28 7
EXPLANATION OF SCHEDULED MAINTENANCE ITEMS
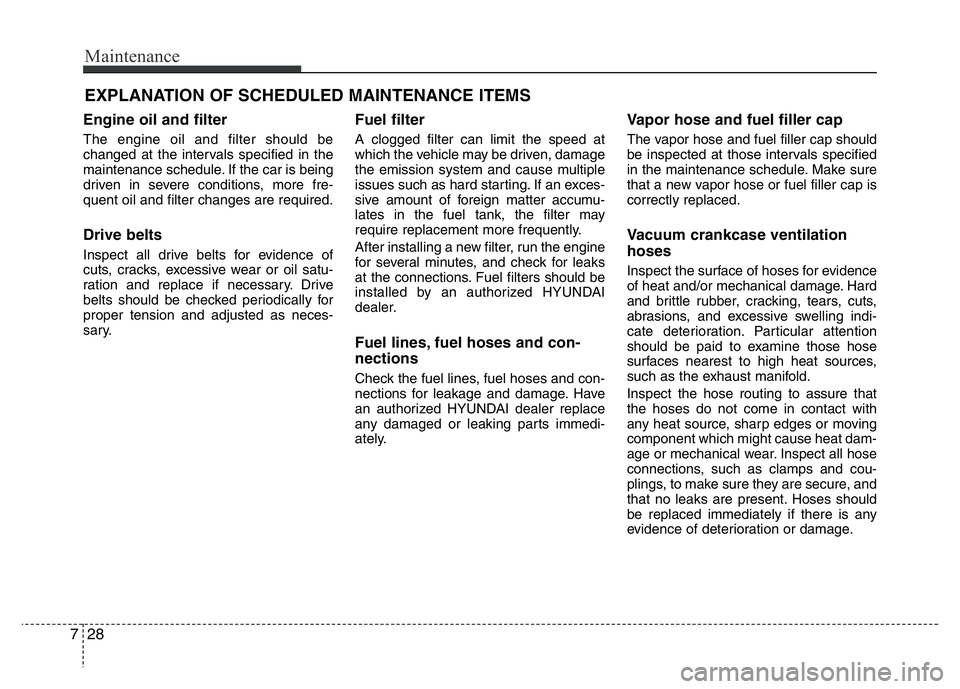
Engine oil and filter
The engine oil and filter should be
changed at the intervals specified in the
maintenance schedule. If the car is being
driven in severe conditions, more fre-
quent oil and filter changes are required.
Drive belts
Inspect all drive belts for evidence of
cuts, cracks, excessive wear or oil satu-
ration and replace if necessary. Drive
belts should be checked periodically for
proper tension and adjusted as neces-
sary.
Fuel filter
A clogged filter can limit the speed at
which the vehicle may be driven, damage
the emission system and cause multiple
issues such as hard starting. If an exces-
sive amount of foreign matter accumu-
lates in the fuel tank, the filter may
require replacement more frequently.
After installing a new filter, run the engine
for several minutes, and check for leaks
at the connections. Fuel filters should be
installed by an authorized HYUNDAI
dealer.
Fuel lines, fuel hoses and con-
nections
Check the fuel lines, fuel hoses and con-
nections for leakage and damage. Have
an authorized HYUNDAI dealer replace
any damaged or leaking parts immedi-
ately.
Vapor hose and fuel filler cap
The vapor hose and fuel filler cap should
be inspected at those intervals specified
in the maintenance schedule. Make sure
that a new vapor hose or fuel filler cap is
correctly replaced.
Vacuum crankcase ventilation
hoses
Inspect the surface of hoses for evidence
of heat and/or mechanical damage. Hard
and brittle rubber, cracking, tears, cuts,
abrasions, and excessive swelling indi-
cate deterioration. Particular attention
should be paid to examine those hose
surfaces nearest to high heat sources,
such as the exhaust manifold.
Inspect the hose routing to assure that
the hoses do not come in contact with
any heat source, sharp edges or moving
component which might cause heat dam-
age or mechanical wear. Inspect all hose
connections, such as clamps and cou-
plings, to make sure they are secure, and
that no leaks are present. Hoses should
be replaced immediately if there is any
evidence of deterioration or damage.
Page 341 of 406
731
Maintenance
ENGINE OIL
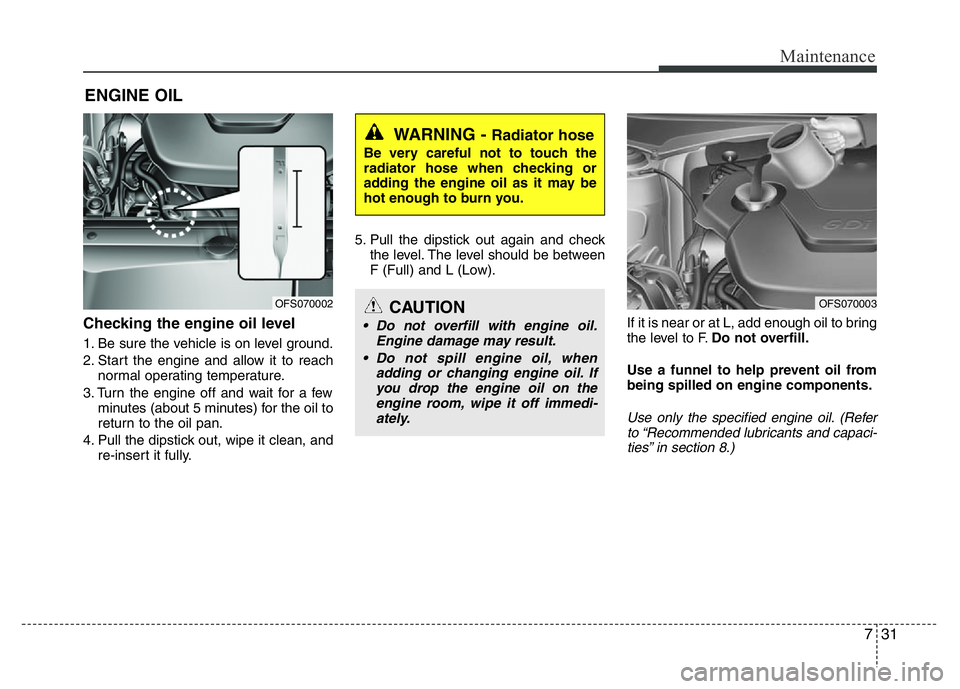
Checking the engine oil level
1. Be sure the vehicle is on level ground.
2. Start the engine and allow it to reach
normal operating temperature.
3. Turn the engine off and wait for a few
minutes (about 5 minutes) for the oil to
return to the oil pan.
4. Pull the dipstick out, wipe it clean, and
re-insert it fully.5. Pull the dipstick out again and check
the level. The level should be between
F (Full) and L (Low).
If it is near or at L, add enough oil to bring
the level to F.Do not overfill.
Use a funnel to help prevent oil from
being spilled on engine components.
Use only the specified engine oil. (Refer
to “Recommended lubricants and capaci-
ties” in section 8.)
WARNING - Radiator hose
Be very careful not to touch the
radiator hose when checking or
adding the engine oil as it may be
hot enough to burn you.
CAUTION
• Do not overfill with engine oil.
Engine damage may result.
• Do not spill engine oil, when
adding or changing engine oil. If
you drop the engine oil on the
engine room, wipe it off immedi-
ately.
OFS070002OFS070003
Page 346 of 406
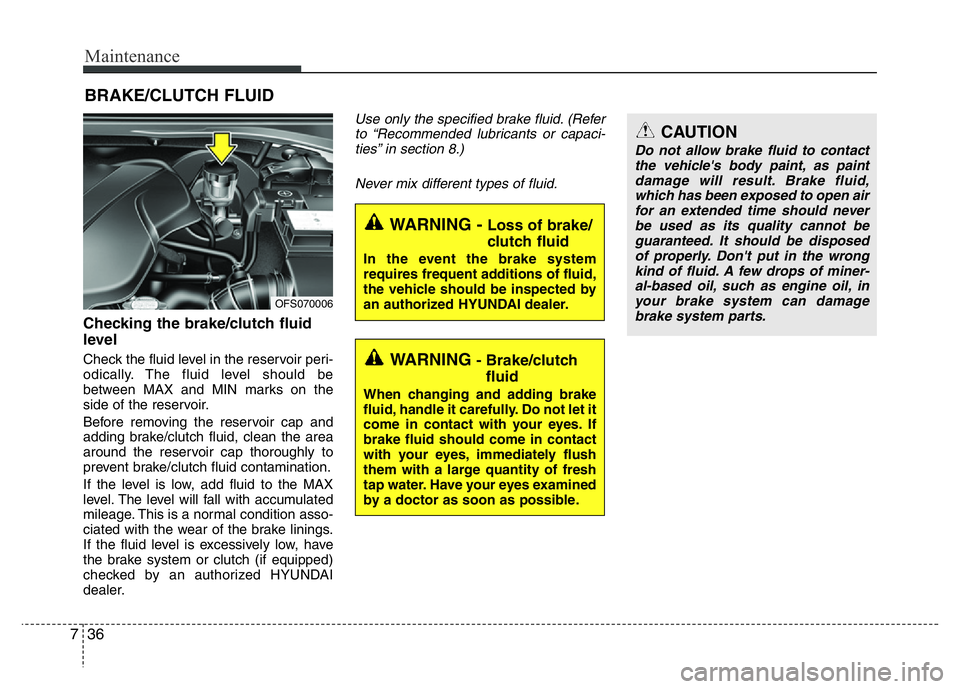
Maintenance
36 7
BRAKE/CLUTCH FLUID
Checking the brake/clutch fluid
level
Check the fluid level in the reservoir peri-
odically. The fluid level should be
between MAX and MIN marks on the
side of the reservoir.
Before removing the reservoir cap and
adding brake/clutch fluid, clean the area
around the reservoir cap thoroughly to
prevent brake/clutch fluid contamination.
If the level is low, add fluid to the MAX
level. The level will fall with accumulated
mileage. This is a normal condition asso-
ciated with the wear of the brake linings.
If the fluid level is excessively low, have
the brake system or clutch (if equipped)
checked by an authorized HYUNDAI
dealer.
Use only the specified brake fluid. (Refer
to “Recommended lubricants or capaci-
ties” in section 8.)
Never mix different types of fluid.
WARNING- Brake/clutch
fluid
When changing and adding brake
fluid, handle it carefully. Do not let it
come in contact with your eyes. If
brake fluid should come in contact
with your eyes, immediately flush
them with a large quantity of fresh
tap water. Have your eyes examined
by a doctor as soon as possible.
WARNING - Loss of brake/
clutch fluid
In the event the brake system
requires frequent additions of fluid,
the vehicle should be inspected by
an authorized HYUNDAI dealer.
CAUTION
Do not allow brake fluid to contact
the vehicle's body paint, as paint
damage will result. Brake fluid,
which has been exposed to open air
for an extended time should never
be used as its quality cannot be
guaranteed. It should be disposed
of properly. Don't put in the wrong
kind of fluid. A few drops of miner-
al-based oil, such as engine oil, in
your brake system can damage
brake system parts.
OFS070006
Page 357 of 406

747
Maintenance
Battery recharging
Your vehicle has a maintenance-free,
calcium-based battery.
If the battery becomes discharged in a
short time (because, for example the
headlights or interior lights were left on
while vehicle was not in use) jump start
the vehicle from another battery and run
the engine at least 20 minutes at idle
before driving. Do not turn off the engine
for 30 minutes total of idle and/or driving
as the battery may not have sufficient
recharge to start.
CAUTION
• When the vehicle is not used for a
long time in the low tempera-
tures, remove the battery and
stores it indoors.
• Always charge the battery fully to
prevent the battery case from
being damaged in low tempera-
tures.
• If you use unauthorized electric
devices, the battery may be dis-
charged. Never use unauthorized
devices.
(Continued)
• The electrical ignition system
works with high voltage. Never
touch these components with the
engine running or the ignition
switched on.
Failure to follow the above warn-
ings can result in serious bodily
injury or death.WARNING- Recharging
battery
When recharging the battery,
observe the following precautions:
• The battery must be removed
from the vehicle and placed in an
area with good ventilation.
• Do not allow cigarettes, sparks,
or flame near the battery.
• Watch the battery during charg-
ing, and stop or reduce the charg-
ing rate if the battery cells begin
gassing (boiling) violently or if
the temperature of the electrolyte
of any cell exceeds 49°C (120°F).
• Wear eye protection when check-
ing the battery during charging.
• Disconnect the battery charger in
the following order.
1. Turn off the battery charger main
switch.
2. Unhook the negative clamp from
the negative battery terminal.
3. Unhook the positive clamp from
the positive battery terminal.
Page 372 of 406

Maintenance
62 7
FUSES
A vehicle’s electrical system is protected
from electrical overload damage by
fuses.
This vehicle has 2 fuse panels, one locat-
ed in the driver’s side panel bolster, the
other in the engine compartment.
If any of your vehicle’s lights, acces-
sories, or controls do not work, check the
appropriate circuit fuse. If a fuse has
blown, the element inside the fuse will be
melted.
If the electrical system does not work,
first check the driver’s side fuse panel.
Before replacing a blown fuse, discon-
nect the negative battery cable.
Always replace a blown fuse with one of
the same rating.
If the replacement fuse blows, this indi-
cates an electrical problem. Avoid using
the system involved and immediately
consult an authorized HYUNDAI dealer.
Three kinds of fuses are used: blade type
for lower amperage rating, cartridge type,
and multi fuse for higher amperage rat-
ings.✽NOTICE
The actual fuse/relay panel label may
differ from equipped items.
WARNING - Fuse
replacement
• Never replace a fuse with any-
thing but another fuse of the
same rating.
• A higher capacity fuse could
cause damage and possibly a fire.
• Never install a wire or aluminum
foil instead of the proper fuse -
even as a temporary repair. It may
cause extensive wiring damage
and a possible fire.
CAUTION
Do not use a screwdriver or any
other metal object to remove fuses
because it may cause a short circuit
and damage the system.
OBK079042 NormalNormal Blade type
Cartridge type
Multi fuseBlown
Blown
Normal Blown