Page 260 of 642
3-162
Convenient features of your vehicle
To use the cargo security screen
1. Pull the cargo security screentowards the rear of the vehicle by the handle (1).
2. Pull the cargo screen out all the way and then slowly allow the
screen to retract back into themechanism.
When the cargo security screen is
not in use:
1. Pull the cargo security screenbackward and up to release it from
the guides.
2. The cargo security screen will automatically slide back in.
The cargo security screen may
not automatically slide back in if
the cargo security screen is not
fully pulled out. Pull the cargo
screen out all the way and then
slowly allow the screen to retract
back into the mechanism.
To remove the cargo security screen
1. Push one side of the cargo screen inward to compress the springmechanism and release the
screen from the vehicle.
2. While the mechanism is com- pressed, pull out the cargo securi-ty screen.
NOTICE
OTLA045323
OTLA045324
Page 261 of 642
3-163
Convenient features of your vehicle
3. Open the luggage tray and keep thecargo security screen in the tray.
To remove the cargo security
screen from the luggage tray
1. Pull up the screen board. 2. Push in the guide pin.
3
OTL045236
OTLE055152
OTLE055153
Page 262 of 642
3-164
Convenient features of your vehicle
3. While pushing the guide pin, pullout the cargo security screen.
Luggage tray (if equipped)
You can place a first aid kit, a reflec-
tor triangle, tools, etc. in the box for
easy access.
Grasp the handle on the top of thecover and lift it.
OTL045274
OTLE055154Do not place objects on the
cargo security screen. Such
objects may be thrown about
inside the vehicle and possi-
bly injure vehicle occupantsduring an accident or whenbraking.
Never allow anyone to ride in
the luggage compartment. It is
designed for luggage only.
Maintain the balance of the
vehicle and locate the weight
as forward as possible.
WARNING
Since the cargo security screen
may be damaged or malformed,
do not put luggage on it when itis used.
CAUTION
Page 263 of 642

3-165
Convenient features of your vehicle
3
EEXX TTEERR IIOO RR FF EE AA TTUU RREESS
Roof rack (if equipped)
If the vehicle has a roof rack, you can
load cargo on top of your vehicle.
If the vehicle is equipped with a
sunroof or a panorama roof, be
sure not to position cargo onto
the roof rack in such a way that it
could interfere with sunroof or a
panorama roof operation. When carrying cargo on the roof
rack, take the necessary precau-
tions to make sure the cargo
does not damage the roof of the
vehicle.
When carrying large objects on the roof rack, make sure they do
not exceed the overall rooflength or width.
NOTICE
NOTICE
OTL045502L
The following specification is
the maximum weight that can
be loaded onto the roof rack.
Distribute the load as evenly
as possible onto the roof rack
and secure the load firmly.
Loading cargo or luggage in
excess of the specified weight
limit on the roof rack may
damage your vehicle.
(Continued)
(Continued)
The vehicle center of gravity will be higher when items are
loaded onto the roof rack.
Avoid sudden starts, braking,
sharp turns, abrupt maneuvers
or high speeds that may result
in loss of vehicle control or
rollover resulting in an accident.
Always drive slowly and turn
corners carefully when carry-
ing items on the roof rack.
Severe wind updrafts, caused
by passing vehicles or natural
causes, can cause sudden
upward pressure on items
loaded on the roof rack. This
is especially true when carry-
ing large, flat items such as
wood panels or mattresses.This could cause the items to
fall off the roof rack and cause
damage to your vehicle or
others around you.
To prevent damage or loss of
cargo while driving, check fre-
quently before or while drivingto make sure the items on the
roof rack are securely fastened.
WARNING
ROOF 220 lbs. (100 kg)
RACK EVENLY DISTRIBUTED
Page 323 of 642

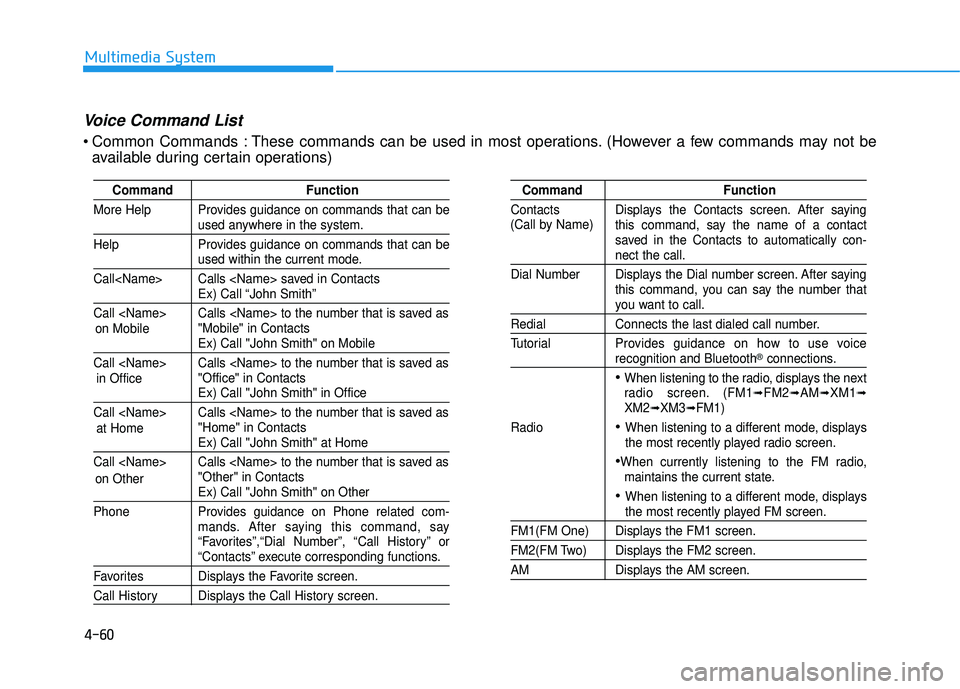
4-60
Multimedia System
Command Function
More Help Provides guidance on commands that can be
used anywhere in the system.
Help Provides guidance on commands that can be
used within the current mode.
Call Calls saved in Contacts
Ex) Call “John Smith”
Call Calls to the number that is saved as "Mobile" in Contacts
Ex) Call "John Smith" on Mobile
Call Calls to the number that is saved as "Office" in Contacts
Ex) Call "John Smith" in Office
Call Calls to the number that is saved as "Home" in Contacts
Ex) Call "John Smith" at Home
Call Calls to the number that is saved as "Other" in Contacts
Ex) Call "John Smith" on Other
Phone Provides guidance on Phone related com- mands. After saying this command, say
“Favorites”,“Dial Number”, “Call History” or
“Contacts” execute corresponding functions.
Favorites Displays the Favorite screen.
Call History Displays the Call History screen.
Command Function
Contacts Displays the Contacts screen. After saying this command, say the name of a contact
saved in the Contacts to automatically con-
nect the call.
Dial Number Displays the Dial number screen. After saying this command, you can say the number that
you want to call.
Redial Connects the last dialed call number.
Tutorial Pro vides guidance on how to use voice
recognition and Bluetooth®connections.
When listening to the radio, displays the next
radio screen. (FM1➟FM2➟AM➟XM1➟XM2➟XM3➟FM1)
Radio
When listening to a different mode, displays
the most recently played radio screen.
When currently listening to the FM radio, maintains the current state.
When listening to a different mode, displaysthe most recently played FM screen.
FM1(FM One) Displays the FM1 screen.
FM2(FM Two) Displays the FM2 screen.
AM Displays the AM screen.
(Call by Name)
Voice Command List
Common Commands : These commands can be used in most operations. (However a few commands may not be
available during certain operations)
on Mobile
in Officeat Home
on Other
Page 374 of 642

4-111
Multimedia System
4
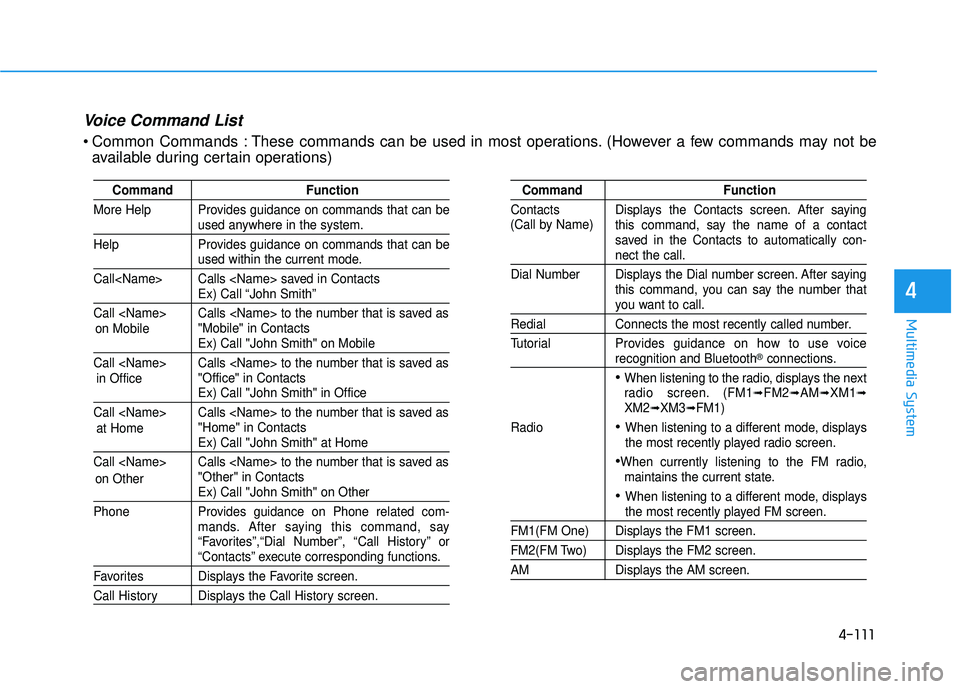
Command Function
More Help Provides guidance on commands that can be
used anywhere in the system.
Help Provides guidance on commands that can be
used within the current mode.
Call Calls saved in Contacts
Ex) Call “John Smith”
Call Calls to the number that is saved as "Mobile" in Contacts
Ex) Call "John Smith" on Mobile
Call Calls to the number that is saved as "Office" in Contacts
Ex) Call "John Smith" in Office
Call Calls to the number that is saved as "Home" in Contacts
Ex) Call "John Smith" at Home
Call Calls to the number that is saved as "Other" in Contacts
Ex) Call "John Smith" on Other
Phone Provides guidance on Phone related com- mands. After saying this command, say
“Favorites”,“Dial Number”, “Call History” or
“Contacts” execute corresponding functions.
Favorites Displays the Favorite screen.
Call History Displays the Call History screen.
Command Function
Contacts Displays the Contacts screen. After saying this command, say the name of a contact
saved in the Contacts to automatically con-
nect the call.
Dial Number Displays the Dial number screen. After saying this command, you can say the number that
you want to call.
Redial Connects the most recently called number.
Tutorial Pro vides guidance on how to use voice
recognition and Bluetooth®connections.
When listening to the radio, displays the next
radio screen. (FM1➟FM2➟AM➟XM1➟XM2➟XM3➟FM1)
Radio
When listening to a different mode, displays
the most recently played radio screen.
When currently listening to the FM radio, maintains the current state.
When listening to a different mode, displaysthe most recently played FM screen.
FM1(FM One) Displays the FM1 screen.
FM2(FM Two) Displays the FM2 screen.
AM Displays the AM screen.
(Call by Name)
Voice Command List
Common Commands : These commands can be used in most operations. (However a few commands may not be
available during certain operations)
on Mobile
in Officeat Home
on Other
Page 388 of 642

5-4
Driving your vehicle
Before Entering the Vehicle
• Be sure all windows, outside mir-ror(s), and outside lights are clean
and unobstructed.
Remove frost, snow, or ice.
Visually check the tires for uneven wear and damage.
Check under the vehicle for any sign of leaks.
Be sure there are no obstacles behind you if you intend to back up.
Before Starting
Make sure the hood, the liftgate,and the doors are securely closed
and locked.
Adjust the position of the seat and steering wheel.
Adjust the inside and outside rearview mirrors.
Verify all the lights work.
Fasten your seatbelt. Check that all passengers have fastened their
seatbelts.
Check the gauges and indicators in the instrument panel and the mes-
sages on the instrument display
when the ignition switch is in theON position.
Check that any items you are car- rying are stored properly or fas-
tened down securely.
CALIFORNIA PROPOSITION 65
WARNING
Engine exhaust and a wide vari- ety of automobile components
including components found inthe interior furnishings in a
vehicle, contain or emit harmful
chemicals known to the State of
California to cause cancer and
birth defects and reproductive
harm. In addition, certain fluids
contained in vehicles and cer-
tain products of components
contain or emit chemicals
known to the State of California
to cause cancer and birth
defects or other reproductiveharm.WARNING
BB
EEFFOO RREE DD RRIIVV IINN GG
Page 401 of 642

5-17
Driving your vehicle
5
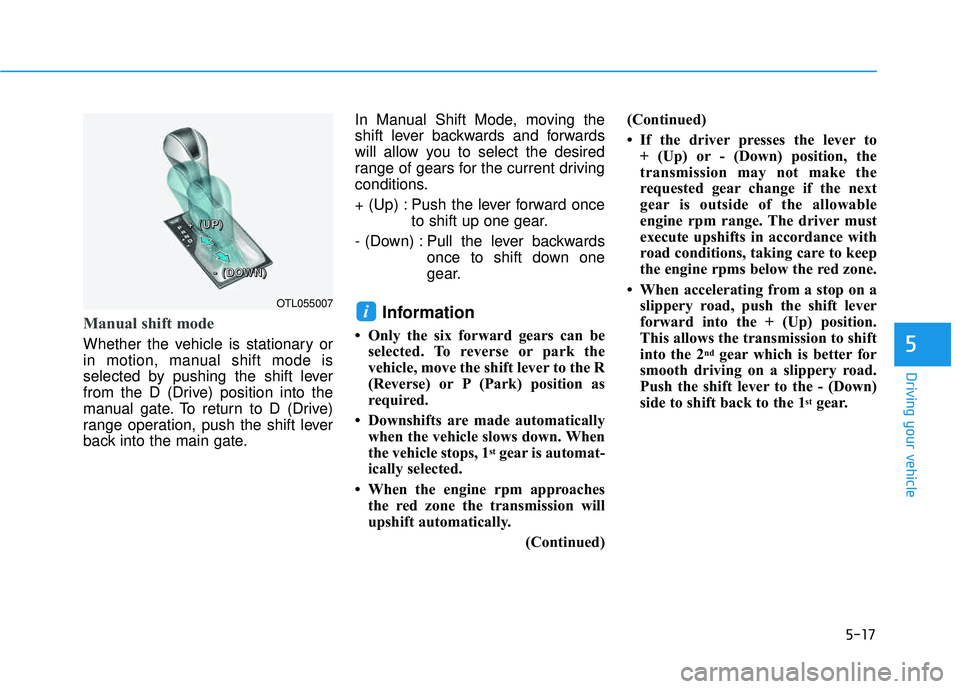
Manual shift mode
Whether the vehicle is stationary or
in motion, manual shift mode is
selected by pushing the shift lever
from the D (Drive) position into the
manual gate. To return to D (Drive)
range operation, push the shift lever
back into the main gate.In Manual Shift Mode, moving the
shift lever backwards and forwards
will allow you to select the desired
range of gears for the current driving
conditions.
+ (Up) : Push the lever forward once
to shift up one gear.
- (Down) : Pull the lever backwards once to shift down one
gear.
Information
Only the six forward gears can beselected. To reverse or park the
vehicle, move the shift lever to the R
(Reverse) or P (Park) position as
required.
Downshifts are made automatically when the vehicle slows down. When
the vehicle stops, 1
stgear is automat-
ically selected.
When the engine rpm approaches the red zone the transmission will
upshift automatically.
(Continued)(Continued)
If the driver presses the lever to
+ (Up) or - (Down) position, the
transmission may not make the
requested gear change if the next
gear is outside of the allowable
engine rpm range. The driver must
execute upshifts in accordance with
road conditions, taking care to keep
the engine rpms below the red zone.
When accelerating from a stop on a slippery road, push the shift lever
forward into the + (Up) position.
This allows the transmission to shift
into the 2
ndgear which is better for
smooth driving on a slippery road.
Push the shift lever to the - (Down)
side to shift back to the 1
stgear.
iOTL055007
++++ ((((UUUUPPPP))))
---- ((((DDDDOOOOWWWWNNNN))))