Page 379 of 642
4-116
Multimedia System
SSeettuu pp
Starting Mode
Press the key to display the Setup screen.
You can select and control options
related to [Display], [Sound], [Clock/Calendar], [Phone] and [System].
Display Settings
Adjusting the Brightness
Press the key Select
[Display] Select [Brightness]
Use the , buttons to adjust the
screen brightness or set the
Brightness on Automatic, Day, or
Night mode.
Press the button to reset.
1) Automatic : Adjusts the brightness
automatically
2) Day : Always maintains the bright- ness on high
3) Night : Always maintains the brightness on low
Mode Pop up
Press the key Select
[Display] Select [Mode Pop up]
This feature is used to display the
Mode Pop up screen when entering
radio and media modes.
When this feature is turned on, pressing the or key
will display the Mode Pop up screen.
Information
The media Mode Pop up screen can be
displayed only when two or more
media modes have been connected.
i
MEDIA RADIO
SETUP
Default
SETUPSETUP
Page 382 of 642
4-119
Multimedia System
4
Clock/Calendar Setting
Clock Settings
Press the key Select [Clock
/Calendar] Select [Clock Settings]
Use the , buttons to set the
Hour, Minutes and AM/PM setting.
Press and hold the key
(over 0.8 seconds) to display the
Clock /Calendar screen.
Calendar Settings
Press the key Select
[Clock/Calendar] Select [CalendarSettings]
Use the , buttons to set the
Day, Month and Year setting.
Time Format
Press the key Select
[Clock/Calendar] Select [Time Format]
This feature is used to change the
clock format between 12hr or 24hr.SETUPSETUP
CLOCK
NOTICE
SETUP
Page 383 of 642
4-120
Multimedia System
Clock Display
Press the key Select [Clock
/Calendar] Select [Clock Display
(Power off)]
This feature is used to display a clock on the screen when the audio sys-
tem is turned off.
System Setting
Memory Information
Press the key Select
[System] Select [Memory Information]
This feature displays information
related to system memory.
1) Using : Displays capacity currentlyin use
2) Capacity : Displays total capacity
Prompt Feedback
Press the key Select
[System] Select [Prompt Feedback]
This feature is used to select the
desired prompt feedback option from
ON and OFF.
1) ON : When using voice recogni- tion, provides detailed guidance prompts
2) OFF : When using voice recogni- tion, omits some guidancepromptsSETUP
SETUP
SETUP
Page 495 of 642

6-8
What to do in an emergency
6. If you cannot find the cause of theoverheating, wait until the engine
temperature has returned to nor-
mal. Then, if coolant has beenlost, carefully add coolant to the
reservoir to bring the fluid level in
the reservoir up to the halfway
mark.
7. Proceed with caution, keeping alert for further signs of overheat-
ing. If overheating happens again,
call an authorized HYUNDAI deal-
er for assistance.
Serious loss of coolant indi-cates a leak in the cooling sys-
tem and should be checked as
soon as possible by an author-
ized HYUNDAI dealer.
CAUTION
Your vehicle is equipped with a pres-
surized coolant
reserve tank. NEVER
remove the coolant
reserve tank cap or the radiatordrain plug while the engine and
radiator are HOT. Hot coolant
and steam may blow out under
pressure, causing serious
injury.
Turn the engine off and wait
until the engine cools down.
Use extreme care when remov-
ing the coolant reserve tank
cap. Wrap a towel or thick rag
around it, and turn it counter-
clockwise slowly to release
some of the pressure from the
system. Step back while thepressure is released.
When you are sure all the pres-
sure has been released, contin-ue turning the cap counter-
clockwise to remove it.
WARNING
Page 502 of 642
6-15
What to do in an emergency
6
Jack and tools
➀Jack handle
② Jack
③ Wheel nut wrench
The jack, jack handle, and wheel lug
nut wrench are stored in the luggage
compartment under the luggage box
cover.
The jack is provided for emergency
tire changing only. Turn the winged hold down bolt
counterclockwise to remove the
spare tire. Store the spare tire in the same com-
partment by turning the winged hold
down bolt clockwise.
To prevent the spare tire and tools
from “rattling,” store them in theirproper location.
II
FF YY OO UU HH AAVVEE AA FF LLAA TT TT IIRR EE
Changing a tire can be danger-
ous. Follow the instructions in
this section when changing atire to reduce the risk of serious
injury or death.
WARNING
OTL065004
OTL065005Be careful as you use the jack
handle to stay clear of the flat
end. The flat end has sharp
edges that could cause cuts.
CAUTION
Page 503 of 642

6-16
What to do in an emergency
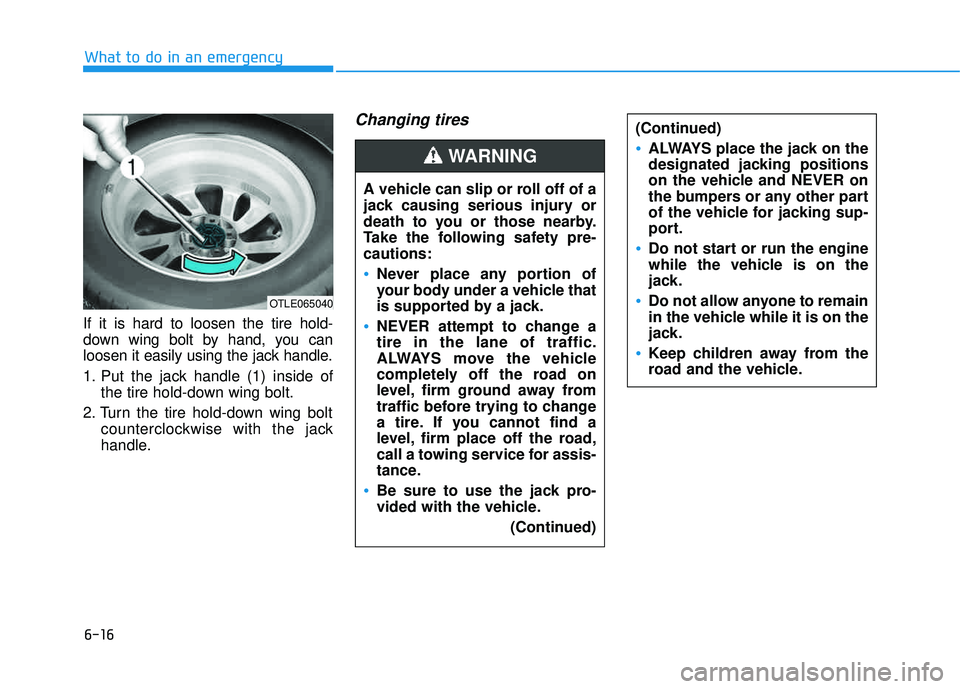
If it is hard to loosen the tire hold-
down wing bolt by hand, you can
loosen it easily using the jack handle.
1. Put the jack handle (1) inside ofthe tire hold-down wing bolt.
2. Turn the tire hold-down wing bolt counterclockwise with the jack
handle.
Changing tires
A vehicle can slip or roll off of a
jack causing serious injury or
death to you or those nearby.
Take the following safety pre-cautions:
Never place any portion of
your body under a vehicle that
is supported by a jack.
NEVER attempt to change a tire in the lane of traffic.
ALWAYS move the vehicle
completely off the road on
level, firm ground away from
traffic before trying to change
a tire. If you cannot find a
level, firm place off the road,
call a towing service for assis-
tance.
Be sure to use the jack pro-
vided with the vehicle.
(Continued)
(Continued)
ALWAYS place the jack on the
designated jacking positions
on the vehicle and NEVER on
the bumpers or any other part
of the vehicle for jacking sup-
port.
Do not start or run the engine
while the vehicle is on the
jack.
Do not allow anyone to remain
in the vehicle while it is on the
jack.
Keep children away from the
road and the vehicle.
WARNING
OTLE065040
Page 504 of 642
6-17
What to do in an emergency
Follow these steps to change your
vehicle’s tire:
1. Park on a level, firm surface.
2. Move the shift lever into P (Park),apply the parking brake, and place
the ignition switch in the LOCK/OFF position.
3. Press the hazard warning flasher button.
4. Remove the wheel lug nut wrench, jack, jack handle, and spare tire
from the vehicle. 5. Block both the front and rear of the
tire diagonally opposite of the tire
you are changing. 6. Loosen the wheel lug nuts coun-
terclockwise one turn each in the
order shown above, but do not
remove any lug nuts until the tire
has been raised off of the ground.
6
OTL065012
BlockOTL065013
Page 505 of 642

6-18
What to do in an emergency
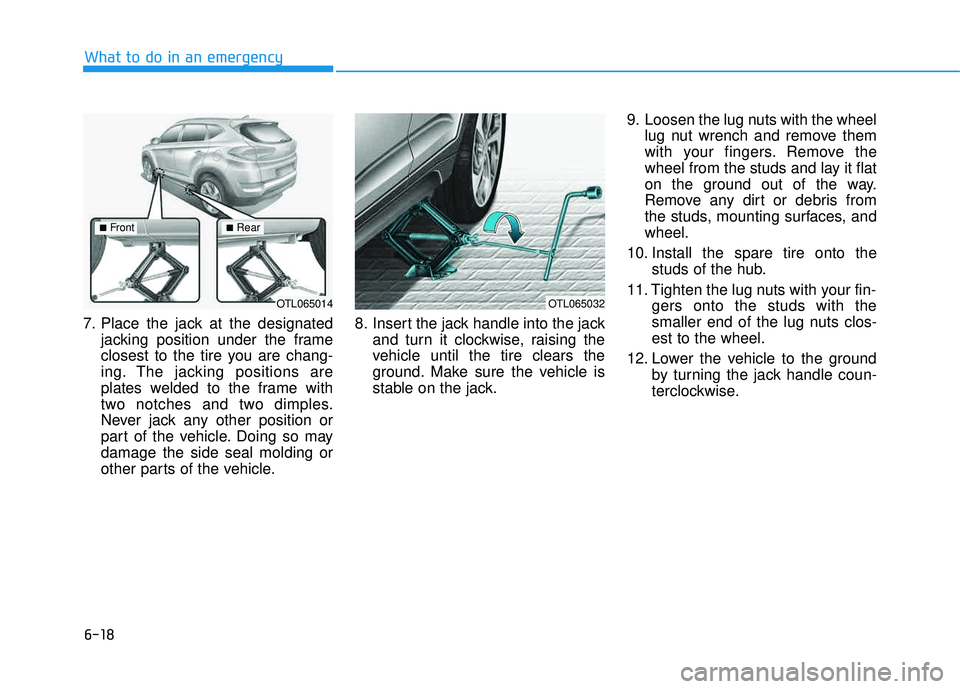
7. Place the jack at the designatedjacking position under the frame
closest to the tire you are chang-
ing. The jacking positions are
plates welded to the frame with
two notches and two dimples.
Never jack any other position or
part of the vehicle. Doing so maydamage the side seal molding or
other parts of the vehicle. 8. Insert the jack handle into the jack
and turn it clockwise, raising the
vehicle until the tire clears the
ground. Make sure the vehicle is
stable on the jack. 9. Loosen the lug nuts with the wheel
lug nut wrench and remove them
with your fingers. Remove the
wheel from the studs and lay it flat
on the ground out of the way.
Remove any dirt or debris from
the studs, mounting surfaces, andwheel.
10. Install the spare tire onto the studs of the hub.
11. Tighten the lug nuts with your fin- gers onto the studs with the
smaller end of the lug nuts clos-est to the wheel.
12. Lower the vehicle to the ground by turning the jack handle coun-
terclockwise.
OTL065014OTL065032
■Front■Rear