Page 91 of 642
2-64
Safety system of your vehicle
Why Didn't My Air Bag Go Off in a Collision?
Air bags are not designed to inflate in
every collision.There are certain
types of accidents in which the air bag
would not be expected to provide
additional protection. These include
rear impacts, second or third colli-
sions in multiple impact accidents, as
well as low speed impacts. Damage
to the vehicle indicates a collision
energy absorption, and is not an indi-cator of whether or not an air bag
should have inflated.
Air bag collision sensors
To reduce the risk of an air bag
deploying unexpectedly and
causing serious injury or death:
Do not hit or allow any objects to impact the locations where air
bags or sensors are installed.
Do not perform maintenance
on or around the air bag sen-
sors. If the location or angle of
the sensors is altered, the air
bags may deploy when they
should not or may not deploy
when they should.
Do not install bumper guards
or replace the bumper with a
non-genuine HYUNDAI parts.
This may adversely affect the
collision and air bag deploy-
ment performance.
(Continued)
(Continued)
Place the ignition switch in
the LOCK/OFF or ACC posi-
tion when the vehicle is being
towed to prevent inadvertent
air bag deployment.
Have all air bag repairs conduct-
ed by an authorized HYUNDAI
dealer.
WARNING
Page 109 of 642
3-11
Convenient features of your vehicle
3
Loss of a smart key
A maximum of two Smart Keys can
be registered to a single vehicle. If
you happen to lose your smart key,
you should immediately take the
vehicle and remaining keys to your
authorized HYUNDAI dealer or tow
the vehicle, if necessary.
Smart key precautions
The smart key will not work if any of
the following occur:
The smart key is close to a radiotransmitter such as a radio station
or an airport which can interfere
with normal operation of the trans-
mitter.
The smart key is near a mobile two way radio system or a cellular
phone.
Another vehicle’s smart key is being operated close to your vehicle.
When the smart key does not work
correctly, open and close the door
with the mechanical key. If you have
a problem with the smart key, contact
an authorized HYUNDAI dealer. If the smart key is in close proximity
to your mobile phone, the signal
could be blocked by your mobile
phone's normal operational signals.
This is especially important when the
phone is active such as making and
receiving calls, text messaging,
and/or sending/receiving emails.
When possible, avoid placing the
remote key and your mobile phone inthe same location such as a pants or
jacket pocket in order to avoid inter-
ference between the two devices.
Keep the smart key away from
electromagnetic materials that
blocks electromagnetic waves
to the key surface.
CAUTION
Page 112 of 642
3-14
Convenient features of your vehicle
Operating Door Locks from
Outside the Vehicle
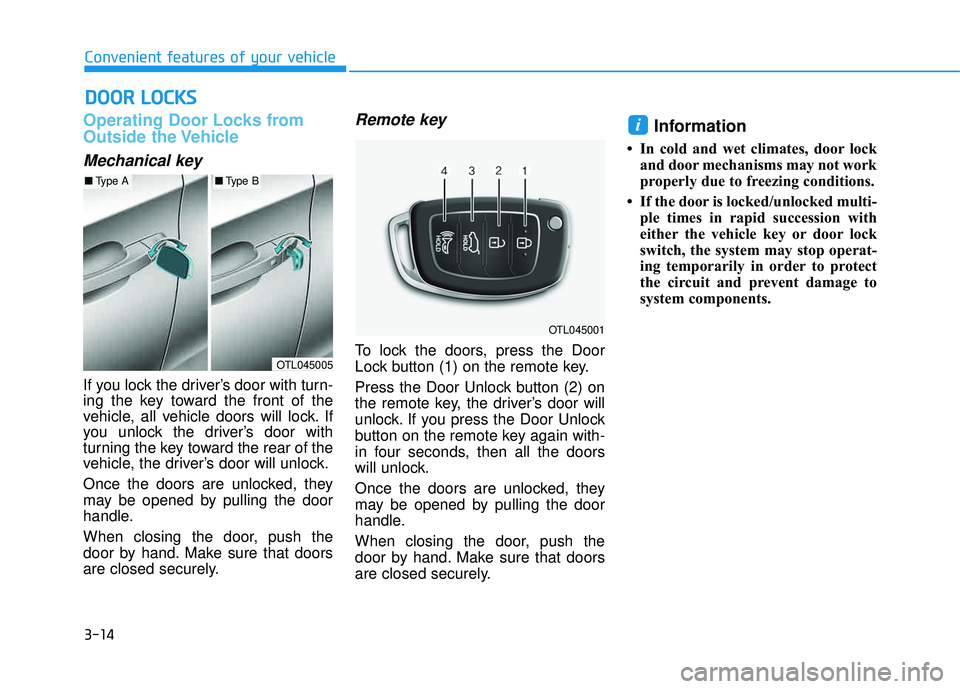
Mechanical key
If you lock the driver’s door with turn-
ing the key toward the front of the
vehicle, all vehicle doors will lock. If
you unlock the driver’s door with
turning the key toward the rear of the
vehicle, the driver’s door will unlock.
Once the doors are unlocked, they
may be opened by pulling the door
handle.
When closing the door, push the
door by hand. Make sure that doors
are closed securely.
Remote key
To lock the doors, press the Door
Lock button (1) on the remote key.
Press the Door Unlock button (2) on
the remote key, the driver’s door will
unlock. If you press the Door Unlock
button on the remote key again with-
in four seconds, then all the doors
will unlock.
Once the doors are unlocked, they
may be opened by pulling the door
handle.
When closing the door, push the
door by hand. Make sure that doors
are closed securely.
Information
In cold and wet climates, door lockand door mechanisms may not work
properly due to freezing conditions.
If the door is locked/unlocked multi- ple times in rapid succession with
either the vehicle key or door lock
switch, the system may stop operat-
ing temporarily in order to protect
the circuit and prevent damage to
system components.
i
DDOO OORR LL OO CCKK SS
OTL045005
■Type A■Type B
OTL045001
Page 119 of 642
3-21
Convenient features of your vehicle
3
Tilt Steering / Telescope Steering
When adjusting the steering wheel to
a comfortable position, adjust the
steering wheel so that it points
toward your chest, not toward your
face. Make sure you can see the
instrument panel warning lights and
gauges. After adjusting, push the
steering wheel both up and down to
be certain it is locked in position.
Always adjust the position of the
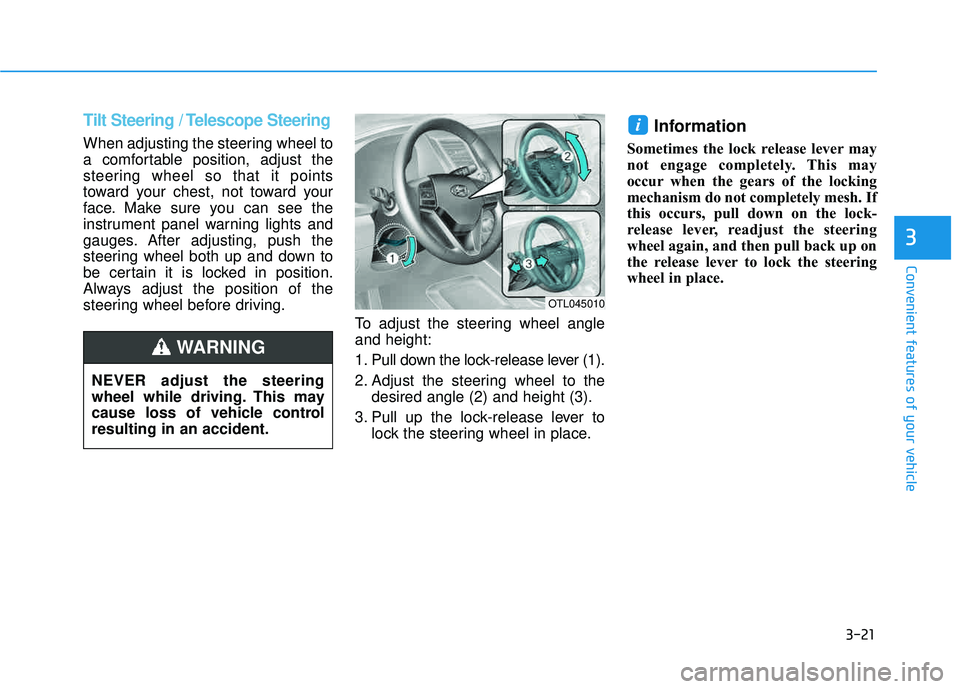
steering wheel before driving.To adjust the steering wheel angleand height:
1. Pull down the lock-release lever (1).
2. Adjust the steering wheel to thedesired angle (2) and height (3).
3. Pull up the lock-release lever to lock the steering wheel in place.
Information
Sometimes the lock release lever may
not engage completely. This may
occur when the gears of the locking
mechanism do not completely mesh. If
this occurs, pull down on the lock-
release lever, readjust the steering
wheel again, and then pull back up on
the release lever to lock the steering
wheel in place.
i
OTL045010
NEVER adjust the steering
wheel while driving. This may
cause loss of vehicle controlresulting in an accident.
WARNING
Page 121 of 642
3-23
Convenient features of your vehicle
3
MMIIRR RROO RRSS
Inside Rearview Mirror
Before you start driving, adjust the
rearview mirror to center on the view
through the rear window.
When cleaning the mirror, use a
paper towel or similar material
dampened with glass cleaner. Do
not spray glass cleaner directly on
the mirror as this may cause the
liquid cleaner to enter the mirrorhousing.
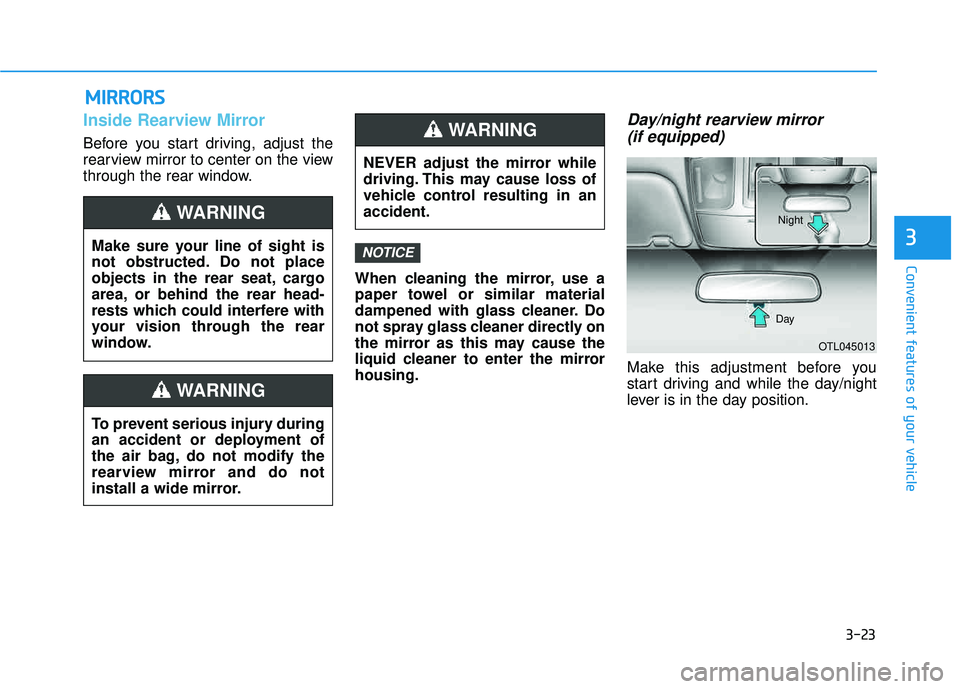
Day/night rearview mirror (if equipped)
Make this adjustment before you
start driving and while the day/night
lever is in the day position.
NOTICEMake sure your line of sight is
not obstructed. Do not place
objects in the rear seat, cargo
area, or behind the rear head-
rests which could interfere with
your vision through the rear
window.
WARNING
NEVER adjust the mirror while
driving. This may cause loss of
vehicle control resulting in anaccident.
WARNING
To prevent serious injury during
an accident or deployment of
the air bag, do not modify the
rearview mirror and do not
install a wide mirror.
WARNING
OTL045013
Day Night
Page 122 of 642
3-24
Pull the day/night lever toward you to reduce glare from the headlights of
the vehicles behind you during night
driving.
Remember that you lose some
rearview clarity in the night position.Electric chromic mirror withhomelink system (if equipped)
To operate the electric rearview
mirror
Press the I button (1) to turn the
automatic- dimming function on. The
mirror indicator light will illuminate.
Press the O button (2) to turn the
automatic- dimming function off. The
mirror indicator light will turn off.
HomeLink®Wireless Control System
Your new mirror comes with an inte-
grated HomeLink Universal
Transceiver, which allows you to pro-
gram the mirror to activate your
garage door(s), estate gate, home
lighting, etc. The mirror actually
learns the codes from your various
existing transmitters.
Convenient features of your vehicle
OHD046025N
OHD046305N
Glare detection sensor
Indicator light
Homelink buttons
Page 135 of 642
3-37
Convenient features of your vehicle
3
Side View Mirror Adjustment
Adjusting the left and right side view mirrors:
1. Press either the L (driver's side) orR (passenger's side) button (1) to
select the rearview mirror you
would like to adjust.
2. Use the mirror adjustment control (2) to position the selected mirror
up, down, left or right.
3. After adjustment, put the button into neutral (center) position to
prevent inadvertent adjustment. The mirrors stop moving when
they reach the maximum adjust-
ing angles, but the motor contin-
ues to operate while the switch
is pressed. Do not press the
switch longer than necessary,
the motor may be damaged.
Do not attempt to adjust the side view mirror by hand or the motor
may be damaged.
Folding the side view mirrors
To fold either the left or right hand
side view mirror, grasp the housing
of the mirror and then fold it toward
the rear of the vehicle.
NOTICE
OTLA045313OTL045019
Page 164 of 642
3-66
Convenient features of your vehicle
If the gauge pointer moves
beyond the normal range area
toward the "H" position, it indi-
cates overheating that may dam-
age the engine.
Do not continue driving with an
overheated engine. If your vehicle
overheats, refer to "If the Engine
Overheats" in chapter 6.
Fuel Gauge
This gauge indicates the approxi-mate amount of fuel remaining in thefuel tank.
Information
The fuel tank capacity is given inchapter 8.
The fuel gauge is supplemented by a low fuel warning light, which will
illuminate when the fuel tank is
nearly empty.
On inclines or curves, the fuel gauge pointer may fluctuate or the low fuel
warning light may come on earlier
than usual due to the movement of
fuel in the tank.
iNOTICE
Never remove the radiator cap or
reservoir cap when the engine is
hot. The engine coolant is under
pressure and could severely
burn. Wait until the engine is cool
before adding coolant to the
reservoir.
WARNINGOTL045106