2016 Hyundai Santa Fe Rear seat
[x] Cancel search: Rear seatPage 17 of 759
Your vehicle at a glance
42
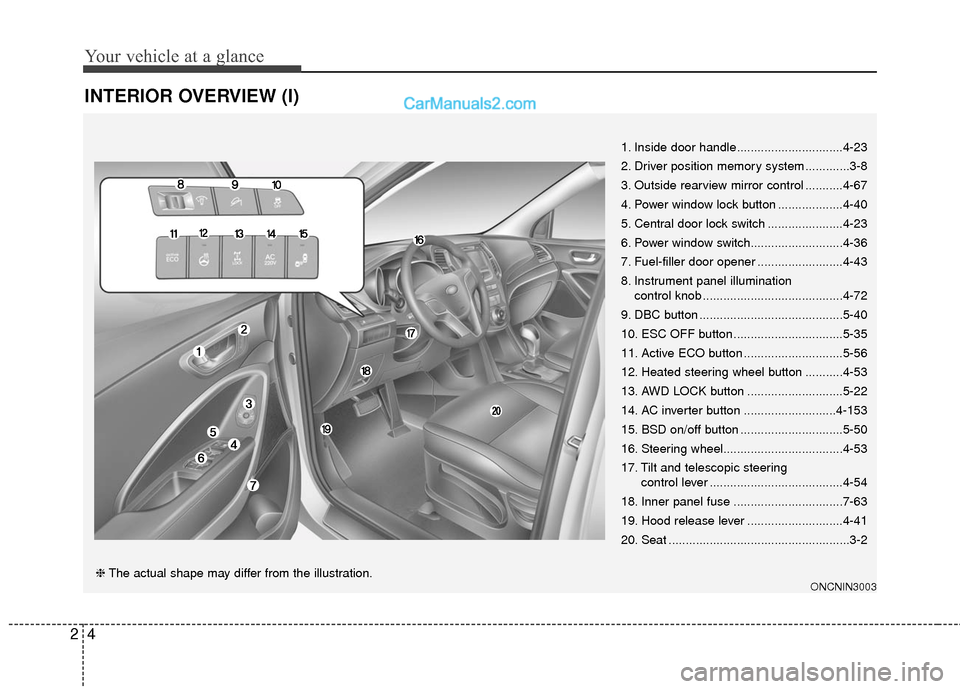
INTERIOR OVERVIEW (I)
1. Inside door handle...............................4-23
2. Driver position memory system .............3-8
3. Outside rearview mirror control ...........4-67
4. Power window lock button ...................4-40
5. Central door lock switch ......................4-23
6. Power window switch...........................4-36
7. Fuel-filler door opener .........................4-43
8. Instrument panel illumination control knob .........................................4-72
9. DBC button ..........................................5-40
10. ESC OFF button ................................5-35
11. Active ECO button .............................5-56
12. Heated steering wheel button ...........4-53
13. AWD LOCK button ............................5-22
14. AC inverter button ...........................4-153
15. BSD on/off button ..............................5-50
16. Steering wheel...................................4-53
17. Tilt and telescopic steering control lever .......................................4-54
18. Inner panel fuse ................................7-63
19. Hood release lever ............................4-41
20. Seat .....................................................3-2
ONCNIN3003❈ The actual shape may differ from the illustration.
Page 21 of 759
Safety features of your vehicle
Seats . . . . . . . . . . . . . . . . . . . . . . . . . . . . . . . . . . . . \
. . 3-2
• Front seat adjustment - Manual . . . . . . . . . . . . . . . . . 3-5
• Front seat adjustment - Power. . . . . . . . . . . . . . . . . . . 3-6
• Driver position memory system . . . . . . . . . . . . . . . . . . 3-8
• Rear seat adjustment . . . . . . . . . . . . . . . . . . . . . . . . . 3-15
Seat belts . . . . . . . . . . . . . . . . . . . . . . . . . . . . . . . . . 3-27
• Seat belt restraint system . . . . . . . . . . . . . . . . . . . . . . 3-27
• Pre-tensioner seat belt. . . . . . . . . . . . . . . . . . . . . . . . . 3-33
• Seat belt precautions . . . . . . . . . . . . . . . . . . . . . . . . . . 3-36
• Care of seat belts . . . . . . . . . . . . . . . . . . . . . . . . . . . . . 3-39
Child restraint system . . . . . . . . . . . . . . . . . . . . . . 3-40
• Using a child restraint system . . . . . . . . . . . . . . . . . . 3-42
• Tether Anchor system . . . . . . . . . . . . . . . . . . . . . . . . . 3-45
• Securing a child restraint seat with child seat lower anchor system . . . . . . . . . . . . . . . . 3-47
Air bag - supplemental restraint system . . . . . . . 3-49
• How does the air bag system operate . . . . . . . . . . . . 3-50
• Do not Installing a child restraint on a front passenger's seat . . . . . . . . . . . . . . . . . . . . . . . . . . . . . 3-51
• Air bag warning light . . . . . . . . . . . . . . . . . . . . . . . . . 3-52
• SRS components and functions . . . . . . . . . . . . . . . . . 3-52
• Occupant classification system. . . . . . . . . . . . . . . . . . 3-56
• Main components of occupant classification system . 3-57
• Driver's and passenger's front air bag . . . . . . . . . . . 3-62
• Side impact air bag . . . . . . . . . . . . . . . . . . . . . . . . . . . 3-67 • Curtain air bag . . . . . . . . . . . . . . . . . . . . . . . . . . . . . . 3-68
• SRS Care . . . . . . . . . . . . . . . . . . . . . . . . . . . . . . . . . . . 3-\
75
• Additional safety precautions . . . . . . . . . . . . . . . . . . . 3-76
• Air bag warning label . . . . . . . . . . . . . . . . . . . . . . . . . 3-77
3
Page 24 of 759
Safety features of your vehicle
43
WARNING - Rear
seatbacks
The rear seatback must be securely latched. If not, pas-
sengers and objects could be
thrown forward resulting in
serious injury or death in the
event of a sudden stop or col-
lision.
No passenger should ride in the cargo area or sit or lie on
folded seatbacks while the
vehicle is moving. All passen-
gers must be properly seated
in seats and restrained prop-
erly while riding.
When resetting the seatback to the upright position, make
sure it is securely latched by
pushing it forward and rear-
wards.
To avoid the possibility of burns, do not remove the car-
pet in the cargo area. Emission
control devices beneath this
floor generate high tempera-
tures.
(Continued)(Continued)
Luggage and other cargoshould be laid flat in the cargo
area or on the folded rear
seatback. If objects are large,
heavy, or must be piled, they
must be secured. Under no
circumstances should cargo
be piled higher than the seat-
backs. Failure to follow these
warnings could result in seri-
ous injury or death in the
event of a sudden stop, colli-
sion or rollover.
WARNING
After adjusting the seat, always
check that it is securely locked
into place by attempting to
move the seat forward or
reverse without using the lock
release lever. Sudden or unex-
pected movement of the dri-
ver's seat could cause you to
lose control of the vehicle
resulting in an accident.
WARNING
Do not adjust the seat whilewearing seat belts. Moving the
seat cushion forward may
cause strong pressure on the
abdomen.
Use extreme caution so that hands or other objects are not
caught in the seat mechanisms
while the seat is moving.
Do not place a cigarette lighter on the floor or seat.
When you operate the seat,
gas may exit out of the lighter
and cause a fire.
Use extreme caution when picking small objects trapped
under the seats or between
the seat and the center con-
sole. Your hands might be cut
or injured by the sharp edges
of the seats mechanism.
Page 25 of 759

35
Safety features of your vehicle
Front seat adjustment - Manual
(if equipped)
Forward and rearward
To move the seat forward or rearward:
1. Pull the seat slide adjustmentlever up and hold it.
2. Slide the seat to the position you desire.
3. Release the lever and make sure the seat is locked in place.
Adjust the seat before driving, and
make sure the seat is locked secure-
ly by trying to move forward and rear-
ward without using the lever. If the
seat moves, it is not locked properly.
Seatback angle
To recline the seatback:
1. Lean forward slightly and lift up the seatback recline lever.
2. Carefully lean back on the seat and adjust the seatback of the
seat to the position you desire.
3. Release the lever and make sure the seatback is locked in place.
(The lever MUST return to its orig-
inal position for the seatback to
lock.)
Seat cushion height
(for driver’s seat) (if equipped)
To change the height of the seat
cushion, push the lever upwards or
downwards.
To lower the seat cushion, push the lever down several times.
To raise the seat cushion, pull the lever up several times.ONCESA2002
ONCESA2003
ONCESA2004
Page 26 of 759
Safety features of your vehicle
63
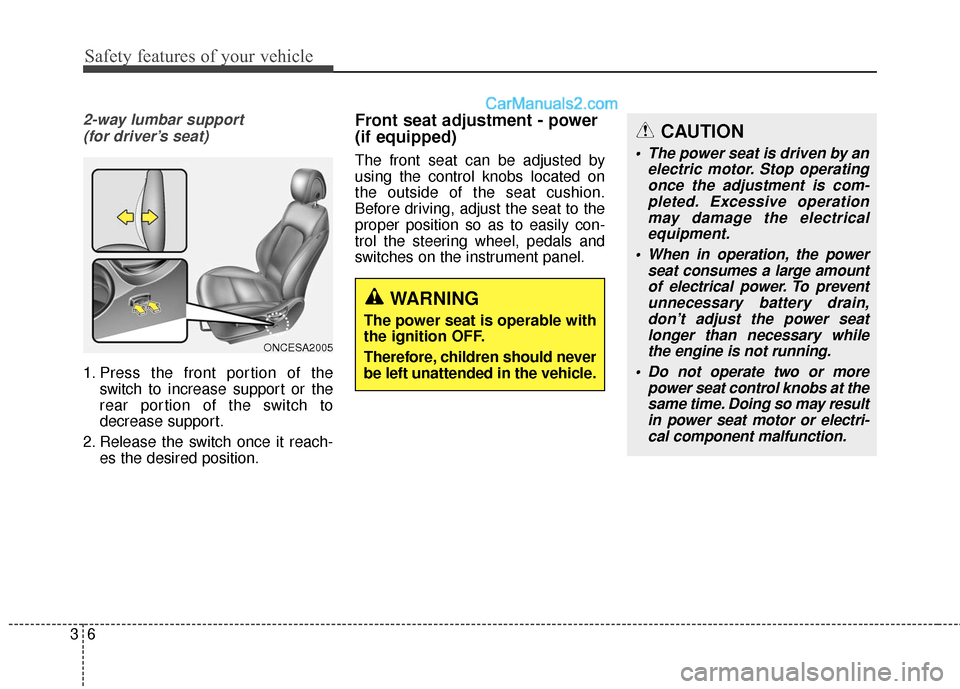
2-way lumbar support (for driver’s seat)
1. Press the front portion of the switch to increase support or the
rear portion of the switch to
decrease support.
2. Release the switch once it reach- es the desired position.
Front seat adjustment - power
(if equipped)
The front seat can be adjusted by
using the control knobs located on
the outside of the seat cushion.
Before driving, adjust the seat to the
proper position so as to easily con-
trol the steering wheel, pedals and
switches on the instrument panel.
ONCESA2005
WARNING
The power seat is operable with
the ignition OFF.
Therefore, children should never
be left unattended in the vehicle.
CAUTION
The power seat is driven by anelectric motor. Stop operatingonce the adjustment is com-pleted. Excessive operationmay damage the electricalequipment.
When in operation, the power seat consumes a large amountof electrical power. To preventunnecessary battery drain,don’t adjust the power seatlonger than necessary whilethe engine is not running.
Do not operate two or more power seat control knobs at thesame time. Doing so may resultin power seat motor or electri-cal component malfunction.
Page 27 of 759
37
Safety features of your vehicle
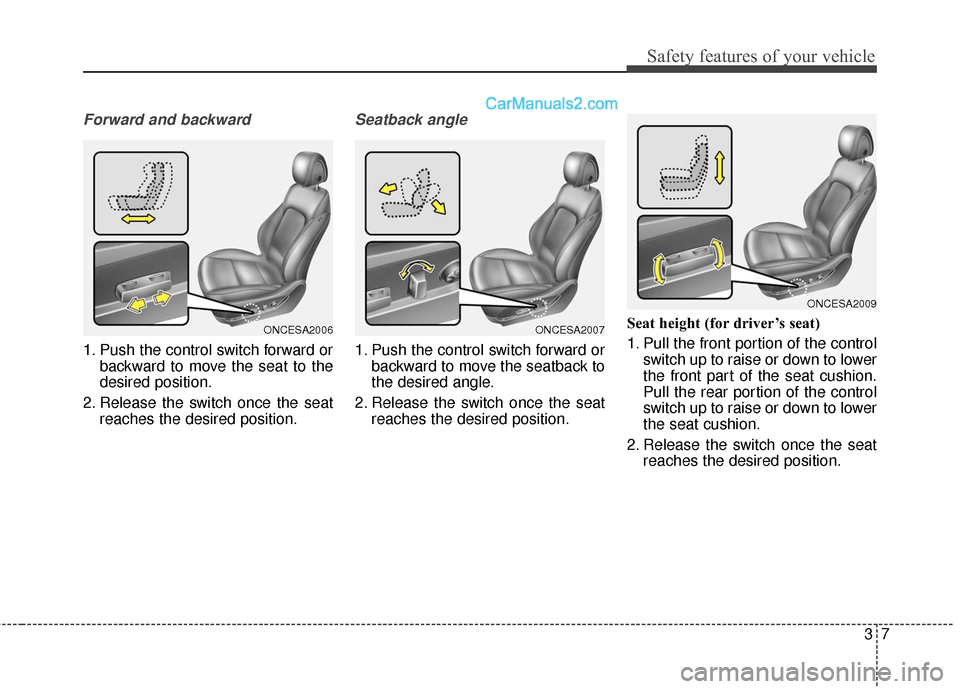
Forward and backward
1. Push the control switch forward orbackward to move the seat to the
desired position.
2. Release the switch once the seat reaches the desired position.
Seatback angle
1. Push the control switch forward orbackward to move the seatback to
the desired angle.
2. Release the switch once the seat reaches the desired position. Seat height (for driver’s seat)
1. Pull the front portion of the control
switch up to raise or down to lower
the front part of the seat cushion.
Pull the rear portion of the control
switch up to raise or down to lower
the seat cushion.
2. Release the switch once the seat reaches the desired position.
ONCESA2009
ONCESA2006ONCESA2007
Page 28 of 759

Safety features of your vehicle
83
4-way lumbar support (for driver’s seat, if equipped)
The lumbar support can be adjusted
by pressing the switch.
1. Press the front portion (1) of the switch to increase support, or the
rear portion (2) of the switch, to
decrease support.
2. Release the switch once it reach- es the desired position.
3. Press the upper portion (3) of the switch to move the support posi-
tion up, or press the lower portion
(4) of the switch, to move the sup-
port position down.
4. Release the switch once it reach- es the desired position.
Driver position memory system
(if equipped, for power seat)
A driver position memory system is
provided to store and recall the driv-
er seat and outside rearview mirror
position with a simple button opera-
tion. By saving the desired position
into the system memory, different
drivers can reposition the driver seat
based upon their driving preference.
If the battery is disconnected, the posi-
tion memory will be erased and the
driving position should be restored in
the system.
Storing positions into memory
using the buttons on the door
Storing driver’s seat positions
1. Shift the shift lever into P or N while the engine start/stop button
is ON or ignition switch ON.
2. Adjust the driver’s seat and out- side rearview mirror to a position
that is comfortable for the driver.
3. Press SET button on the control panel. The system will beep once.
4. Press one of the memory buttons (1 or 2) within 5 seconds after
pressing the SET button. The sys-
tem will beep twice when memory
has been successfully stored.ONCESA2008
WARNING
Never attempt to operate the
driver position memory system
while the vehicle is moving.
This could result in loss of con-
trol, and an accident causing
death, serious injury, or property
damage.
ODM042335
Page 29 of 759

39
Safety features of your vehicle
Recalling positions from memory
The position in memory will be
recalled when:
1. The shift lever is in P or N with oneof the condition below:
- The ignition switch in the ON position or engine running.
- The ignition switch in the LOCK/OFF or ACC position
while the driver's door is opened.
2. Press the desired memory button (1 or 2). The system will beep
once, then the driver’s seat will
automatically adjust to the stored
position.
Adjusting the control switch for the
driver’s seat while the system is
recalling the stored position will
cause the movement to stop and
move in the direction that the control
switch is moved.
Easy access function (if equipped)
The system will move the driver's
seat automatically as follows:
Without smart key system
- It will move the driver’s seat rear-ward when the ignition key is
removed and front driver’s door is
opened.
- It will move the driver’s seat for- ward when the ignition key is
inserted.
With smart key system - It will move the driver’s seat rear-ward when the engine start/stop
button is changed to the OFF
position and front driver’s door is
opened.
- It will move the driver’s seat for- ward when the engine start/stop
button is changed to the ACC or
START position.
You can activate or deactivate this
feature. Refer to "User settings" in
section 4.
WARNING
Use caution when recalling the
adjustment memory while sit-
ting in the vehicle. Push the
seat position control switch to
the desired position immediate-
ly if the seat moves too far in
any direction.