Page 165 of 759

Features of your vehicle
68
4
Remote control
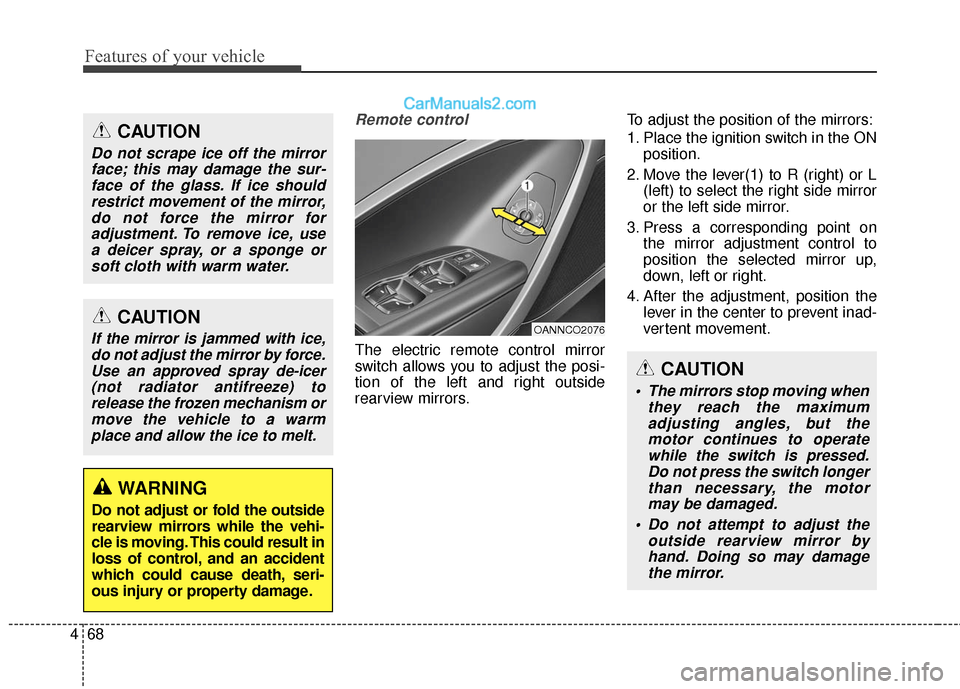
The electric remote control mirror
switch allows you to adjust the posi-
tion of the left and right outside
rearview mirrors. To adjust the position of the mirrors:
1. Place the ignition switch in the ON
position.
2. Move the lever(1) to R (right) or L (left) to select the right side mirror
or the left side mirror.
3. Press a corresponding point on the mirror adjustment control to
position the selected mirror up,
down, left or right.
4. After the adjustment, position the lever in the center to prevent inad-
vertent movement.
CAUTION
If the mirror is jammed with ice,do not adjust the mirror by force.Use an approved spray de-icer(not radiator antifreeze) torelease the frozen mechanism ormove the vehicle to a warmplace and allow the ice to melt.
WARNING
Do not adjust or fold the outside
rearview mirrors while the vehi-
cle is moving. This could result in
loss of control, and an accident
which could cause death, seri-
ous injury or property damage.
CAUTION
Do not scrape ice off the mirrorface; this may damage the sur-face of the glass. If ice shouldrestrict movement of the mirror,do not force the mirror foradjustment. To remove ice, usea deicer spray, or a sponge orsoft cloth with warm water.
OANNCO2076
CAUTION
The mirrors stop moving when they reach the maximumadjusting angles, but themotor continues to operatewhile the switch is pressed.Do not press the switch longerthan necessary, the motormay be damaged.
Do not attempt to adjust the outside rearview mirror byhand. Doing so may damagethe mirror.
Page 166 of 759

469
Features of your vehicle
Reverse parking aid function (if equipped)
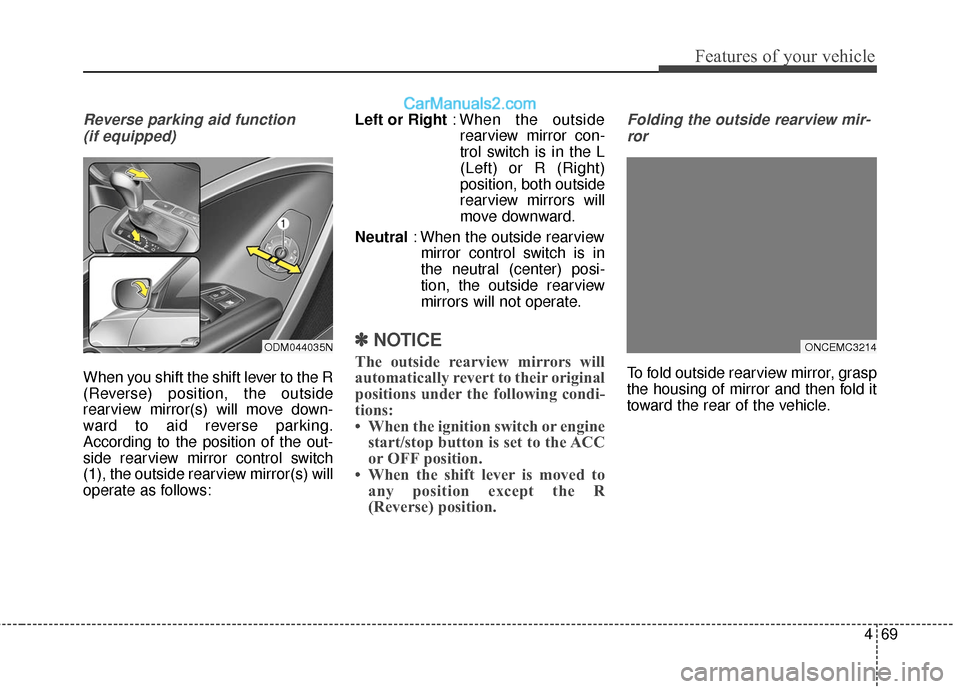
When you shift the shift lever to the R
(Reverse) position, the outside
rearview mirror(s) will move down-
ward to aid reverse parking.
According to the position of the out-
side rearview mirror control switch
(1), the outside rearview mirror(s) will
operate as follows: Left or Right
: When the outside
rearview mirror con-
trol switch is in the L
(Left) or R (Right)
position, both outside
rearview mirrors will
move downward.
Neutral : When the outside rearview
mirror control switch is in
the neutral (center) posi-
tion, the outside rearview
mirrors will not operate.
✽ ✽ NOTICE
The outside rearview mirrors will
automatically revert to their original
positions under the following condi-
tions:
• When the ignition switch or engine
start/stop button is set to the ACC
or OFF position.
• When the shift lever is moved to any position except the R
(Reverse) position.
Folding the outside rearview mir-
ror
To fold outside rearview mirror, grasp
the housing of mirror and then fold it
toward the rear of the vehicle.
ONCEMC3214ODM044035N
Page 169 of 759
Features of your vehicle
72
4
Instrument Cluster Control
Adjusting Instrument Cluster
Illumination
The brightness of the instrument
panel illumination is changed by
moving the illumination control knob
right or left when the ignition switch
or Engine Start/Stop button is ON, or
the tale lights are turned on. The brightness has 20 levels : 1
(MIN) ~ 20 (MAX)
If you hold the illumination control knob on the right end (+) or left end
(-), the brightness will be changed
continuously.
If the brightness reaches to the maximum or minimum level, an
alarm will sound.
LCD Display Control
The LCD display modes can be
changed by using the control buttons
on the steering wheel.
(1) : MODE button for changing modes
(2) : MOVE button for changing items
(3) : SELECT/RESET button for setting or resetting the
selected item
❈ For the LCD modes, refer to “LCD
Display” in this chapter.
ODM042224
ODM042056ODMEDI2001/ODMEDI2029
■
Type A
■Type B
Page 171 of 759

Features of your vehicle
74
4
Engine Coolant Temperature
Gauge
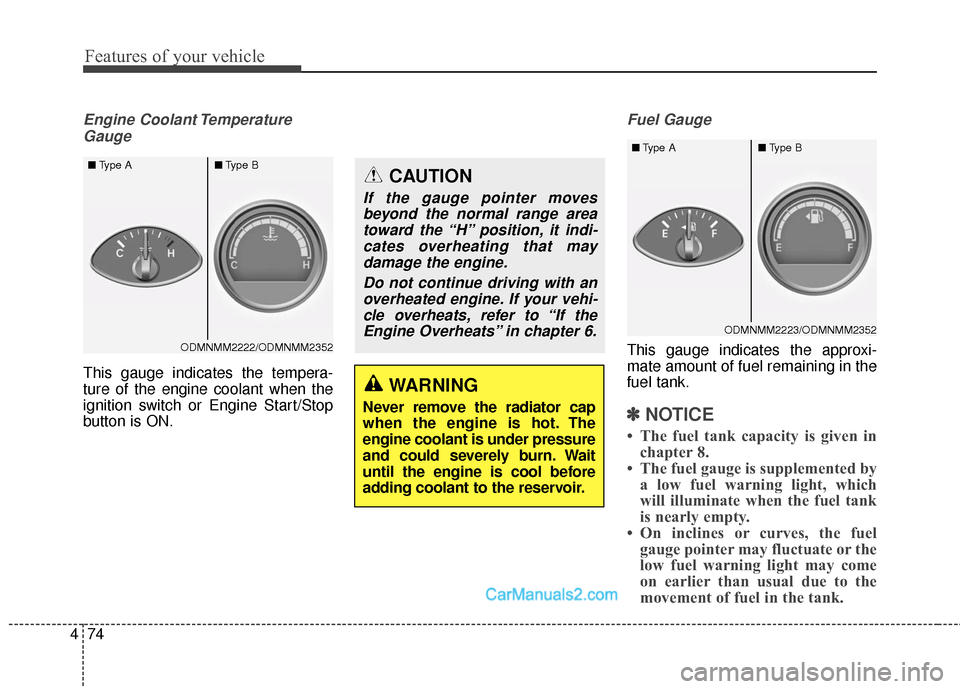
This gauge indicates the tempera-
ture of the engine coolant when the
ignition switch or Engine Start/Stop
button is ON.
Fuel Gauge
This gauge indicates the approxi-
mate amount of fuel remaining in the
fuel tank.
✽ ✽ NOTICE
• The fuel tank capacity is given in
chapter 8.
• The fuel gauge is supplemented by a low fuel warning light, which
will illuminate when the fuel tank
is nearly empty.
• On inclines or curves, the fuel gauge pointer may fluctuate or the
low fuel warning light may come
on earlier than usual due to the
movement of fuel in the tank.
WARNING
Never remove the radiator cap
when the engine is hot. The
engine coolant is under pressure
and could severely burn. Wait
until the engine is cool before
adding coolant to the reservoir.
CAUTION
If the gauge pointer moves
beyond the normal range areatoward the “H” position, it indi-cates overheating that maydamage the engine.
Do not continue driving with anoverheated engine. If your vehi-cle overheats, refer to “If theEngine Overheats” in chapter 6.
ODMNMM2222/ODMNMM2352
■
Type A ■Type B
ODMNMM2223/ODMNMM2352
■
Type A ■Type B
Page 175 of 759

Features of your vehicle
78
4
Service Mode
Service Interval
Service in
It calculates and displays when you
need a scheduled maintenance
service (mileage or days).
If the remaining mileage or time
reaches 900 mi. (1,500 km) or 30
days, "Service in" message is dis-
played for several seconds each time
you set the ignition switch or Engine
Start/Stop Button to the ON position. Service required
If you do not have your vehicle serv-
iced according to the already inputted
service interval, “Service required”
message is displayed for several sec-
onds each time you set the ignition
switch or Engine Start/Stop Button to
the ON position (The mileage and
time changes to "---").
To reset the service interval to the
mileage and days you inputted before:
- Press the SELECT/RESET button
for more than 1 second. Service in OFF
If the service interval is not set,
“Service in OFF” message is dis-
played on the LCD display.
✽ ✽
NOTICE
If any of the following conditions
occurs, the mileage and days may be
incorrect.
- The battery cable is disconnected.
- The fuse switch is turned off.
- The battery is discharged.
OANNDI2066/OANNDI2070
■
Type A
■Type BODMEDI2067/ODMEDI2071
■
Type A
■Type BODMEDI2068/ODMEDI2072
■
Type A
■Type B
Page 176 of 759
479
Features of your vehicle
User Settings Mode
Description
On this mode, you can change set-
ting of the doors, lamps, and so on.
Door
Auto Door Lock (if equipped)
Off:The auto door lock operation will
be deactivated.
Speed: All doors will be automatically
locked when the vehicle speed
exceeds 15km/h (9.3mph).
Shift Lever: All doors will be automatically
locked if the automatic transaxle
shift lever is shifted from the P
(Park) position to the R (Reverse),
N (Neutral), or D (Drive) position. Auto Door Unlock (if equipped)
Off:
The auto door unlock operation will
be canceled.
Key Out or Power Off: All doors will be automatically
unlocked when the ignition key is
removed from ignition switch or
Engine Start/Stop Button is set to
the OFF position.
Shift Lever: All doors will be automatically
unlocked if the automatic transaxle
shift lever is shifted to the P (Park)
position.
ODMEDI2025/ODMEDI2054
■
Type A
■Type B
Page 185 of 759
Features of your vehicle
88
4
Low Washer Fluid (if equipped)
This warning message illuminates
on the service reminder mode if
the washer fluid level in the reser-
voir is nearly empty.
It means that you should refill the washer fluid.
Low Tire Pressure (if equipped)
This warning message illuminatesif the tire pressure is low with the
ignition switch or the Engine/Start
Button in ON position.
For more information, refer to "Tire
Pressure Monitoring System
(TPMS)" in chapter 6.
Turn on "FUSE SWITCH" (if equipped)
This warning message illuminates if the fuse switch on the fuse box is
OFF.
It means that you should turn the fuse switch on.
For more details, refer to “Fuses” in
chapter 7.
ODMEDI2021/ODMEDI2050
■
Type A
■Type B
ODMEDI2022/ODMEDI2051
■
Type A
■Type B
ODM064023L/ODM064020L
■
Type A
■Type B
Page 187 of 759

Features of your vehicle
90
4
Trip A/BTripmeter (1)
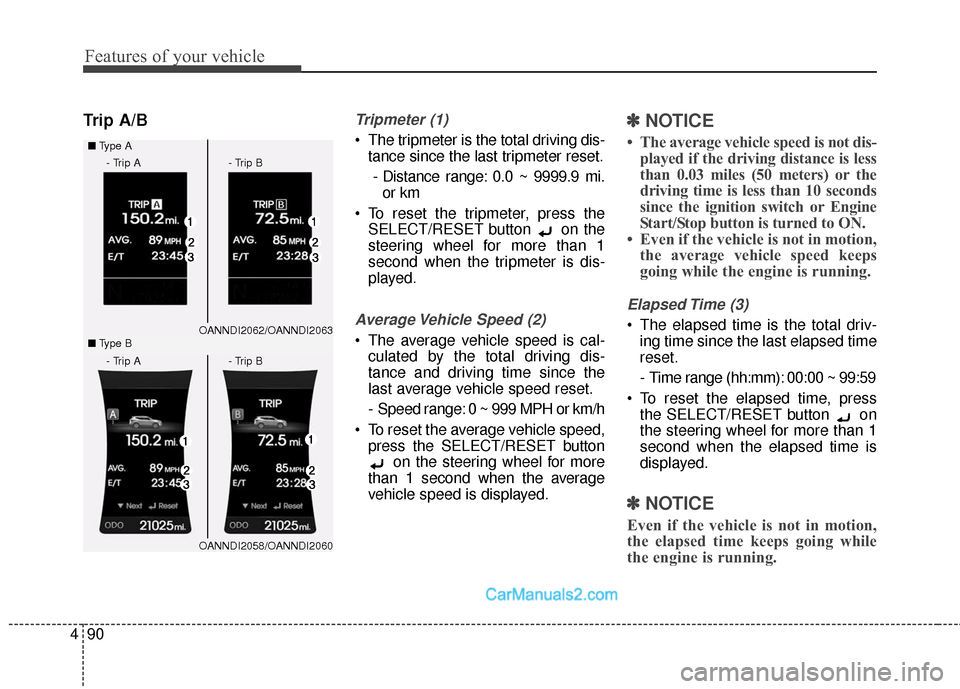
The tripmeter is the total driving dis-
tance since the last tripmeter reset.
- Distance range: 0.0 ~ 9999.9 mi. or km
To reset the tripmeter, press the SELECT/RESET button on the
steering wheel for more than 1
second when the tripmeter is dis-
played.
Average Vehicle Speed (2)
The average vehicle speed is cal-culated by the total driving dis-
tance and driving time since the
last average vehicle speed reset.
- Speed range: 0 ~ 999 MPH or km/h
To reset the average vehicle speed, press the SELECT/RESET button on the steering wheel for more
than 1 second when the average
vehicle speed is displayed.
✽ ✽ NOTICE
• The average vehicle speed is not dis-
played if the driving distance is less
than 0.03 miles (50 meters) or the
driving time is less than 10 seconds
since the ignition switch or Engine
Start/Stop button is turned to ON.
• Even if the vehicle is not in motion, the average vehicle speed keeps
going while the engine is running.
Elapsed Time (3)
The elapsed time is the total driv-
ing time since the last elapsed time
reset.
- Time range (hh:mm): 00:00 ~ 99:59
To reset the elapsed time, press the SELECT/RESET button on
the steering wheel for more than 1
second when the elapsed time is
displayed.
✽ ✽ NOTICE
Even if the vehicle is not in motion,
the elapsed time keeps going while
the engine is running.
OANNDI2062/OANNDI2063
■
Type A
OANNDI2058/OANNDI2060
■
Type B
- Trip A - Trip B
- Trip A - Trip B