Page 108 of 759
411
Features of your vehicle
Door Lock
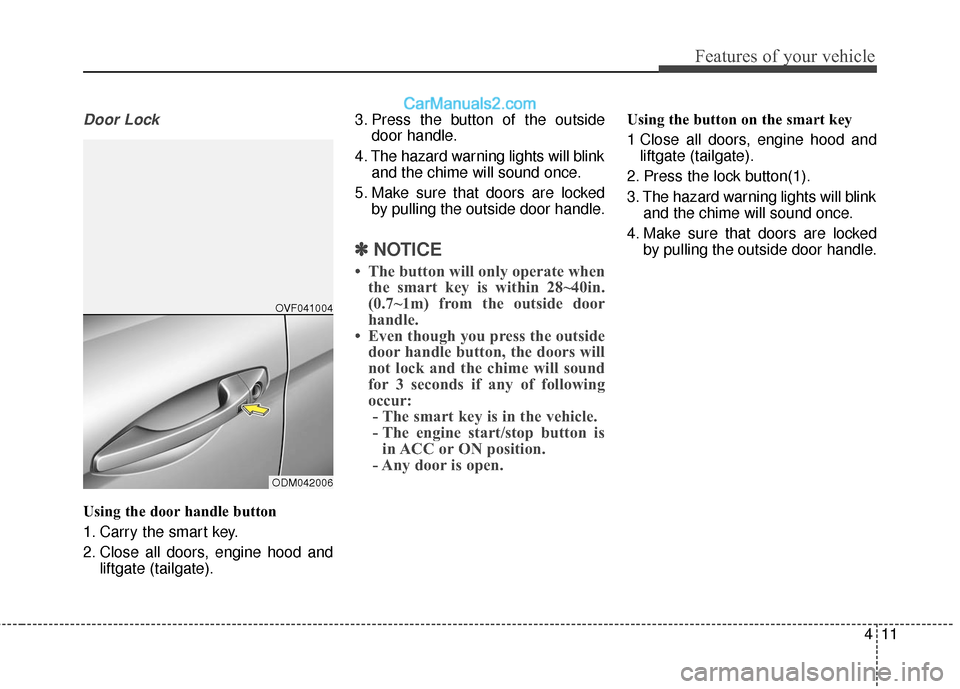
Using the door handle button
1. Carry the smart key.
2. Close all doors, engine hood andliftgate (tailgate). 3. Press the button of the outside
door handle.
4. The hazard warning lights will blink and the chime will sound once.
5. Make sure that doors are locked by pulling the outside door handle.
✽ ✽NOTICE
• The button will only operate when
the smart key is within 28~40in.
(0.7~1m) from the outside door
handle.
• Even though you press the outside door handle button, the doors will
not lock and the chime will sound
for 3 seconds if any of following
occur:- The smart key is in the vehicle.
- The engine start/stop button is in ACC or ON position.
- Any door is open.
Using the button on the smart key
1 Close all doors, engine hood and
liftgate (tailgate).
2. Press the lock button(1).
3. The hazard warning lights will blink and the chime will sound once.
4. Make sure that doors are locked by pulling the outside door handle.
ODM042006OVF041004
Page 110 of 759
413
Features of your vehicle
Liftgate (Tailgate) unlocking
Using the liftgate (tailgate) handle
button
1. Carry the smart key.
2. Press the liftgate (tailgate) handlebutton.
3. When all doors are locked, the hazard warning lights will blink two
times.
Once the liftgate (tailgate) is
opened and then closed, the lift-
gate (tailgate) will lock automati-
cally.
✽ ✽NOTICE
The button will only operate when
the smart key is within 28~40in.
(0.7~1m) from the liftgate (tailgate)
handle.
Using the button on the smart key
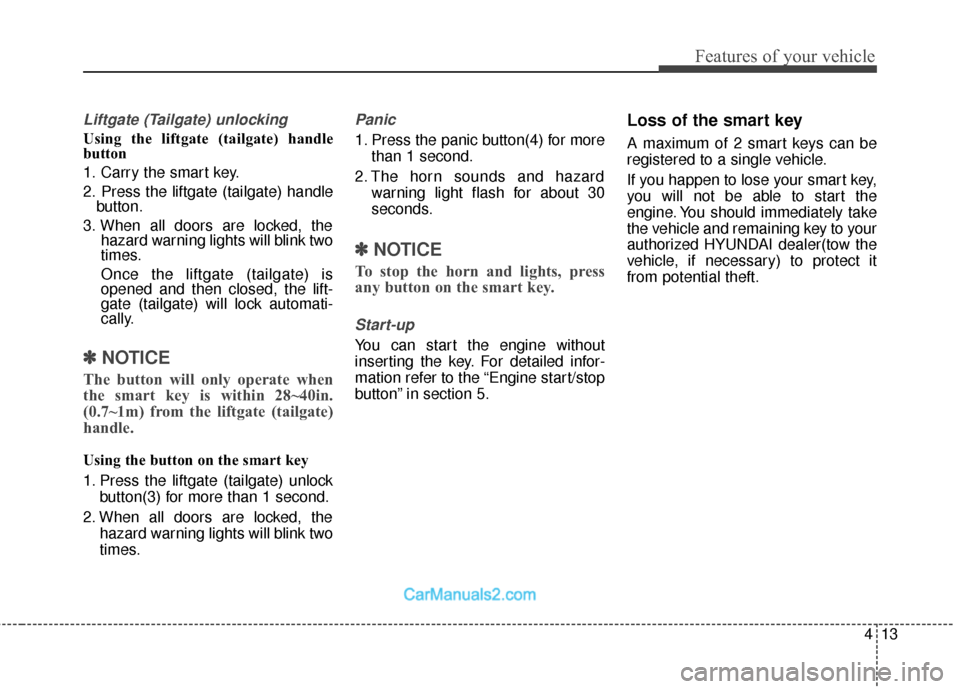
1. Press the liftgate (tailgate) unlock
button(3) for more than 1 second.
2. When all doors are locked, the hazard warning lights will blink two
times.
Panic
1. Press the panic button(4) for morethan 1 second.
2. The horn sounds and hazard warning light flash for about 30
seconds.
✽ ✽NOTICE
To stop the horn and lights, press
any button on the smart key.
Start-up
You can start the engine without
inserting the key. For detailed infor-
mation refer to the “Engine start/stop
button” in section 5.
Loss of the smart key
A maximum of 2 smart keys can be
registered to a single vehicle.
If you happen to lose your smart key,
you will not be able to start the
engine. You should immediately take
the vehicle and remaining key to your
authorized HYUNDAI dealer(tow the
vehicle, if necessary) to protect it
from potential theft.
Page 111 of 759
Features of your vehicle
14
4
Smart key precautions
The smart key will not work if any
of the following occur:
- The smart key is close to a radio transmitter such as a radio sta-
tion or an airport which can inter-
fere with normal operation of the
smart key.
- The smart key is near a mobile two way radio system or a cellu-
lar phone.
- Another vehicle’s smart key is being operated close to your
vehicle.
When the smart key does not work correctly, open and close the door
with the mechanical key and contact
an authorized HYUNDAI dealer. If the smart key is in close proximi-
ty to your cell phone or smart
phone, the signal from the smart
key could be blocked by normal
operation of your cell phone or
smart phone. This is especially
important when the phone is active
such as making a call, receiving
calls, text messaging, and/or send-
ing/receiving emails. Avoid placing
the smart key and your cell phone
or smart phone in the same pants
or jacket pocket and maintain ade-
quate distance between the two
devices.
Smart key immobilizer system
Your vehicle is equipped with an
electronic engine immobilizer system
to reduce the risk of unauthorized
vehicle use.
Your immobilizer system is com-
prised of a small transponder in the
smart key and electronic devices
inside the vehicle.
With the immobilizer system, when-
ever you turn the engine start/stop
button to the ON position by pressing
the button while carrying the smart
key, it checks and determines and
verifies if the smart key is valid or not.
If the key is determined to be valid,
the engine will start.
If the key is determined to be invalid,
the engine will not start.
CAUTION
Keep the smart key away fromwater or any liquid and fire. Ifthe inside of the smart key getsdamp (due to drinks or mois-ture), or is heated, internal cir-cuit may malfunction, excludingthe car from the warranty.
Page 112 of 759

415
Features of your vehicle
To deactivate the immobilizersystem:
Turn the engine start/stop button to
the ON position by pressing the but-
ton while carrying the smart key.
To activate the immobilizer system:
Turn the engine start/stop button to
the OFF position. The immobilizer
system activates automatically.
Without a valid smart key for your
vehicle, the engine will not start.
✽ ✽ NOTICE
When starting the engine, do not use
the key with other immobilizer keys
around. Otherwise the engine may
not start or may stop soon after it
starts. Keep each key separate in
order to avoid a starting malfunction.
✽ ✽NOTICE
If you need additional keys or lose
your keys, contact an authorized
HYUNDAI dealer.
CAUTION
In order to prevent theft of your
vehicle, do not leave spare keysanywhere in your vehicle. YourImmobilizer password is a cus-tomer unique password andshould be kept confidential. Donot leave this number anywherein your vehicle.
CAUTION
The transponder in your smartkey is an important part of theimmobilizer system. It isdesigned to give years of trou-ble-free service, however youshould avoid exposure to mois-ture, static electricity and roughhandling. Immobilizer systemmalfunction could occur.
CAUTION
Do not change, alter or adjustthe immobilizer system becauseit could cause the immobilizersystem to malfunction andshould only be serviced by anauthorized HYUNDAI dealer.
Malfunctions caused by improp-er alterations, adjustments ormodifications to the immobilizersystem are not covered by yourvehicle manufacturer warranty.
CAUTION
Do not put metal accessoriesnear the smart key.
The engine may not start becausethe metal accessories may inter-rupt the transponder signal fromtransmitting normally.
Page 166 of 759
469
Features of your vehicle
Reverse parking aid function (if equipped)
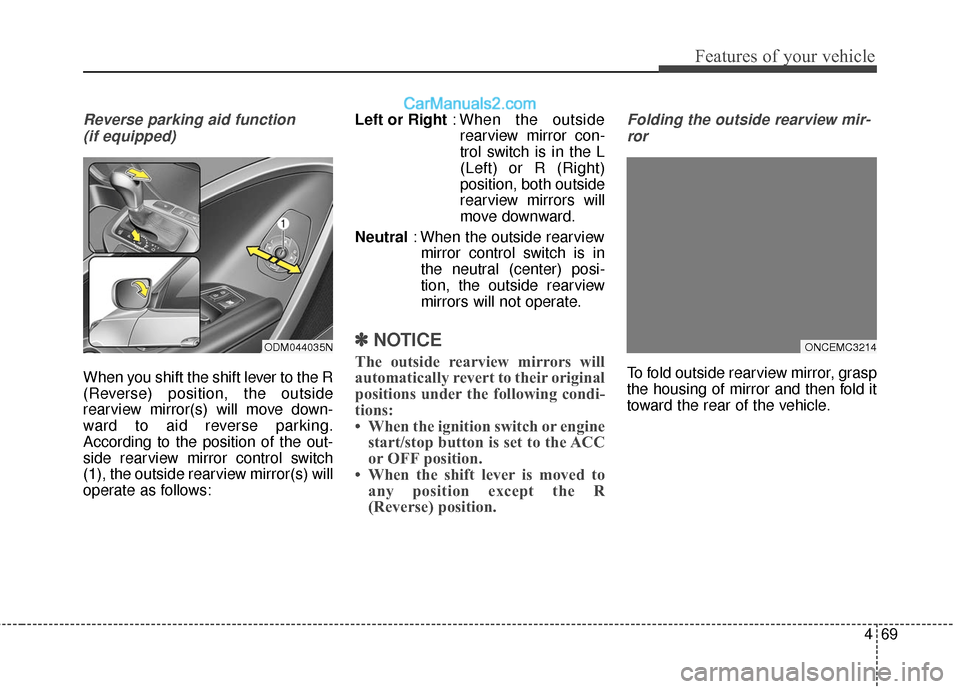
When you shift the shift lever to the R
(Reverse) position, the outside
rearview mirror(s) will move down-
ward to aid reverse parking.
According to the position of the out-
side rearview mirror control switch
(1), the outside rearview mirror(s) will
operate as follows: Left or Right
: When the outside
rearview mirror con-
trol switch is in the L
(Left) or R (Right)
position, both outside
rearview mirrors will
move downward.
Neutral : When the outside rearview
mirror control switch is in
the neutral (center) posi-
tion, the outside rearview
mirrors will not operate.
✽ ✽ NOTICE
The outside rearview mirrors will
automatically revert to their original
positions under the following condi-
tions:
• When the ignition switch or engine
start/stop button is set to the ACC
or OFF position.
• When the shift lever is moved to any position except the R
(Reverse) position.
Folding the outside rearview mir-
ror
To fold outside rearview mirror, grasp
the housing of mirror and then fold it
toward the rear of the vehicle.
ONCEMC3214ODM044035N
Page 169 of 759
Features of your vehicle
72
4
Instrument Cluster Control
Adjusting Instrument Cluster
Illumination
The brightness of the instrument
panel illumination is changed by
moving the illumination control knob
right or left when the ignition switch
or Engine Start/Stop button is ON, or
the tale lights are turned on. The brightness has 20 levels : 1
(MIN) ~ 20 (MAX)
If you hold the illumination control knob on the right end (+) or left end
(-), the brightness will be changed
continuously.
If the brightness reaches to the maximum or minimum level, an
alarm will sound.
LCD Display Control
The LCD display modes can be
changed by using the control buttons
on the steering wheel.
(1) : MODE button for changing modes
(2) : MOVE button for changing items
(3) : SELECT/RESET button for setting or resetting the
selected item
❈ For the LCD modes, refer to “LCD
Display” in this chapter.
ODM042224
ODM042056ODMEDI2001/ODMEDI2029
■
Type A
■Type B
Page 171 of 759
Features of your vehicle
74
4
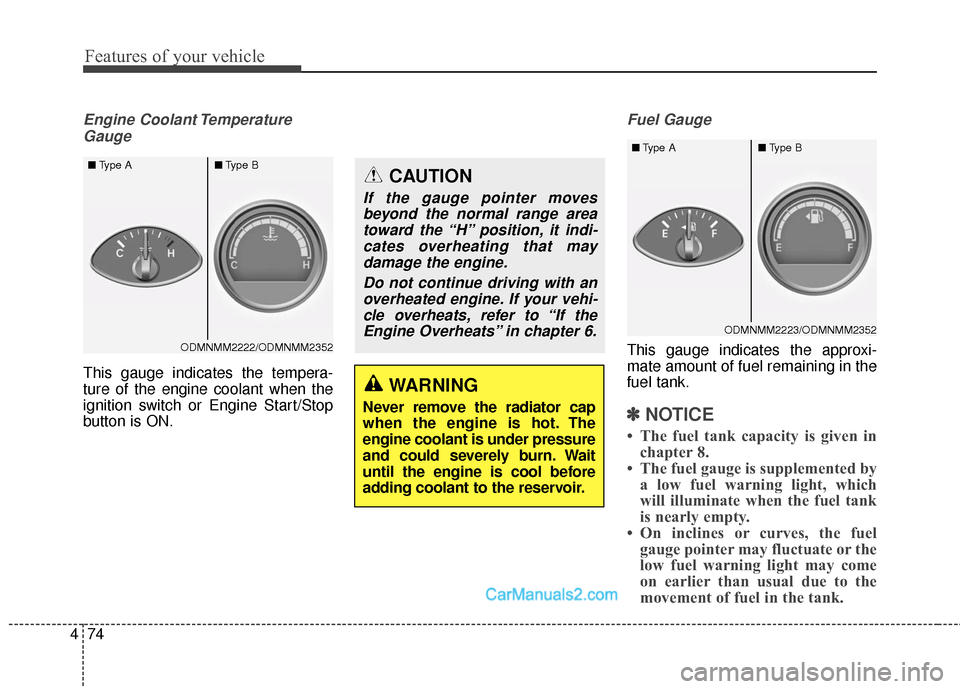
Engine Coolant Temperature
Gauge
This gauge indicates the tempera-
ture of the engine coolant when the
ignition switch or Engine Start/Stop
button is ON.
Fuel Gauge
This gauge indicates the approxi-
mate amount of fuel remaining in the
fuel tank.
✽ ✽ NOTICE
• The fuel tank capacity is given in
chapter 8.
• The fuel gauge is supplemented by a low fuel warning light, which
will illuminate when the fuel tank
is nearly empty.
• On inclines or curves, the fuel gauge pointer may fluctuate or the
low fuel warning light may come
on earlier than usual due to the
movement of fuel in the tank.
WARNING
Never remove the radiator cap
when the engine is hot. The
engine coolant is under pressure
and could severely burn. Wait
until the engine is cool before
adding coolant to the reservoir.
CAUTION
If the gauge pointer moves
beyond the normal range areatoward the “H” position, it indi-cates overheating that maydamage the engine.
Do not continue driving with anoverheated engine. If your vehi-cle overheats, refer to “If theEngine Overheats” in chapter 6.
ODMNMM2222/ODMNMM2352
■
Type A ■Type B
ODMNMM2223/ODMNMM2352
■
Type A ■Type B
Page 175 of 759

Features of your vehicle
78
4
Service Mode
Service Interval
Service in
It calculates and displays when you
need a scheduled maintenance
service (mileage or days).
If the remaining mileage or time
reaches 900 mi. (1,500 km) or 30
days, "Service in" message is dis-
played for several seconds each time
you set the ignition switch or Engine
Start/Stop Button to the ON position. Service required
If you do not have your vehicle serv-
iced according to the already inputted
service interval, “Service required”
message is displayed for several sec-
onds each time you set the ignition
switch or Engine Start/Stop Button to
the ON position (The mileage and
time changes to "---").
To reset the service interval to the
mileage and days you inputted before:
- Press the SELECT/RESET button
for more than 1 second. Service in OFF
If the service interval is not set,
“Service in OFF” message is dis-
played on the LCD display.
✽ ✽
NOTICE
If any of the following conditions
occurs, the mileage and days may be
incorrect.
- The battery cable is disconnected.
- The fuse switch is turned off.
- The battery is discharged.
OANNDI2066/OANNDI2070
■
Type A
■Type BODMEDI2067/ODMEDI2071
■
Type A
■Type BODMEDI2068/ODMEDI2072
■
Type A
■Type B