Page 142 of 699

Features of your vehicle
44 4
Opening the fuel filler lid
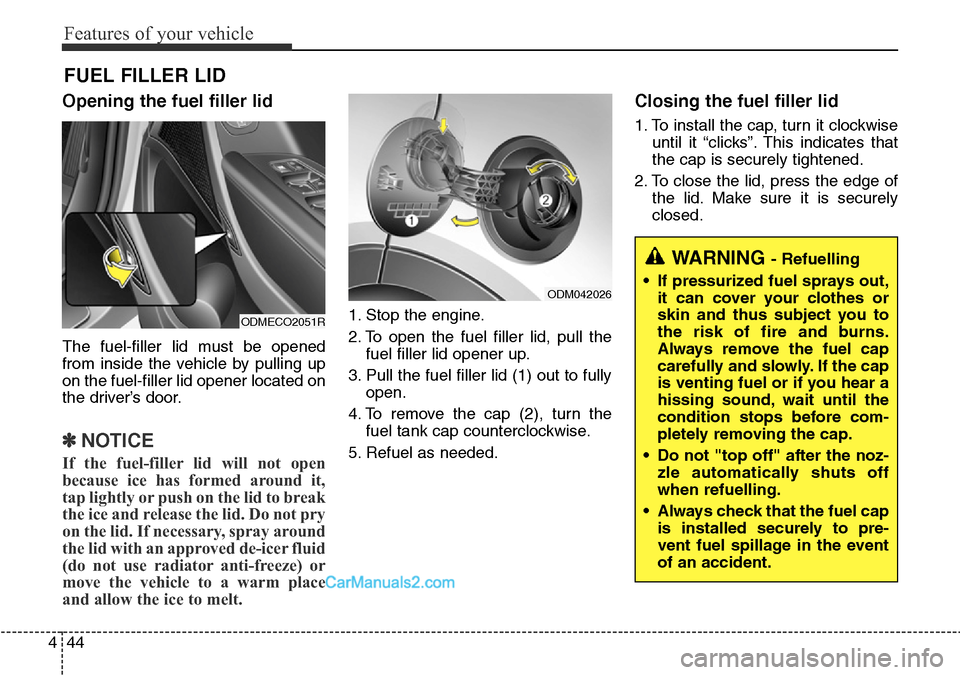
The fuel-filler lid must be opened
from inside the vehicle by pulling up
on the fuel-filler lid opener located on
the driver’s door.
✽NOTICE
If the fuel-filler lid will not open
because ice has formed around it,
tap lightly or push on the lid to break
the ice and release the lid. Do not pry
on the lid. If necessary, spray around
the lid with an approved de-icer fluid
(do not use radiator anti-freeze) or
move the vehicle to a warm place
and allow the ice to melt.
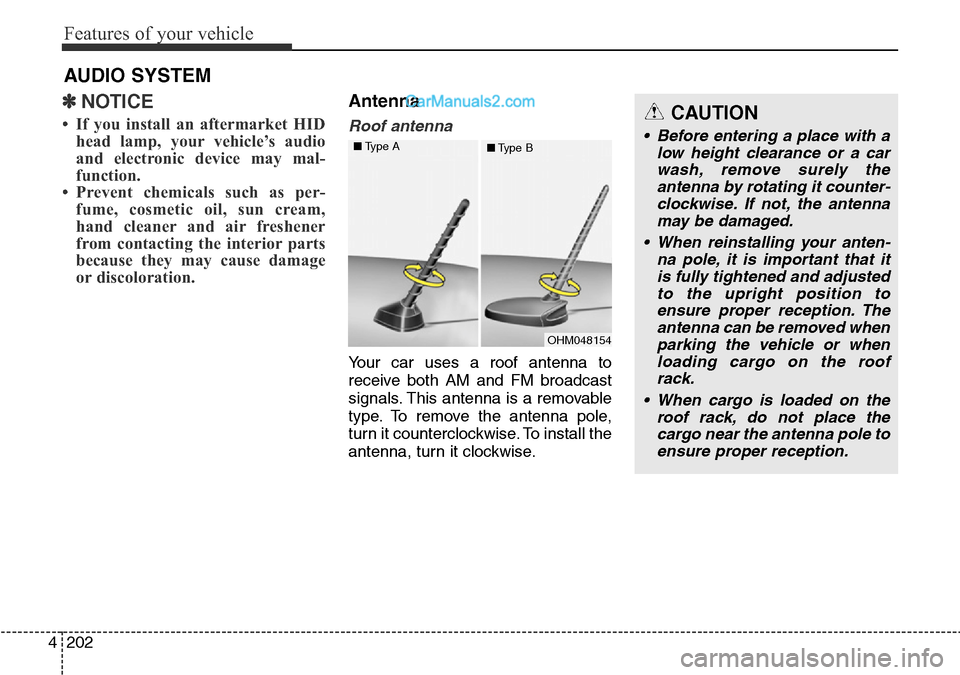
1. Stop the engine.
2. To open the fuel filler lid, pull the
fuel filler lid opener up.
3. Pull the fuel filler lid (1) out to fully
open.
4. To remove the cap (2), turn the
fuel tank cap counterclockwise.
5. Refuel as needed.
Closing the fuel filler lid
1. To install the cap, turn it clockwise
until it “clicks”. This indicates that
the cap is securely tightened.
2. To close the lid, press the edge of
the lid. Make sure it is securely
closed.
FUEL FILLER LID
ODMECO2051R
ODM042026
WARNING - Refuelling
• If pressurized fuel sprays out,
it can cover your clothes or
skin and thus subject you to
the risk of fire and burns.
Always remove the fuel cap
carefully and slowly. If the cap
is venting fuel or if you hear a
hissing sound, wait until the
condition stops before com-
pletely removing the cap.
• Do not "top off" after the noz-
zle automatically shuts off
when refuelling.
• Always check that the fuel cap
is installed securely to pre-
vent fuel spillage in the event
of an accident.
Page 300 of 699

Features of your vehicle
202 4
✽NOTICE
• If you install an aftermarket HID
head lamp, your vehicle’s audio
and electronic device may mal-
function.
• Prevent chemicals such as per-
fume, cosmetic oil, sun cream,
hand cleaner and air freshener
from contacting the interior parts
because they may cause damage
or discoloration.
Antenna
Roof antenna
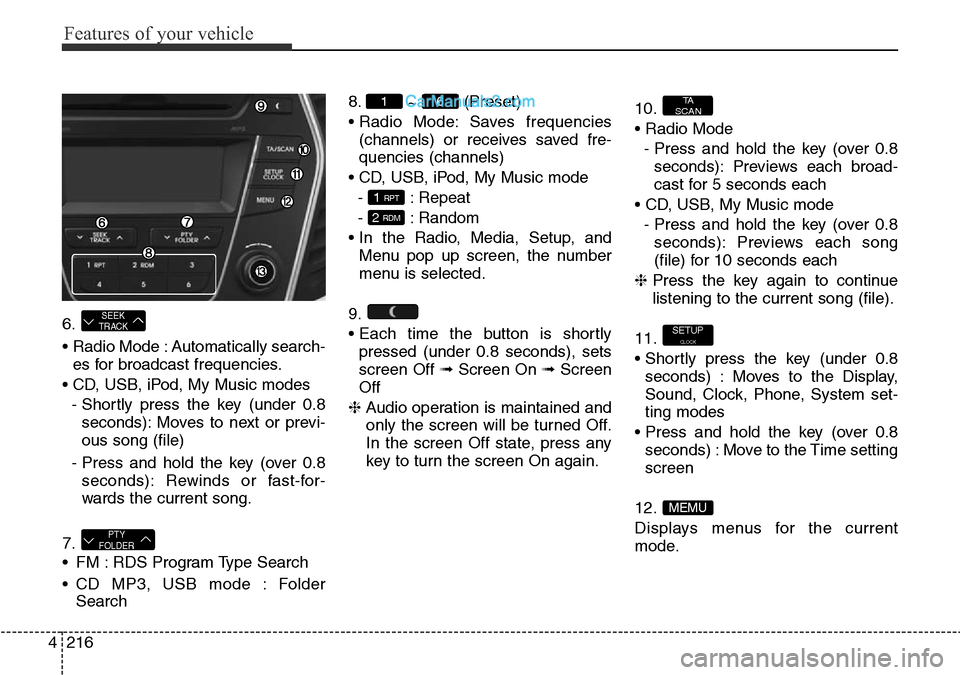
Your car uses a roof antenna to
receive both AM and FM broadcast
signals. This antenna is a removable
type. To remove the antenna pole,
turn it counterclockwise. To install the
antenna, turn it clockwise.
AUDIO SYSTEM
CAUTION
• Before entering a place with a
low height clearance or a car
wash, remove surely the
antenna by rotating it counter-
clockwise. If not, the antenna
may be damaged.
• When reinstalling your anten-
na pole, it is important that it
is fully tightened and adjusted
to the upright position to
ensure proper reception. The
antenna can be removed when
parking the vehicle or when
loading cargo on the roof
rack.
• When cargo is loaded on the
roof rack, do not place the
cargo near the antenna pole to
ensure proper reception.
OHM048154 ■Type A
■Type B
Page 314 of 699

Features of your vehicle
216 4
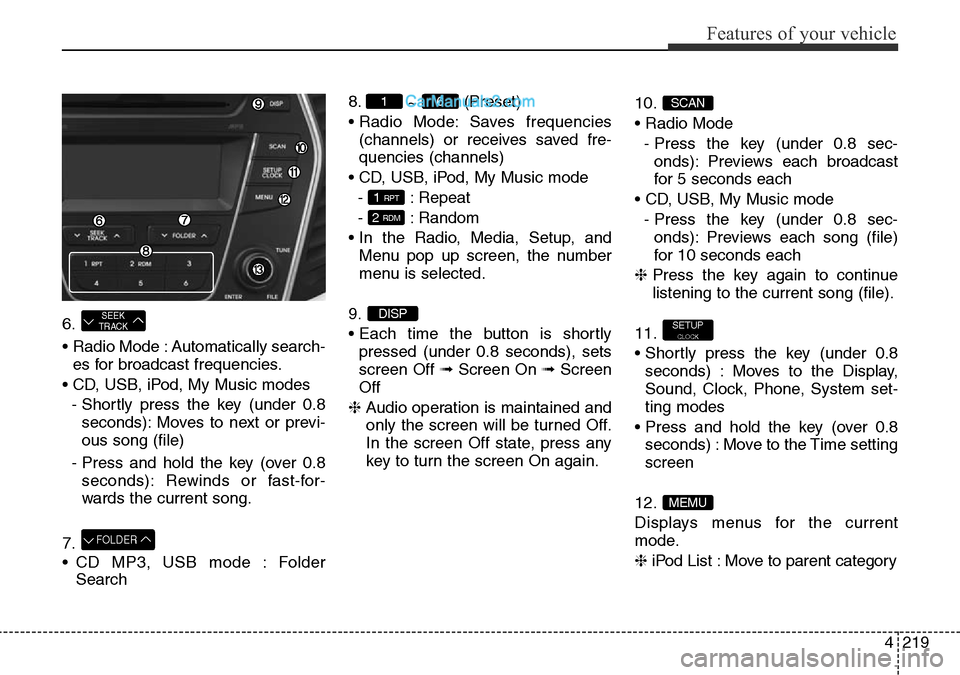
6.
• Radio Mode : Automatically search-
es for broadcast frequencies.
• CD, USB, iPod, My Music modes
- Shortly press the key (under 0.8
seconds): Moves to next or previ-
ous song (file)
- Press and hold the key (over 0.8
seconds): Rewinds or fast-for-
wards the current song.
7.
• FM : RDS Program Type Search
• CD MP3, USB mode : Folder
Search8.
~ (Preset)
• Radio Mode: Saves frequencies
(channels) or receives saved fre-
quencies (channels)
• CD, USB, iPod, My Music mode
- : Repeat
- : Random
• In the Radio, Media, Setup, and
Menu pop up screen, the number
menu is selected.
9.
• Each time the button is shortly
pressed (under 0.8 seconds), sets
screen Off ➟Screen On ➟Screen
Off
❈ Audio operation is maintained and
only the screen will be turned Off.
In the screen Off state, press any
key to turn the screen On again.10.
• Radio Mode
- Press and hold the key (over 0.8
seconds): Previews each broad-
cast for 5 seconds each
• CD, USB, My Music mode
- Press and hold the key (over 0.8
seconds): Previews each song
(file) for 10 seconds each
❈ Press the key again to continue
listening to the current song (file).
11.
• Shortly press the key (under 0.8
seconds) : Moves to the Display,
Sound, Clock, Phone, System set-
ting modes
• Press and hold the key (over 0.8
seconds) : Move to the Time setting
screen
12.
Displays menus for the current
mode.
MEMU
SETUPCLOCK
TA
SCAN
2 RDM
1 RPT
61
PTY
FOLDER
SEEK
TRACK
Page 317 of 699

4219
Features of your vehicle
6.
• Radio Mode : Automatically search-
es for broadcast frequencies.
• CD, USB, iPod, My Music modes
- Shortly press the key (under 0.8
seconds): Moves to next or previ-
ous song (file)
- Press and hold the key (over 0.8
seconds): Rewinds or fast-for-
wards the current song.
7.
• CD MP3, USB mode : Folder
Search8.
~ (Preset)
• Radio Mode: Saves frequencies
(channels) or receives saved fre-
quencies (channels)
• CD, USB, iPod, My Music mode
- : Repeat
- : Random
• In the Radio, Media, Setup, and
Menu pop up screen, the number
menu is selected.
9.
• Each time the button is shortly
pressed (under 0.8 seconds), sets
screen Off ➟Screen On ➟Screen
Off
❈ Audio operation is maintained and
only the screen will be turned Off.
In the screen Off state, press any
key to turn the screen On again.10.
• Radio Mode
- Press the key (under 0.8 sec-
onds): Previews each broadcast
for 5 seconds each
• CD, USB, My Music mode
- Press the key (under 0.8 sec-
onds): Previews each song (file)
for 10 seconds each
❈ Press the key again to continue
listening to the current song (file).
11.
• Shortly press the key (under 0.8
seconds) : Moves to the Display,
Sound, Clock, Phone, System set-
ting modes
• Press and hold the key (over 0.8
seconds) : Move to the Time setting
screen
12.
Displays menus for the current
mode.
❈ iPod List : Move to parent category
MEMU
SETUPCLOCK
SCAN
DISP
2 RDM
1 RPT
61
FOLDER
SEEK
TRACK
Page 321 of 699
4223
Features of your vehicle
Clock Settings
Press the key Select
[Clock] through TUNE knob or
key Select menu through
TUNE knob
Clock Settings
This menu is used to set the time.
Select [Clock Settings] Set through
TUNE knob Press TUNE knob
❈ Adjust the number currently in
focus to set the [hour] and press
the tune knob to set the [minute].
Day Settings
This menu is used to set the date
(DD/MM/YYYY).
Select [Day Settings] Set through
TUNE knob Press TUNE knob
❈ Adjust the number currently in
focus to make the settings and
press the tune knob to move to the
next setting. (Set in order of
Year/Month/Day)
3
SETUPCLOCK
Page 322 of 699
Features of your vehicle
224 4
Time Format
This function is used to set the 12/24
hour time format of the audio system.
Select [Time Format] Set 12Hr /
24Hr through TUNE knob
Clock Display when Power is
OFF
Select [Clock Disp.(Pwr Off) Set
/ through TUNE knob
• : Displays time/date on screen
• : Turn off.
Automatic RDS Time
This option is used to automatically
set the time by synchronizing with
RDS.
Select [Automatic RDS Time] Set
/ through TUNE knob
• : Turn on Automatic Time
• : Turn off.
Off
On
OffOn
Off
On
OffOn
Page 331 of 699
4233
Features of your vehicle
Speed Dependent Volume
Control
This feature is used to automatically
control the volume level according to
the speed of the vehicle.
Select [Speed Dependent Vol.] Set
in 4 levels [Off/Low/Mid/High] of
TUNE knob
Clock Settings
Press the key Select
[Clock] through TUNE knob or
key Select menu through
TUNE knob
Clock Settings
This menu is used to set the time.
Select [Clock Settings] Set through
TUNE knob Press TUNE knob
❈ Adjust the number currently in
focus to set the [hour] and press
the tune knob to set the [minute].
3
SETUPCLOCK
Page 332 of 699
Features of your vehicle
234 4
Calendar Settings
This menu is used to set the date
(DD/MM/YYYY).
Select [Calendar Settings] Set
through TUNE knob Press
TUNE knob
❈ Adjust the number currently in
focus to make the settings and
press the tune knob to move to the
next setting. (Set in order of
Year/Month/Day)
Clock Display when Power is
OFF
Select [Clock Disp.(Pwr Off) Set
/ through TUNE knob
• : Displays time/date on screen
• : Turn off.
Off
On
OffOn