Page 661 of 699

Maintenance
64 7
LIGHT BULBS
Use only the bulbs of the specified
wattage.
✽NOTICE
After heavy, driving rain or wash-
ing, headlight and taillight lenses
could appear frosty. This condition
is caused by the temperature differ-
ence between the lamp inside and
outside. This is similar to the con-
densation on your windows inside
your vehicle during the rain and
doesn’t indicate a problem with
your vehicle. If the water leaks into
the lamp bulb circuitry, we recom-
mend that the system be checked by
a HYUNDAI authorised repairer.WARNING - Working on
the lights
Prior to working on the light,
firmly apply the parking brake,
ensure that the ignition switch
is turned to the “LOCK” position
and turn off the lights to avoid
sudden movement of the vehi-
cle and burning your fingers or
receiving an electric shock.
CAUTION
Be sure to replace the burned-
out bulb with one of the same
wattage rating. Otherwise, it
may cause damage to the fuse
or electric wiring system.
CAUTION
If you don’t have necessary
tools, the correct bulbs and the
expertise, consult a HYUNDAI
authorised repairer. In many
cases, it is difficult to replace
vehicle light bulbs because
other parts of the vehicle must
be removed before you can get
to the bulb. This is especially
true if you have to remove the
headlight assembly to get to the
bulb(s).
Removing/installing the head-
light assembly can result in
damage to the vehicle.
Page 666 of 699

769
Maintenance
Headlight and front fog light
aiming (for Europe)
Headlight aiming
Without AFLS
1. Inflate the tyres to the specified
pressure and remove any loads
from the vehicle except the driver,
spare tyre, and tools.
2. The vehicle should be placed on a
flat floor.
3. Draw vertical lines (Vertical lines
passing through respective head
lamp centres) and a horizontal line
(Horizontal line passing through
centre of head lamps) on the
screen.4. With the head lamp and battery in
normal condition, aim the head
lamps so the brightest portion falls
on the horizontal and vertical
lines.
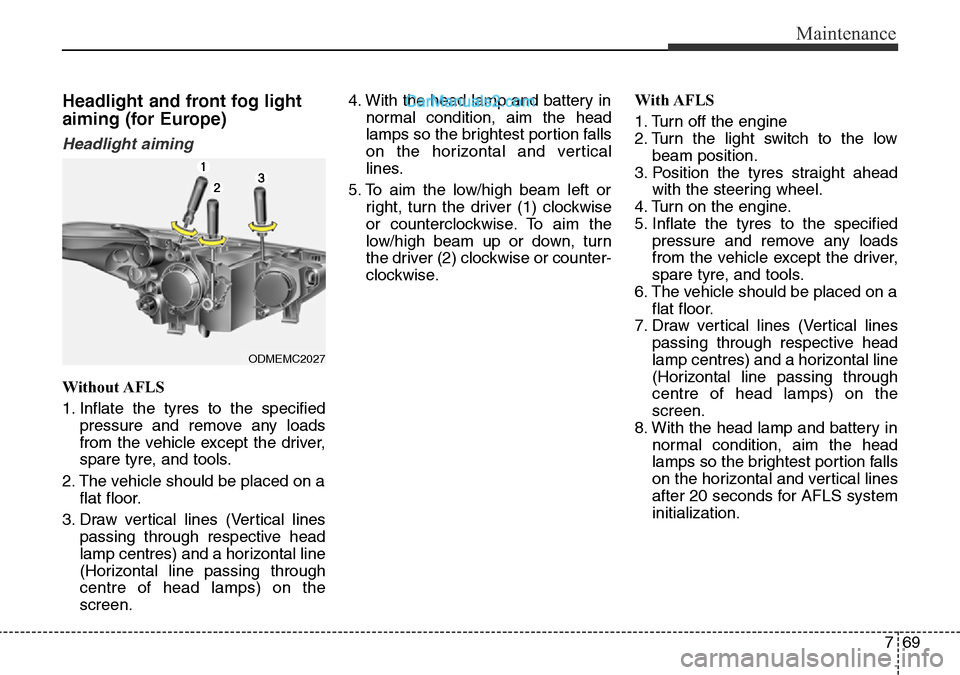
5. To aim the low/high beam left or
right, turn the driver (1) clockwise
or counterclockwise. To aim the
low/high beam up or down, turn
the driver (2) clockwise or counter-
clockwise.With AFLS
1. Turn off the engine
2. Turn the light switch to the low
beam position.
3. Position the tyres straight ahead
with the steering wheel.
4. Turn on the engine.
5. Inflate the tyres to the specified
pressure and remove any loads
from the vehicle except the driver,
spare tyre, and tools.
6. The vehicle should be placed on a
flat floor.
7. Draw vertical lines (Vertical lines
passing through respective head
lamp centres) and a horizontal line
(Horizontal line passing through
centre of head lamps) on the
screen.
8. With the head lamp and battery in
normal condition, aim the head
lamps so the brightest portion falls
on the horizontal and vertical lines
after 20 seconds for AFLS system
initialization.
ODMEMC2027
Page 677 of 699

Maintenance
80 7
APPEARANCE CARE
Exterior care
Exterior general caution
It is very important to follow the label
directions when using any chemical
cleaner or polish. Read all warning
and caution statements that appear
on the label.
High-pressure washing
• When using high-pressure wash-
ers, make sure to maintain suffi-
cient distance from the vehicle.
Insufficient clearance or excessive
pressure can lead to component
damage or water penetration.
• Do not spray the camera, sensors
or its surrounding area directly with
a high pressure washer. Shock
applied from high pressure water
may cause the device to not oper-
ate normally.
• Do not bring the nozzle tip close to
boots (rubber or plastic covers) or
connectors as they may be dam-
aged if they come into contact with
high pressure water.
Finish maintenance
Washing
To help protect your vehicle’s finish
from rust and deterioration, wash it
thoroughly and frequently at least
once a month with lukewarm or cold
water.
If you use your vehicle for off-road
driving, you should wash it after each
off-road trip. Pay special attention to
the removal of any accumulation of
salt, dirt, mud, and other foreign
materials. Make sure the drain holes
in the lower edges of the doors and
rocker panels are kept clear and
clean.
Insects, tar, tree sap, bird droppings,
industrial pollution and similar
deposits can damage your vehicle’s
finish if not removed immediately.
Even prompt washing with plain
water may not completely remove all
these deposits.
A mild soap, safe for use on painted
surfaces, may be used.
After washing, rinse the vehicle thor-
oughly with lukewarm or cold water.
Do not allow soap to dry on the fin-
ish.
WARNING - Wet brakes
After washing the vehicle, test
the brakes whilst driving slowly
to see if they have been affected
by water. If braking performance
is impaired, dry the brakes by
applying them lightly whilst
maintaining a slow forward
speed.
CAUTION
• Do not use strong soap, chem-
ical detergents or hot water,
and do not wash the vehicle in
direct sunlight or when the
body of the vehicle is warm.
• Be careful when washing the
side windows of your vehicle.
Especially, with high-pressure
water. Water may leak through
the windows and wet the inte-
rior.
• To prevent damage to the
plastic parts and lamps, do
not clean with chemical sol-
vents or strong detergents.
Page 696 of 699

89
Specifications & Consumer information
Recommended SAE viscosity
number Engine oil viscosity (thickness) has
an effect on fuel economy and cold
weather operating (engine start and
engine oil flowability). Lower viscosi-
ty engine oils can provide better fuel
economy and cold weather perform-
ance, however, higher viscosity
engine oils are required for satisfac-
tory lubrication in hot weather.Using oils of any viscosity other than
those recommended could result in
engine damage.
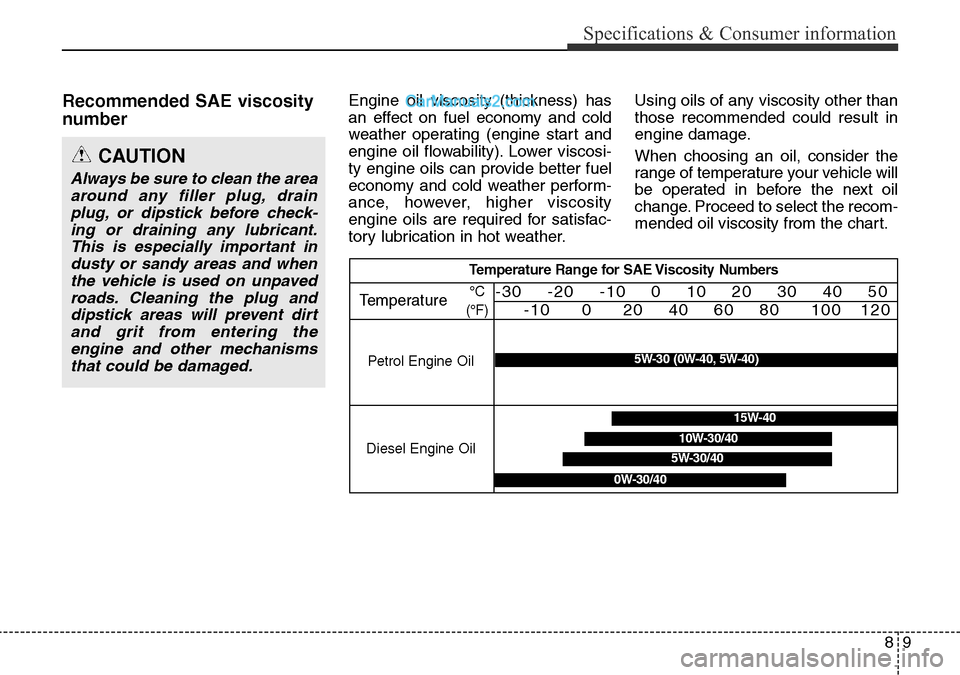
When choosing an oil, consider the
range of temperature your vehicle will
be operated in before the next oil
change. Proceed to select the recom-
mended oil viscosity from the chart.
CAUTION
Always be sure to clean the area
around any filler plug, drain
plug, or dipstick before check-
ing or draining any lubricant.
This is especially important in
dusty or sandy areas and when
the vehicle is used on unpaved
roads. Cleaning the plug and
dipstick areas will prevent dirt
and grit from entering the
engine and other mechanisms
that could be damaged.
Temperature Range for SAE Viscosity Numbers
Temperature
Petrol Engine Oil°C
(°F)
-30 -20 -10 0 10 20 30 40 50
-10 0 20 40 60 80 100 120
Diesel Engine Oil5W-30/40
15W-40
10W-30/40
0W-30/40
5W-30 (0W-40, 5W-40)