Page 218 of 699
Features of your vehicle
120 4
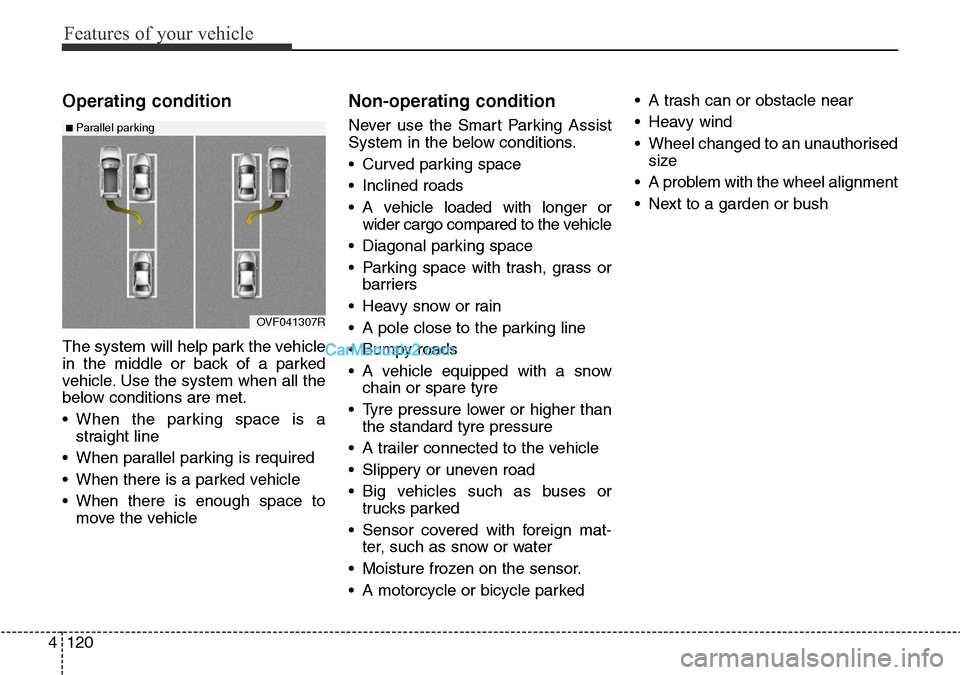
Operating condition
The system will help park the vehicle
in the middle or back of a parked
vehicle. Use the system when all the
below conditions are met.
• When the parking space is a
straight line
• When parallel parking is required
• When there is a parked vehicle
• When there is enough space to
move the vehicle
Non-operating condition
Never use the Smart Parking Assist
System in the below conditions.
• Curved parking space
• Inclined roads
• A vehicle loaded with longer or
wider cargo compared to the vehicle
• Diagonal parking space
• Parking space with trash, grass or
barriers
• Heavy snow or rain
• A pole close to the parking line
• Bumpy roads
• A vehicle equipped with a snow
chain or spare tyre
• Tyre pressure lower or higher than
the standard tyre pressure
• A trailer connected to the vehicle
• Slippery or uneven road
• Big vehicles such as buses or
trucks parked
• Sensor covered with foreign mat-
ter, such as snow or water
• Moisture frozen on the sensor.
• A motorcycle or bicycle parked• A trash can or obstacle near
• Heavy wind
• Wheel changed to an unauthorised
size
• A problem with the wheel alignment
• Next to a garden or bush
OVF041307R
■Parallel parking
Page 219 of 699
4121
Features of your vehicle
WARNING
Do not use the Smart Parking
Assist System in the following
conditions for unexpected
results may occur and cause a
serious accident.
1. Parking on inclines
The driver must apply the accel-
erator and brake pedal when
parking on inclines. If the driver
is unfamiliar with applying the
accelerator and brake pedal, a
car accident may occur.
(Continued)
OLM041290
(Continued)
2. Parking in snow
Snow may interfere with sensor
operation or the system may
cancel if the road is slippery
whilst parking. Also, if the driv-
er is unfamiliar with applying
the accelerator and brake pedal,
a car accident may occur.
(Continued)(Continued)
3. Parking in narrow space
The system may not search for
parking spaces if the space is
too narrow. Even if it operates
always be careful.
(Continued)
OLM041292OSL040144
Page 221 of 699
4123
Features of your vehicle
How the system works
1. Activate the Smart Parking Assist
System
2. Select parking assist mode
3. Search for parking space (slowly
move forward.)
4. Search complete (automatic
search by sensor.)
5. Steering wheel control
(1) Shift according to the instruc-
tion on the LCD display.
(2) Drive slowly with the brake
pedal applied.
6. Smart Parking Assist System
complete
7. If necessary, manually adjust posi-
tion of vehicle.
✽NOTICE
• Before activating the system check
if the conditions are possible to use
the system.
• For your safety, always apply the
brake pedal except for when driv-
ing.
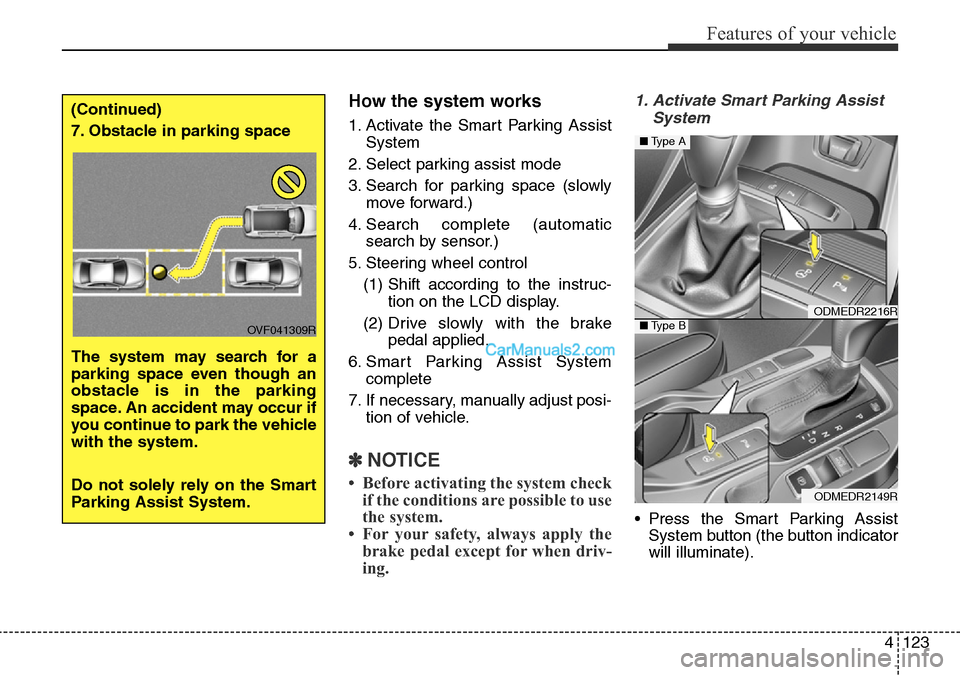
1. Activate Smart Parking Assist
System
• Press the Smart Parking Assist
System button (the button indicator
will illuminate).
(Continued)
7. Obstacle in parking space
The system may search for a
parking space even though an
obstacle is in the parking
space. An accident may occur if
you continue to park the vehicle
with the system.
Do not solely rely on the Smart
Parking Assist System.
OVF041309R
ODMEDR2216R
ODMEDR2149R
■Type A
■Type B
Page 223 of 699
4125
Features of your vehicle
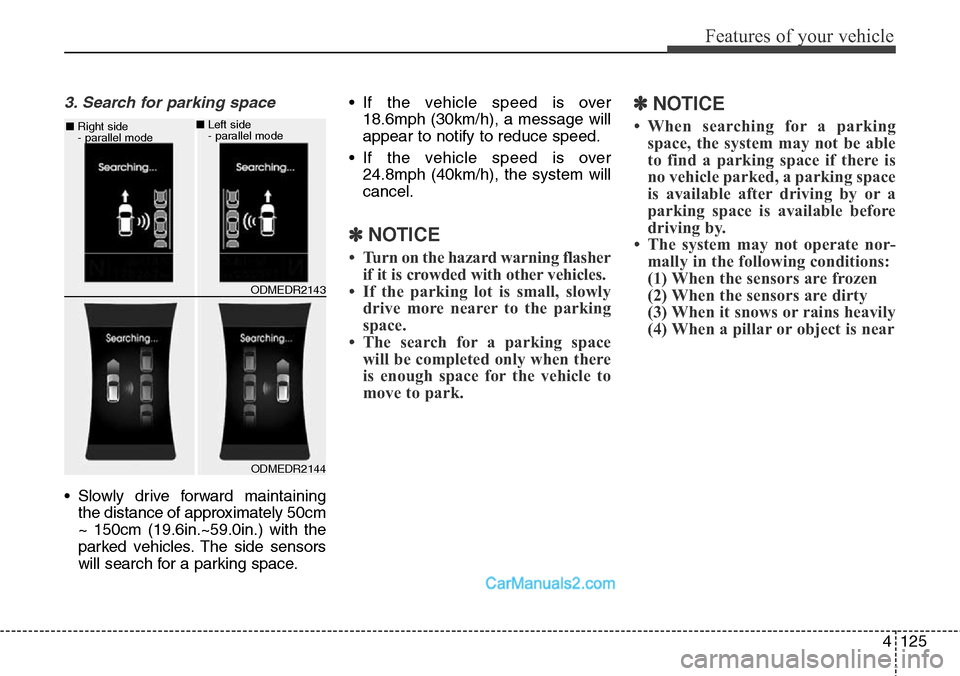
3. Search for parking space
• Slowly drive forward maintaining
the distance of approximately 50cm
~ 150cm (19.6in.~59.0in.) with the
parked vehicles. The side sensors
will search for a parking space.• If the vehicle speed is over
18.6mph (30km/h), a message will
appear to notify to reduce speed.
• If the vehicle speed is over
24.8mph (40km/h), the system will
cancel.
✽NOTICE
• Turn on the hazard warning flasher
if it is crowded with other vehicles.
• If the parking lot is small, slowly
drive more nearer to the parking
space.
• The search for a parking space
will be completed only when there
is enough space for the vehicle to
move to park.
✽NOTICE
• When searching for a parking
space, the system may not be able
to find a parking space if there is
no vehicle parked, a parking space
is available after driving by or a
parking space is available before
driving by.
• The system may not operate nor-
mally in the following conditions:
(1) When the sensors are frozen
(2) When the sensors are dirty
(3) When it snows or rains heavily
(4) When a pillar or object is near
ODMEDR2144 ■Right side
- parallel mode
ODMEDR2143 ■Left side
- parallel mode
Page 234 of 699
Features of your vehicle
136 4
Traffic direction change
Headlamp dipping system
Use this function when you visit a
country with opposite traffic direction.
If the traffic change is activated when
you visit a country with opposite traf-
fic direction, it will decrease the daz-
zle on oncoming vehicle drivers.
Follow the below procedure.
1. Select “User Settings” by pressing
the mode button ( ) on the steer-
ing wheel.
2. Select “Lamp” by pressing the
move button ( ) and select but-
ton ( ) on the steering wheel.
CAUTION
• Never place anything over the
sensor (1) located on the
instrument panel, this will
ensure better auto-light sys-
tem control.
• Don’t clean the sensor using a
window cleaner, the cleaner
may leave a light film which
could interfere with sensor
operation.
• If your vehicle has window tint
or other types of coating on
the front windscreen, the Auto
light system may not work
properly.
ODMECO2072/ODMECO2073 ■Type A
■Type B
Page 242 of 699
Features of your vehicle
144 4
Windscreen wipers
Operates as follows when the igni-
tion switch is turned ON.
/ MIST : For a single wiping cycle,
move the lever to this
( / MIST) position and
release it. The wipers will
operate continuously if
the lever is held in this
position.
O / OFF : Wiper is not in operation
---/ INT : Wiper operates intermittently
at the same wiping intervals.
Use this mode in light rain or
mist. To vary the speed setting,
turn the speed control knob.
1 / LO : Normal wiper speed
2 / HI : Fast wiper speed
✽NOTICE
If there is heavy accumulation of
snow or ice on the windscreen,
defrost the windscreen for about 10
minutes, or until the snow and/or ice
is removed before using the wind-
screen wipers to ensure proper oper-
ation.
If you do not remove the snow
and/or ice before using the wiper
and washer, it may damage the
wiper and washer system.
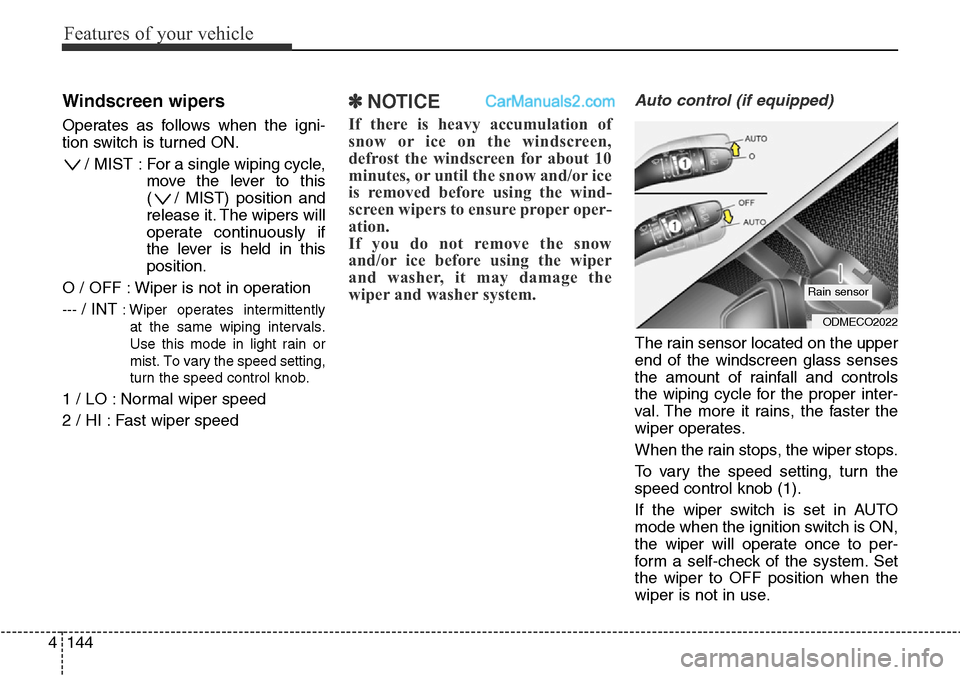
Auto control (if equipped)
The rain sensor located on the upper
end of the windscreen glass senses
the amount of rainfall and controls
the wiping cycle for the proper inter-
val. The more it rains, the faster the
wiper operates.
When the rain stops, the wiper stops.
To vary the speed setting, turn the
speed control knob (1).
If the wiper switch is set in AUTO
mode when the ignition switch is ON,
the wiper will operate once to per-
form a self-check of the system. Set
the wiper to OFF position when the
wiper is not in use.
ODMECO2022
Rain sensor
Page 243 of 699
4145
Features of your vehicle
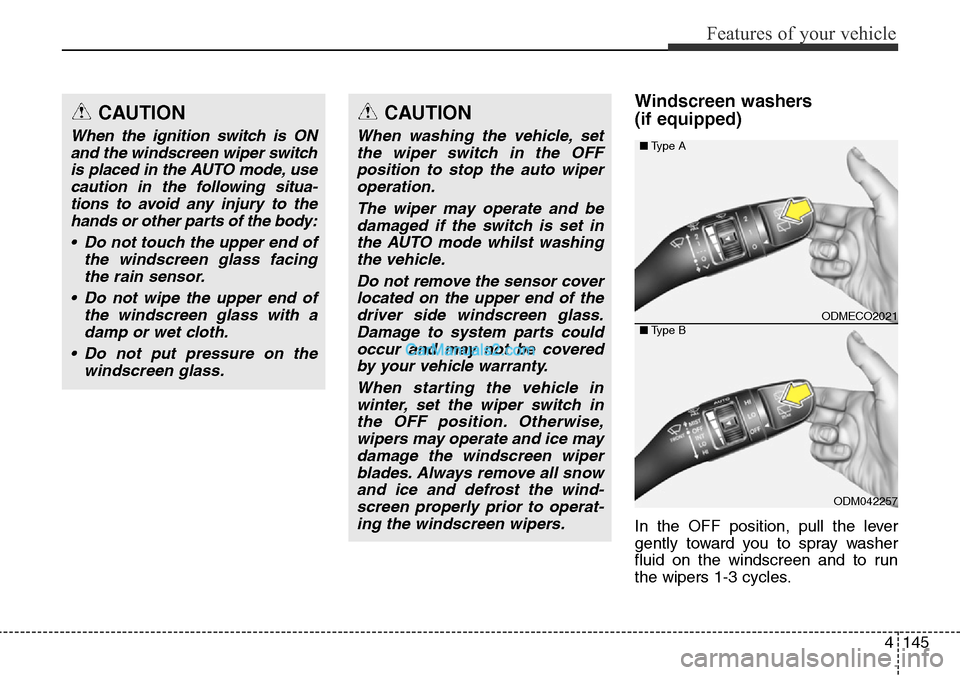
Windscreen washers
(if equipped)
In the OFF position, pull the lever
gently toward you to spray washer
fluid on the windscreen and to run
the wipers 1-3 cycles.
CAUTION
When washing the vehicle, set
the wiper switch in the OFF
position to stop the auto wiper
operation.
The wiper may operate and be
damaged if the switch is set in
the AUTO mode whilst washing
the vehicle.
Do not remove the sensor cover
located on the upper end of the
driver side windscreen glass.
Damage to system parts could
occur and may not be covered
by your vehicle warranty.
When starting the vehicle in
winter, set the wiper switch in
the OFF position. Otherwise,
wipers may operate and ice may
damage the windscreen wiper
blades. Always remove all snow
and ice and defrost the wind-
screen properly prior to operat-
ing the windscreen wipers.
ODMECO2021
ODM042257 ■Type A
■Type B
CAUTION
When the ignition switch is ON
and the windscreen wiper switch
is placed in the AUTO mode, use
caution in the following situa-
tions to avoid any injury to the
hands or other parts of the body:
• Do not touch the upper end of
the windscreen glass facing
the rain sensor.
• Do not wipe the upper end of
the windscreen glass with a
damp or wet cloth.
• Do not put pressure on the
windscreen glass.
Page 283 of 699
4185
Features of your vehicle
If your vehicle is equipped with the
auto defogging system, it is automat-
ically activated when the conditions
are met. However, if you would like to
cancel the auto defogging system,
press the front defroster button 4
times within 2 seconds whilst press-
ing the AUTO button. The indicator of
front defroster button will blink 3
times to notify you that the system is
cancelled. To use the auto defogging
system again, follow the procedures
mentioned above.
If the battery has been disconnected
or discharged, it resets to the auto
defogging status.✽NOTICE
If the A/C off is manually selected
whilst the auto defogging system is
on, the auto defogging indicator will
blink 3 times to give notice that the
A/C off can not be selected.
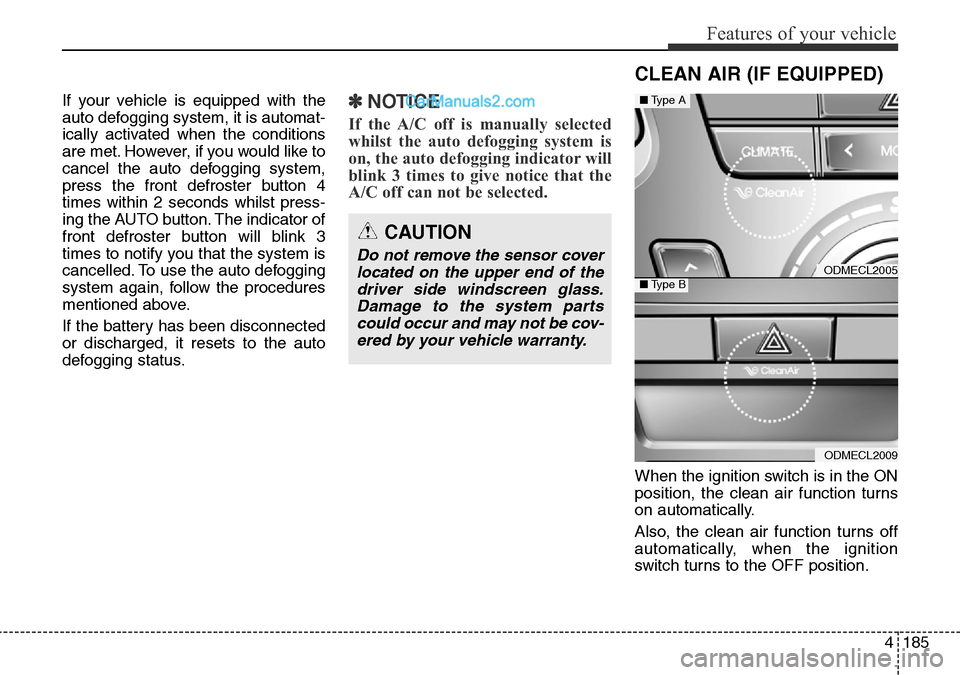
When the ignition switch is in the ON
position, the clean air function turns
on automatically.
Also, the clean air function turns off
automatically, when the ignition
switch turns to the OFF position.
CAUTION
Do not remove the sensor cover
located on the upper end of the
driver side windscreen glass.
Damage to the system parts
could occur and may not be cov-
ered by your vehicle warranty.
CLEAN AIR (IF EQUIPPED)
ODMECL2005
ODMECL2009
■Type A
■Type B