Page 618 of 699
721
Maintenance
POWER STEERING FLUID (IF EQUIPPED)
Checking the power steering
fluid level
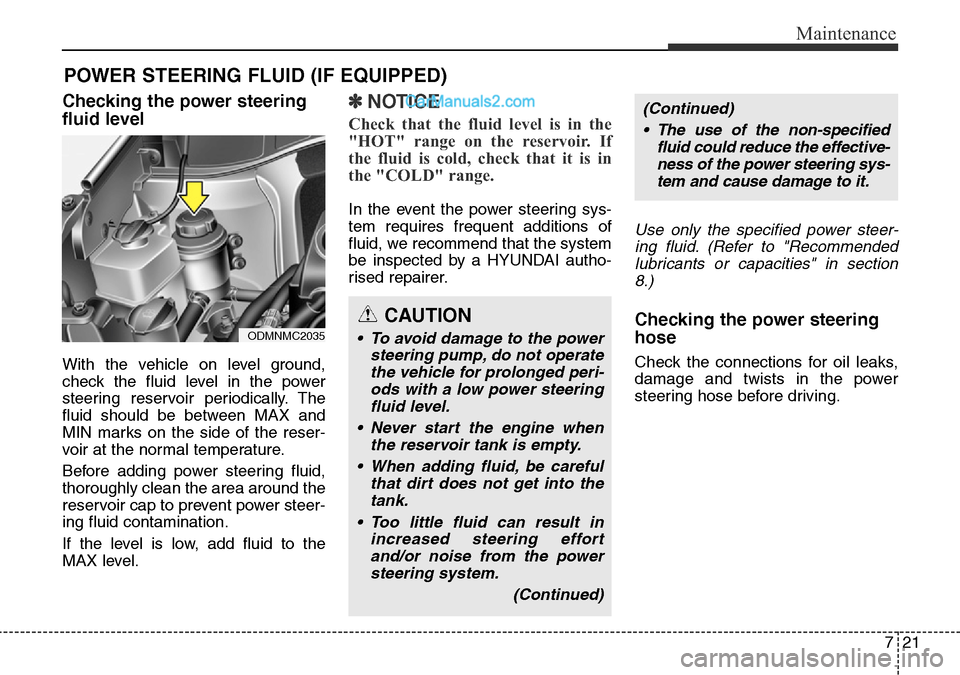
With the vehicle on level ground,
check the fluid level in the power
steering reservoir periodically. The
fluid should be between MAX and
MIN marks on the side of the reser-
voir at the normal temperature.
Before adding power steering fluid,
thoroughly clean the area around the
reservoir cap to prevent power steer-
ing fluid contamination.
If the level is low, add fluid to the
MAX level.
✽NOTICE
Check that the fluid level is in the
"HOT" range on the reservoir. If
the fluid is cold, check that it is in
the "COLD" range.
In the event the power steering sys-
tem requires frequent additions of
fluid, we recommend that the system
be inspected by a HYUNDAI autho-
rised repairer.
Use only the specified power steer-
ing fluid. (Refer to "Recommended
lubricants or capacities" in section
8.)
Checking the power steering
hose
Check the connections for oil leaks,
damage and twists in the power
steering hose before driving.
CAUTION
• To avoid damage to the power
steering pump, do not operate
the vehicle for prolonged peri-
ods with a low power steering
fluid level.
• Never start the engine when
the reservoir tank is empty.
• When adding fluid, be careful
that dirt does not get into the
tank.
• Too little fluid can result in
increased steering effort
and/or noise from the power
steering system.
(Continued)ODMNMC2035
(Continued)
• The use of the non-specified
fluid could reduce the effective-
ness of the power steering sys-
tem and cause damage to it.
Page 631 of 699
Maintenance
34 7
Battery recharging
Your vehicle has a maintenance-free,
calcium-based battery.
• If the battery becomes discharged
in a short time (because, for exam-
ple, the headlights or interior lights
were left on whilst the vehicle was
not in use), recharge it by slow
charging (trickle) for 10 hours.
• If the battery gradually discharges
because of high electric load whilst
the vehicle is being used, recharge
it at 20-30A for two hours.
Reset items
Items should be reset after the bat-
tery has been discharged or the bat-
tery has been disconnected.
• Auto up/down window
(See section 4)
• Sunroof (See section 4)
• Trip computer (See section 4)
• Climate control system
(See section 4)
• Clock (See section 4)
• Audio (See section 4)
(Continued)
• Watch the battery during
charging, and stop or reduce
the charging rate if the battery
cells begin gassing (boiling)
violently or if the temperature
of the electrolyte of any cell
exceeds 49°C (120°F).
• Wear eye protection when
checking the battery during
charging.
• Disconnect the battery charg-
er in the following order.
1. Turn off the battery charger
main switch.
2. Unhook the negative clamp
from the negative battery
terminal.
3. Unhook the positive clamp
from the positive battery
terminal.
(Continued)
WARNING- Recharging
battery
When recharging the battery,
observe the following precau-
tions:
• The battery must be removed
from the vehicle and placed in
an area with good ventilation.
• Do not allow cigarettes,
sparks, or flame near the bat-
tery.
(Continued)
(Continued)
• Before performing mainte-
nance or recharging the bat-
tery, turn off all accessories
and stop the engine.
• The negative battery cable
must be removed first and
installed last when the battery
is disconnected.
Page 644 of 699
747
Maintenance
FUSES
A vehicle’s electrical system is pro-
tected from electrical overload dam-
age by fuses.
This vehicle has 2 (or 3) fuse panels,
one located in the driver’s side panel
bolster, the other in the engine com-
partment near the battery.
If any of your vehicle’s lights, acces-
sories, or controls do not work, check
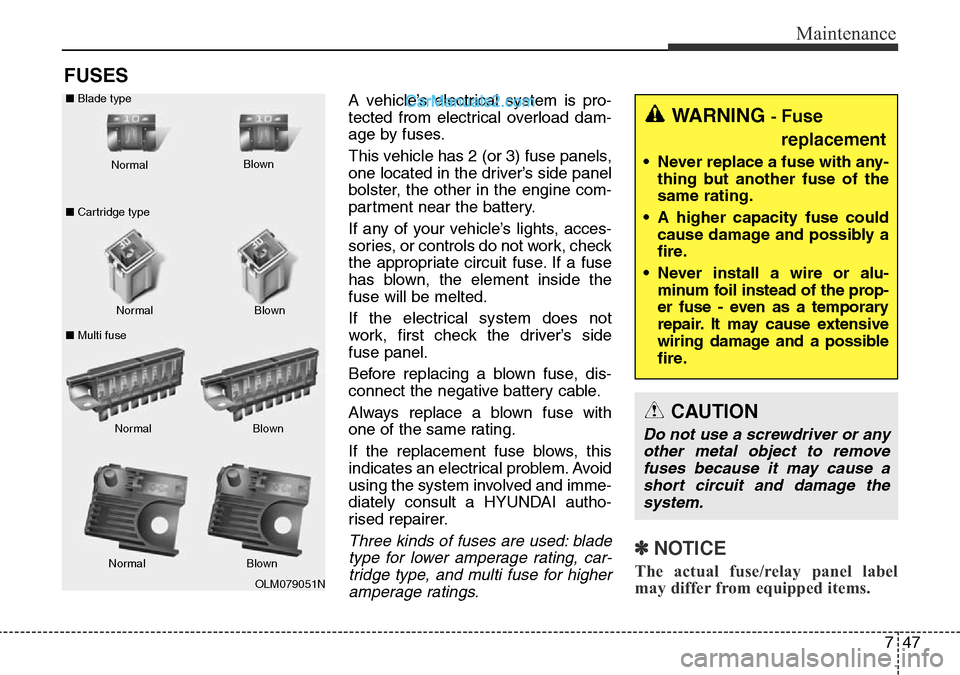
the appropriate circuit fuse. If a fuse
has blown, the element inside the
fuse will be melted.
If the electrical system does not
work, first check the driver’s side
fuse panel.
Before replacing a blown fuse, dis-
connect the negative battery cable.
Always replace a blown fuse with
one of the same rating.
If the replacement fuse blows, this
indicates an electrical problem. Avoid
using the system involved and imme-
diately consult a HYUNDAI autho-
rised repairer.
Three kinds of fuses are used: blade
type for lower amperage rating, car-
tridge type, and multi fuse for higher
amperage ratings.✽NOTICE
The actual fuse/relay panel label
may differ from equipped items.
WARNING - Fuse
replacement
• Never replace a fuse with any-
thing but another fuse of the
same rating.
• A higher capacity fuse could
cause damage and possibly a
fire.
• Never install a wire or alu-
minum foil instead of the prop-
er fuse - even as a temporary
repair. It may cause extensive
wiring damage and a possible
fire.
CAUTION
Do not use a screwdriver or any
other metal object to remove
fuses because it may cause a
short circuit and damage the
system.
OLM079051N Normal Normal ■Blade type
■Cartridge type
■Multi fuseBlown
Blown
Normal Blown
Normal Blown
Page 682 of 699
785
Maintenance
Keep paint and trim in good con-
dition
Scratches or chips in the finish
should be covered with "touch-up"
paint as soon as possible to reduce
the possibility of corrosion. If bare
metal is showing through, the atten-
tion of a qualified body and paint
shop is recommended.
Bird droppings : Bird droppings are
highly corrosive and may damage
painted surfaces in just a few hours.
Always remove bird droppings as
soon as possible.Don't neglect the interior
Moisture can collect under the floor
mats and carpeting to cause corro-
sion. Check under the mats periodi-
cally to be sure the carpeting is dry.
Use particular care if you carry fertil-
izers, cleaning materials or chemi-
cals in the car.
These should be carried only in
proper containers and any spills or
leaks should be cleaned up, flushed
with clean water and thoroughly
dried.Interior care
Interior general precautions
Prevent chemicals such as perfume,
cosmetic oil, sun cream, hand clean-
er and air freshener from contacting
the interior parts because they may
cause damage or discolouration. If
they do contact the interior parts,
wipe them off immediately.
See the instructions that follow for
the proper way to clean vinyl.
CAUTION
Never allow water or other liq-
uids to come in contact with
electrical/electronic compo-
nents inside the vehicle as this
may damage them.
Page 696 of 699
89
Specifications & Consumer information
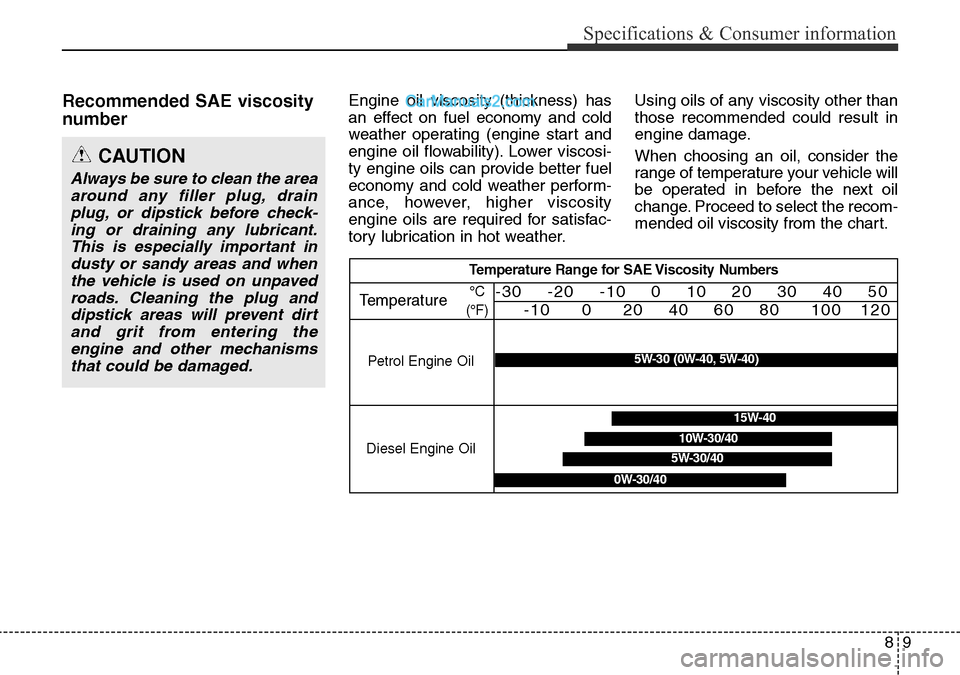
Recommended SAE viscosity
number Engine oil viscosity (thickness) has
an effect on fuel economy and cold
weather operating (engine start and
engine oil flowability). Lower viscosi-
ty engine oils can provide better fuel
economy and cold weather perform-
ance, however, higher viscosity
engine oils are required for satisfac-
tory lubrication in hot weather.Using oils of any viscosity other than
those recommended could result in
engine damage.
When choosing an oil, consider the
range of temperature your vehicle will
be operated in before the next oil
change. Proceed to select the recom-
mended oil viscosity from the chart.
CAUTION
Always be sure to clean the area
around any filler plug, drain
plug, or dipstick before check-
ing or draining any lubricant.
This is especially important in
dusty or sandy areas and when
the vehicle is used on unpaved
roads. Cleaning the plug and
dipstick areas will prevent dirt
and grit from entering the
engine and other mechanisms
that could be damaged.
Temperature Range for SAE Viscosity Numbers
Temperature
Petrol Engine Oil°C
(°F)
-30 -20 -10 0 10 20 30 40 50
-10 0 20 40 60 80 100 120
Diesel Engine Oil5W-30/40
15W-40
10W-30/40
0W-30/40
5W-30 (0W-40, 5W-40)
Page:
< prev 1-8 9-16 17-24