2016 HYUNDAI IX35 tow
[x] Cancel search: towPage 10 of 550
15
Introduction
Biodiesel Commercially supplied Diesel blends of
no more than 7% biodiesel, commonly
known as "B7 Diesel" may be used in
your vehicle if Biodiesel meets EN 14214
or equivalent specifications. (EN stands
for "European Norm"). The use of biofu-
els exceeding 7%, made from rapeseed
methyl ester (RME), fatty acid methyl
ester (FAME), vegetable oil methyl ester
(VME) etc. or mixing diesel exceeding
7% with biodiesel will cause increased
wear or damage to the engine and fuel
system. Repair or replacement of worn or
damaged components due to the use of
non approved fuels will not be covered by
the manufactures warranty.As with other vehicles of this type, failure
to operate this vehicle correctly may
result in loss of control, an accident or
vehicle rollover.
Specific design characteristics (higher
ground clearance, track, etc.) give this
vehicle a higher centre of gravity than
other types of vehicles. In other words
they are not designed for cornering at the
same speeds as conventional 2-wheel
drive vehicles. Avoid sharp turns or
abrupt manoeuvres. Again, failure to
operate this vehicle correctly may result
in loss of control, an accident or vehicle
rollover.
Be sure to read the “Reducing
the risk of a rollover” driving guide-
lines, in section 5 of this manual. No special run-in period is needed. By
following a few simple precautions for the
first 600 miles (1,000 km) you may add to
the performance, economy and life of
your vehicle.
Do not race the engine.
Whilst driving, keep your engine speed
(rpm, or revolutions per minute)
between 2,000 rpm and 4,000 rpm.
Do not maintain a single speed for long periods of time, either fast or slow.
Varying engine speed is needed to
properly run-in the engine.
Avoid hard stops, except in emergen- cies, to allow the brakes to seat prop-
erly.
Don't tow a trailer/caravan during the first 1,200 miles (2,000 km) of opera-
tion.
CAUTION
Never use any fuel, whether diesel, B7 biodiesel or otherwise,that fails to meet the latest petro-leum industry specification.
Never use any fuel additives or treatments that are not recom-mended or approved by the vehi-cle manufacturer.
VEHICLE HANDLING
INSTRUCTIONS VEHICLE RUN-IN PROCESS
EL(FL) UK 1.QXP 12/16/2014 8:50 PM Page 5
Page 29 of 550

Safety features of your vehicle10
3
Removal
To remove the head restraint:
1. Recline the seatback (2) with the
recline lever or switch (1).
2. Raise head restraint as far as it can go.
3. Press the head restraint release button (3) whilst pulling the head restraint up (4). Reinstall
To reinstall the head restraint :
1. Put the head restraint poles (2) into the
holes whilst pressing the release
buton (1).
2. Recline the seatback (4) with the recline lever or switch (3).
3. Adjust the head restraint to the appro- priate height.
WARNING
NEVER allow anyone to ride in a seat
with the head restraint removed.
OEL034303ROLM034305R
■Type A■Type B
OYFH034205
CAUTION
If you recline the seatback towards
the front with the Head restraint andseat cushion raised, the Headrestraint may come in contact with the sunvisor or other parts of thevehicle.
EL(FL) UK 3.QXP 12/16/2014 8:55 PM Page 10
Page 35 of 550
Safety features of your vehicle16
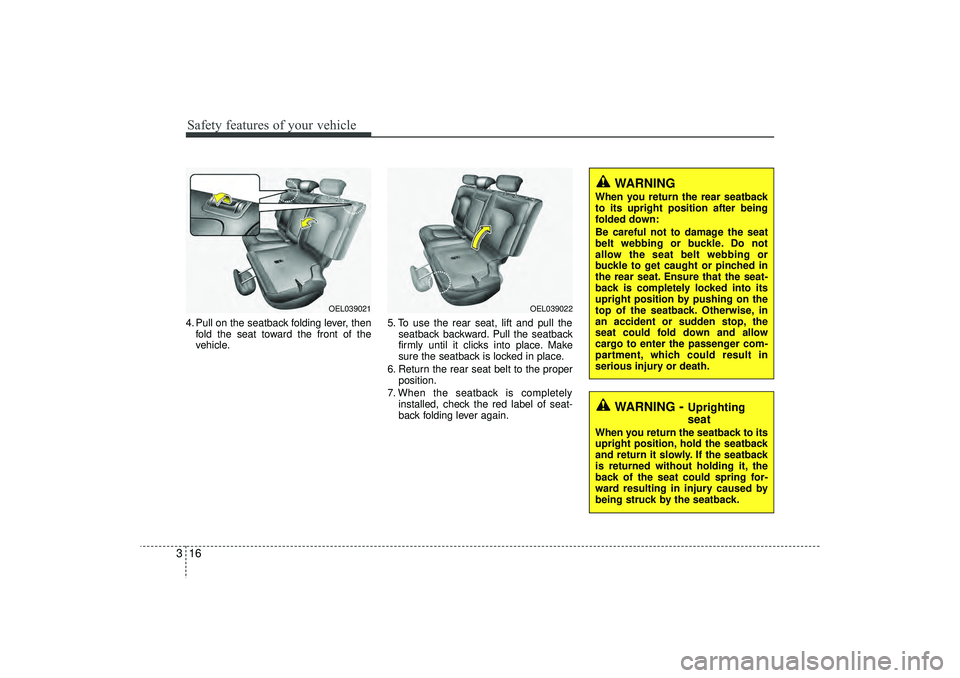
34. Pull on the seatback folding lever, then
fold the seat toward the front of the
vehicle. 5. To use the rear seat, lift and pull the
seatback backward. Pull the seatback
firmly until it clicks into place. Make
sure the seatback is locked in place.
6. Return the rear seat belt to the proper position.
7. When the seatback is completely installed, check the red label of seat-
back folding lever again.
WARNING
When you return the rear seatback
to its upright position after being
folded down:
Be careful not to damage the seat
belt webbing or buckle. Do not
allow the seat belt webbing or
buckle to get caught or pinched in
the rear seat. Ensure that the seat-
back is completely locked into its
upright position by pushing on the
top of the seatback. Otherwise, in
an accident or sudden stop, the
seat could fold down and allow
cargo to enter the passenger com-
partment, which could result in
serious injury or death.
WARNING
- Uprighting
seat
When you return the seatback to its
upright position, hold the seatback
and return it slowly. If the seatback
is returned without holding it, the
back of the seat could spring for-
ward resulting in injury caused by
being struck by the seatback.
OEL039022
OEL039021
EL(FL) UK 3.QXP 12/16/2014 8:55 PM Page 16
Page 43 of 550
Safety features of your vehicle24
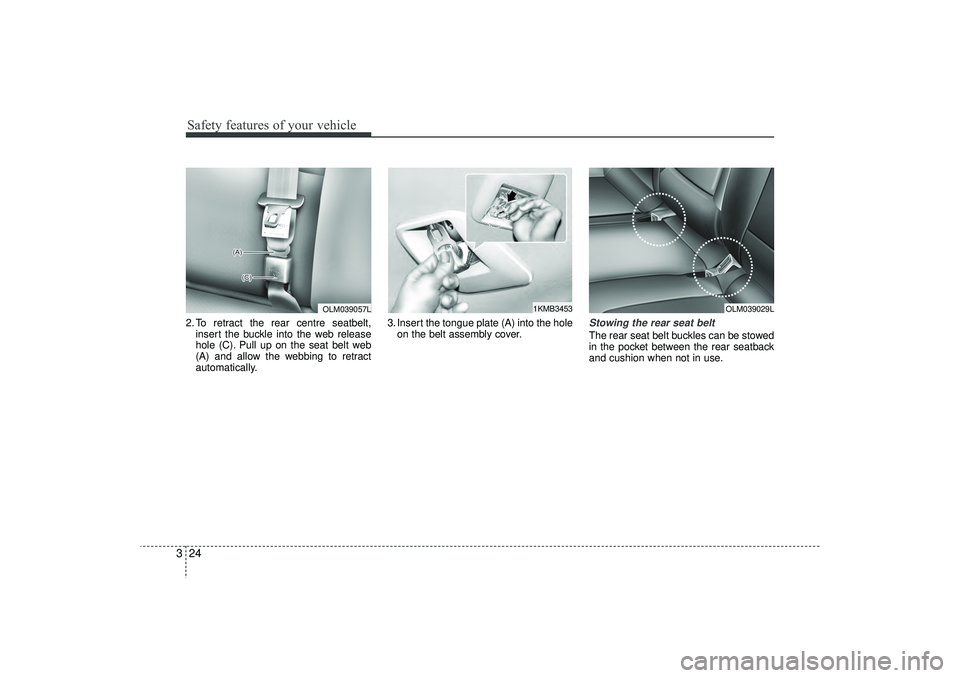
32. To retract the rear centre seatbelt,
insert the buckle into the web release
hole (C). Pull up on the seat belt web
(A) and allow the webbing to retract
automatically. 3. Insert the tongue plate (A) into the hole
on the belt assembly cover.
Stowing the rear seat belt The rear seat belt buckles can be stowed
in the pocket between the rear seatback
and cushion when not in use.
OLM039057L
1KMB3453
OLM039029L
EL(FL) UK 3.QXP 12/16/2014 8:55 PM Page 24
Page 54 of 550
335
Safety features of your vehicle
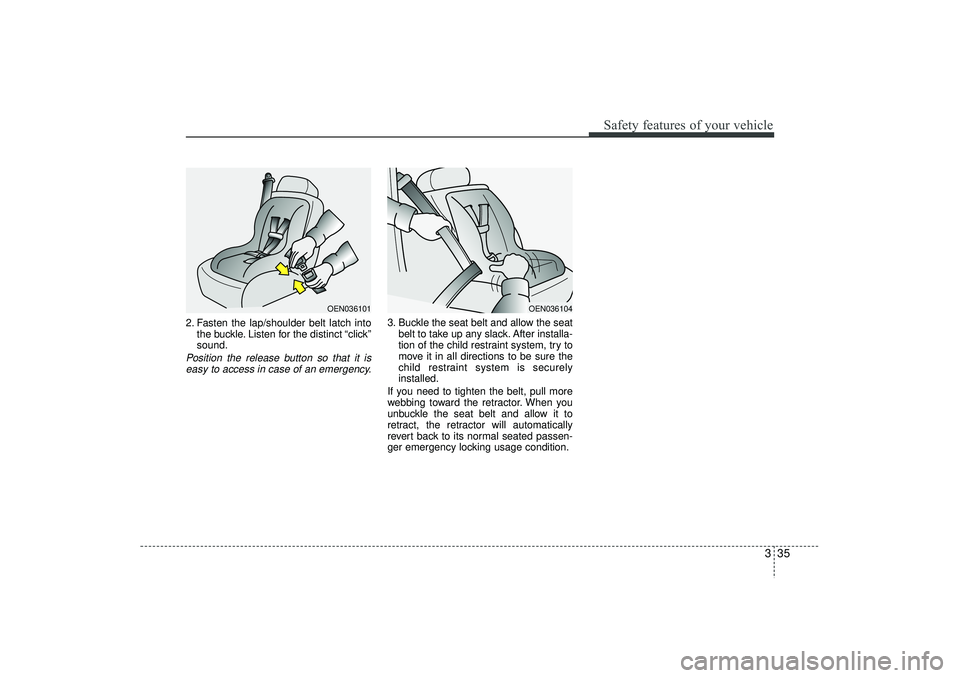
2. Fasten the lap/shoulder belt latch intothe buckle. Listen for the distinct “click”
sound.Position the release button so that it iseasy to access in case of an emergency.
3. Buckle the seat belt and allow the seat belt to take up any slack. After installa-
tion of the child restraint system, try to
move it in all directions to be sure the
child restraint system is securely
installed.
If you need to tighten the belt, pull more
webbing toward the retractor. When you
unbuckle the seat belt and allow it to
retract, the retractor will automatically
revert back to its normal seated passen-
ger emergency locking usage condition.
OEN036101
OEN036104
EL(FL) UK 3.QXP 12/16/2014 8:56 PM Page 35
Page 97 of 550
Features of your vehicle12
4Smart key precautions✽
✽
NOTICE• If, for some reason, you happen to lose
your smart key, you will not be able to
start the engine. Tow the vehicle, if
necessary. We recommend that you
contact a HYUNDAI authorised
repairer.
• A maximum of 2 smart keys can be registered to a single vehicle. If you
lose a smart key, you should immedi-
ately take the vehicle and key and we
recommend that you contact a
HYUNDAI authorised repairer.
• The smart key will not work if any of the following occurs:
- The smart key is close to a radiotransmitter such as a radio station or
an airport which can interfere with
normal operation of the smart key.
- The smart key is near a mobile two- way radio system or a mobile phone.
- Another vehicle’s smart key is being operated close to your vehicle.
When the smart key does not work
properly, open and close the door with
the mechanical key. If you have a
problem with the smart key, we rec-
ommend that you contact a
HYUNDAI authorised repairer. (Continued)(Continued)
• If the smart key is in close proximity
to your cell phone or smart phone, the
signal from the smart key could be
blocked by normal operation of your
cell phone or smart phone. This is
especially important when the phone
is active such as making call, receiving
calls, text messaging, and/or sending/
receiving emails. Avoid placing the
smart key and your cell phone or
smart phone in the same pants or
jacket pocket and maintain adequate
distance between the two devices.
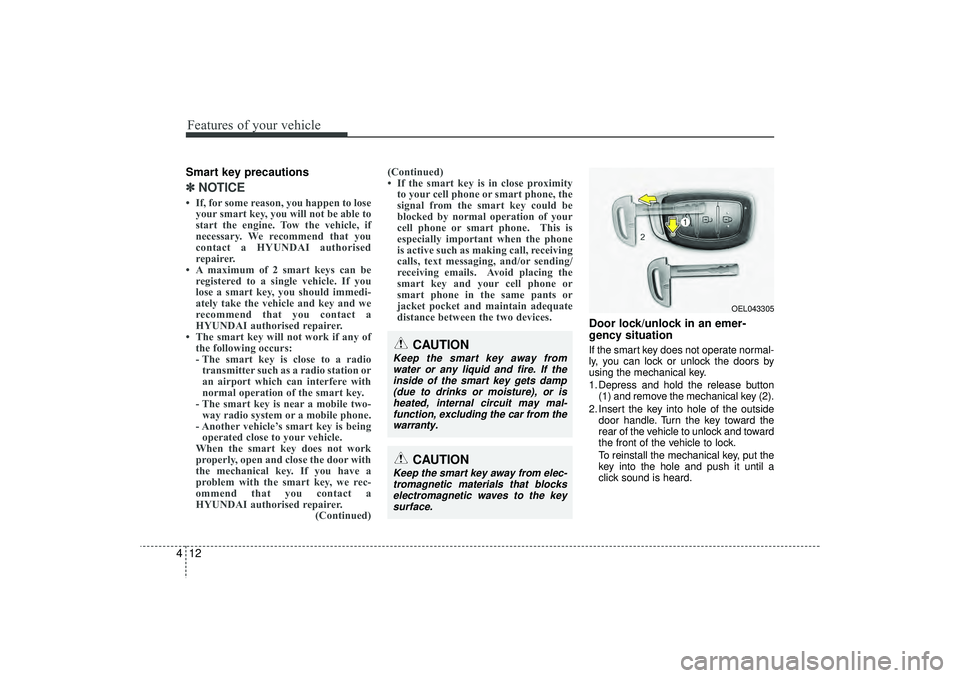
Door lock/unlock in an emer-
gency situationIf the smart key does not operate normal-
ly, you can lock or unlock the doors by
using the mechanical key.
1. Depress and hold the release button
(1) and remove the mechanical key (2).
2. Insert the key into hole of the outside door handle. Turn the key toward the
rear of the vehicle to unlock and toward
the front of the vehicle to lock.
To reinstall the mechanical key, put the
key into the hole and push it until a
click sound is heard.
CAUTION
Keep the smart key away fromwater or any liquid and fire. If theinside of the smart key gets damp(due to drinks or moisture), or is heated, internal circuit may mal-function, excluding the car from the warranty.
OEL043305
CAUTION
Keep the smart key away from elec-tromagnetic materials that blockselectromagnetic waves to the key surface.
EL(FL) UK 4A.QXP 2/9/2015 9:02 PM Page 12
Page 100 of 550
415
Features of your vehicle
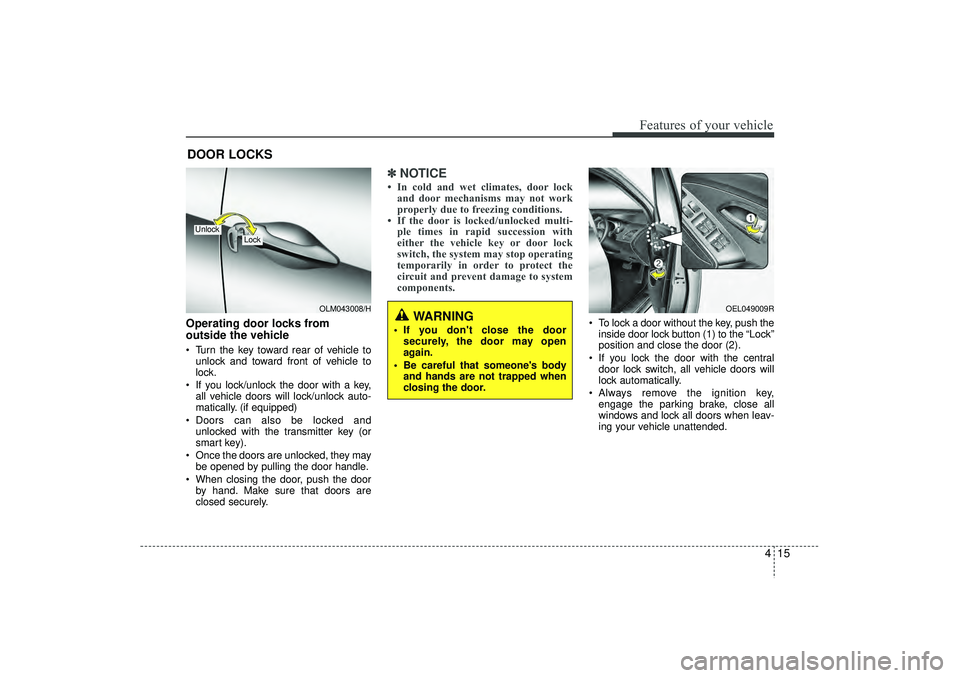
Operating door locks from
outside the vehicle Turn the key toward rear of vehicle tounlock and toward front of vehicle to
lock.
If you lock/unlock the door with a key, all vehicle doors will lock/unlock auto-
matically. (if equipped)
Doors can also be locked and unlocked with the transmitter key (or
smart key).
Once the doors are unlocked, they may be opened by pulling the door handle.
When closing the door, push the door by hand. Make sure that doors are
closed securely.
✽ ✽ NOTICE• In cold and wet climates, door lock
and door mechanisms may not work
properly due to freezing conditions.
• If the door is locked/unlocked multi- ple times in rapid succession with
either the vehicle key or door lock
switch, the system may stop operating
temporarily in order to protect the
circuit and prevent damage to system
components.
To lock a door without the key, push the
inside door lock button (1) to the “Lock”
position and close the door (2).
If you lock the door with the central door lock switch, all vehicle doors will
lock automatically.
Always remove the ignition key, engage the parking brake, close all
windows and lock all doors when leav-
ing your vehicle unattended.
DOOR LOCKS
OLM043008/H
Lock
Unlock
OEL049009R
WARNING
If you don't close the doorsecurely, the door may open
again.
Be careful that someone's body and hands are not trapped when
closing the door.
EL(FL) UK 4A.QXP 2/9/2015 9:03 PM Page 15
Page 123 of 550

Features of your vehicle38
4omfort modeThe steering wheel becomes lighter. The
comfort mode is usually used when driv-
ing in downtown or parking the vehicle.
Also, the comfort mode helps weak peo-
ple to drive easily.
Sport modeThe steering wheel becomes heavier.
The sport mode is usually used when
driving in highway.
OLM043355
OLM043356
CAUTION
For your safety, if you press the
steering mode button whilst oper-ating the steering wheel, the LCDdisplay will change, but the steer-ing effort will not change immedi- ately. After operating the steeringwheel, the steering effort will change automatically to theselected mode.
Be careful when changing the steering mode whilst driving.
When the electronic power steer- ing is not working properly, theflex steering wheel will not work.
EL(FL) UK 4A.QXP 2/9/2015 9:04 PM Page 38