2016 HYUNDAI IX35 service
[x] Cancel search: servicePage 471 of 550
711
Maintenance
SCHEDULED MAINTENANCE SERVICE Follow Normal Maintenance Schedule
if the vehicle is usually operated where
none of the following conditions apply. If
any of the following conditions apply, fol-
low Maintenance Under Severe Usage
Conditions.
Repeated short distance driving.
Driving in dusty conditions or sandyareas.
Extensive use of brakes.
Driving in areas where salt or other corrosive materials are being used.
Driving on rough or muddy roads.
Driving in mountainous areas.
Extended periods of idling or low speed operation.
Driving for a prolonged period in cold temperatures and/or extremely humid
climates.
More than 50% driving in heavy city traffic during hot weather above 32°C
(90°F).
If your vehicle is operated under theabove conditions, you should inspect, replace or refill more frequently than“Normal Maintenance Schedule which isprovied in your Service Passport.”
EL(FL) UK 7.QXP 3/4/2015 9:04 PM Page 11
Page 490 of 550
Maintenance30
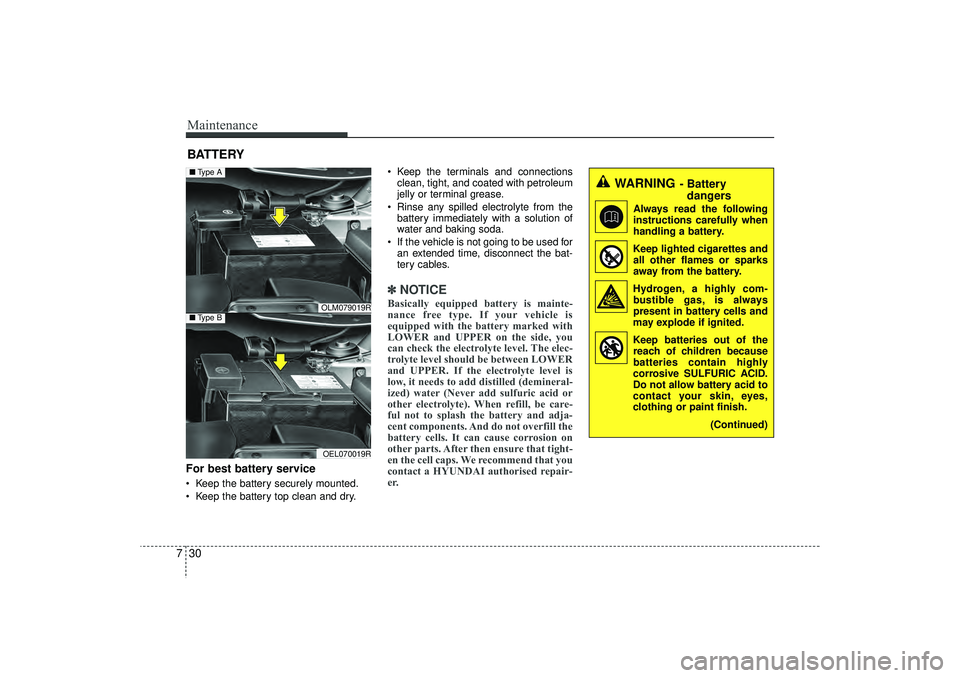
7BATTERYFor best battery service Keep the battery securely mounted.
Keep the battery top clean and dry. Keep the terminals and connections
clean, tight, and coated with petroleum
jelly or terminal grease.
Rinse any spilled electrolyte from the battery immediately with a solution of
water and baking soda.
If the vehicle is not going to be used for an extended time, disconnect the bat-
tery cables.
✽ ✽ NOTICEBasically equipped battery is mainte-
nance free type. If your vehicle is
equipped with the battery marked with
LOWER and UPPER on the side, you
can check the electrolyte level. The elec-
trolyte level should be between LOWER
and UPPER. If the electrolyte level is
low, it needs to add distilled (demineral-
ized) water (Never add sulfuric acid or
other electrolyte). When refill, be care-
ful not to splash the battery and adja-
cent components. And do not overfill the
battery cells. It can cause corrosion on
other parts. After then ensure that tight-
en the cell caps. We recommend that you
contact a HYUNDAI authorised repair-
er.
WARNING
- Battery
dangers
Always read the following
instructions carefully when
handling a battery.
Keep lighted cigarettes and all other flames or sparks
away from the battery.
Hydrogen, a highly com- bustible gas, is always
present in battery cells and
may explode if ignited.
Keep batteries out of the reach of children because
batteries contain highly
corrosive SULFURIC ACID.
Do not allow battery acid to
contact your skin, eyes,
clothing or paint finish.
(Continued)
OLM079019ROEL070019R
■Type A■Type B
EL(FL) UK 7.QXP 3/4/2015 9:05 PM Page 30
Page 501 of 550

741
Maintenance
3. Checking tyre life (TIN : Tyre Identification Number) Any tyres that are over 6 years,
based on the manufacturing date,
tyre strength and performance,
decline with age naturally (even
unused spare tyres). Therefore, the
tyres (including the spare tyre)
should be replaced by new ones. You
can find the manufacturing date on
the tyre sidewall (possibly on the
inside of the wheel), displaying the
DOT Code. The DOT Code is a
series of numbers on a tyre consist-
ing of numbers and English letters.
The manufacturing date is designat-
ed by the last four digits (characters)
of the DOT code.DOT : XXXX XXXX OOOOThe front part of the DOT means a
plant code number, tyre size and
tread pattern and the last four num-
bers indicate week and year manu-
factured.
For example:
DOT XXXX XXXX 1615 represents
that the tyre was produced in the
16th week of 2015.
4. Tyre ply composition and materialThe number of layers or plies of rub-
ber-coated fabric are in the tyre. Tyre
manufacturers also must indicate the
materials in the tyre, which include
steel, nylon, polyester, and others.
The letter "R" means radial ply con-
struction; the letter "D" means diago-
nal or bias ply construction; and the
letter "B" means belted-bias ply con-
struction.
5. Maximum permissible inflationpressureThis number is the greatest amount
of air pressure that should be put in
the tyre. Do not exceed the maximum
permissible inflation pressure. Refer
to the Tyre and Loading Information
label for recommended inflation
pressure.6. Maximum load ratingThis number indicates the maximum
load in kilograms and pounds that
can be carried by the tyre. When
replacing the tyres on the vehicle,
always use a tyre that has the same
load rating as the factory installed
tyre.7. Uniform tyre quality grading Quality grades can be found where
applicable on the tyre sidewall
between tread shoulder and maxi-
mum section width.
For example:
TREADWEAR 200
TRACTION AA
TEMPERATURE A
WARNING - Tyre age
Tyres degrade over time, even
when they are not being used.
Regardless of the remaining
tread, it is recommended that
tyres generally be replaced
after six (6) years of normal
service. Heat caused by hot cli-
mates or frequent high loading
conditions can accelerate the
aging process. Failure to follow
this Warning can result in sud-
den tyre failure, which could
lead to a loss of control and an
accident involving serious
injury or death.
EL(FL) UK 7.QXP 3/4/2015 9:05 PM Page 41
Page 502 of 550
Maintenance42
7Tread wearThe tread wear grade is a compara-
tive rating based on the wear rate of
the tyre when tested under controlled
conditions on a specified govern-
ment test course. For example, a tyre
graded 150 would wear one-and-a-
half times (1½) as well on the gov-
ernment course as a tyre graded
100.
The relative performance of tyres
depends upon the actual conditions
of their use, however, and may
depart significantly from the norm
because of variations in driving
habits, service practices and differ-
ences in road characteristics and cli-
mate.
These grades are molded on the
side-walls of passenger vehicle
tyres. The tyres available as standard
or optional equipment on your vehi-
cles may vary with respect to grade.
Traction - AA, A, B & C The traction grades, from highest to
lowest, are AA, A, B and C. Those
grades represent the tyres ability to
stop on wet pavement as measured
under controlled conditions on spec-
ified government test surfaces of
asphalt and concrete. A tyre marked
C may have poor traction perform-
ance.
Temperature -A, B & C The temperature grades are A (the
highest), B and C representing the
tyre’s resistance to the generation of
heat and its ability to dissipate heat
when tested under controlled condi-
tions on a specified indoor laboratory
test wheel. Sustained high tempera-
ture can cause the material of the
tyre to degenerate and reduce tyre
life, and excessive temperature can
lead to sudden tyre failure. Grades B
and A represent higher levels of per-
formance on the laboratory test
wheel than the minimum required by
the law.
WARNING
The traction grade assigned to
this tyre is based on straight-
ahead braking traction tests,
and does not include accelera-
tion, cornering, hydroplaning,
or peak traction characteristics.
WARNING - Tyre
temperature
The temperature grade for this
tyre is established for a tyre that
is properly inflated and not
overloaded. Excessive speed,
underinflation, or excessive
loading, either separately or in
combination, can cause heat
build-up and possible sudden
tyre failure. This can cause loss
of vehicle control and serious
injury or death.
EL(FL) UK 7.QXP 3/4/2015 9:05 PM Page 42
Page 526 of 550
Maintenance66
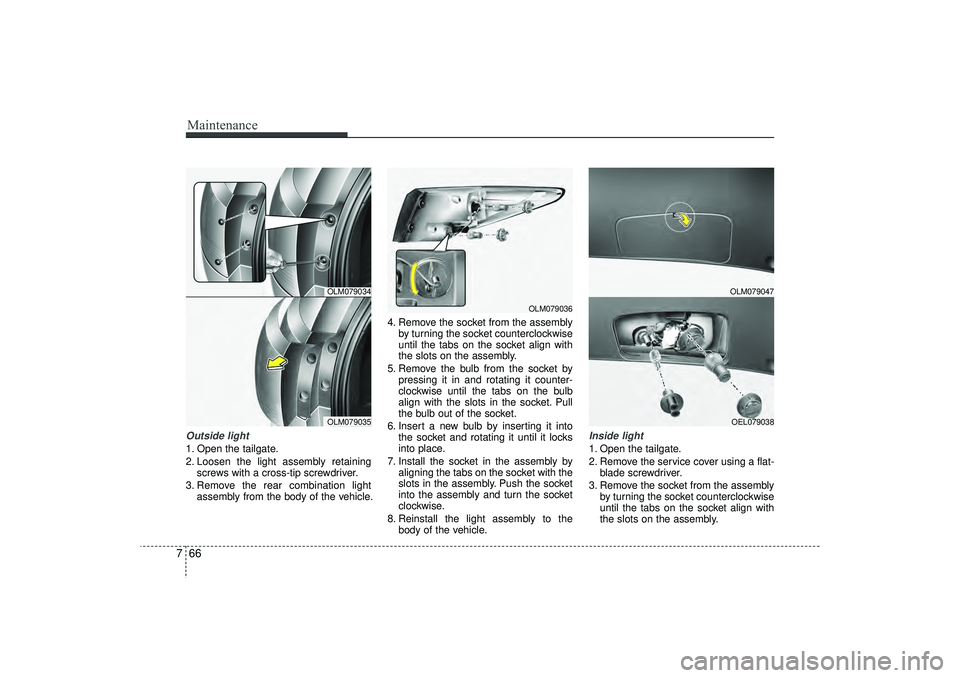
7Outside light1. Open the tailgate.
2. Loosen the light assembly retaining
screws with a cross-tip screwdriver.
3. Remove the rear combination light assembly from the body of the vehicle. 4. Remove the socket from the assembly
by turning the socket counterclockwise
until the tabs on the socket align with
the slots on the assembly.
5. Remove the bulb from the socket by pressing it in and rotating it counter-
clockwise until the tabs on the bulb
align with the slots in the socket. Pull
the bulb out of the socket.
6. Insert a new bulb by inserting it into the socket and rotating it until it locks
into place.
7. Install the socket in the assembly by aligning the tabs on the socket with the
slots in the assembly. Push the socket
into the assembly and turn the socket
clockwise.
8. Reinstall the light assembly to the body of the vehicle.
Inside light1. Open the tailgate.
2. Remove the service cover using a flat-blade screwdriver.
3. Remove the socket from the assembly by turning the socket counterclockwise
until the tabs on the socket align with
the slots on the assembly.
OLM079034OLM079035
OLM079036
OLM079047OEL079038
EL(FL) UK 7.QXP 3/4/2015 9:08 PM Page 66
Page 527 of 550
767
Maintenance
4. Remove the bulb from the socket bypressing it in and rotating it counter-
clockwise until the tabs on the bulb
align with the slots in the socket. Pull
the bulb out of the socket.
5. Insert a new bulb by inserting it into the socket and rotating it until it locks
into place.
6. Install the socket in the assembly by aligning the tabs on the socket with the
slots in the assembly. Push the socket
into the assembly and turn the socket
clockwise.
7. Install the service cover by putting it into the service hole.
Stop and tail light (LED type)
If the light does not operate, we recom-
mend that the system be checked by a
HYUNDAI authorised repairer.
Rear Fog Light (if equipped)1. Remove the socket from the assembly by turning the socket counterclockwise
until the tabs on the socket align with
the slots on the assembly.
2. Remove the bulb from the socket by pressing it in and rotating it counter-
clockwise until the tabs on the bulb
align with the slots in the socket. Pull
the bulb out of the socket.
3. Insert a new bulb in the socket.
4. Reinstall the light assembly to the body of the vehicle.
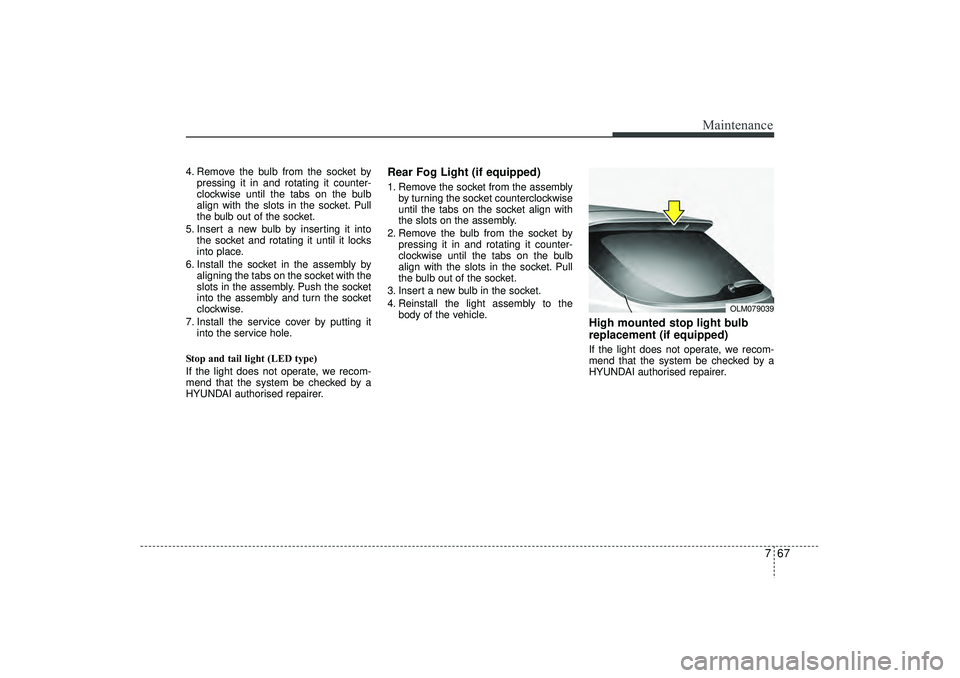
High mounted stop light bulb
replacement (if equipped)If the light does not operate, we recom-
mend that the system be checked by a
HYUNDAI authorised repairer.
OLM079039
EL(FL) UK 7.QXP 3/4/2015 9:08 PM Page 67
Page 536 of 550
Maintenance76
7EMISSION CONTROL SYSTEMThe emission control system of your
vehicle is covered by a written limited
warranty. Please see the warranty infor-
mation contained in the Service Passport
in your vehicle.
Your vehicle is equipped with an emis-
sion control system to meet all emission
regulations.
There are three emission control sys-
tems which are as follows.
(1) Crankcase emission control system
(2) Evaporative emission control system
(3) Exhaust emission control system
In order to assure the proper function of
the emission control systems, it is rec-
ommended that you have your car
inspected and maintained by a
HYUNDAI authorised repairer in accor-
dance with the maintenance schedule. Caution for the Inspection and
Maintenance Test (With Electronic
Stability Control (ESC) system)
To prevent the vehicle from misfir-
ing during dynamometer testing,
turn the Electronic Stability Control
(ESC) system off by pressing the
ESC switch.
After dynamometer testing is com- pleted, turn the ESC system back on
by pressing the ESC switch again.
1. Crankcase emission control systemThe positive crankcase ventilation sys-
tem is employed to prevent air pollution
caused by blow-by gases being emitted
from the crankcase. This system supplies
fresh filtered air to the crankcase through
the air intake hose. Inside the crankcase,
the fresh air mixes with blow-by gases,
which then pass through the PCV valve
into the induction system.
2. Evaporative emission controlSystemThe Evaporative Emission Control
System is designed to prevent fuel
vapours from escaping into the atmos-
phere.CanisterFuel vapours generated inside the fuel
tank are absorbed and stored in the
onboard canister. When the engine is
running, the fuel vapours absorbed in the
canister are drawn into the surge tank
through the purge control solenoid valve.Purge Control Solenoid Valve (PCSV)The purge control solenoid valve is con-
trolled by the Engine Control Module
(ECM); when the engine coolant temper-
ature is low during idling, the PCSV clos-
es so that evaporated fuel is not taken
into the engine. After the engine warms-
up during ordinary driving, the PCSV
opens to introduce evaporated fuel to the
engine.
EL(FL) UK 7.QXP 3/4/2015 9:08 PM Page 76
Page 550 of 550
811
Specifications & Consumer information
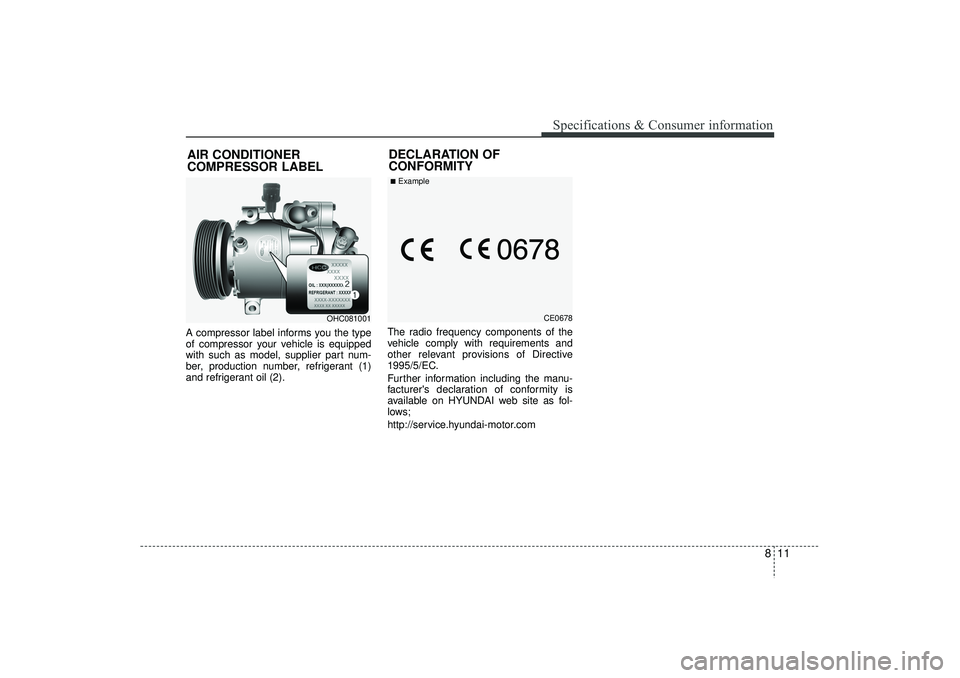
A compressor label informs you the type
of compressor your vehicle is equipped
with such as model, supplier part num-
ber, production number, refrigerant (1)
and refrigerant oil (2).The radio frequency components of the
vehicle comply with requirements and
other relevant provisions of Directive
1995/5/EC.
Further information including the manu-
facturer's declaration of conformity is
available on HYUNDAI web site as fol-
lows;
http://service.hyundai-motor.comAIR CONDITIONER
COMPRESSOR LABEL
OHC081001
DECLARATION OF
CONFORMITY
CE0678
■Example
EL(FL) UK 8.QXP 3/13/2015 5:44 PM Page 11