2016 HYUNDAI IX35 service
[x] Cancel search: servicePage 375 of 550
527
Driving your vehicle
Good driving practices Never move the shift lever from P(Park) or N (Neutral) to any other posi-
tion with the accelerator pedal
depressed.
Never move the shift lever into "P" when the vehicle is in motion.
Be sure the vehicle is completely stopped before you attempt to shift into
R (Reverse) or D (Drive).
Never take the vehicle out of gear and coast down a hill. This may be
extremely hazardous. Always leave the
vehicle in gear when moving.
Do not "ride" the brakes. This can cause them to overheat and malfunc-
tion. Instead, when you are driving
down a long hill, slow down and shift to
a lower gear. When you do this, engine
braking will help slow down the vehicle.
Slow down before shifting to a lower gear. Otherwise, the lower gear may
not be engaged.
Always use the parking brake. Do not depend on placing the transaxle in P
(Park) to keep the vehicle from moving.
Exercise extreme caution when driving on a slippery surface. Be especially
careful when braking, accelerating or
shifting gears. On a slippery surface,
an abrupt change in vehicle speed can
cause the drive wheels to lose traction
and the vehicle to go out of control. Optimum vehicle performance and
economy is obtained by smoothly
depressing and releasing the accelera-
tor pedal.
Moving up a steep grade from a stand-ing startTo move up a steep grade from a stand-
ing start, depress the brake pedal, shift
the shift lever to D (Drive). Select the
appropriate gear depending on load
weight and steepness of the grade, and
release the parking brake. Depress the
accelerator gradually whilst releasing the
service brakes.
When accelerating from a stop on a
steep hill, the vehicle may have a ten-
dency to roll backwards. Shifting the
shift lever into 2 (Second Gear) will
help prevent the vehicle from rolling
backwards.
WARNING
Always buckle-up! In a collision, an unbelted occupant is signifi-
cantly more likely to be seriously
injured or killed than a properly
belted occupant.
Avoid high speeds when corner- ing or turning.
Do not make quick steering wheel movements, such as sharp
lane changes or fast, sharp turns.
The risk of rollover is greatly increased if you lose control of
your vehicle at highway speeds.
Loss of control often occurs if two or more wheels drop off the
roadway and the driver over-
steers to reenter the roadway.
In the event your vehicle leaves the roadway, do not steer sharply.
Instead, slow down before pulling
back into the travel lanes.
Never exceed posted speed lim- its.
WARNING
If your vehicle becomes stuck in
snow, mud, sand, etc., then you
may attempt to rock the vehicle free
by moving it forward and backward.
Do not attempt this procedure if
people or objects are anywhere
near the vehicle. During the rocking
operation the vehicle may suddenly
move forward of backward as it
becomes unstuck, causing injury
or damage to nearby people or
objects.
EL(FL) UK 5.QXP 12/16/2014 8:09 PM Page 27
Page 383 of 550
535
Driving your vehicle
Power brakes Your vehicle has power-assisted brakes
that adjust automatically through normal
usage.
In the event that the power-assisted
brakes lose power because of a stalled
engine or some other reason, you can
still stop your vehicle by applying greater
force to the brake pedal than you nor-
mally would. The stopping distance, how-
ever, will be longer.
When the engine is not running, the
reserve brake power is partially depleted
each time the brake pedal is applied. Do
not pump the brake pedal when the
power assist has been interrupted.
Pump the brake pedal only when neces-
sary to maintain steering control on slip-
pery surfaces.
In the event of brake failure If service brakes fail to operate whilst the
vehicle is in motion, you can make an
emergency stop with the parking brake.
The stopping distance, however, will be
much greater than normal.
BRAKE SYSTEM
(Continued)
When descending a long or steephill, shift to a lower gear and
avoid continuous application of
the brakes. Continuous brake
application will cause the brakes
to overheat and could result in a
temporary loss of braking per-
formance.
Wet brakes may impair the vehi- cle’s ability to sefely slow down;
the vehicle may also pull to one
side when the brakes are applied.
Applying the brakes lightly will
indicate whether they have been
affected in this way. Always test
your brakes in this fashion after
driving through deep water. To
dry the brakes, apply them lightly
whilst maintaining a safe forward
speed until brake performance
returns to normal.
Always, confirm the position of the brake and accelerator pedal
before driving. If you don't check
the position of the accelerator
and brake pedal before driving,
you may depress the accelerator
instead of the brake pedal. It may
cause a serious accident.
WARNING
- Parking brake
Applying the parking brake whilst
the vehicle is moving at normal
speeds can cause a sudden loss of
control of the vehicle. If you must
use the parking brake to stop the
vehicle, use great caution in apply-
ing the brake.
WARNING -
Brakes
Do not drive with your foot rest-ing on the brake pedal. This will
create abnormal high brake tem-
peratures, excessive brake lining
and pad wear, and increased
stopping distances.
(Continued)
EL(FL) UK 5.QXP 12/16/2014 8:09 PM Page 35
Page 384 of 550
Driving your vehicle36
5Disc brakes wear indicator When your brake pads are worn and new
pads are required, you will hear a high-
pitched warning sound from your front
brakes or rear brakes. You may hear this
sound come and go or it may occur
whenever you depress the brake pedal.
Please remember that some driving con-
ditions or climates may cause a brake
squeal when you first apply (or lightly
apply) the brakes. This is normal and
does not indicate a problem with your
brakes.
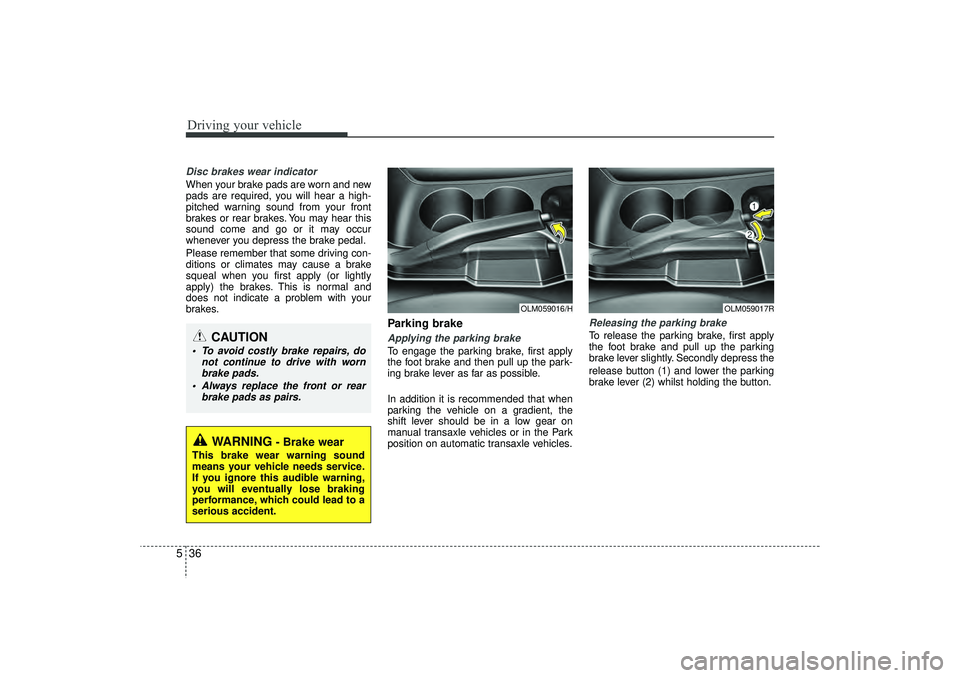
Parking brake Applying the parking brakeTo engage the parking brake, first apply
the foot brake and then pull up the park-
ing brake lever as far as possible.
In addition it is recommended that when
parking the vehicle on a gradient, the
shift lever should be in a low gear on
manual transaxle vehicles or in the Park
position on automatic transaxle vehicles.
Releasing the parking brakeTo release the parking brake, first apply
the foot brake and pull up the parking
brake lever slightly. Secondly depress the
release button (1) and lower the parking
brake lever (2) whilst holding the button.
WARNING
- Brake wear
This brake wear warning sound
means your vehicle needs service.
If you ignore this audible warning,
you will eventually lose braking
performance, which could lead to a
serious accident.
CAUTION
To avoid costly brake repairs, do
not continue to drive with wornbrake pads.
Always replace the front or rear brake pads as pairs.
OLM059016/H
OLM059017R
EL(FL) UK 5.QXP 12/16/2014 8:09 PM Page 36
Page 403 of 550
555
Driving your vehicle
ECONOMICAL OPERATIONYour vehicle's fuel economy depends
mainly on your style of driving, where you
drive and when you drive.
Each of these factors affects how many
miles (kilometers) you can get from a
gallon (litre) of fuel. To operate your vehi-
cle as economically as possible, use the
following driving suggestions to help
save money in both fuel and repairs:
Drive smoothly. Accelerate at a moder-ate rate. Don't make "jack-rabbit" starts
or full-throttle shifts and maintain a
steady cruising speed. Don't race
between stoplights. Try to adjust your
speed to the traffic so you don't have to
change speeds unnecessarily. Avoid
heavy traffic whenever possible.
Always maintain a safe distance from
other vehicles so you can avoid unnec-
essary braking. This also reduces
brake wear.
Drive at a moderate speed. The faster you drive, the more fuel your vehicle
uses. Driving at a moderate speed,
especially on the highway, is one of the
most effective ways to reduce fuel con-
sumption. Don't "ride" the brake or clutch pedal.
This can increase fuel consumption
and also increase wear on these com-
ponents. In addition, driving with your
foot resting on the brake pedal may
cause the brakes to overheat, which
reduces their effectiveness and may
lead to more serious consequences.
Take care of your tyres. Keep them inflated to the recommended pressure.
Incorrect inflation, either too much or
too little, results in unnecessary tyre
wear. Check the tyre pressures at least
once a month.
Be sure that the wheels are aligned correctly. Improper alignment can
result from hitting kerbs or driving too
fast over irregular surfaces. Poor align-
ment causes faster tyre wear and may
also result in other problems as well as
greater fuel consumption. Keep your vehicle in good condition.
For better fuel economy and reduced
maintenance costs, maintain your vehi-
cle in accordance with the mainte-
nance schedule. If you drive your vehi-
cle in severe conditions, more frequent
maintenance is required.
Keep your vehicle clean. For maximum service, your vehicle should be kept
clean and free of corrosive materials. It
is especially important that mud, dirt,
ice, etc. not be allowed to accumulate
on the underside of the vehicle. This
extra weight can result in increased
fuel consumption and also contribute
to corrosion.
Travel lightly. Don't carry unnecessary weight in your vehicle. Weight reduces
fuel economy.
Don't let the engine idle longer than necessary. If you are waiting (and not
in traffic), turn off your engine and
restart only when you're ready to go.
EL(FL) UK 5.QXP 12/16/2014 8:10 PM Page 55
Page 419 of 550
571
Driving your vehicle
When you are ready to leave after park-
ing on a hill
1. With the manual transaxle in Neutralor automatic transaxle in P (Park),
apply your brakes and hold the brake
pedal down whilst you:
Start your engine;
Shift into gear; and
Release the parking brake.
2. Slowly remove your foot from the brake pedal.
3. Drive slowly until the trailer is clear of the chocks.
4. Stop and have someone pick up and store the chocks.
Maintenance when trailer towing Your vehicle will need service more often
when you regularly pull a trailer.
Important items to pay particular atten-
tion to include engine oil, automatic
transaxle fluid, axle lubricant and cooling
system fluid. Brake condition is another
important item to frequently check. Each
item is covered in this manual, and the
Index will help you find them quickly. If
you’re trailering, it’s a good idea to review
these sections before you start your trip.
Don’t forget to also maintain your trailer
and towbar. Follow the maintenance
schedule that accompanied your trailer
and check it periodically. Preferably, con-
duct the check at the start of each day’s
driving. Most importantly, all towbar nuts
and bolts should be tight.
CAUTION
Due to higher load during trailer usage, overheating might occurin hot days or during uphill driv-ing. If the coolant gauge indicatesover-heating, switch off the A/C and stop the vehicle in a safe areato cool down the engine.
When towing check transaxle fluid more frequently.
If your vehicle is not equipped with the air conditioner, youshould install a condenser fan toimprove engine performance when towing a trailer.
EL(FL) UK 5.QXP 12/16/2014 8:10 PM Page 71
Page 423 of 550
What to do in an emergencyRoad warning . . . . . . . . . . . . . . . . . . . . . . . . . . . . . . 6-2• Hazard warning flasher . . . . . . . . . . . . . . . . . . . . . . . . 6-2In case of an emergency whilst driving . . . . . . . . . 6-3• If the engine stalls at a crossroad or crossing. . . . . . . 6-3
• If you have a flat tyre whilst driving . . . . . . . . . . . . . . 6-3
• If engine stalls whilst driving . . . . . . . . . . . . . . . . . . . . 6-3If the engine will not start . . . . . . . . . . . . . . . . . . . . 6-4• If engine doesn't turn over or turns over slowly . . . . 6-4
• If engine turns over normally but does not start . . . . 6-4Emergency starting . . . . . . . . . . . . . . . . . . . . . . . . . 6-5• Jump starting . . . . . . . . . . . . . . . . . . . . . . . . . . . . . . . . . 6-5
• Push-starting . . . . . . . . . . . . . . . . . . . . . . . . . . . . . . . . . 6-6If the engine overheats . . . . . . . . . . . . . . . . . . . . . . . 6-7
Tyre pressure monitoring system (TPMS) (Type A) . . . . . . . . . . . . . . . . . . . . . . . . . . . . . . . . . 6-8• Low tyre pressure telltale . . . . . . . . . . . . . . . . . . . . . . . 6-9
• TPMS (tyre pressure monitoring system)
malfunction indicator . . . . . . . . . . . . . . . . . . . . . . . 6-10
• Changing a tyre with tpms . . . . . . . . . . . . . . . . . . . . . 6-11Tyre pressure monitoring system (TPMS) (Type B) . . . . . . . . . . . . . . . . . . . . . . . . . . . . . . . . 6-13• Low tyre pressure telltale . . . . . . . . . . . . . . . . . . . . . . 6-14
• Low tyre pressure position telltale. . . . . . . . . . . . . . . 6-14
• TPMS (tyre pressure monitoring system)
malfunction indicator . . . . . . . . . . . . . . . . . . . . . . . 6-15 • Changing a tyre with tpms . . . . . . . . . . . . . . . . . . . . . 6-16
If you have a flat tyre. . . . . . . . . . . . . . . . . . . . . . . 6-19• Jack and tools . . . . . . . . . . . . . . . . . . . . . . . . . . . . . . . 6-19
• Removing and storing the spare tyre . . . . . . . . . . . 6-20
• Changing tyres . . . . . . . . . . . . . . . . . . . . . . . . . . . . . . 6-20
• Jack label . . . . . . . . . . . . . . . . . . . . . . . . . . . . . . . . . . . 6-\
25
• EC Declaration of Conformity for Jack . . . . . . . . . . 6-26If you have a flat tyre (with tyre mobility kit) . . 6-27• Introduction . . . . . . . . . . . . . . . . . . . . . . . . . . . . . . . . . 6-27
• Notes on the safe use of the tyre mobility kit . . . . . . 6-28
• Components of the tyre mobility kit . . . . . . . . . . . . . 6-29
• Using the tyre mobility kit . . . . . . . . . . . . . . . . . . . . . 6-30
• Distributing the sealant. . . . . . . . . . . . . . . . . . . . . . . . 6-31Towing . . . . . . . . . . . . . . . . . . . . . . . . . . . . . . . . . . . 6-\
34• Towing service . . . . . . . . . . . . . . . . . . . . . . . . . . . . . . . 6-34
• Removable towing hook . . . . . . . . . . . . . . . . . . . . . . . 6-35
• Emergency towing . . . . . . . . . . . . . . . . . . . . . . . . . . . . 6-36
6
EL(FL) UK 6.QXP 12/16/2014 8:12 PM Page 1
Page 427 of 550
65
What to do in an emergency
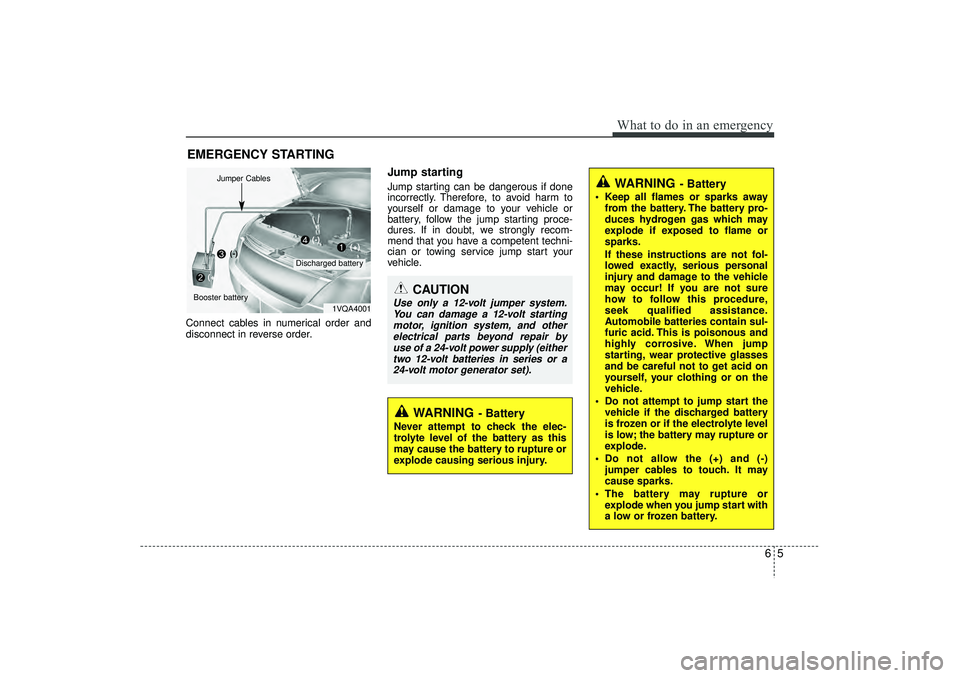
EMERGENCY STARTINGConnect cables in numerical order and
disconnect in reverse order.
Jump starting Jump starting can be dangerous if done
incorrectly. Therefore, to avoid harm to
yourself or damage to your vehicle or
battery, follow the jump starting proce-
dures. If in doubt, we strongly recom-
mend that you have a competent techni-
cian or towing service jump start your
vehicle.
CAUTION
Use only a 12-volt jumper system.You can damage a 12-volt starting motor, ignition system, and otherelectrical parts beyond repair by use of a 24-volt power supply (eithertwo 12-volt batteries in series or a 24-volt motor generator set).
WARNING
- Battery
• Keep all flames or sparks away from the battery. The battery pro-
duces hydrogen gas which may
explode if exposed to flame or
sparks.
If these instructions are not fol-
lowed exactly, serious personal
injury and damage to the vehicle
may occur! If you are not sure
how to follow this procedure,
seek qualified assistance.
Automobile batteries contain sul-
furic acid. This is poisonous and
highly corrosive. When jump
starting, wear protective glasses
and be careful not to get acid on
yourself, your clothing or on the
vehicle.
Do not attempt to jump start the vehicle if the discharged battery
is frozen or if the electrolyte level
is low; the battery may rupture or
explode.
Do not allow the (+) and (-) jumper cables to touch. It may
cause sparks.
The battery may rupture or explode when you jump start with
a low or frozen battery.
WARNING
- Battery
Never attempt to check the elec-
trolyte level of the battery as this
may cause the battery to rupture or
explode causing serious injury.
1VQA4001
Discharged battery
Jumper Cables
Booster battery
(-)
(+)
(+)
(-)
EL(FL) UK 6.QXP 12/16/2014 8:12 PM Page 5
Page 428 of 550
What to do in an emergency66Jump starting procedure
1. Make sure the booster battery is 12-voltand that its negative terminal is grounded.
2. If the booster battery is in another vehicle, do not allow the vehicles to touch.
3. Turn off all unnecessary electrical loads.4. Connect the jumper cables in the exact sequence shown in the illustration. First
connect one end of a jumper cable to
the positive terminal of the discharged
battery (1), then connect the other end
to the positive terminal on the booster
battery (2). Proceed to connect one end
of the other jumper cable to the negative
terminal of the booster battery (3), then
the other end to a solid, stationary,
metallic point (for example, the engine
lifting bracket) away from the battery (4).
Do not connect it to or near any part that
moves when the engine is cranked.
Do not allow the jumper cables to con-
tact anything except the correct battery
terminals or the correct ground. Do not
lean over the battery when making con-
nections. 5. Start the engine of the vehicle with the
booster battery and let it run at 2,000
rpm, then start the engine of the vehi-
cle with the discharged battery.
If the cause of your battery discharging isnot apparent, we recommend that the system be checked by a HYUNDAIauthorised repairer.Push-starting Your manual transaxle-equipped vehicle
should not be push-started because it
might damage the emission control sys-
tem.
Vehicles equipped with automatic
transaxle cannot be push-started.
Follow the directions in this section for
jump-starting.
WARNING
Never tow a vehicle to start it
because the sudden surge forward
when the engine starts could cause
a collision with the tow vehicle.
CAUTION
- Battery cables
Do not connect the jumper cablefrom the negative terminal of thebooster battery to the negative ter-minal of the discharged battery.This can cause the discharged bat-tery to overheat and crack, releas-ing battery acid.
CAUTION
-AGM battery
(if equipped)
AAbsorbent Glass Matt (AGM)
batteries are maintenance-freeand we recommend that the sys-tem be serviced by a HYUNDAIauthorised repairer. For chargingyour AGM battery, use only fully automatic battery chargers thatare specially developed for AGM batteries.
When replacing the AGM battery, we recommend that you use partsfor replacement from a HYUNDAIauthorised repairer.
Do not open or remove the cap on top of the battery. This may causeleaks of internal electrolyte thatcould result in severe injury.
If the AGM battery is reconnected or replaced, ISG function will notoperate immediately.
If you want to use the ISG func-tion, the battery sensor needs to be calibrated for approximately 4hours with the ignition off.
EL(FL) UK 6.QXP 12/16/2014 8:12 PM Page 6