2016 HYUNDAI IX35 reset
[x] Cancel search: resetPage 332 of 550
4 247
Features of your vehicle
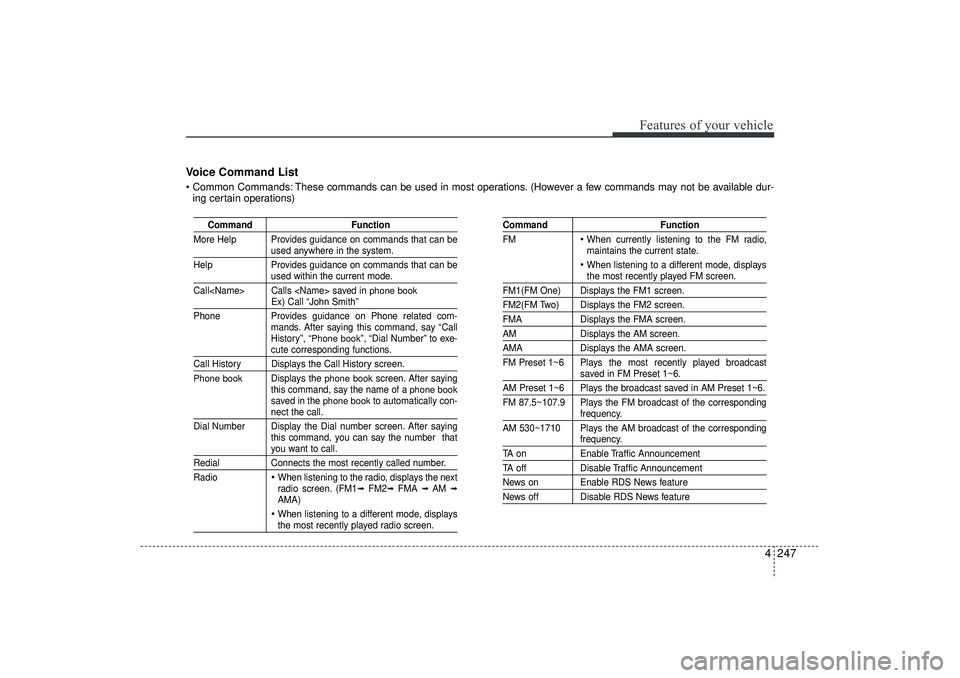
Voice Command List Common Commands: These commands can be used in most operations. (However a few commands may not be available dur-ing certain operations)
Command Function
More Help Provides guidance on commands that can be
used anywhere in the system.
Help Provides guidance on commands that can beused within the current mode.
Call
phone book
Ex) Call “John Smith”
Phone Provides guidance on Phone related com- mands. After saying this command, say “Call
History”, “
Phone book
”, “Dial Number” to exe-
cute corresponding functions.
Call History Displays the Call History screen.Phone book
Displays the
phone book
screen. After saying
this command, say the name of a
phone book
saved in the
phone book
to automatically con-
nect the call.
Dial Number Display the Dial number screen. After saying this command, you can say the number thatyou want to call.
RedialConnects the most recently called number.
Radio
When listening to the radio, displays the next
radio screen. (FM1
➟FM2
➟FMA
➟ AM
➟
AMA) When listening to a different mode, displaysthe most recently played radio screen.
Command Function
FM
When currently listening to the FM radio,
maintains the current state. When listening to a different mode, displaysthe most recently played FM screen.
FM1(FM One) Displays the FM1 screen.FM2(FM Two) Displays the FM2 screen.FMA Displays the FMA screen.AMDisplays the AM screen.AMADisplays the AMA screen.
FM Preset 1~6 Plays the most recently played broadcast
saved in FM Preset 1~6.
AM Preset 1~6 Plays the broadcast saved in AM Preset 1~6.
FM 87.5~107.9 Plays the FM broadcast of the corresponding
frequency.
AM 530~1710 Plays the AM broadcast of the correspondingfrequency.
TA on Enable Traffic AnnouncementTA offDisable Traffic AnnouncementNews on Enable RDS News featureNews off Disable RDS News feature
EL(FL) UK 4B AUDIO.QXP 3/13/2015 4:19 PM Page 247
Page 334 of 550
4 249
Features of your vehicle
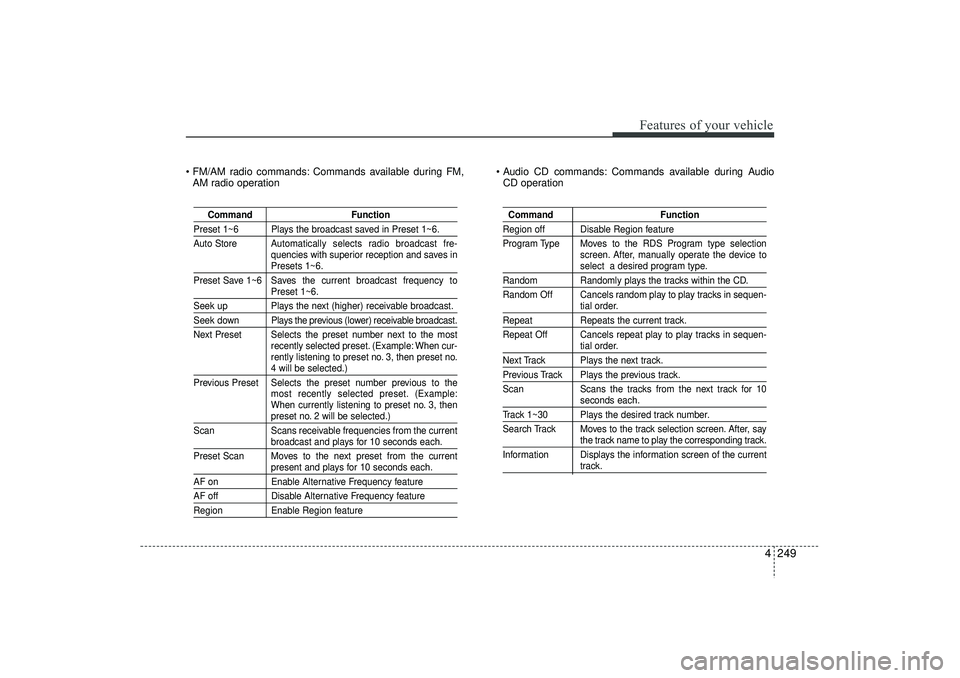
FM/AM radio commands: Commands available during FM,AM radio operation Audio CD commands: Commands available during Audio
CD operation
Command Function
Preset 1~6 Plays the broadcast saved in Preset 1~6.
Auto Store Automatically selects radio broadcast fre-
quencies with superior reception and saves in
Presets 1~6.
Preset Save 1~6 Saves the current broadcast frequency toPreset 1~6.
Seek up Plays the next (higher) receivable broadcast.Seek down Plays the previous (lower) receivable broadcast.
Next Preset Selects the preset number next to the most recently selected preset. (Example: When cur-
rently listening to preset no. 3, then preset no.
4 will be selected.)
Previous Preset Selects the preset number previous to the most recently selected preset. (Example:
When currently listening to preset no. 3, thenpreset no. 2 will be selected.)
Scan Scans receivable frequencies from the currentbroadcast and plays for 10 seconds each.
Preset Scan Moves to the next preset from the currentpresent and plays for 10 seconds each.
AF on Enable Alternative Frequency featureAF offDisable Alternative Frequency featureRegionEnable Region feature
Command FunctionRegion off Disable Region feature
Program Type Moves to the RDS Program type selection
screen. After, manually operate the device to
select a desired program type.
Random Randomly plays the tracks within the CD.
Random Off Cancels random play to play tracks in sequen-
tial order.
Repeat Repeats the current track.
Repeat Off Cancels repeat play to play tracks in sequen-
tial order.
Next Track Plays the next track.Previous Track Plays the previous track.
Scan Scans the tracks from the next track for 10
seconds each.
Track 1~30 Plays the desired track number.
Search Track Moves to the track selection screen. After, say
the track name to play the corresponding track.
Information Displays the information screen of the currenttrack.
EL(FL) UK 4B AUDIO.QXP 3/13/2015 4:19 PM Page 249
Page 337 of 550
![HYUNDAI IX35 2016 Owners Manual Features of your vehicle252
4SETUPStarting ModePress the key to display the
Setup screen.
You can select and control options relat-
ed to [Display], [Sound], [Clock/Day],
[Phone] and [System].
Displa HYUNDAI IX35 2016 Owners Manual Features of your vehicle252
4SETUPStarting ModePress the key to display the
Setup screen.
You can select and control options relat-
ed to [Display], [Sound], [Clock/Day],
[Phone] and [System].
Displa](/manual-img/35/56235/w960_56235-336.png)
Features of your vehicle252
4SETUPStarting ModePress the key to display the
Setup screen.
You can select and control options relat-
ed to [Display], [Sound], [Clock/Day],
[Phone] and [System].
Display SettingsAdjusting the BrightnessPress the key Select
[Display] Select [Brightness]
Use the , buttons to adjust the
screen brightness or set the Brightness
on Automatic, Day, or Night mode.
Press the button to reset.
1) Automatic : Adjusts the brightness automatically
2) Day : Always maintains the brightness on high
3) Night : Always maintains the bright- ness on low
Pop-up ModePress the key Select
[Display] Select [Pop-up Mode]
This feature is used to display the Pop-up
Mode screen when entering radio and
media modes.
When this feature is turned on, pressing
the or key will display
the Pop-up Mode screen.✽ ✽ NOTICE The media Pop-up Mode screen can be
displayed only when two or more media
modes have been connected.
MEDIA
RADIO
SETUP
Default
SETUP
SETUP
EL(FL) UK 4B AUDIO.QXP 3/13/2015 4:19 PM Page 252
Page 339 of 550
![HYUNDAI IX35 2016 Owners Manual Features of your vehicle254
4Sound SettingsSound SettingsPress the key Select
[Sound] Select [Audio Setting] Use the , , , buttons to
adjust the Fader/Balance settings.
Use the , buttons to adjust HYUNDAI IX35 2016 Owners Manual Features of your vehicle254
4Sound SettingsSound SettingsPress the key Select
[Sound] Select [Audio Setting] Use the , , , buttons to
adjust the Fader/Balance settings.
Use the , buttons to adjust](/manual-img/35/56235/w960_56235-338.png)
Features of your vehicle254
4Sound SettingsSound SettingsPress the key Select
[Sound] Select [Audio Setting] Use the , , , buttons to
adjust the Fader/Balance settings.
Use the , buttons to adjust the
Bass/Middle/Treble settings.
Press the button to reset.
SDVC (Speed Dependent Volume
Control)Press the key Select
[Sound] Select [Speed Dependent Vol.]
The volume level is controlled automati-
cally according to the vehicle speed.
SDVC can be set by selecting from
Off/Low/Mid/High.
SETUP
Default
SETUP
EL(FL) UK 4B AUDIO.QXP 3/13/2015 4:19 PM Page 254
Page 348 of 550
4 263
Features of your vehicle
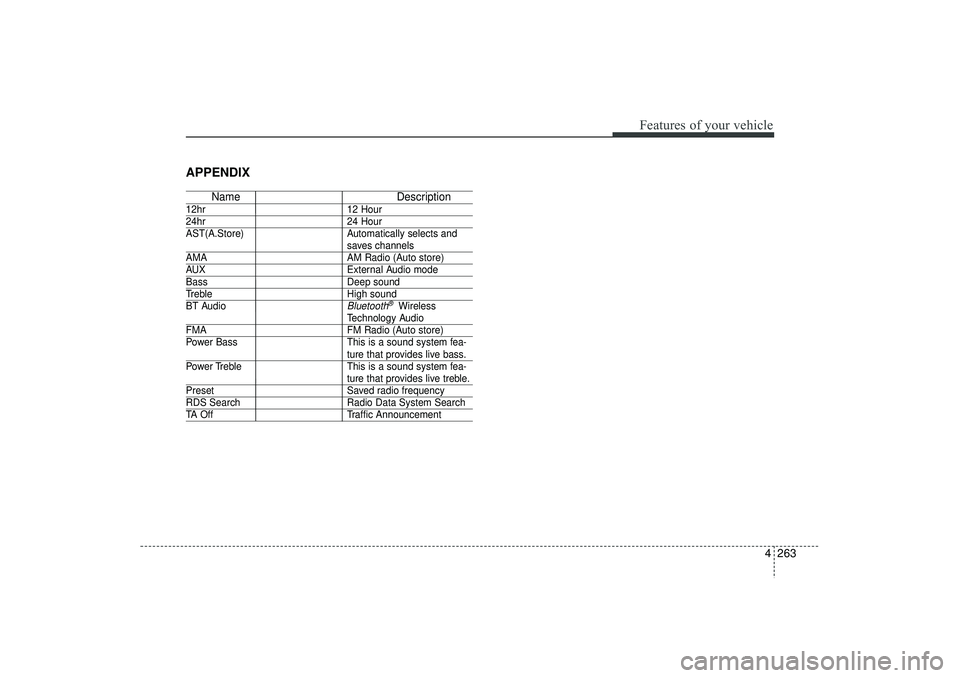
APPENDIX
NameDescription
12hr12 Hour24hr24 Hour
AST(A.Store) Automatically selects and
saves channels
AMA AM Radio (Auto store)AUXExternal Audio modeBassDeep soundTrebleHigh sound
BT Audio
Bluetooth
®Wireless
Technology Audio
FMA FM Radio (Auto store)
Power Bass This is a sound system fea-
ture that provides live bass.
Power Treble This is a sound system fea-ture that provides live treble.
Preset Saved radio frequencyRDS SearchRadio Data System SearchTA OffTraffic Announcement
EL(FL) UK 4B AUDIO.QXP 3/13/2015 4:19 PM Page 263
Page 401 of 550
553
Driving your vehicle
Each of these actions will cancel cruisecontrol operation (the SET indicator lightin the instrument cluster will go off), but itwill not turn the system off. If you wish to resume cruise control operation, moveup the lever (to RES+) located on yoursteering wheel. You will return to your previously preset speed.
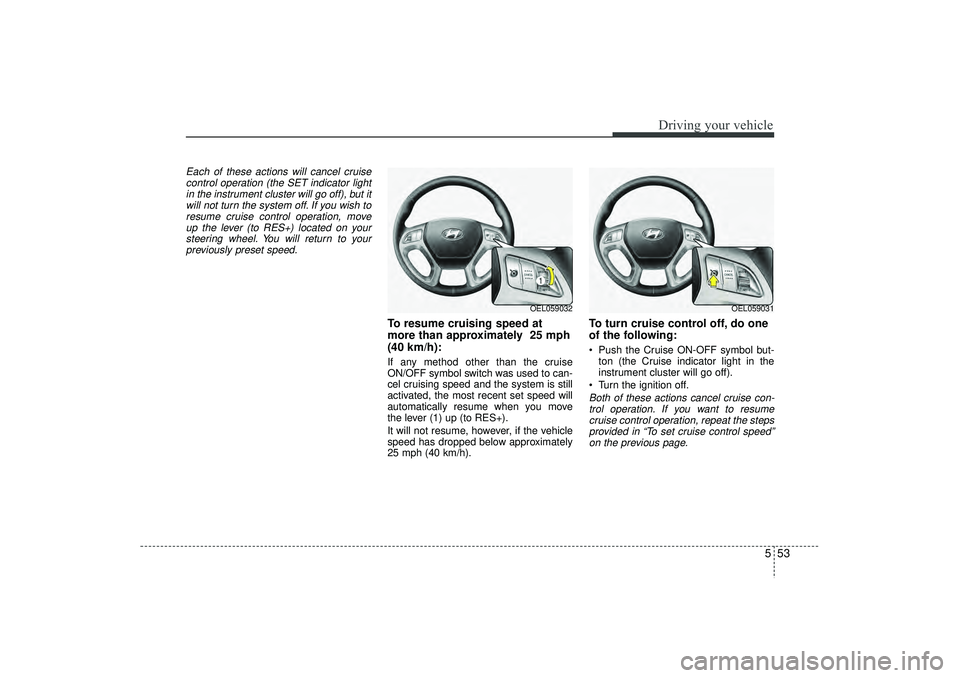
To resume cruising speed at
more than approximately 25 mph
(40 km/h):If any method other than the cruise
ON/OFF symbol switch was used to can-
cel cruising speed and the system is still
activated, the most recent set speed will
automatically resume when you move
the lever (1) up (to RES+).
It will not resume, however, if the vehicle
speed has dropped below approximately
25 mph (40 km/h).
To turn cruise control off, do one
of the following: Push the Cruise ON-OFF symbol but- ton (the Cruise indicator light in the
instrument cluster will go off).
Turn the ignition off.Both of these actions cancel cruise con- trol operation. If you want to resume cruise control operation, repeat the stepsprovided in “To set cruise control speed”on the previous page.
OEL059032
OEL059031
EL(FL) UK 5.QXP 12/16/2014 8:10 PM Page 53
Page 461 of 550

Maintenance
7
Engine compartment . . . . . . . . . . . . . . . . . . . . . . . . 7-3
Maintenance services . . . . . . . . . . . . . . . . . . . . . . . . 7-7• Owner’s responsibility . . . . . . . . . . . . . . . . . . . . . . . . 7-7
• Owner maintenance precautions . . . . . . . . . . . . . . . . 7-7
• Engine compartment precautions (Diesel engine) . . . 7-8Owner maintenance . . . . . . . . . . . . . . . . . . . . . . . . . 7-9• Owner maintenance schedule. . . . . . . . . . . . . . . . . . . . 7-9Scheduled maintenance service . . . . . . . . . . . . . . . 7-11
Explanation of scheduled maintenance items . . . 7-12
Engine oil. . . . . . . . . . . . . . . . . . . . . . . . . . . . . . . . . 7-15• Checking the engine oil level . . . . . . . . . . . . . . . . . . . 7-15
• Changing the engine oil and filter . . . . . . . . . . . . . . . 7-16Engine coolant . . . . . . . . . . . . . . . . . . . . . . . . . . . . 7-16• Checking the coolant level . . . . . . . . . . . . . . . . . . . . . 7-17
• Changing the coolant . . . . . . . . . . . . . . . . . . . . . . . . . 7-18Brake/clutch fluid . . . . . . . . . . . . . . . . . . . . . . . . . . 7-19• Checking the brake/clutch fluid level . . . . . . . . . . . 7-19Washer fluid . . . . . . . . . . . . . . . . . . . . . . . . . . . . . . 7-20• Checking the washer fluid level . . . . . . . . . . . . . . . . 7-20Parking brake . . . . . . . . . . . . . . . . . . . . . . . . . . . . . 7-20• Check the parking brake . . . . . . . . . . . . . . . . . . . . . . 7-20Fuel Filter (For Diesel). . . . . . . . . . . . . . . . . . . . . . 7-21• Draining water from fuel filter . . . . . . . . . . . . . . . . . 7-21
• Extracting air from the fuel filter . . . . . . . . . . . . . . . 7-21
• Fuel filter cartridge replacement . . . . . . . . . . . . . . . . 7-22
Air cleaner. . . . . . . . . . . . . . . . . . . . . . . . . . . . . . . . 7-23• Filter replacement . . . . . . . . . . . . . . . . . . . . . . . . . . . 7-23Climate control air filter . . . . . . . . . . . . . . . . . . . . 7-25• Filter inspection . . . . . . . . . . . . . . . . . . . . . . . . . . . . . . 7-25
• Filter replacement . . . . . . . . . . . . . . . . . . . . . . . . . . . . 7-25Wiper blades . . . . . . . . . . . . . . . . . . . . . . . . . . . . . . 7-27• Blade inspection . . . . . . . . . . . . . . . . . . . . . . . . . . . . . . 7-27
• Blade replacement . . . . . . . . . . . . . . . . . . . . . . . . . . . 7-27Battery . . . . . . . . . . . . . . . . . . . . . . . . . . . . . . . . . . . 7-\
30• For best battery service . . . . . . . . . . . . . . . . . . . . . . . 7-30
• Battery capacity label . . . . . . . . . . . . . . . . . . . . . . . . 7-31
• Battery recharging . . . . . . . . . . . . . . . . . . . . . . . . . . 7-32
• Reset items . . . . . . . . . . . . . . . . . . . . . . . . . . . . . . . . . . 7-32\
Tyres and wheels . . . . . . . . . . . . . . . . . . . . . . . . . . 7-33• Tyre care . . . . . . . . . . . . . . . . . . . . . . . . . . . . . . . . . . . 7-\
33
• Recommended cold tyre inflation pressures . . . . . . 7-33
• Checking tyre inflation pressure . . . . . . . . . . . . . . . . 7-35
• Tyre rotation . . . . . . . . . . . . . . . . . . . . . . . . . . . . . . . . 7-36
• Wheel alignment and tyre balance . . . . . . . . . . . . . 7-37
• Tyre replacement . . . . . . . . . . . . . . . . . . . . . . . . . . . . . 7-37
• Wheel replacement . . . . . . . . . . . . . . . . . . . . . . . . . . . 7-39
• Tyre traction. . . . . . . . . . . . . . . . . . . . . . . . . . . . . . . . \
. 7-39
• Tyre maintenance . . . . . . . . . . . . . . . . . . . . . . . . . . . . 7-39
• Tyre sidewall labeling . . . . . . . . . . . . . . . . . . . . . . . . . 7-39
• Low aspect ratio tyre . . . . . . . . . . . . . . . . . . . . . . . . . 7-43
EL(FL) UK 7.QXP 3/4/2015 9:04 PM Page 1
Page 492 of 550
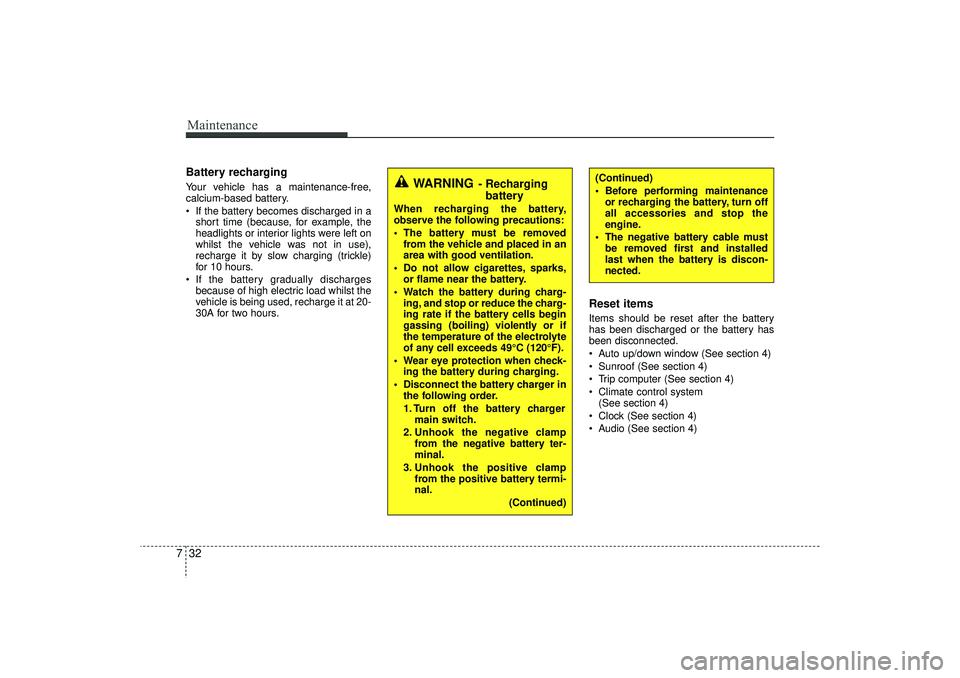
Maintenance32
7Battery recharging Your vehicle has a maintenance-free,
calcium-based battery.
If the battery becomes discharged in a
short time (because, for example, the
headlights or interior lights were left on
whilst the vehicle was not in use),
recharge it by slow charging (trickle)
for 10 hours.
If the battery gradually discharges because of high electric load whilst the
vehicle is being used, recharge it at 20-
30A for two hours.
Reset itemsItems should be reset after the battery
has been discharged or the battery has
been disconnected.
Auto up/down window (See section 4)
Sunroof (See section 4)
Trip computer (See section 4)
Climate control system (See section 4)
Clock (See section 4)
Audio (See section 4)(Continued)
Before performing maintenance or recharging the battery, turn off
all accessories and stop the
engine.
The negative battery cable must be removed first and installed
last when the battery is discon-
nected.
WARNING
- Rechargingbattery
When recharging the battery,
observe the following precautions:
The battery must be removed
from the vehicle and placed in an
area with good ventilation.
Do not allow cigarettes, sparks, or flame near the battery.
Watch the battery during charg- ing, and stop or reduce the charg-
ing rate if the battery cells begin
gassing (boiling) violently or if
the temperature of the electrolyte
of any cell exceeds 49°C (120°F).
Wear eye protection when check- ing the battery during charging.
Disconnect the battery charger in the following order.
1. Turn off the battery charger main switch.
2. Unhook the negative clamp from the negative battery ter-
minal.
3. Unhook the positive clamp from the positive battery termi-
nal.
(Continued)
EL(FL) UK 7.QXP 3/4/2015 9:05 PM Page 32