Page 526 of 550

Maintenance66
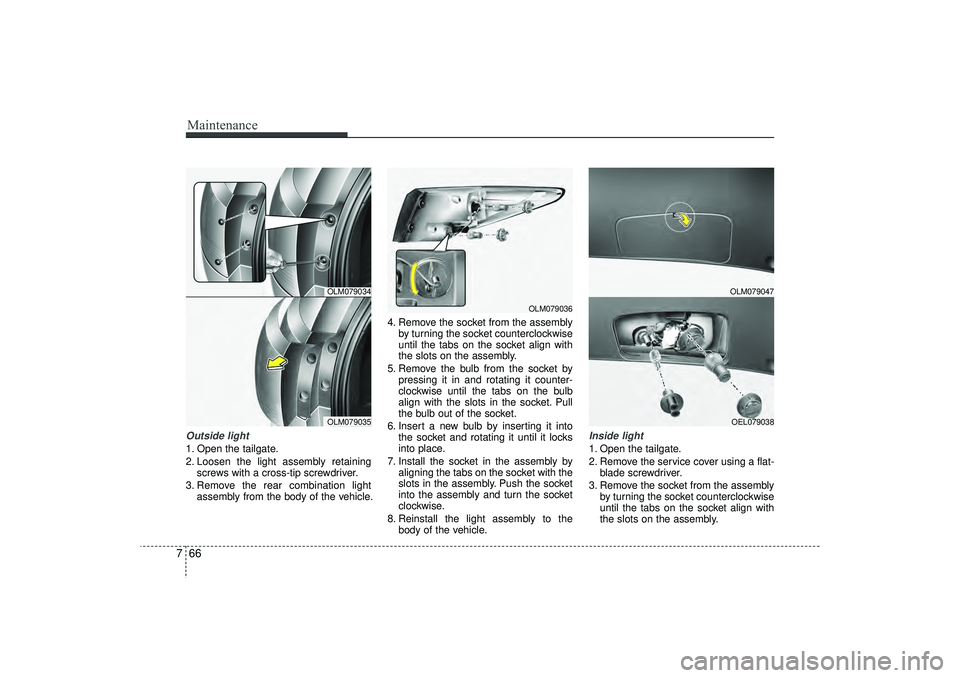
7Outside light1. Open the tailgate.
2. Loosen the light assembly retaining
screws with a cross-tip screwdriver.
3. Remove the rear combination light assembly from the body of the vehicle. 4. Remove the socket from the assembly
by turning the socket counterclockwise
until the tabs on the socket align with
the slots on the assembly.
5. Remove the bulb from the socket by pressing it in and rotating it counter-
clockwise until the tabs on the bulb
align with the slots in the socket. Pull
the bulb out of the socket.
6. Insert a new bulb by inserting it into the socket and rotating it until it locks
into place.
7. Install the socket in the assembly by aligning the tabs on the socket with the
slots in the assembly. Push the socket
into the assembly and turn the socket
clockwise.
8. Reinstall the light assembly to the body of the vehicle.
Inside light1. Open the tailgate.
2. Remove the service cover using a flat-blade screwdriver.
3. Remove the socket from the assembly by turning the socket counterclockwise
until the tabs on the socket align with
the slots on the assembly.
OLM079034OLM079035
OLM079036
OLM079047OEL079038
EL(FL) UK 7.QXP 3/4/2015 9:08 PM Page 66
Page 527 of 550

767
Maintenance
4. Remove the bulb from the socket bypressing it in and rotating it counter-
clockwise until the tabs on the bulb
align with the slots in the socket. Pull
the bulb out of the socket.
5. Insert a new bulb by inserting it into the socket and rotating it until it locks
into place.
6. Install the socket in the assembly by aligning the tabs on the socket with the
slots in the assembly. Push the socket
into the assembly and turn the socket
clockwise.
7. Install the service cover by putting it into the service hole.
Stop and tail light (LED type)
If the light does not operate, we recom-
mend that the system be checked by a
HYUNDAI authorised repairer.
Rear Fog Light (if equipped)1. Remove the socket from the assembly by turning the socket counterclockwise
until the tabs on the socket align with
the slots on the assembly.
2. Remove the bulb from the socket by pressing it in and rotating it counter-
clockwise until the tabs on the bulb
align with the slots in the socket. Pull
the bulb out of the socket.
3. Insert a new bulb in the socket.
4. Reinstall the light assembly to the body of the vehicle.
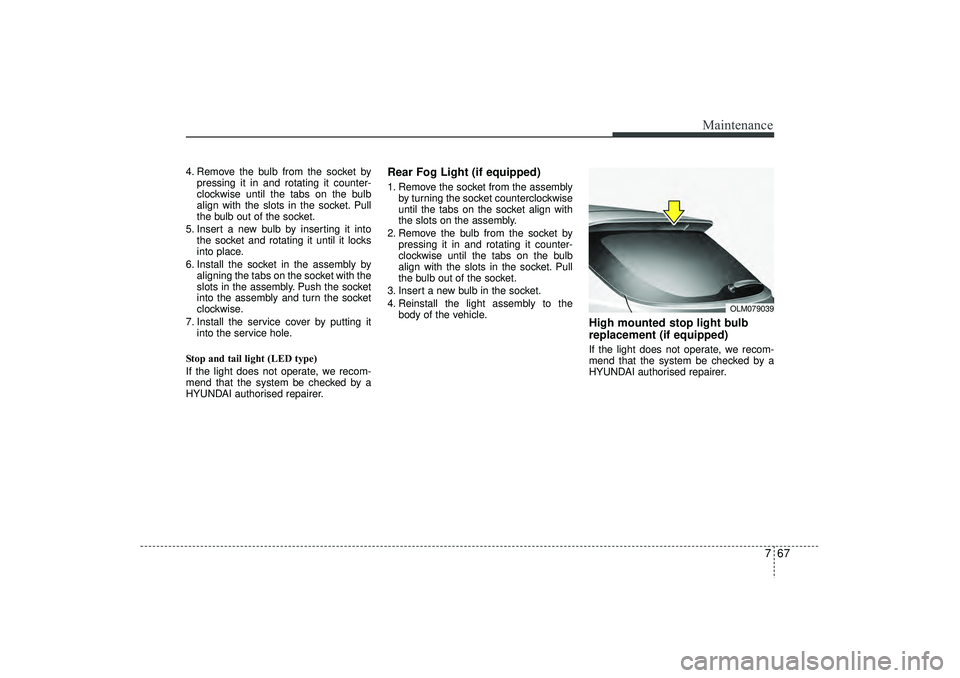
High mounted stop light bulb
replacement (if equipped)If the light does not operate, we recom-
mend that the system be checked by a
HYUNDAI authorised repairer.
OLM079039
EL(FL) UK 7.QXP 3/4/2015 9:08 PM Page 67
Page 528 of 550
Maintenance68
7License plate light bulb replace-
ment 1. Remove the lens by pressing the tabs.
2. Remove the socket from the lens.
3. Remove the bulb by pulling it straight
out.
4. Install a new bulb in the socket and install the socket to the lens.
5. Reinstall the lens securely.
OLM079055
EL(FL) UK 7.QXP 3/4/2015 9:08 PM Page 68
Page 529 of 550
769
Maintenance
Interior light bulb replacement1. Using a flat-blade screwdriver, gentlypry the lens from the interior light
housing.
2. Remove the bulb by pulling it straight out.
3. Install a new bulb in the socket.
4. Align the lens tabs with the interior light housing notches and snap the
lens into place.
WARNING
Prior to working on the Interior
Lights, ensure that the “OFF” but-
ton is depressed to avoid burning
your fingers or receiving an electric
shock.
CAUTION
Use care not to dirty or damagelens, lens tab, and plastic housings.
Map lamp
Glove box lamp (if equipped)Luggage room lamp (if equipped)
Sunvisor lampRoom lamp OLM079040/OXM079041/H/OEL079042/OLM07904
4/OLM079045/H
EL(FL) UK 7.QXP 3/4/2015 9:08 PM Page 69
Page 536 of 550

Maintenance76
7EMISSION CONTROL SYSTEMThe emission control system of your
vehicle is covered by a written limited
warranty. Please see the warranty infor-
mation contained in the Service Passport
in your vehicle.
Your vehicle is equipped with an emis-
sion control system to meet all emission
regulations.
There are three emission control sys-
tems which are as follows.
(1) Crankcase emission control system
(2) Evaporative emission control system
(3) Exhaust emission control system
In order to assure the proper function of
the emission control systems, it is rec-
ommended that you have your car
inspected and maintained by a
HYUNDAI authorised repairer in accor-
dance with the maintenance schedule. Caution for the Inspection and
Maintenance Test (With Electronic
Stability Control (ESC) system)
To prevent the vehicle from misfir-
ing during dynamometer testing,
turn the Electronic Stability Control
(ESC) system off by pressing the
ESC switch.
After dynamometer testing is com- pleted, turn the ESC system back on
by pressing the ESC switch again.
1. Crankcase emission control systemThe positive crankcase ventilation sys-
tem is employed to prevent air pollution
caused by blow-by gases being emitted
from the crankcase. This system supplies
fresh filtered air to the crankcase through
the air intake hose. Inside the crankcase,
the fresh air mixes with blow-by gases,
which then pass through the PCV valve
into the induction system.
2. Evaporative emission controlSystemThe Evaporative Emission Control
System is designed to prevent fuel
vapours from escaping into the atmos-
phere.CanisterFuel vapours generated inside the fuel
tank are absorbed and stored in the
onboard canister. When the engine is
running, the fuel vapours absorbed in the
canister are drawn into the surge tank
through the purge control solenoid valve.Purge Control Solenoid Valve (PCSV)The purge control solenoid valve is con-
trolled by the Engine Control Module
(ECM); when the engine coolant temper-
ature is low during idling, the PCSV clos-
es so that evaporated fuel is not taken
into the engine. After the engine warms-
up during ordinary driving, the PCSV
opens to introduce evaporated fuel to the
engine.
EL(FL) UK 7.QXP 3/4/2015 9:08 PM Page 76