2016 Hyundai H-1 (Grand Starex) light
[x] Cancel search: lightPage 14 of 332

17
Introduction
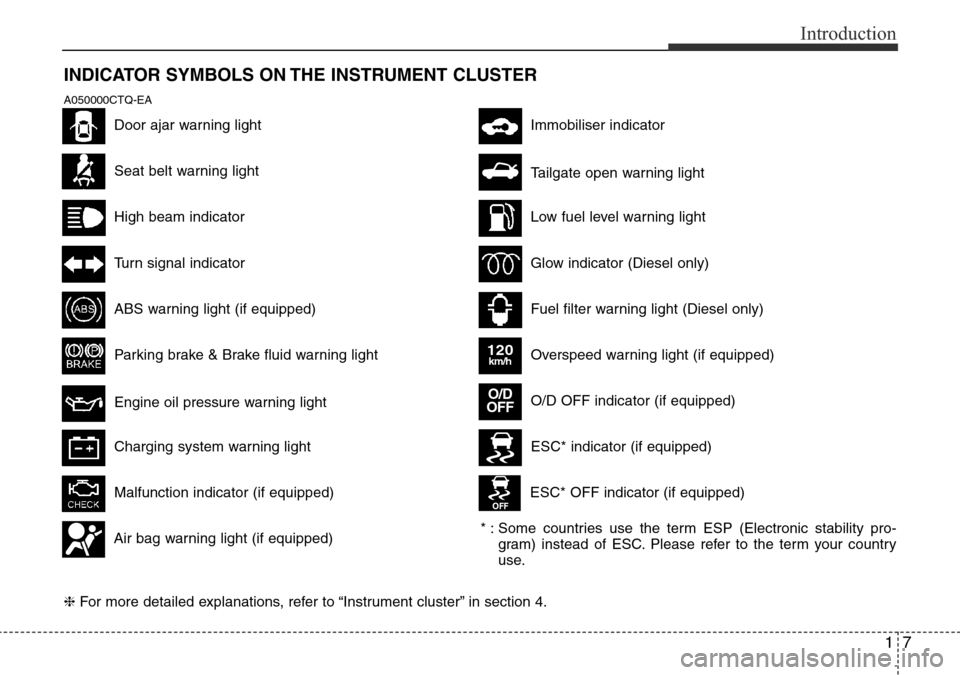
INDICATOR SYMBOLS ON THE INSTRUMENT CLUSTER
Seat belt warning light
High beam indicator
Turn signal indicator
ABS warning light (if equipped)
Parking brake & Brake fluid warning light
Engine oil pressure warning light
Malfunction indicator (if equipped)
Air bag warning light (if equipped)
Immobiliser indicator
Low fuel level warning light
Glow indicator (Diesel only)
Fuel filter warning light (Diesel only)
❈For more detailed explanations, refer to “Instrument cluster” in section 4.
Charging system warning light
A050000CTQ-EA
Door ajar warning light
Overspeed warning light (if equipped)
120km/h
Tailgate open warning light
O/D OFF indicator (if equipped) O/D
OFF
ESC* indicator (if equipped)
ESC* OFF indicator (if equipped)
* : Some countries use the term ESP (Electronic stability pro-
gram) instead of ESC. Please refer to the term your country
use.
Page 16 of 332

Your vehicle at a glance
2 2
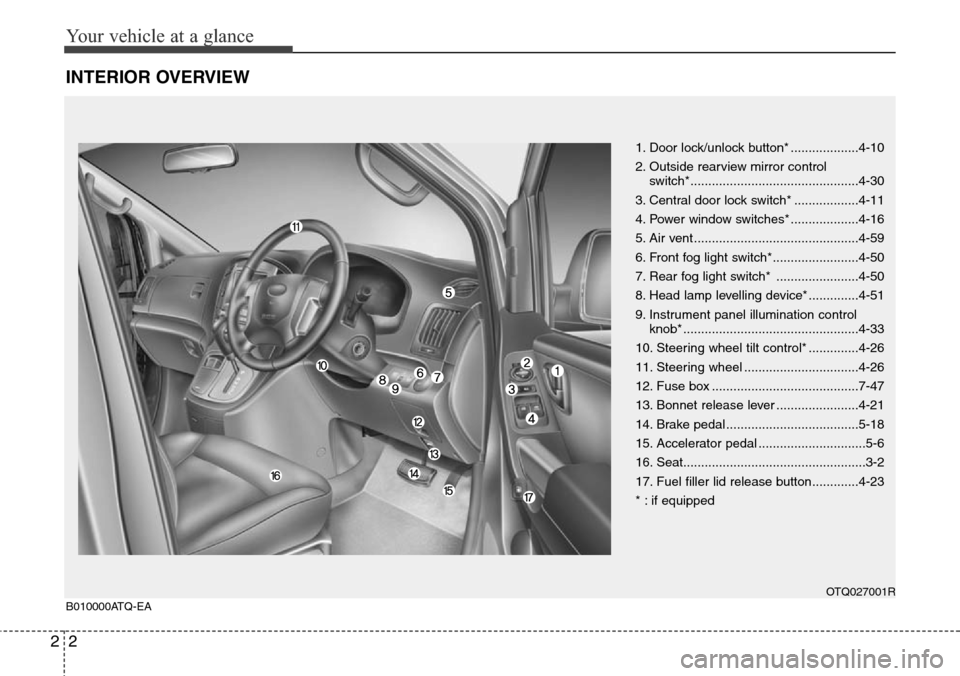
INTERIOR OVERVIEW
1. Door lock/unlock button* ...................4-10
2. Outside rearview mirror control
switch*...............................................4-30
3. Central door lock switch* ..................4-11
4. Power window switches* ...................4-16
5. Air vent ..............................................4-59
6. Front fog light switch*........................4-50
7. Rear fog light switch* .......................4-50
8. Head lamp levelling device* ..............4-51
9. Instrument panel illumination control
knob* .................................................4-33
10. Steering wheel tilt control* ..............4-26
11. Steering wheel ................................4-26
12. Fuse box .........................................7-47
13. Bonnet release lever .......................4-21
14. Brake pedal .....................................5-18
15. Accelerator pedal ..............................5-6
16. Seat...................................................3-2
17. Fuel filler lid release button.............4-23
* : if equipped
OTQ027001RB010000ATQ-EA
Page 17 of 332

23
Your vehicle at a glance
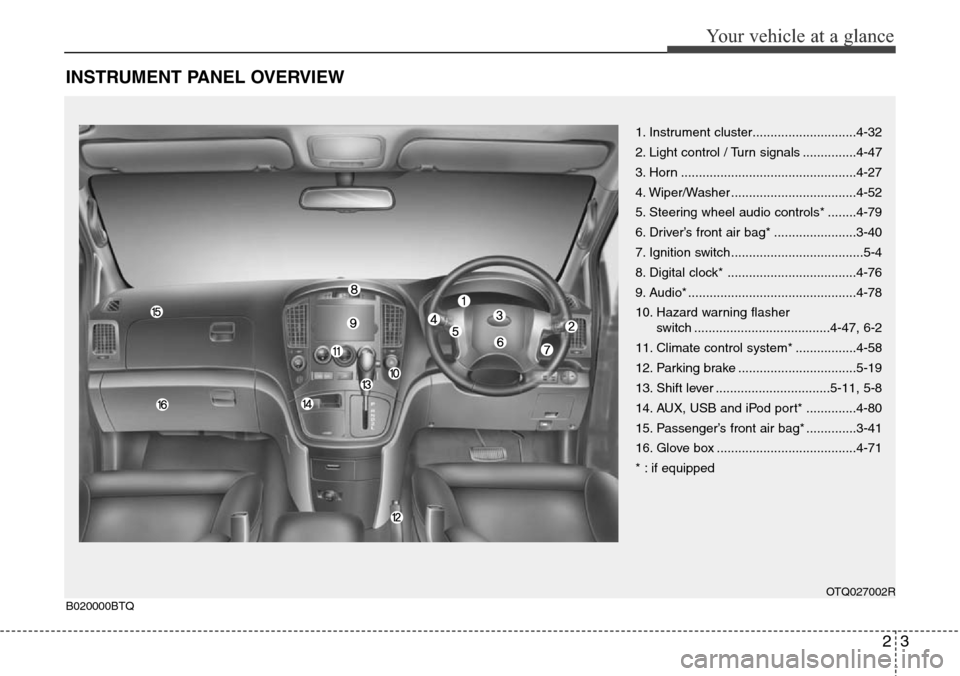
INSTRUMENT PANEL OVERVIEW
1. Instrument cluster.............................4-32
2. Light control / Turn signals ...............4-47
3. Horn .................................................4-27
4. Wiper/Washer ...................................4-52
5. Steering wheel audio controls* ........4-79
6. Driver’s front air bag* .......................3-40
7. Ignition switch .....................................5-4
8. Digital clock* ....................................4-76
9. Audio* ...............................................4-78
10. Hazard warning flasher
switch ......................................4-47, 6-2
11. Climate control system* .................4-58
12. Parking brake .................................5-19
13. Shift lever ................................5-11, 5-8
14. AUX, USB and iPod port* ..............4-80
15. Passenger’s front air bag* ..............3-41
16. Glove box .......................................4-71
* : if equipped
OTQ027002RB020000BTQ
Page 22 of 332

Safety features of your vehicle
4 3
(Continued)
• To avoid the possibility of burns,
do not remove the carpet in the
cargo area. Emission control
devices beneath this floor gener-
ate high temperatures.WARNING- Rear seatbacks
• The rear seatback must be
securely latched. If not, passen-
gers and objects could be thrown
forward resulting in serious
injury or death in the event of a
sudden stop or collision.
• Luggage and other cargo should
be laid flat in the cargo area. If
objects are large, heavy, or must
be piled, they must be secured.
Under no circumstances should
cargo be piled higher than the
seatbacks. Failure to follow these
warnings could result in serious
injury or death in the event of a
sudden stop, collision or rollover.
• No passenger should ride in the
cargo area or sit or lie on folded
seatbacks whilst the vehicle is
moving. All passengers must be
properly seated in seats and
restrained properly whilst riding.
• When resetting the seatback to
the upright position, make sure it
is securely latched by pushing it
forward and backwards.
(Continued)
WARNING
After adjusting the seat, always
check that it is securely locked into
place by attempting to move the
seat forward or backward without
using the lock release lever.
Sudden or unexpected movement
of the driver's seat could cause you
to lose control of the vehicle result-
ing in an accident.
WARNING
• Use extreme caution so that
hands or other objects are not
caught in the seat mechanisms
whilst the seat is moving.
• Do not put a cigarette lighter on
the floor or seat. When you oper-
ate the seat, gas may gush out of
the lighter and cause fire.
• If there are occupants in the rear
seats, be careful whilst adjusting
the front seat position.
• Use extreme caution when pick-
ing small objects trapped under
the seats or between the seat and
the centre console. Your hands
might be cut or injured by the
sharp edges of the seats mecha-
nism.
Page 23 of 332

35
Safety features of your vehicle
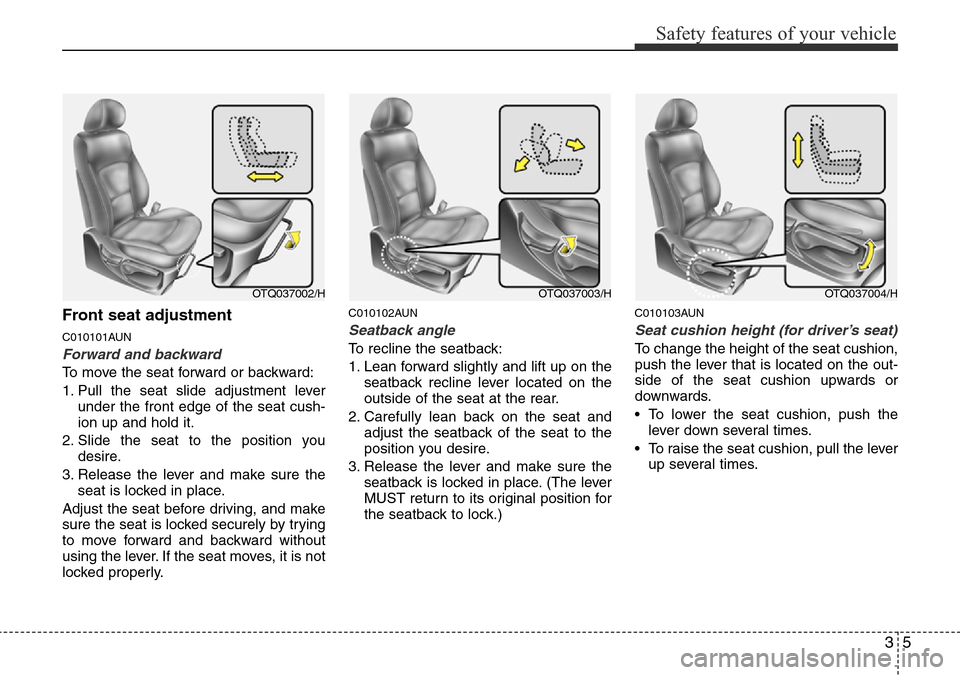
Front seat adjustment
C010101AUN
Forward and backward
To move the seat forward or backward:
1. Pull the seat slide adjustment lever
under the front edge of the seat cush-
ion up and hold it.
2. Slide the seat to the position you
desire.
3. Release the lever and make sure the
seat is locked in place.
Adjust the seat before driving, and make
sure the seat is locked securely by trying
to move forward and backward without
using the lever. If the seat moves, it is not
locked properly.
C010102AUN
Seatback angle
To recline the seatback:
1. Lean forward slightly and lift up on the
seatback recline lever located on the
outside of the seat at the rear.
2. Carefully lean back on the seat and
adjust the seatback of the seat to the
position you desire.
3. Release the lever and make sure the
seatback is locked in place. (The lever
MUST return to its original position for
the seatback to lock.)
C010103AUN
Seat cushion height (for driver’s seat)
To change the height of the seat cushion,
push the lever that is located on the out-
side of the seat cushion upwards or
downwards.
• To lower the seat cushion, push the
lever down several times.
• To raise the seat cushion, pull the lever
up several times.
OTQ037002/HOTQ037004/HOTQ037003/H
Page 33 of 332

315
Safety features of your vehicle
D150302AEN-EA
Seat belt warning (if equipped)
As a reminder to the driver, the seat belt
warning light will blink for approximately
6 seconds each time you turn the ignition
switch ON regardless of belt fastening.
If the driver’s seat belt is unfastened after
the ignition switch is ON, the seat belt
warning light blinks again for approxi-
mately 6 seconds.
Seat belt warning chime (if equipped)
If the driver's seat belt is not fastened
when the ignition switch is turned ON or
if it is unfastened after the ignition switch
is ON, the seat belt warning chime will
sound for approximately 6 seconds.
Once the seat belt is fastened the chime
will stop.
C020102AEN
Lap/shoulder belt
To fasten your seat belt:
To fasten your seat belt, pull it out of the
retractor and insert the metal tab (1) into
the buckle (2). There will be an audible
"click" when the tab locks into the buckle.
The seat belt automatically adjusts to the
proper length only after the lap belt por-
tion is adjusted manually so that it fits
snugly around your hips. If you lean for-
ward in a slow, easy motion, the belt will
extend and let you move around. If there
is a sudden stop or impact, however, the
belt will lock into position. It will also lock
if you try to lean forward too quickly.
1GQA2083B180A01NF-E
WARNING
• No modifications or additions
should be made by the user
which will either prevent the seat
belt adjusting devices from oper-
ating to remove slack, or prevent
the seat belt assembly from being
adjusted to remove slack.
• When you fasten the seat belt, be
careful not to latch the seat belt in
buckles of other seat. It's very dan-
gerous and you may not be pro-
tected by the seat belt properly.
• Do not unfasten the seat belt and
do not fasten and unfasten the
seat belt repeatedly whilst driv-
ing. This could result in loss of
control, and an accident causing
death, serious injury, or property
damage.
• When fastening the seat belt,
make sure that the seat belt does
not pass over objects that are
hard or can break easily.
• Make sure there is nothing in the
buckle. The seat belt may not be
fastened securely.
Page 38 of 332

Safety features of your vehicle
20 3
The seat belt pre-tensioner system con-
sists mainly of the following components.
Their locations are shown in the illustra-
tion:
1. SRS air bag warning light
2. Retractor pre-tensioner assembly
3. SRS control module
✽NOTICE
• Both the driver's and front passen-
ger's pre-tensioner seat belts may be
activated in certain frontal collisions.
• When the pre-tensioner seat belts are
activated, a loud noise may be heard
and fine dust, which may appear to be
smoke, may be visible in the passenger
compartment. These are normal oper-
ating conditions and are not haz-
ardous.
• Although it is harmless, the fine dust
may cause skin irritation and should
not be breathed for prolonged peri-
ods. Wash all exposed skin areas thor-
oughly after an accident in which the
pre-tensioner seat belts were activat-
ed.WARNING
To obtain maximum benefit from a
pre-tensioner seat belt:
1. The seat belt must be worn cor-
rectly and adjusted to the proper
position. Please read and follow
all of the important information
and precautions about your vehi-
cle’s occupant safety features –
including seat belts and air bags
– that are provided in this manu-
al.
2. Be sure you and your passen-
gers always wear seat belts prop-
erly.
1KMB3311/H
WARNING
For your safety, be sure that the
belt webbing is not loose or twisted
and always sit properly on your
seat.
Page 39 of 332

321
Safety features of your vehicle
✽NOTICE
Because the sensor that activates the
SRS air bag is connected with the pre-
tensioner seat belt, the SRS air bag
warning light on the instrument
panel will illuminate for approximately
6 seconds after the ignition switch has
been turned to the ON position, and
then it should turn off.WARNING
• Pre-tensioners are designed to
operate only one time. After acti-
vation, pre-tensioner seat belts
must be replaced. All seat belts,
of any type, should always be
replaced after they have been
worn during a collision.
• The pre-tensioner seat belt
assembly mechanisms become
hot during activation. Do not
touch the pre-tensioner seat belt
assemblies for several minutes
after they have been activated.
• Do not attempt to inspect or
replace the pre-tensioner seat
belts yourself. We recommend
that the system be inspected by
an authorised HYUNDAI dealer.
• Do not strike the pre-tensioner
seat belt assemblies.
• Do not attempt to service or
repair the pre-tensioner seat belt
system in any manner.
(Continued)
(Continued)
• Improper handling of the pre-ten-
sioner seat belt assemblies, and
failure to heed the warnings not
to strike, modify, inspect, replace,
service or repair the pre-tension-
er seat belt assemblies may lead
to improper operation or inadver-
tent activation and serious injury.
• Always wear the seat belts when
driving or riding in a motor vehi-
cle.
• If the vehicle or pre-tensioner
seat belt must be discarded, we
recommend that you contact an
authorised HYUNDAI dealer.
CAUTION
If the pre-tensioner seat belt is not
working properly, this warning light
will illuminate even if there is no
malfunction of the SRS air bag.
If the SRS air bag warning light
does not illuminate when the igni-
tion key is turned to ON, or if it
remains illuminated after illuminat-
ing for approximately 6 seconds, or
if it illuminates whilst the vehicle is
being driven, we recommend that
the system be inspected by an
authorised HYUNDAI dealer.
CAUTION
Body work on the front area of the
vehicle may damage the pre-ten-
sioner seat belt system.
Therefore, we recommend that the
system be serviced by an autho-
rised HYUNDAI dealer.