2016 Hyundai Grand Santa Fe fuel
[x] Cancel search: fuelPage 523 of 717
Driving your vehicle
74 5
• Remember, your vehicle does not
require extended warm-up. After
the engine has started, allow the
engine to run for 10 to 20 seconds
prior to placing the vehicle in gear.
In very cold weather, however, give
your engine a slightly longer warm-
up period.
• Do not "lug" or "over-rev" the
engine. Lugging is driving too
slowly in too high a gear resulting
engine bucking. If this happens,
shift to a lower gear. Over-revving
is racing the engine beyond its safe
limit. This can be avoided by shift-
ing at the recommended speeds.
• Use your air conditioning sparingly.
The air conditioning system is
operated by engine power so your
fuel economy is reduced when you
use it.
• Open windows at high speeds can
reduce fuel economy.
• Fuel economy is less in crosswinds
and headwinds. To help offset
some of this loss, slow down when
driving in these conditions.Keeping a vehicle in good operating
condition is important both for econ-
omy and safety. Therefore, we rec-
ommend that the system be serviced
by an authorized HYUNDAI dealer.
WARNING- Engine off
during
motion
Never turn the engine off to
coast down hills or anytime the
vehicle is in motion. The power
steering and power brakes will
not function properly without
the engine running. Instead,
keep the engine on and down-
shift to an appropriate gear for
engine braking effect. In addi-
tion, turning off the ignition
while driving could engage the
steering wheel lock (if
equipped) resulting in loss of
vehicle steering which could
cause serious injury or death.
Page 529 of 717
Driving your vehicle
80 5
Fuel, engine coolant and engine
oil
High speed travel consumes more
fuel than urban motoring. Do not for-
get to check both engine coolant and
engine oil.
Drive belt
A loose or damaged drive belt may
result in overheating of the engine.
WARNING
• Underinflated or overinflated
tires can cause poor handling,
loss of vehicle control, and
sudden tire failure leading to
accidents, injuries, and even
death. Always check the tires
for proper inflation before
driving. For proper tire pres-
sures, refer to section 8,
“Tires and wheels”.
• Driving on tires with no or
insufficient tread is danger-
ous. Worn-out tires can result
in loss of vehicle control, col-
lisions, injury, and even death.
Worn-out tires should be
replaced as soon as possible
and should never be used for
driving. Always check the tire
tread before driving your vehi-
cle. For further information
and tread limits, refer to sec-
tion 7, “Tires and wheels”.
Page 536 of 717
587
Driving your vehicle
Your vehicle can tow a trailer. To
identify what the vehicle trailering
capacity is for your vehicle, you
should read the information in
“Weight of the trailer” that appears
later in this section.
Remember that trailering is different
than just driving your vehicle by itself.
Trailering means changes in han-
dling, durability, and fuel economy.
Successful, safe trailering requires
correct equipment, and it has to be
used properly.
This section contains many time-
tested, important trailering tips and
safety rules. Many of these are
important for your safety and that of
your passengers. Please read this
section carefully before you pull a
trailer.Load-pulling components such as
the engine, transaxle, wheel assem-
blies, and tires are forced to work
harder against the load of the added
weight. The engine is required to
operate at relatively higher speeds
and under greater loads. This addi-
tional burden generates extra heat.
The trailer also considerably adds
wind resistance, increasing the
pulling requirements.
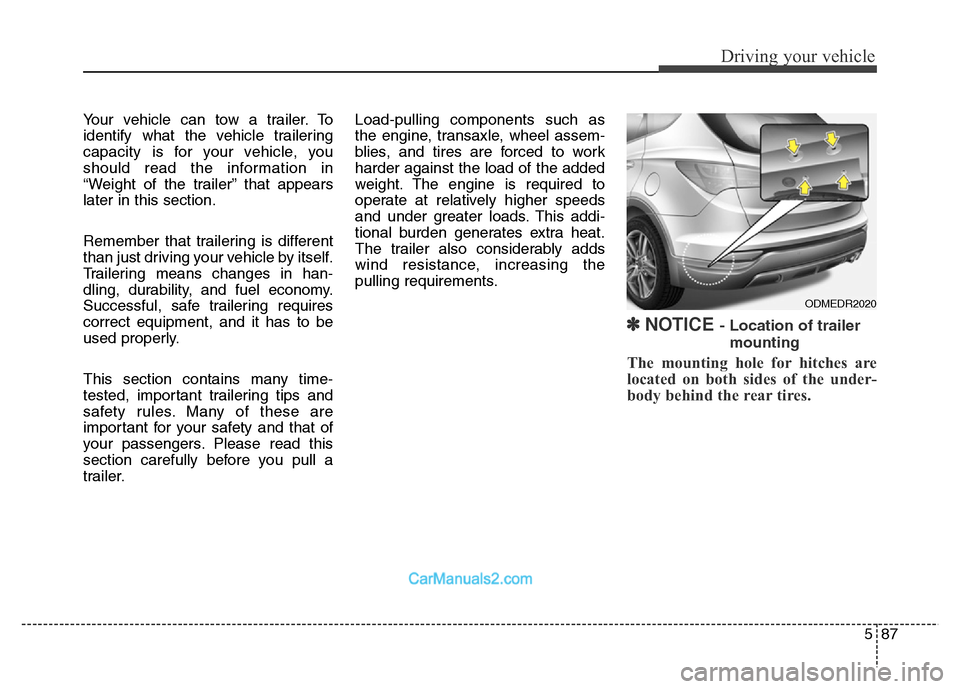
✽NOTICE - Location of trailer
mounting
The mounting hole for hitches are
located on both sides of the under-
body behind the rear tires.
ODMEDR2020
Page 545 of 717
Driving your vehicle
96 5
This section will guide you in the
proper loading of your vehicle and/or
trailer, to keep your loaded vehicle
weight within its design rating capa-
bility, with or without a trailer.
Properly loading your vehicle will
provide maximum return of the vehi-
cle design performance. Before load-
ing your vehicle, familiarize yourself
with the following terms for determin-
ing your vehicle's weight ratings, with
or without a trailer, from the vehicle's
specifications and the certification
label:
Base curb weight
This is the weight of the vehicle
including a full tank of fuel and all
standard equipment. It does not
include passengers, cargo, or option-
al equipment.
Vehicle curb weight
This is the weight of your new vehicle
when you picked it up from your deal-
er plus any aftermarket equipment.
Cargo weight
This figure includes all weight added
to the Base Curb Weight, including
cargo and optional equipment.
GAW (Gross axle weight)
This is the total weight placed on
each axle (front and rear) - including
vehicle curb weight and all payload.
GAWR (Gross axle weight rat-
ing)
This is the maximum allowable
weight that can be carried by a single
axle (front or rear). These numbers
are shown on the certification label.
The total load on each axle must
never exceed its GAWR.
GVW (Gross vehicle weight)
This is the Base Curb Weight plus
actual Cargo Weight plus passen-
gers.
GVWR (Gross vehicle weight
rating)
This is the maximum allowable
weight of the fully loaded vehicle
(including all options, equipment,
passengers and cargo). The GVWR
is shown on the certification label.
Overloading
VEHICLE WEIGHT
WARNING - Vehicle
weight
The gross axle weight rating
(GAWR) and the gross vehicle
weight rating (GVWR) for your
vehicle are on the certification
label attached to the driver's (or
front passenger’s) door.
Exceeding these ratings can
cause an accident or vehicle
damage. You can calculate the
weight of your load by weighing
the items (and people) before
putting them in the vehicle. Be
careful not to overload your
vehicle.
Page 549 of 717
What to do in an emergency
4 6
IF THE ENGINE DOES NOT START
If engine doesn't turn over or
turns over slowly
1.If your vehicle has an automatic
transaxle, be sure the shift lever is
in N (Neutral) or P (Park) and the
emergency brake is set.
2.Check the battery connections to
be sure they are clean and tight.
3.Turn on the interior light. If the light
dims or goes out when you operate
the starter, the battery is dis-
charged.
4.Check the starter connections to
be sure they are securely tight-
ened.
5.Do not push or pull the vehicle to
start it. See instructions for "Jump
starting".
If engine turns over normally
but does not start
1.Check fuel level.
2.With the ignition switch in the
LOCK/OFF position, check all con-
nectors at ignition, coil and spark
plugs. Reconnect any that may be
disconnected or loose.
3.Check the fuel line in the engine
compartment.
4.If the engine still does not start, we
recommend that you call an
authorized HYUNDAI dealer.
WARNING
If the engine will not start, do
not push or pull the vehicle to
start it. This could result in a
collision or cause other dam-
age. In addition, push or pull
starting may cause the catalytic
converter to be overloaded and
create a fire hazard.
Page 553 of 717
What to do in an emergency
8 6
TIRE PRESSURE MONITORING SYSTEM (TPMS) - TYPE A (IF EQUIPPED)
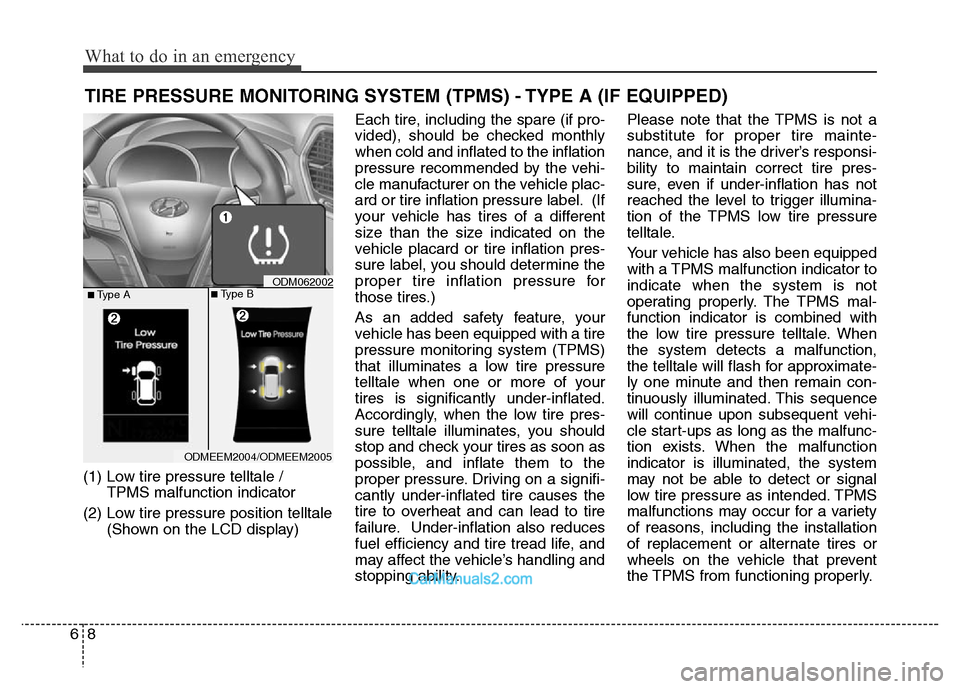
(1) Low tire pressure telltale /
TPMS malfunction indicator
(2) Low tire pressure position telltale
(Shown on the LCD display)Each tire, including the spare (if pro-
vided), should be checked monthly
when cold and inflated to the inflation
pressure recommended by the vehi-
cle manufacturer on the vehicle plac-
ard or tire inflation pressure label. (If
your vehicle has tires of a different
size than the size indicated on the
vehicle placard or tire inflation pres-
sure label, you should determine the
proper tire inflation pressure for
those tires.)
As an added safety feature, your
vehicle has been equipped with a tire
pressure monitoring system (TPMS)
that illuminates a low tire pressure
telltale when one or more of your
tires is significantly under-inflated.
Accordingly, when the low tire pres-
sure telltale illuminates, you should
stop and check your tires as soon as
possible, and inflate them to the
proper pressure. Driving on a signifi-
cantly under-inflated tire causes the
tire to overheat and can lead to tire
failure. Under-inflation also reduces
fuel efficiency and tire tread life, and
may affect the vehicle’s handling and
stopping ability.Please note that the TPMS is not a
substitute for proper tire mainte-
nance, and it is the driver’s responsi-
bility to maintain correct tire pres-
sure, even if under-inflation has not
reached the level to trigger illumina-
tion of the TPMS low tire pressure
telltale.
Your vehicle has also been equipped
with a TPMS malfunction indicator to
indicate when the system is not
operating properly. The TPMS mal-
function indicator is combined with
the low tire pressure telltale. When
the system detects a malfunction,
the telltale will flash for approximate-
ly one minute and then remain con-
tinuously illuminated. This sequence
will continue upon subsequent vehi-
cle start-ups as long as the malfunc-
tion exists. When the malfunction
indicator is illuminated, the system
may not be able to detect or signal
low tire pressure as intended. TPMS
malfunctions may occur for a variety
of reasons, including the installation
of replacement or alternate tires or
wheels on the vehicle that prevent
the TPMS from functioning properly.
ODMEEM2004/ODMEEM2005
ODM062002■Type A■Type B
Page 559 of 717
What to do in an emergency
14 6
Tire pressure monitoring sys-
tem
Each tire, including the spare (if pro-
vided), should be checked monthly
when cold and inflated to the inflation
pressure recommended by the vehi-
cle manufacturer on the vehicle plac-
ard or tire inflation pressure label. (If
your vehicle has tires of a different
size than the size indicated on the
vehicle placard or tire inflation pres-
sure label, you should determine the
proper tire inflation pressure for
those tires.)As an added safety feature, your
vehicle has been equipped with a tire
pressure monitoring system (TPMS)
that illuminates a low tire pressure
telltale when one or more of your
tires is significantly under-inflated.
Accordingly, when the low tire pres-
sure telltale illuminates, you should
stop and check your tires as soon as
possible, and inflate them to the
proper pressure. Driving on a signifi-
cantly under-inflated tire causes the
tire to overheat and can lead to tire
failure. Under-inflation also reduces
fuel efficiency and tire tread life, and
may affect the vehicle’s handling and
stopping ability.
Please note that the TPMS is not a
substitute for proper tire mainte-
nance, and it is the driver’s responsi-
bility to maintain correct tire pres-
sure, even if under-inflation has not
reached the level to trigger illumina-
tion of the TPMS low tire pressure
telltale.Your vehicle has also been equipped
with a TPMS malfunction indicator to
indicate when the system is not
operating properly. The TPMS mal-
function indicator is combined with
the low tire pressure telltale. When
the system detects a malfunction,
the telltale will flash for approximate-
ly one minute and then remain con-
tinuously illuminated. This sequence
will continue upon subsequent vehi-
cle start-ups as long as the malfunc-
tion exists. When the malfunction
indicator is illuminated, the system
may not be able to detect or signal
low tire pressure as intended.
TPMS malfunctions may occur for a
variety of reasons, including the
installation of replacement or alter-
nate tires or wheels on the vehicle
that prevent the TPMS from function-
ing properly. Always check the TPMS
malfunction telltale after replacing
one or more tires or wheels on your
vehicle to ensure that the replace-
ment or alternate tires and wheels
allow the TPMS to continue to func-
tion properly.
WARNING
Over-inflation or under-inflation
can reduce tire life, adversely
affect vehicle handling, and
lead to sudden tire failure that
may cause loss of vehicle con-
trol resulting in an accident.
Page 582 of 717
Maintenance
Engine compartment . . . . . . . . . . . . . . . . . . . . . . . . 7-3
Maintenance services . . . . . . . . . . . . . . . . . . . . . . . . 7-4
• Owner’s responsibility . . . . . . . . . . . . . . . . . . . . . . . . 7-4
• Owner maintenance precautions . . . . . . . . . . . . . . . . 7-4
• Engine compartment precautions (Diesel engine) . . . 7-5
Owner maintenance . . . . . . . . . . . . . . . . . . . . . . . . . 7-7
• Owner maintenance schedule . . . . . . . . . . . . . . . . . . . 7-7
Scheduled maintenance service . . . . . . . . . . . . . . 7-9
• Normal maintenance schedule - Gasoline engine. . . 7-10
• Maintenance under severe usage conditions
- Gasoline engine . . . . . . . . . . . . . . . . . . . . . . . . . . . 7-14
• Normal maintenance schedule - Diesel engine
(for europe). . . . . . . . . . . . . . . . . . . . . . . . . . . . . . . . . . 7-16
• Maintenance under severe usage conditions
- Diesel engine (for europe) . . . . . . . . . . . . . . . . . . . 7-20
• Normal maintenance schedule - Diesel engine
(except europe). . . . . . . . . . . . . . . . . . . . . . . . . . . . . . . 7-22
• Maintenance under severe usage conditions
- Diesel engine (except europe) . . . . . . . . . . . . . . . . 7-26
Explanation of scheduled maintenance items . . . 7-28
Engine oil. . . . . . . . . . . . . . . . . . . . . . . . . . . . . . . . . 7-32
• Checking the engine oil level . . . . . . . . . . . . . . . . . . 7-32
• Changing the engine oil and filter . . . . . . . . . . . . . . . 7-33
Engine coolant . . . . . . . . . . . . . . . . . . . . . . . . . . . . 7-34
• Checking the coolant level . . . . . . . . . . . . . . . . . . . . . 7-34
• Changing the coolant . . . . . . . . . . . . . . . . . . . . . . . . . 7-36
Brake fluid . . . . . . . . . . . . . . . . . . . . . . . . . . . . . . . 7-37
• Checking the brake fluid level . . . . . . . . . . . . . . . . . 7-37
Washer fluid . . . . . . . . . . . . . . . . . . . . . . . . . . . . . . 7-38
• Checking the washer fluid level . . . . . . . . . . . . . . . . 7-38
Parking brake . . . . . . . . . . . . . . . . . . . . . . . . . . . . . 7-39
• Checking the parking brake. . . . . . . . . . . . . . . . . . . . 7-39
Fuel filter (for diesel) . . . . . . . . . . . . . . . . . . . . . . . 7-40
• Draining water from fuel filter . . . . . . . . . . . . . . . . . 7-40
• Fuel filter cartridge replacement . . . . . . . . . . . . . . . . 7-40
Air cleaner. . . . . . . . . . . . . . . . . . . . . . . . . . . . . . . . 7-41
• Filter replacement . . . . . . . . . . . . . . . . . . . . . . . . . . . 7-41
Climate control air filter . . . . . . . . . . . . . . . . . . . . 7-43
• Filter inspection . . . . . . . . . . . . . . . . . . . . . . . . . . . . . . 7-43
• Filter replacement . . . . . . . . . . . . . . . . . . . . . . . . . . . . 7-43
Wiper blades . . . . . . . . . . . . . . . . . . . . . . . . . . . . . . 7-45
• Blade inspection . . . . . . . . . . . . . . . . . . . . . . . . . . . . . . 7-45
• Blade replacement . . . . . . . . . . . . . . . . . . . . . . . . . . . 7-45
Battery . . . . . . . . . . . . . . . . . . . . . . . . . . . . . . . . . . . 7-48
• For best battery service . . . . . . . . . . . . . . . . . . . . . . . 7-48
• Battery capacity label . . . . . . . . . . . . . . . . . . . . . . . . 7-49
• Battery recharging . . . . . . . . . . . . . . . . . . . . . . . . . . 7-50
• Reset items . . . . . . . . . . . . . . . . . . . . . . . . . . . . . . . . . . 7-50
7