Page 606 of 717
725
Maintenance
NORMAL MAINTENANCE SCHEDULE - DIESEL ENGINE (EXCEPT EUROPE)
Number of months or driving distance, whichever comes first
Months1224364860728496
Miles×1,0001020304050607080
Km×1,000153045607590105120
Tire (pressure & tread wear) IIIIIIII
Front suspension ball jointsIIIIIIII
Air conditioner refrigerant (if equipped)IIIIIIII
Air conditioner compressor (if equipped)IIIIIIII
Climate control air filter (if equipped)RRRRRRRR
Automatic transaxle fluid No check, No service required
Transfer case oil (4WD) *6II
Rear differantail oil (4WD) *6II
Propeller shaft (4WD)IIII
I : Inspect and if necessary, adjust, correct, clean or replace.
R : Replace or change.
*6: Transfer case oil and rear axle oil should be changed anytime they have been submerged in water.
MAINTENANCE
INTERVALS
MAINTENANCE
ITEM
Page 608 of 717

727
Maintenance
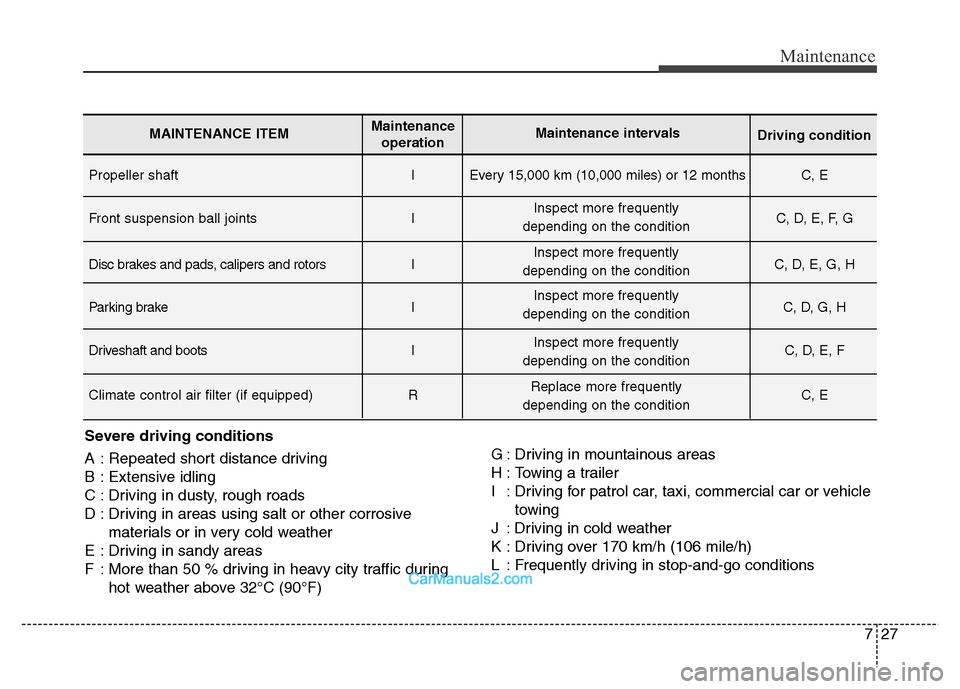
Severe driving conditions
A : Repeated short distance driving
B : Extensive idling
C : Driving in dusty, rough roads
D : Driving in areas using salt or other corrosive
materials or in very cold weather
E : Driving in sandy areas
F : More than 50 % driving in heavy city traffic during
hot weather above 32°C (90°F)G : Driving in mountainous areas
H : Towing a trailer
I : Driving for patrol car, taxi, commercial car or vehicle
towing
J : Driving in cold weather
K : Driving over 170 km/h (106 mile/h)
L : Frequently driving in stop-and-go conditions
Propeller shaft I Every 15,000 km (10,000 miles) or 12 months C, E
Front suspension ball joints I C, D, E, F, G
Disc brakes and pads, calipers and rotors I C, D, E, G, H
Parking brake I C, D, G, H
Driveshaft and boots I C, D, E, F
Climate control air filter (if equipped) R C, E
MAINTENANCE ITEMMaintenance
operationMaintenance intervals
Driving condition
Inspect more frequently
depending on the condition
Inspect more frequently
depending on the condition
Inspect more frequently
depending on the condition
Inspect more frequently
depending on the condition
Replace more frequently
depending on the condition
Page 624 of 717
743
Maintenance
CLIMATE CONTROL AIR FILTER
Filter inspection
If the vehicle is operated in the
severely air-polluted cities or on
dusty rough roads for a long period,
it should be inspected more fre-
quently and replaced earlier. When
you, the owner, replace the climate
control air filter, replace it performing
the following procedure, and be care-
ful to avoid damaging other compo-
nents.
Replace the filter according to the
maintenance Schedule.
Filter replacement
1. Open the glove box and remove
the support strap.2. With the glove box open, remove
the stoppers on both sides.
ODM072015
ODM072014
Page 625 of 717
Maintenance
44 7
3. Remove the climate control air fil-
ter case while pressing the lock on
the right of the cover.4. Replace the climate control air fil-
ter.
5. Reassemble in the reverse order
of disassembly.
✽NOTICE
Install a new climate control air fil-
ter in the correct direction with the
arrow symbol (
↓) facing downwards.
Otherwise, the climate control effects
may decrease, possibly with a noise.
OHG075041ODM072016
Page 631 of 717

Maintenance
50 7
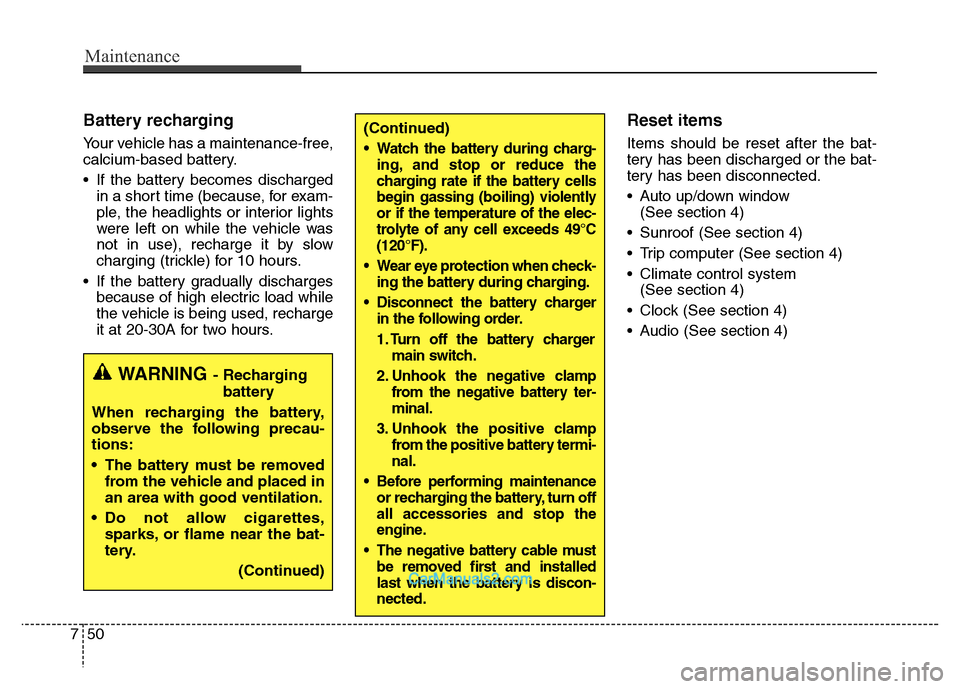
Battery recharging
Your vehicle has a maintenance-free,
calcium-based battery.
• If the battery becomes discharged
in a short time (because, for exam-
ple, the headlights or interior lights
were left on while the vehicle was
not in use), recharge it by slow
charging (trickle) for 10 hours.
• If the battery gradually discharges
because of high electric load while
the vehicle is being used, recharge
it at 20-30A for two hours.
Reset items
Items should be reset after the bat-
tery has been discharged or the bat-
tery has been disconnected.
• Auto up/down window
(See section 4)
• Sunroof (See section 4)
• Trip computer (See section 4)
• Climate control system
(See section 4)
• Clock (See section 4)
• Audio (See section 4)(Continued)
• Watch the battery during charg-
ing, and stop or reduce the
charging rate if the battery cells
begin gassing (boiling) violently
or if the temperature of the elec-
trolyte of any cell exceeds 49°C
(120°F).
• Wear eye protection when check-
ing the battery during charging.
• Disconnect the battery charger
in the following order.
1. Turn off the battery charger
main switch.
2. Unhook the negative clamp
from the negative battery ter-
minal.
3. Unhook the positive clamp
from the positive battery termi-
nal.
• Before performing maintenance
or recharging the battery, turn off
all accessories and stop the
engine.
• The negative battery cable must
be removed first and installed
last when the battery is discon-
nected.
WARNING- Recharging
battery
When recharging the battery,
observe the following precau-
tions:
• The battery must be removed
from the vehicle and placed in
an area with good ventilation.
• Do not allow cigarettes,
sparks, or flame near the bat-
tery.
(Continued)
Page 640 of 717

759
Maintenance
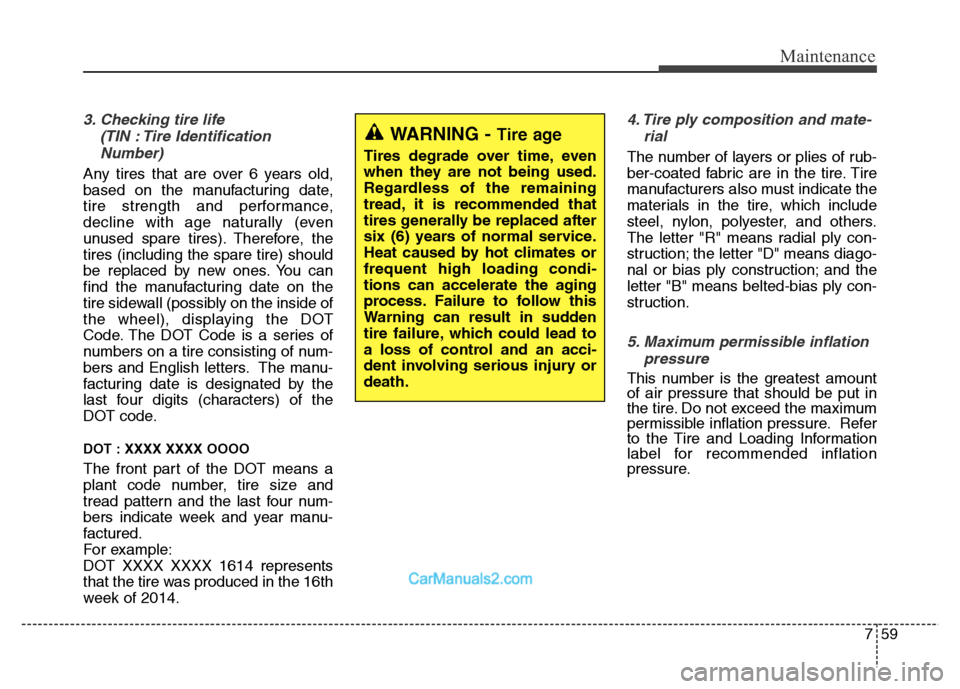
3. Checking tire life
(TIN : Tire Identification
Number)
Any tires that are over 6 years old,
based on the manufacturing date,
tire strength and performance,
decline with age naturally (even
unused spare tires). Therefore, the
tires (including the spare tire) should
be replaced by new ones. You can
find the manufacturing date on the
tire sidewall (possibly on the inside of
the wheel), displaying the DOT
Code. The DOT Code is a series of
numbers on a tire consisting of num-
bers and English letters. The manu-
facturing date is designated by the
last four digits (characters) of the
DOT code.
DOT : XXXX XXXX OOOO
The front part of the DOT means a
plant code number, tire size and
tread pattern and the last four num-
bers indicate week and year manu-
factured.
For example:
DOT XXXX XXXX 1614 represents
that the tire was produced in the 16th
week of 2014.
4. Tire ply composition and mate-
rial
The number of layers or plies of rub-
ber-coated fabric are in the tire. Tire
manufacturers also must indicate the
materials in the tire, which include
steel, nylon, polyester, and others.
The letter "R" means radial ply con-
struction; the letter "D" means diago-
nal or bias ply construction; and the
letter "B" means belted-bias ply con-
struction.
5. Maximum permissible inflation
pressure
This number is the greatest amount
of air pressure that should be put in
the tire. Do not exceed the maximum
permissible inflation pressure. Refer
to the Tire and Loading Information
label for recommended inflation
pressure.
WARNING - Tire age
Tires degrade over time, even
when they are not being used.
Regardless of the remaining
tread, it is recommended that
tires generally be replaced after
six (6) years of normal service.
Heat caused by hot climates or
frequent high loading condi-
tions can accelerate the aging
process. Failure to follow this
Warning can result in sudden
tire failure, which could lead to
a loss of control and an acci-
dent involving serious injury or
death.
Page 649 of 717

Maintenance
68 7
DescriptionSymbol Fuse ratingProtected Component
A/BAG IND10AInstrument Cluster
A/BAG15ASRS Control Module, A/C Control Module
MODULE 57.5ARain Sensor, Sunroof, Smart Key Control Module, BCM, Parking Guide System, AC,
Inverter Module, Rear Blower Relay, Rear Seat Warmer LH/RH, Driver/Passenger
Climate Control Seat Control Module, Driver/Passenger Seat Warmer Module
MODULE 17.5ASport Mode Switch, Key Solenoid, Console Switch LH/RH, Front Console Switch,
Rear Power Window Switch LH/RH, RR_BLOWER SW
REAR FOG LAMP10AICM Relay Box (Rear Fog Lamp Relay)
MEMORY 210ABCM, Tire Pressure Monitoring Module, Driver IMS Module, Driver/Passenger Door
Module, Auto Light & Photo Sensor, Data Link Connector, A/C Control Module,
Instrument Cluster
SMART KEY 27.5ASmart Key Control Module, Immobilizer Module
MODULE 310A
BCM, Instrument Cluster, Tire Pressure Monitoring Module, AMP, Smart Parking Assist
Control Module, Electro Chromic Mirror, Lane Departure Warning Module, Steering
Angle Sensor, Audio, A/C Control Module, A/V & Navigation Head Unit, 4WD ECM
ATM Shift Lever Indicator, Rear Parking Assist Sensor LH/RH, Rear Seat Warmer
LH/RH, Driver/Passenger Climate Control Seat Control Module, Driver/Passenger Seat
Warmer Module, Driver IMS Module, Console Switch LH/RH, Rear Console Switch,
Rear Parking Assist Sensor (Center) LH/RH, Driver/Passenger Door Module, Electric
Parking Brake Module
SMART KEY 410AStart/Stop Button Switch, Immobilizer Module
Page 651 of 717
Maintenance
70 7
DescriptionSymbol Fuse ratingProtected Component
A/CON 17.5AE/R Fuse & Relay Box (RLY. 4/14), A/C Control Module
Cluster Ionizer, Diesel Box (RLY. 3/4)
WIPER RR15ARear Wiper Relay, Rear Wiper Motor, Multifunction Switch
SMART KEY 125ASmart Key Control Module
S/HEATER FRT20ADriver/Passenger Climate Control Seat Control Module
Driver/Passenger Seat Warmer Module
A/CON 27.5AA/C Control Module
C/LIGHTER20AFront Power Outlet & Cigarette Lighter, Luggage Power Outlet
WIPER FRT15AMultifunction Switch, E/R Fuse & Relay Box (RLY. 9/11)
RR BLOWER20AICM Relay Box (Rear Blower Relay)
P/WDW RH25APassenger Safety Power Window Module Passenger Door Module,
Rear Power Window Switch RH Rear Safety Power Window Module RH
RR DEFOGGER10AA/C Control Module
BRAKE SWITCH7.5ASmart Key Control Module, Stop Lamp Switch
SUNROOF 120ASunroof