Page 236 of 502

3-145
Convenient features of your vehicle
3
DEFROSTER
✽
NOTICE
If you want to defrost and defog the
front windscreen, refer to
“Windscreen Defrosting and
Defogging” in this chapter.
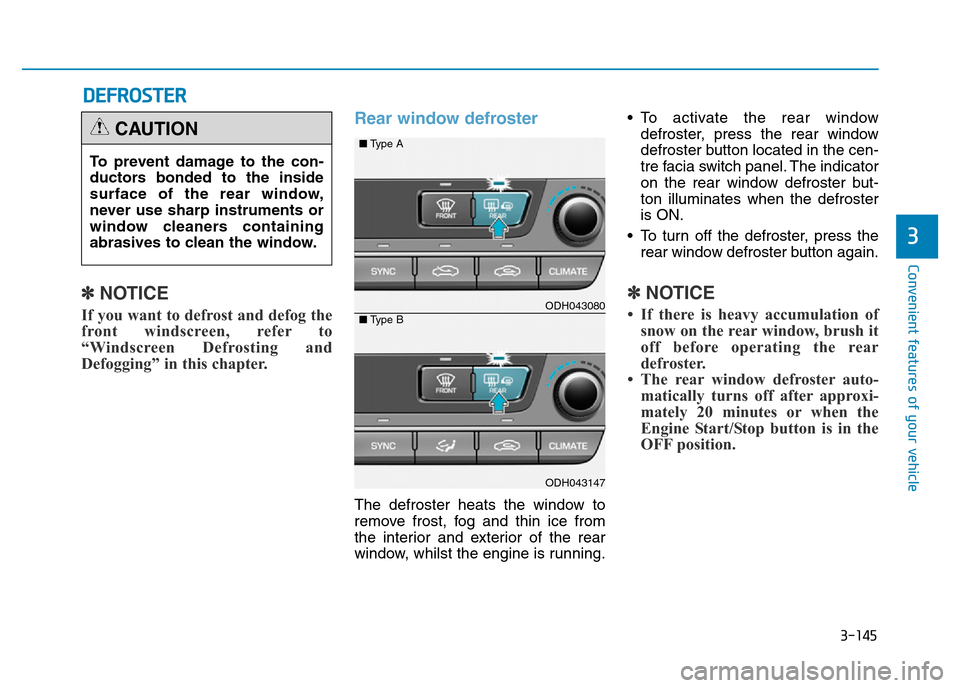
Rear window defroster
The defroster heats the window to
remove frost, fog and thin ice from
the interior and exterior of the rear
window, whilst the engine is running.• To activate the rear window
defroster, press the rear window
defroster button located in the cen-
tre facia switch panel. The indicator
on the rear window defroster but-
ton illuminates when the defroster
is ON.
• To turn off the defroster, press the
rear window defroster button again.
✽NOTICE
• If there is heavy accumulation of
snow on the rear window, brush it
off before operating the rear
defroster.
• The rear window defroster auto-
matically turns off after approxi-
mately 20 minutes or when the
Engine Start/Stop button is in the
OFF position.
To prevent damage to the con-
ductors bonded to the inside
surface of the rear window,
never use sharp instruments or
window cleaners containing
abrasives to clean the window.
CAUTION
ODH043080
ODH043147
■Type A
■Type B
Page 243 of 502
3-152
Convenient features of your vehicle
Defrost-Level (A)
Most of the air flow is directed to the
windscreen with a small amount of air
directed to the side window defrosters.
Instrument panel vents
The outlet vents can be opened or
closed separately using the thumb-
wheel. To close the vent, rotate it left
(Rear : down) to the maximum posi-
tion. To open the vent, rotate it right
(Rear : up) to the desired position.Also, you can adjust the direction of
air delivery from these vents using
the vent control lever as shown.
ODH043089
ODH043149
■Type A
■Type BODH044090R
ODH043162
■Front
■Rear
Page 276 of 502

5-3
Driving your vehicle
5
Carbon monoxide (CO) gas is toxic. Breathing CO can cause unconsciousness and death.
Engine exhaust contains carbon monoxide which cannot be seen or smelled.
Do not inhale engine exhaust.
If at any time you smell engine exhaust inside the vehicle, open the windows immediately. Exposure to CO can cause
unconsciousness and death by asphyxiation.
Be sure the exhaust system does not leak.
The exhaust system should be checked whenever the vehicle is raised to change the oil or for any other purpose. If
you hear a change in the sound of the exhaust or if you drive over something that strikes the underneath side of the
vehicle, we recommend that the exhaust system be checked as soon as possible by a HYUNDAI authorised repairer.
Do not run the engine in an enclosed area.
Letting the engine idle in your garage, even with the garage door open, is a hazardous practice. Run the engine only
long enough to start the engine and to move the vehicle out of the garage.
Avoid idling the engine for prolonged periods with people inside the vehicle.
If it is necessary to idle the engine for a prolonged period with people inside the vehicle, be sure to do so only in an
open area with the air intake set at "Fresh" and fan control set to high so fresh air is drawn into the interior.
Keep the air intakes clear.
To assure proper operation of the ventilation system, keep the ventilation air intakes located in front of the windscreen
clear of snow, ice, leaves, or other obstructions.
If you must drive with the boot open:
Close all windows.
Open instrument panel air vents.
Set the air intake control at "Fresh", the air flow control at "Floor" or "Face", and the fan control set to high.
WARNING
Page 277 of 502

5-4
Driving your vehicle
Before entering the vehicle
• Be sure all windows, outside mir-
ror(s), and outside lights are clean
and unobstructed.
• Remove frost, snow, or ice.
• Visually check the tyres for uneven
wear and damage.
• Check under the vehicle for any
sign of leaks.
• Be sure there are no obstacles
behind you if you intend to back up.
Before starting
• Make sure the bonnet, the boot,
and the doors are securely closed
and locked.
• Adjust the position of the seat and
steering wheel.
• Adjust the inside and outside
rearview mirrors.
• Verify all the lights work.
• Fasten your seat belt. Check that
all passengers have fastened their
seat belts.
• Check the gauges and indicators in
the instrument panel and the mes-
sages on the instrument display
when the Engine Start/Stop button
is in the ON position.
• Check that any items you are car-
rying are stored properly or fas-
tened down securely.
BEFORE DRIVING
To reduce the risk of SERIOUS
INJURY or DEATH, take the fol-
lowing precautions:
•ALWAYS wear your seat belt.
All passengers must be prop-
erly belted whenever the vehi-
cle is moving. For more infor-
mation, refer to “Seat Belts” in
chapter 2.
•Always drive defensively.
Assume other drivers or
pedestrians may be careless
and make mistakes.
•Stay focused on the task of
driving. Driver distraction can
cause accidents.
•Leave plenty of space
between you and the vehicle
in front of you.
WARNING
Page 454 of 502
7-48
Maintenance
Fuse NameSymbolFuse ratingCircuit Protected
Power
Handle15ASteering Tilt & Telescopic Module
Memory 310APassenger Power Outside Mirror
Cluster10AInstrument Cluster, Head-Up Display
Gateway10AGateway (IG1 (MCU))
Air Bag
IND.10AInstrument Cluster, A/C Control Module (PAB On/Off)
Smart Key 310ASmart Key Control Module
Module 310ABCM, Sport Mode Switch, Stop Lamp Switch,
Driver/Passenger Door Module, Rear Door Module LH/RH
Passenger
S/Warmer20APassenger CCS Module,
Passenger Seat Warmer Control Module
Memory 210ADriver Power Outside Mirror
Multi
Media 120AF16 10A (MULTIMEDIA 2), A/V & Navigation Head Unit
B/Alarm10ABurglar Alarm Horn Relay
Module 910AMultifunction Switch
Driver’s side fuse panel
Page 455 of 502

7-49
7
Maintenance
Fuse NameSymbolFuse ratingCircuit Protected
Module 410A
LKAS Module, Steering Tilt & Telescopic Module, ECS Unit, Crash Pad Switch,
Tyre Pressure Monitoring Module, Smart Parking Assist Control Module,
Console Switch LH/RH, Blind Spot Detection Radar LH/RH
Electric Parking Brake Switch, Rear Parking Assist Sensor LH/RH,
Rear Parking Assist Sensor (Centre)
Module 510A
Multipurpose Check Connector, A/V & Navigation Head Unit, Electro Chromic Mirror,
A/C Control Module, I-Box, AMP, Driver/Passenger CCS Module, Rear CCS Module LH/RH,
Driver/Passenger Seat Warmer Control Module, Rear Seat Warmer Control Module LH/RH,
Driver IMS Control Module, Driver Power Seat Switch
Module 1010ABCM
Multi
Media 210AKeyboard, I-Box, Front Monitor, Rear Audio Switch, Rear Monitor LH/RH
Memory 110ASteering Tilt & Telescopic Module, External Buzzer, BCM, A/C Control Module,
Tyre Pressure Monitoring Module, Analog Clock, Head-Up Display,
Instrument Cluster
Smart Key 110AStart/Stop Button Switch
Module 810ABCM, Smart Key Control Module
A/CON10AMetal Core Block (PCB #1 - Blower Relay), Ionizer,
Co2 Sensor, A/C Control Module
Passenger
P/Door15APassenger Door Latch
Door Lamp10ADriver/Passenger Door Module, Rear Door Module LH/RH
Driver’s side fuse panel
Page 500 of 502
8-9
8
Specifications & Consumer information
The vehicle identification number
(VIN) is the number used in register-
ing your vehicle and in all legal mat-
ters pertaining to its ownership, etc.
The number is punched on the floor
under the driver seat. To check the
number, open the cover.
The VIN is also on a plate attached
to the top of the instrument panel.
The number on the plate can easily
be seen through the windscreen
from outside.The vehicle certification label attached
on the front passenger’s (or driver’s)
side centre pillar provides the vehicle
identification number (VIN).
VEHICLE IDENTIFICATION NUMBER (VIN)VEHICLE CERTIFICATION
LABEL
ODH083001
■Frame number
ODH083002
ODH083004L
■VIN label (if equipped)
ODH083004L/H
■VIN label (if equipped)
• Type A
• Type B
Page:
< prev 1-8 9-16 17-24