2016 HYUNDAI GENESIS COUPE ULTIMATE warning
[x] Cancel search: warningPage 348 of 475
63
What to do in an emergency
2.When the car is stopped, turn onyour emergency hazard flashers,
set the parking brake and put the
transmission in P (automatic trans-
mission) or reverse (manual trans-
mission).
3.Have all passengers get out of the car. Be sure they all get out on the
side of the car that is away from
traffic.
4.When changing a flat tire, follow the instruction provided later in this
section.
If engine stalls while driving
1. Reduce your speed gradually, keeping a straight line. Move cau-
tiously off the road to a safe place.
2. Turn on your emergency flashers.
3. Try to start the engine again. If your vehicle will not start, contact
an authorized HYUNDAI dealer or
seek other qualified assistance.
If engine doesn't turn over or
turns over slowly
1. If your vehicle has an automatictransmission, be sure the gear
selector lever is in N(Neutral) or
P(Park) and the emergency brake
is set.
2. Check the battery connections to be sure they are clean and tight.
3. Turn on the interior light. If the light dims or goes out when you oper-
ate the starter, the battery is dis-
charged.
4. Check the starter connections to be sure they are securely tight-
ened.
5. Do not push or pull the vehicle to start it. See instructions for "Jump
starting".
If the engine turns over nor-
mally but does not start
1. Check fuel level.
2. With the ignition switch in theLOCK position, check all connec-
tors at the ignition coils and spark
plugs. Reconnect any that may be
disconnected or loose.
3. If the engine still does not start, call an authorized HYUNDAI deal-
er or seek other qualified assis-
tance.
IF THE ENGINE WILL NOT START
WARNING
If the engine will not start, do
not push or pull the car to start
it. This could result in a collision
or cause other damage.
Page 349 of 475
What to do in an emergency
46
EMERGENCY STARTING
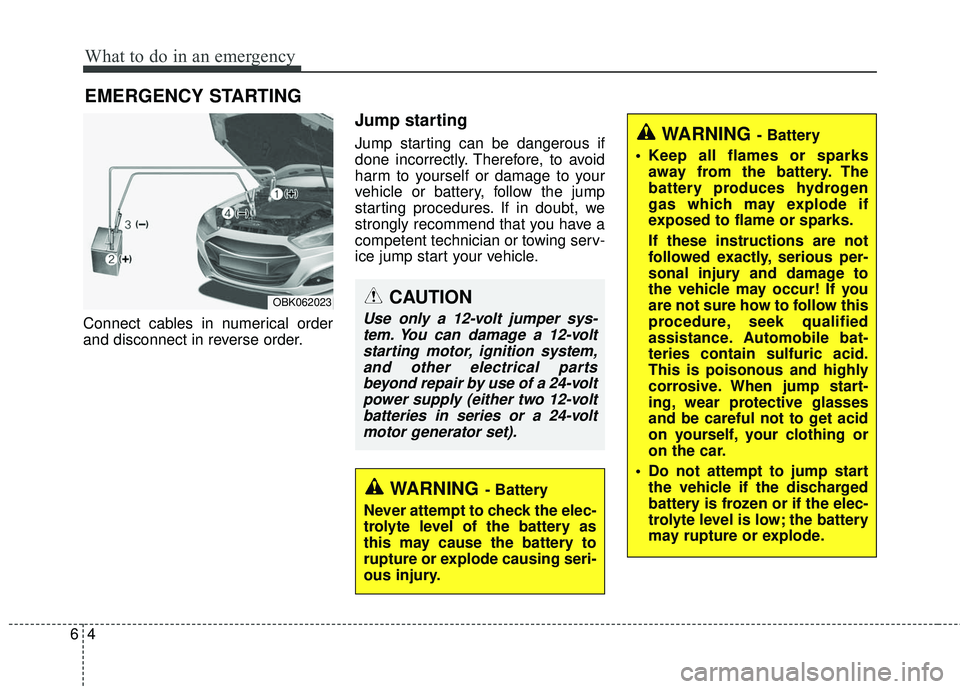
Connect cables in numerical order
and disconnect in reverse order.
Jump starting
Jump starting can be dangerous if
done incorrectly. Therefore, to avoid
harm to yourself or damage to your
vehicle or battery, follow the jump
starting procedures. If in doubt, we
strongly recommend that you have a
competent technician or towing serv-
ice jump start your vehicle.
CAUTION
Use only a 12-volt jumper sys-tem. You can damage a 12-voltstarting motor, ignition system,and other electrical partsbeyond repair by use of a 24-voltpower supply (either two 12-voltbatteries in series or a 24-voltmotor generator set).
WARNING- Battery
• Keep all flames or sparks away from the battery. The
battery produces hydrogen
gas which may explode if
exposed to flame or sparks.
If these instructions are not
followed exactly, serious per-
sonal injury and damage to
the vehicle may occur! If you
are not sure how to follow this
procedure, seek qualified
assistance. Automobile bat-
teries contain sulfuric acid.
This is poisonous and highly
corrosive. When jump start-
ing, wear protective glasses
and be careful not to get acid
on yourself, your clothing or
on the car.
Do not attempt to jump start the vehicle if the discharged
battery is frozen or if the elec-
trolyte level is low; the battery
may rupture or explode.
WARNING- Battery
Never attempt to check the elec-
trolyte level of the battery as
this may cause the battery to
rupture or explode causing seri-
ous injury.
OBK062023
Page 350 of 475
65
What to do in an emergency
Jump starting procedure
1. Make sure the booster battery is12-volt and that its negative termi-
nal is grounded.
2. If the booster battery is in another vehicle, do not allow the vehicles
to touch.
3. Turn off all unnecessary electrical loads.
4. Connect the jumper cables in the exact sequence shown in the illus-
tration. First connect one end of a
jumper cable to the positive termi-
nal of the discharged battery (1),
then connect the other end to the
positive terminal on the booster
battery (2).
Proceed to connect one end of the
other jumper cable to the negative
terminal of the booster battery (3),
then the other end to a solid, sta-
tionary, metallic point (for example,
the engine lifting bracket) away
from the battery (4). Do not con-
nect it to or near any part that
moves when the engine is cranked.
Do not allow the jumper cables to
contact anything except the correct
battery terminals or the correct
ground. Do not lean over the bat-
tery when making connections. 5. Start the engine of the vehicle with
the booster battery and let it run at
2,000 rpm, then start the engine of
the vehicle with the discharged
battery.
6. After jump start of your vehicle run the vehicle for at least 15 minutes
either at idle or driving the vehicle
before turning off the engine. This
will assure the vehicle can be
started next time after the engine
is shut off.
If the cause of your battery discharg-
ing is not apparent, you should have
your vehicle checked by an author-
ized HYUNDAI dealer.
Push-starting
Your manual transmission-equipped
vehicle should not be push-started
because it might damage the emis-
sion control system.
Vehicles equipped with automatic
transmission cannot be push-started.
Follow the directions in this section
for jump-starting.
WARNING
Never tow a vehicle to start it
because the sudden surge for-
ward when the engine starts
could cause a collision with the
tow vehicle.
CAUTION - Battery cables
Do not connect the jumper cable from the negative terminalof the booster battery to thenegative terminal of the dis-charged battery. This can causethe discharged battery to over-heat and crack, releasing bat-tery acid.
Page 351 of 475

What to do in an emergency
66
IF THE ENGINE OVERHEATS
If your temperature gauge indicates
overheating, you experience a loss
of power, or hear loud pinging or
knocking, the engine is probably too
hot. If this happens, you should:
1. Pull off the road and stop as soonas it is safe to do so.
2. Place the shift lever in P (automat- ic transmission) or neutral (manual
transmission) and set the parking
brake. If the air conditioning is on,
turn it off.
3. If engine coolant is running out under the car or steam is coming
out from underneath the hood,
stop the engine. Do not open the
hood until the coolant has flow
stopped. If there is no visible loss
of engine coolant and no steam,
leave the engine running and
check to be sure the engine cool-
ing fan is operating. If the fan is
not running, turn the engine off.
4. Check to see if the water pump drive belt is missing. If it is not
missing, check to see that it is
tight. If the drive belt seems to be
satisfactory, check for coolant
leaking from the radiator, hoses or
under the car. (If the air condition-
ing had been in use, it is normal
for cold water to be draining from it
when you stop). 5. If the water pump drive belt is bro-
ken or engine coolant is leaking
out, stop the engine immediately
and call the nearest authorized
HYUNDAI dealer for assistance.
6.If you cannot find the cause of the overheating, wait until the engine
temperature has returned to nor-
mal. Then, if coolant has been lost,
carefully add coolant to the reser-
voir to bring the fluid level in the
reservoir up to the halfway mark. 7.Proceed with caution, keeping
alert for further signs of overheat-
ing. If overheating happens again,
call an authorized HYUNDAI deal-
er for assistance.
WARNING
While the engine is running,
keep hair, hands and clothing
away from moving parts such
as the fan and drive belts to pre-
vent injury.
WARNING
Do not remove the radiator cap
when the engine is hot. This
may result in coolant to be
blown out of the opening and
cause serious burns.
CAUTION
Serious loss of coolant indicatesthere is a leak in the cooling sys-tem and this should be checkedas soon as possible by anauthorized HYUNDAI dealer.
Page 353 of 475

What to do in an emergency
86
Always check the TPMS malfunction
telltale after replacing one or more
tires or wheels on your vehicle to
ensure that the replacement or alter-
nate tires and wheels allow the TPMS
to continue to function properly.
✽ ✽NOTICE
If any of the below happens, we rec-
ommend that the system be checked
by an authorized HYUNDAI dealer.
1.The low tire pressure telltale/
TPMS malfunction indicator does
not illuminate for 3 seconds when
the ignition switch is turned to the
ON or engine is running.
2. The TPMS malfunction indicator remains illuminated after blinking
for approximately 1 minute.
3. The Low tire pressure position telltale remains illuminated.
Low tire pressure
telltale
Low tire pres-
sure position
telltale
When the tire pressure monitoring
system warning indicators are illumi-
nated and warning massage dis-
played on the cluster LCD display,
one or more of your tires is signifi-
cantly under-inflated. The low tire
pressure position telltale light will
indicate which tire is significantly
under-inflated by illuminating the cor-
responding position light.
If either telltale illuminates, immedi-
ately reduce your speed, avoid hard
cornering and anticipate increased
stopping distances. You should stop
and check your tires as soon as pos-
sible. Inflate the tires to the proper
pressure as indicated on the vehi-
cle’s placard or tire inflation pressure
label located on the driver’s side cen-
ter pillar outer panel. If you cannot reach a service station
or if the tire cannot hold the newly
added air, replace the low pressure
tire with the spare tire.
The Low Tire Pressure Telltale will
remain on and the TPMS Malfunction
Indicator may blink for one minute
and then remain illuminated (when
the vehicle is driven approximately
20 minutes at speed above 15.5 mph
(25 km/h)) until you have the low
pressure tire repaired and replaced
on the vehicle.
✽ ✽
NOTICE
The spare tire is not equipped with a
tire pressure sensor.
OBK044281L
Page 354 of 475
69
What to do in an emergency
TPMS (Tire Pressure
Monitoring System)
malfunction indicator
The TPMS malfunction indicator will
illuminate after it blinks for approxi-
mately one minute when there is a
problem with the Tire Pressure
Monitoring System.
Have the system checked by an
authorized HYUNDAI dealer as soon
as possible to determine the cause
of the problem.
✽ ✽NOTICE
If there is a malfunction with the
TPMS, the low tire pressure position
telltale will not be displayed even
though the vehicle has an under-
inflated tire.
WARNING- Low pressure
damage
Significantly low tire pressure
makes the vehicle unstable and
can contribute to loss of vehicle
control and increased braking
distances.
Continued driving on low pres-
sure tires can cause the tires to
overheat and fail.CAUTION
In winter or cold weather, the low tire pressure telltale may beilluminated if the tire pressurewas adjusted to the recom-mended tire inflation pressurein warm weather. It does notmean your TPMS is malfunction-ing because the decreased tem-perature leads to a proportionallowering of tire pressure.
When you drive your vehiclefrom a warm area to a cold areaor from a cold area to a warmarea, or the outside temperatureis greatly higher or lower, youshould check the tire inflationpressure and adjust the tires tothe recommended tire inflationpressure.
Page 356 of 475
611
What to do in an emergency
You may not be able to identify a tire
with low pressure by simply looking
at it. Always use a good quality tire
pressure gauge to measure. Please
note that a tire that is hot (from being
driven) will have a higher pressure
measurement than a tire that is cold.
A cold tire means the vehicle has
been sitting for 3 hours and driven for
less than 1 mile (1.6 km) in that 3 hour
period.
Allow the tire to cool before measur-
ing the inflation pressure. Always be
sure the tire is cold before inflating to
the recommended pressure.This device complies with Part
15 of the FCC rules.
Operation is subject to the following
two conditions:
1. This device may not cause harmfulinterference, and
2. This device must accept any inter- ference received, including inter-
ference that may cause undesired
operation.
WARNING- Protecting
TPMS
Tampering with, modifying, or
disabling the Tire Pressure
Monitoring System (TPMS) com-
ponents may interfere with the
system's ability to warn the driv-
er of low tire pressure condi-
tions and/or TPMS malfunctions.
Tampering with, modifying, or
disabling the Tire Pressure
Monitoring System (TPMS) com-
ponents may void the warranty
for that portion of the vehicle.
WARNING- TPMS
The TPMS cannot alert you to severe and sudden tire dam-
age caused by external factors
such as nails or road debris.
If you feel any vehicle instabil- ity, immediately take your foot
off the accelerator, apply the
brakes gradually with light
force, and slowly move to a
safe position off the road.
CAUTION
Changes or modifications notexpressly approved by the partyresponsible for compliancecould void the user’s authorityto operate the equipment.
Page 357 of 475

What to do in an emergency
12
6
IF YOU HAVE A FLAT TIRE
Jack and tools
The jack, jack handle, and wheel lug
nut wrench are stored in the luggage
compartment. Pull up the luggage
box cover to reach this equipment.
(1) Jack handle
(2) Jack
(3) Wheel lug nut wrench
Jacking instructions
The jack is provided for emergency
tire changing only.
To prevent the jack from “rattling”
while the vehicle is in motion, store it
properly.
Follow jacking instructions to reduce
the possibility of personal injury.
OBK069001AWARNING- Changing
tires
Never attempt vehicle repairs in the traffic lanes of a public
road or highway.
Always move the vehicle com- pletely off the road and onto
the shoulder before trying to
change a tire. The jack should
be used on level firm ground.
If you cannot find a firm, level
place off the road, call a tow-
ing service company for
assistance.
(Continued)
(Continued)
Be sure to use the correct frontand rear jacking positions on
the vehicle; never use the
bumpers or any other part of
the vehicle for jacking support.
The vehicle can easily roll off the jack causing serious injury
or death. No person should
place any portion of their body
under a vehicle that is support-
ed only by a jack; use vehicle
support stands.
Do not start or run the engine while the vehicle is on the
jack.
Do not allow anyone to remain in the vehicle while it is on the
jack.
Make sure any children pres- ent are in a secure place away
from the road and from the
vehicle to be raised with the
jack.