Page 439 of 498
Maintenance
44 7
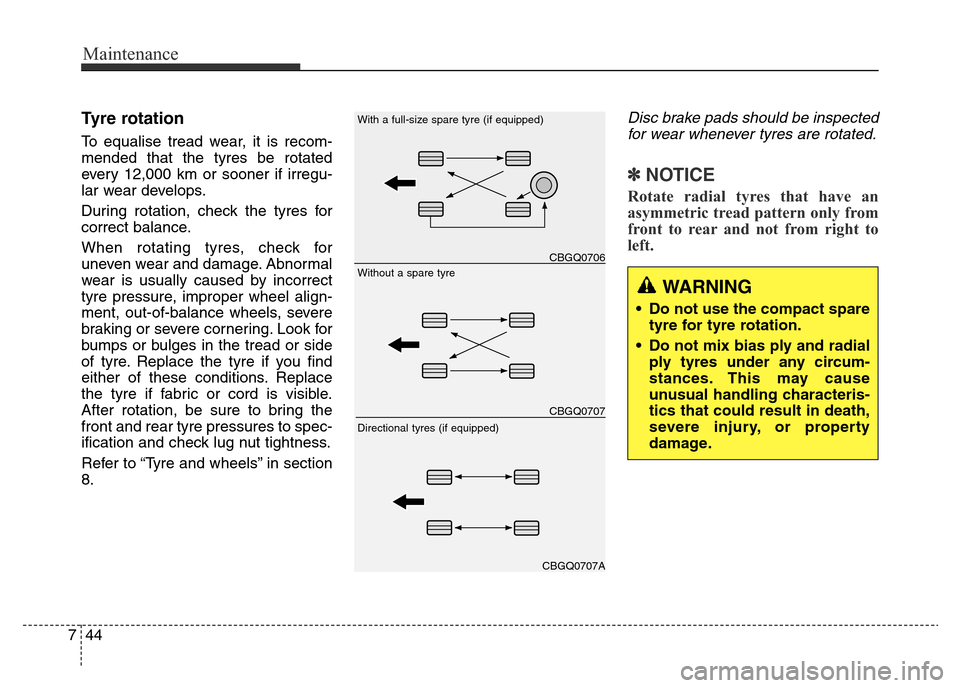
Tyre rotation
To equalise tread wear, it is recom-
mended that the tyres be rotated
every 12,000 km or sooner if irregu-
lar wear develops.
During rotation, check the tyres for
correct balance.
When rotating tyres, check for
uneven wear and damage. Abnormal
wear is usually caused by incorrect
tyre pressure, improper wheel align-
ment, out-of-balance wheels, severe
braking or severe cornering. Look for
bumps or bulges in the tread or side
of tyre. Replace the tyre if you find
either of these conditions. Replace
the tyre if fabric or cord is visible.
After rotation, be sure to bring the
front and rear tyre pressures to spec-
ification and check lug nut tightness.
Refer to “Tyre and wheels” in section
8.
Disc brake pads should be inspected
for wear whenever tyres are rotated.
✽NOTICE
Rotate radial tyres that have an
asymmetric tread pattern only from
front to rear and not from right to
left.
WARNING
• Do not use the compact spare
tyre for tyre rotation.
• Do not mix bias ply and radial
ply tyres under any circum-
stances. This may cause
unusual handling characteris-
tics that could result in death,
severe injury, or property
damage.
CBGQ0706
CBGQ0707
CBGQ0707A
Without a spare tyre With a full-size spare tyre (if equipped)
Directional tyres (if equipped)
Page 441 of 498
Maintenance
46 7
Compact spare tyre replacement
(if equipped)
A compact spare tyre has a shorter
tread life than a regular size tyre.
Replace it when you can see the
tread wear indicator bars on the tyre.
The replaced compact spare tyre
should be the same size and design
tyre as the one provided with your
new vehicle and should be mounted
on the same compact spare tyre
wheel. The compact spare tyre is not
designed to be mounted on a regular
size wheel or tyre.
(Continued)
• Using tyres and wheels other
than the recommended sizes
could cause unusual handling
characteristics and poor vehi-
cle control, resulting in a seri-
ous accident.
• Wheels that do not meet
HYUNDAI’s specifications
may fit poorly and result in
damage to the vehicle or
unusual handling and poor
vehicle control.
• The ABS works by comparing
the speed of the wheels. Tyre
size can affect wheel speed.
When replacing tyres, all 4
tyres must use the same size
originally supplied with the
vehicle. Using tyres of a dif-
ferent size can cause the ABS
(Anti-lock Brake System) and
ESC (Electronic Stability
Control) (if equipped) to work
irregularly.WARNING - Replacing
tyres
To reduce the chance or a seri-
ous or fatal injuries from an
accident caused by tyre failure
or loss of vehicle control:
• Replace tyres that are worn,
show uneven wear, or are
damaged. Worn tyres can
cause loss of braking effec-
tiveness, steering control, and
traction.
• Do not drive your vehicle with
too little or too much pressure
in your tyres. This can lead to
uneven wear and tyre failure.
• When replacing tyres, never
mix radial and bias-ply tyres
on the same car. You must
replace all tyres (including the
spare) if moving from radial to
bias-ply tyres.
(Continued)
Page 445 of 498
Maintenance
50 7
4. Tyre ply composition and mate-
rial
The number of layers or plies of rub-
ber-coated fabric are in the tyre. Tyre
manufacturers also must indicate the
materials in the tyre, which include
steel, nylon, polyester, and others.
The letter "R" means radial ply con-
struction; the letter "D" means diago-
nal or bias ply construction; and the
letter "B" means restrained-bias ply
construction.
5. Maximum permissible inflation
pressure
This number is the greatest amount of
air pressure that should be put in the
tyre. Do not exceed the maximum per-
missible inflation pressure. Refer to
the Tyre and Loading Information
label for recommended inflation pres-
sure.
6. Maximum load rating
This number indicates the maximum
load in kilograms and pounds that can
be carried by the tyre. When replacing
the tyres on the vehicle, always use a
tyre that has the same load rating as
the factory installed tyre.
7. Uniform tyre quality grading
Quality grades can be found where
applicable on the tyre sidewall
between tread shoulder and maxi-
mum section width.
For example:
TREAD wear 200
TRACTION AA
TEMPERATURE ATread wear
The tread wear grade is a compara-
tive rating based on the wear rate of
the tyre when tested under controlled
conditions on a specified govern-
ment test course. For example, a tyre
graded 150 would wear one-and-a-
half times (1½) as well on the gov-
ernment course as a tyre graded
100.
The relative performance of tyres
depends upon the actual conditions
of their use, however, and may
depart significantly from the norm
due to variations in driving habits,
service practices and differences in
road characteristics and climate.
These grades are molded on the
side-walls of passenger vehicle
tyres. The tyres available as standard
or optional equipment on your vehi-
cle may vary with respect to grade.
Page 447 of 498
Maintenance
52 7
Low aspect ratio tyre
(if equipped)
Low aspect ratio tyres, whose aspect
ratio is lower than 50, are provided
for sporty looks.
Because the low aspect ratio tyres
are optimised for handling and brak-
ing, it may be more uncomfortable to
travel in and there is more noise
compared with normal tyres.
CAUTION
Because the sidewall of the low
aspect ratio tyre is shorter than
the normal tyre, the wheel and
tyre of the low aspect ratio tyre
is easier to be damaged.
Therefore, follow the instruc-
tions below.
- When driving on a rough road
or off road, drive cautiously
because tyres and wheels may
be damaged. After driving,
inspect tyres and wheels.
- When passing over a pothole,
speed bump, manhole, or curb
stone, drive slowly so that the
tyres and wheels are not dam-
aged.
- If the tyre is impacted, we rec-
ommend that you inspect the
tyre condition or contact an
authorised HYUNDAI dealer.
- To prevent damage to the tyre,
inspect the tyre condition and
pressure every 3,000km.
CAUTION
• It is not easy to recognise tyre
damage just by looking at a
tyre. But if there is the slight-
est hint of damage, have the
tyre checked or replaced, as
air leakage may occur.
• If the tyre is damaged by driv-
ing on a rough road, off road,
pothole, manhole, or curb
stone, it will not be covered by
the warranty.
• You can find out the tyre infor-
mation on the tyre sidewall.
Page 467 of 498
Maintenance
72 7
Front fog light (if equipped)
4. Remove the bulb-socket from the
housing by turning the socket anti-
clockwise until the tabs on the
socket align with the slots on the
housing.
5. Install the new bulb-socket into the
housing by aligning the tabs on
the socket with the slots in the
housing. Push the socket into the
housing and turn the socket clock-
wise.
6. Connect the power connector to
the socket.Dedicated light (if equipped)
Follow steps 1 to 3 from the previous
page.
4. Remove the socket from the
assembly by turning the socket
anticlockwise until the tabs on the
socket align with the slots on the
assembly.
5. Remove the bulb by pulling it out.
6. Insert a new bulb by inserting it
into the socket.
7. Install the socket in the assembly
by aligning the tabs on the socket
with the slots in the assembly.
Push the socket into the assembly
and turn the socket clockwise.Headlight and front fog light
aiming
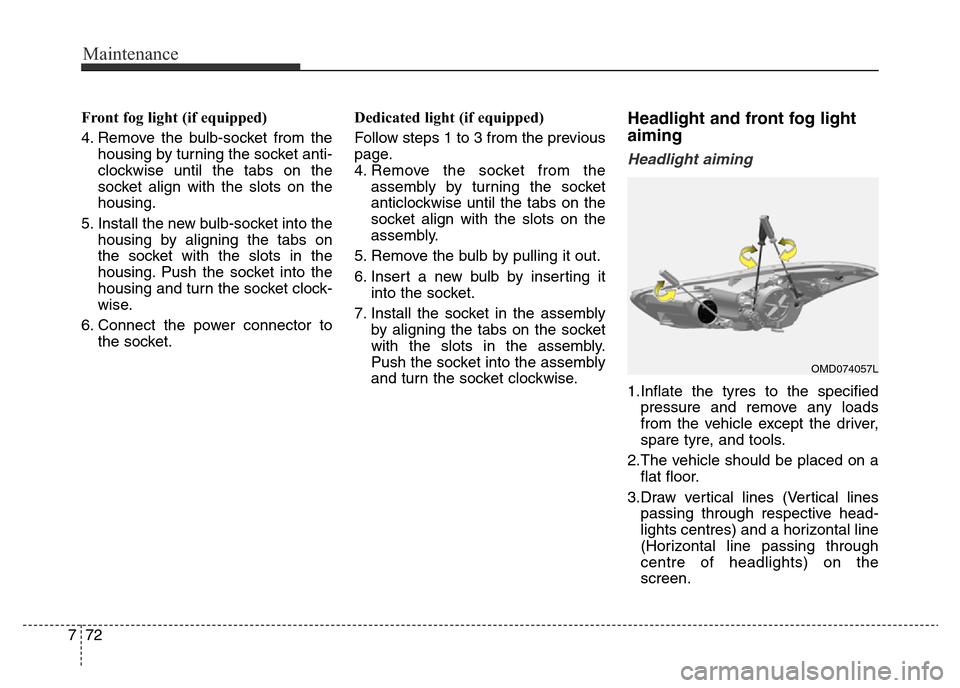
Headlight aiming
1.Inflate the tyres to the specified
pressure and remove any loads
from the vehicle except the driver,
spare tyre, and tools.
2.The vehicle should be placed on a
flat floor.
3.Draw vertical lines (Vertical lines
passing through respective head-
lights centres) and a horizontal line
(Horizontal line passing through
centre of headlights) on the
screen.
OMD074057L
Page 490 of 498
Specifications & Consumer information
Engine . . . . . . . . . . . . . . . . . . . . . . . . . . . . . . . . . . . . 8-2
Dimensions . . . . . . . . . . . . . . . . . . . . . . . . . . . . . . . . 8-2
Air conditioning system . . . . . . . . . . . . . . . . . . . . . . 8-2
Bulb wattage . . . . . . . . . . . . . . . . . . . . . . . . . . . . . . . 8-3
Tyres and wheels . . . . . . . . . . . . . . . . . . . . . . . . . . . 8-4
Load and speed capacity tyres . . . . . . . . . . . . . . . . 8-5
Weight/volume . . . . . . . . . . . . . . . . . . . . . . . . . . . . . 8-5
Recommended lubricants and capacities . . . . . . . . 8-6
• Recommended SAE viscosity number . . . . . . . . . . . 8-7
Vehicle identification number (VIN) . . . . . . . . . . . 8-8
Vehicle certification label. . . . . . . . . . . . . . . . . . . . . 8-8
Tyre specification and pressure label . . . . . . . . . . . 8-9
Engine number . . . . . . . . . . . . . . . . . . . . . . . . . . . . . 8-9
Refrigerant label. . . . . . . . . . . . . . . . . . . . . . . . . . . . 8-9
8
Page 493 of 498
Specifications & Consumer information
4 8
TYRES AND WHEELS
* Normal load : Up to 2 persons
CAUTION
When replacing tyres, use the same size originally supplied with the vehicle.
Using tyres of a different size can damage the related parts or make it work irregularly.
Item Tyre size Wheel sizeCold tyre inflation pressure bar (psi,kPa)
Wheel nut torque
kg•m
(lb•ft, N•m) Normal load *1Maximum load
Front Rear Front Rear
Full size tyre195/65R15 6.0J×15
2.2
(32, 220)2.2
(32, 220)2.2
(32, 220)2.2
(32, 220)
9~11
(65~79, 88~107) 205/55R16 6.5J×16
215/45R17 7.0J×17
Compact spare tyre
(if equipped)T125/80D15 4.0T×154.2
(60, 420)4.2
(60, 420)4.2
(60, 420)4.2
(60, 420)
Page 498 of 498
89
Specifications & Consumer information
The tyres supplied on your new vehi-
cle are chosen to provide the best
performance for normal driving.
The tyre label located on the driver's
side centre pillar gives the tyre pres-
sures recommended for your vehicle.The engine number is stamped on
the engine block as shown.
The refrigerant label is located at the
front of the engine compartment.
TYRE SPECIFICATION AND
PRESSURE LABEL
OMD060012N/H
OMD083003N
ENGINE NUMBER REFRIGERANT LABEL
(IF EQUIPPED)
OMD074105
Page:
< prev 1-8 9-16 17-24