2016 Hyundai Azera power steering
[x] Cancel search: power steeringPage 18 of 521

Your vehicle at a glance
42
INTERIOR OVERVIEW
The actual shape may differ from the illustration.1. Seat.....................................................3-2
2. Door lock/unlock button ....................4-16
3. Central door lock switch....................4-17
4. Power window switches ....................4-26
5. Power window lock button ................4-28
6. Outside rearview mirror control
switch ................................................4-54
7. Outside rearview mirror folding button ................................................4-56
8. Seat adjustment .................................3-4
9. Driver’s position memory system* ....4-40
10. Trunk lid release button or lever......4-19
11. Fuel filler lid release button.............4-31
12. Hood release lever ..........................4-29
13. Fuse box .........................................7-52
14. Steering wheel tilt control ...............4-44
15. Steering wheel ................................4-43
16. Instrument panel illumination control switch ..............................................4-59
17. Active ECO button ..........................5-56
18. Blind spot detection system button*.............................................5-57
19. ESC OFF button .............................5-30
* : if equippedOHG015001N
Page 19 of 521

25
Your vehicle at a glance
INSTRUMENT PANEL OVERVIEW
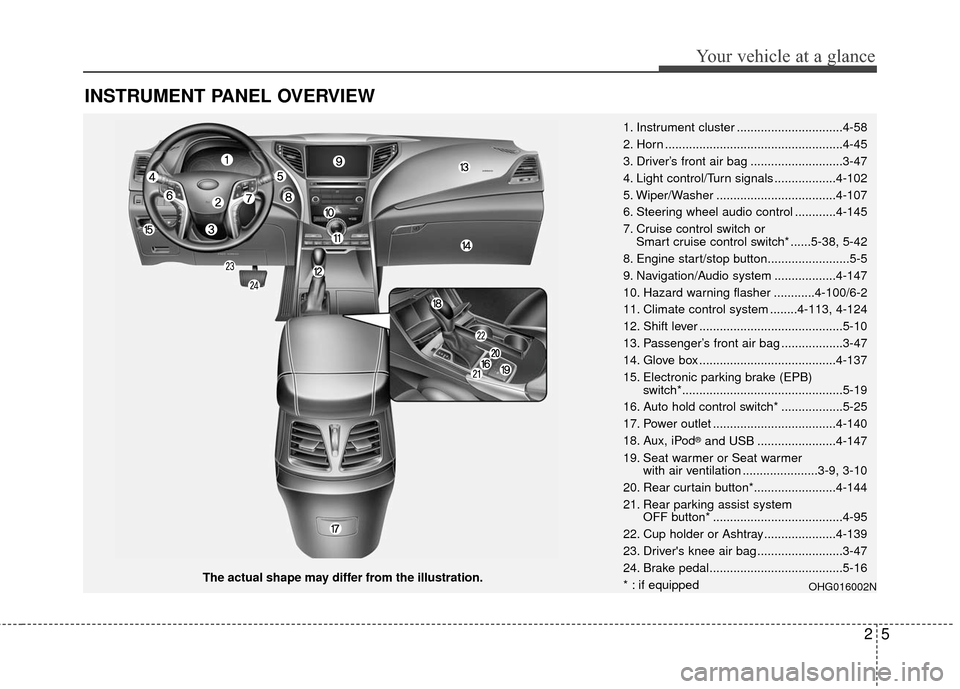
The actual shape may differ from the illustration.1. Instrument cluster ...............................4-58
2. Horn ....................................................4-45
3. Driver’s front air bag ...........................3-47
4. Light control/Turn signals ..................4-102
5. Wiper/Washer ...................................4-107
6. Steering wheel audio control ............4-145
7. Cruise control switch or
Smart cruise control switch* ......5-38, 5-42
8. Engine start/stop button........................5-5
9. Navigation/Audio system ..................4-147
10. Hazard warning flasher ............4-100/6-2
11. Climate control system ........4-113, 4-124
12. Shift lever ..........................................5-10
13. Passenger’s front air bag ..................3-47
14. Glove box ........................................4-137
15. Electronic parking brake (EPB) switch*...............................................5-19
16. Auto hold control switch* ..................5-25
17. Power outlet ....................................4-140
18. Aux, iPod
®and USB .......................4-147
19. Seat warmer or Seat warmer with air ventilation ......................3-9, 3-10
20. Rear curtain button*........................4-144
21. Rear parking assist system OFF button* ......................................4-95
22. Cup holder or Ashtray.....................4-139
23. Driver's knee air bag .........................3-47
24. Brake pedal.......................................5-16
* : if equipped
OHG016002N
Page 24 of 521

Safety features of your vehicle
43
Front seat
Automatic adjustment
The front seat can be adjusted by
using the control switch located on
the door and outside of the seat
cushion. Before driving, adjust the
seat to the proper position so as to
easily control the steering wheel,
pedals and switches on the instru-
ment panel.
WARNING - Rear
seatbacks
Always lock the rear seatback
before driving. Failure to do so
could result in passengers or
objects being thrown forward
injuring vehicle occupants.
WARNING - Seat
adjustment
Do not adjust the seat while wearing seat belts. Moving the
seat cushion forward may
cause strong pressure on the
abdomen.
Use extreme caution so that hands or other objects are not
caught in the seat mechanisms
while the seat is moving.
Use extreme caution when picking small objects trapped
under the seats or between
the seat and the center con-
sole. Your hands might be cut
or injured by the sharp edges
of the seat mechanism.
WARNING
The power seat is operable with
the ignition OFF.
Therefore, children should
never be left unattended in the
vehicle.
CAUTION
The power seat is driven by an electric motor. Stop the motoroperation once the adjust-ment is completed. Excessiveoperation may damage theelectrical equipment.
When in operation, the power seat consumes a largeamount of electrical power. Toprevent unnecessary chargingsystem drain, do not adjustthe power seat longer thannecessary while the engine isnot running.
Do not operate two or more power seat control switches atthe same time. Doing so mayresult in power seat motor orelectrical component malfunc-tion.
Page 123 of 521

443
Features of your vehicle
Electronic power steering (EPS)
The power steering uses a motor to
assist you in steering the vehicle. If
the engine is off or if the power steer-
ing system becomes inoperative, the
vehicle may still be steered, but it will
require increased steering effort.
The motor driven power steering is
controlled by a power steering con-
trol unit which senses the steering
wheel torque and vehicle speed to
command the motor.
The steering becomes heavier as
the vehicle’s speed increases and
becomes lighter as the vehicle’s
speed decreases for optimum steer-
ing control.
Should you notice any change in the
effort required to steer during normal
vehicle operation, have the power
steering checked by an authorized
HYUNDAI dealer.
✽ ✽NOTICE
The following symptoms may occur
during normal vehicle operation:
• The steering effort is high immedi-
ately after the engine starts. This
happens as the system performs
the EPS system diagnostics. When
the diagnostics is completed, the
steering wheel will return to its
normal condition.
• A click noise may be heard from the EPS relay after the ignition
switch is changed to the ON or
OFF position.
• Motor noise may be heard when the vehicle is at a stop or at a low
driving speed.
• When you operate the steering wheel in low temperature, abnor-
mal noise could occur. If tempera-
ture rises, the noise will disappear.
This is a normal condition. (Continued)(Continued)
• When the vehicle is stationary, if
you turn the steering wheel all the
way to the left or right continuous-
ly, the steering wheel effort
increases. This is not a system mal-
function. As time passes, the steer-
ing wheel effort will return to its
normal condition.
If the Electronic Power Steering
System does not operate normally,
the warning light ( ) will illuminate
on the instrument cluster. The steer-
ing wheel may become difficult to
control or operate abnormally. Take
your vehicle to an authorized
HYUNDAI dealer and have the
vehicle checked as soon as possible.
STEERING WHEEL
Page 155 of 521

475
Features of your vehicle
✽
✽NOTICE
• If the vehicle is not on level ground
or the battery power has been
interrupted, the distance to empty
function may not operate correct-
ly.
• The distance to empty may differ from the actual driving distance as
it is an estimate of the available
driving distance.
• The trip computer may not regis- ter additional fuel if less than 1.6
gallons (6 liters) of fuel are added
to the vehicle.
• The fuel economy and distance to empty may vary significantly
based on driving conditions, driv-
ing habits, and condition of the
vehicle.
Average Fuel Economy (2)
The average fuel economy is calcu-
lated by the total driving distance
and fuel consumption since the last
average fuel economy reset.
- Fuel economy range: 0.0 ~ 99.9MPG or L/100km, km/L
The average fuel economy can be reset both manually and automati-
cally.
Manual reset
To clear the average fuel economy
manually, press the [OK] button on
the steering wheel for more than 1
second when the average fuel econo-
my is displayed. Automatic reset
To make the average fuel economy
be reset automatically whenever refu-
eling, select the “Auto Reset” mode in
User Setting menu of the LCD display
(Refer to “LCD Display”).
Under “Auto Reset” mode, the aver-
age fuel economy will be cleared to
zero (---) when the vehicle speed
exceeds 1 km/h after refueling more
than 1.6 gallons (6 liters).
✽ ✽
NOTICE
The average fuel economy is not dis-
played for more accurate calculation
if the vehicle does not drive more
than 10 seconds or 0.19 miles (300
meters) since the Engine Start/Stop
button is turned to ON.
Instant Fuel Economy (3)
This mode displays the instant fuel
economy during the last few sec-
onds when the vehicle speed is
more than 6.2 MPH (10 km/h).
- Fuel economy range: 0 ~ 50 MPGor 0 ~ 30 L/100km
Page 163 of 521

483
Features of your vehicle
EPB (Electric ParkingBrake) malfunction indi-cator (if equipped)
The EPB malfunction indicator will
illuminate when the ignition switch is
turned ON, but should go off after
approximately 3 seconds. If the
warning light does not come on, or
continuously remains on take your
vehicle to an authorized HYUNDAI
dealer and have the system
checked.
Also, the EPB malfunction indicator
may illuminate when the ESC indica-
tor comes on to indicate that the
ESC is not working properly, but if
this occurs, it does not indicate the
EPB has malfunctioned.
AUTO HOLD indicatorlight (if equipped)
If you press the AUTO HOLD switch,
the AUTO HOLD indicator on the
cluster comes on white. And when
you stop the vehicle completely by
pressing the brake pedal, the indica-
tor changes from white to green.
If the AUTO HOLD malfunction indi-
cator lights up yellow, the AUTO
HOLD is not working properly. Take
your vehicle to an authorized
HYUNDAI dealer and have the sys-
tem checked.
For more information, refer to
"AUTO HOLD" in section 5.
EPS (Electronic PowerSteering) system warn-ing light
This indicator light comes on after
the ignition key is turned to the ON
position and then goes out after
approximately 6 seconds.
This light also comes on when the
EPS has some problems. If it comes
on while driving, have your vehicle
checked by an authorized HYUNDAI
dealer.
Engine coolant tempera-ture warning light
The warning light illuminates if the
temperature of the engine coolant is
above 125±2.5°C (257±4.5°F).
Do not continue driving with an over-
heated engine. If your vehicle over-
heats, refer to “Overheating” in sec-
tion 6.
EPBAUTO
HOLD
Page 222 of 521

Features of your vehicle
142
4
The power outlet is designed to pro-
vide power for mobile telephones or
other devices designed to operate
with vehicle electrical systems. The
devices should draw less than 10
amps with the engine running.
Use the power outlet only when the
engine is running and remove the
accessory plug after use. Using the
accessory plug for prolonged peri-
ods of time with the engine off could
cause the battery to discharge.
Only use 12V electric accessories which are less than 10A in electric
capacity. If not, it could lead to an
overheated power outlet or electric
wiring in the vehicle and electric
systems may malfunction.
Adjust the air-conditioner or heater to the lowest operating level when
using the power outlet.
Close the cover when not in use.
Some electronic devices can cause electronic interference when
plugged into a vehicle’s power
outlet. These devices may cause
excessive audio static and malfunc-
tions in other electronic systems or
devices used in your vehicle.Digital clock (if equipped)
Whenever the battery terminals or
related fuses are disconnected, you
must reset the time.
Detailed information on setting the
clock is described in Audio system
section 4.
WARNING
Do not adjust the clock while
driving. You may lose your
steering control and cause an
accident that results in severe
personal injury or death.
WARNING - Electricshock
Do not put fingers or objects
(pin, coin, etc.) into a power out-
let and do not touch with wet
hands. You may get an electric
shock.
CAUTION
Make sure that the electric devices are plugged in secure-ly. If not, it could cause a mal-function of electric systems.
If you use an electric device with a battery, electric currentmay flow from the electricdevice into the vehicle andmay cause a malfunction ofelectric systems. Only useelectric devices which couldprevent inverse current.
Page 246 of 521

4166
Features of your vehicle
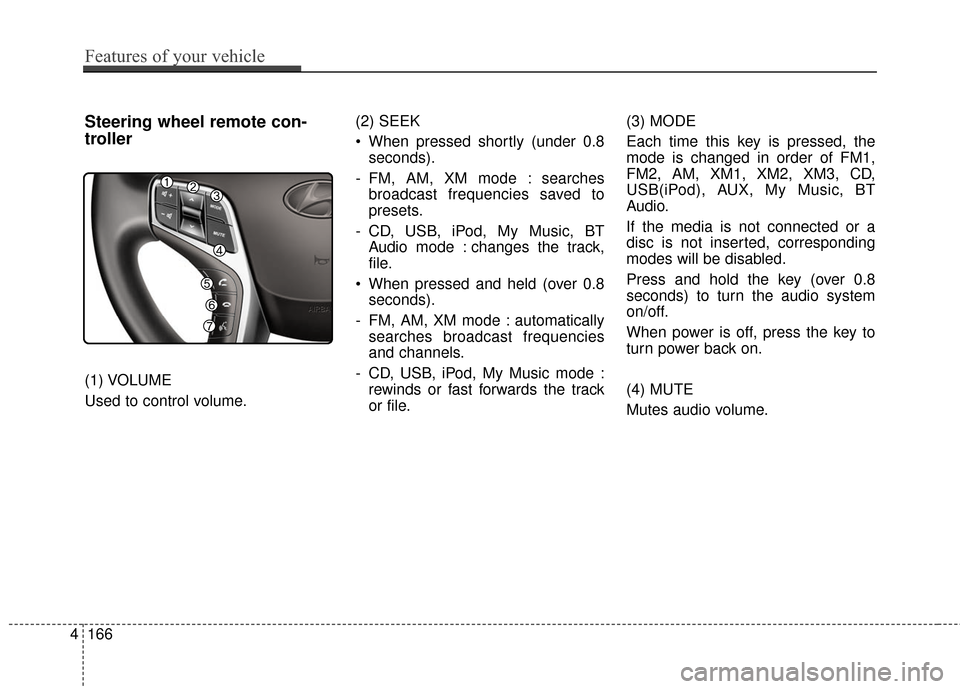
Steering wheel remote con-
troller
(1) VOLUME
Used to control volume.(2) SEEK
When pressed shortly (under 0.8
seconds).
- FM, AM, XM mode : searches broadcast frequencies saved to
presets.
- CD, USB, iPod, My Music, BT Audio mode : changes the track,
file.
When pressed and held (over 0.8 seconds).
- FM, AM, XM mode : automatically searches broadcast frequencies
and channels.
- CD, USB, iPod, My Music mode : rewinds or fast forwards the track
or file. (3) MODE
Each time this key is pressed, the
mode is changed in order of FM1,
FM2, AM, XM1, XM2, XM3, CD,
USB(iPod), AUX, My Music, BT
Audio.
If the media is not connected or a
disc is not inserted, corresponding
modes will be disabled.
Press and hold the key (over 0.8
seconds) to turn the audio system
on/off.
When power is off, press the key to
turn power back on.
(4) MUTE
Mutes audio volume.