2016 Hyundai Azera door lock
[x] Cancel search: door lockPage 7 of 521

1
2
3
4
5
6
7
8I
IntroductionHow to use this manual / Fuel requirements / Vehicle break-in process / Vehicle data collection and event data recorders
Your vehicle at a glance
Exterior overview / Interior overview / Instrument panel overview / Engi\
ne compartment
Safety features of your vehicle
Seats / Seat belts / Child restraint system / Air bag
Features of your vehicleKeys / Door locks / Trunk / Windows / Hood / Fuel filler lid / Sunroof / Steering wheel / Mirrors /
Instrument cluster / Lighting / Wipers & Washers / Climate control system / Multimedia system / Etc.
Driving your vehicleBefore driving / Engine start/stop button / Transaxle / Brake system / Cruise control system /
Active ECO system / Winter driving / Vehicle load limit / Etc.
What to do in an emergencyRoad warning / Emergency while driving / Emergency starting / Engine overheat / TPMS / Flat tire / Towing / Etc.
MaintenanceEngine compartment / Maintenance service / Engine oil / Engine coolant /\
Brake fluid / Washer fluid /
Parking brake / Air cleaner / Wiper blades / Battery / Tire and wheels / Fuses / Light bulbs / Etc.
Specifications, Consumer information and Reporting safety defects
Index
table of contents
Page 18 of 521

Your vehicle at a glance
42
INTERIOR OVERVIEW
The actual shape may differ from the illustration.1. Seat.....................................................3-2
2. Door lock/unlock button ....................4-16
3. Central door lock switch....................4-17
4. Power window switches ....................4-26
5. Power window lock button ................4-28
6. Outside rearview mirror control
switch ................................................4-54
7. Outside rearview mirror folding button ................................................4-56
8. Seat adjustment .................................3-4
9. Driver’s position memory system* ....4-40
10. Trunk lid release button or lever......4-19
11. Fuel filler lid release button.............4-31
12. Hood release lever ..........................4-29
13. Fuse box .........................................7-52
14. Steering wheel tilt control ...............4-44
15. Steering wheel ................................4-43
16. Instrument panel illumination control switch ..............................................4-59
17. Active ECO button ..........................5-56
18. Blind spot detection system button*.............................................5-57
19. ESC OFF button .............................5-30
* : if equippedOHG015001N
Page 24 of 521

Safety features of your vehicle
43
Front seat
Automatic adjustment
The front seat can be adjusted by
using the control switch located on
the door and outside of the seat
cushion. Before driving, adjust the
seat to the proper position so as to
easily control the steering wheel,
pedals and switches on the instru-
ment panel.
WARNING - Rear
seatbacks
Always lock the rear seatback
before driving. Failure to do so
could result in passengers or
objects being thrown forward
injuring vehicle occupants.
WARNING - Seat
adjustment
Do not adjust the seat while wearing seat belts. Moving the
seat cushion forward may
cause strong pressure on the
abdomen.
Use extreme caution so that hands or other objects are not
caught in the seat mechanisms
while the seat is moving.
Use extreme caution when picking small objects trapped
under the seats or between
the seat and the center con-
sole. Your hands might be cut
or injured by the sharp edges
of the seat mechanism.
WARNING
The power seat is operable with
the ignition OFF.
Therefore, children should
never be left unattended in the
vehicle.
CAUTION
The power seat is driven by an electric motor. Stop the motoroperation once the adjust-ment is completed. Excessiveoperation may damage theelectrical equipment.
When in operation, the power seat consumes a largeamount of electrical power. Toprevent unnecessary chargingsystem drain, do not adjustthe power seat longer thannecessary while the engine isnot running.
Do not operate two or more power seat control switches atthe same time. Doing so mayresult in power seat motor orelectrical component malfunc-tion.
Page 40 of 521

Safety features of your vehicle
20
3
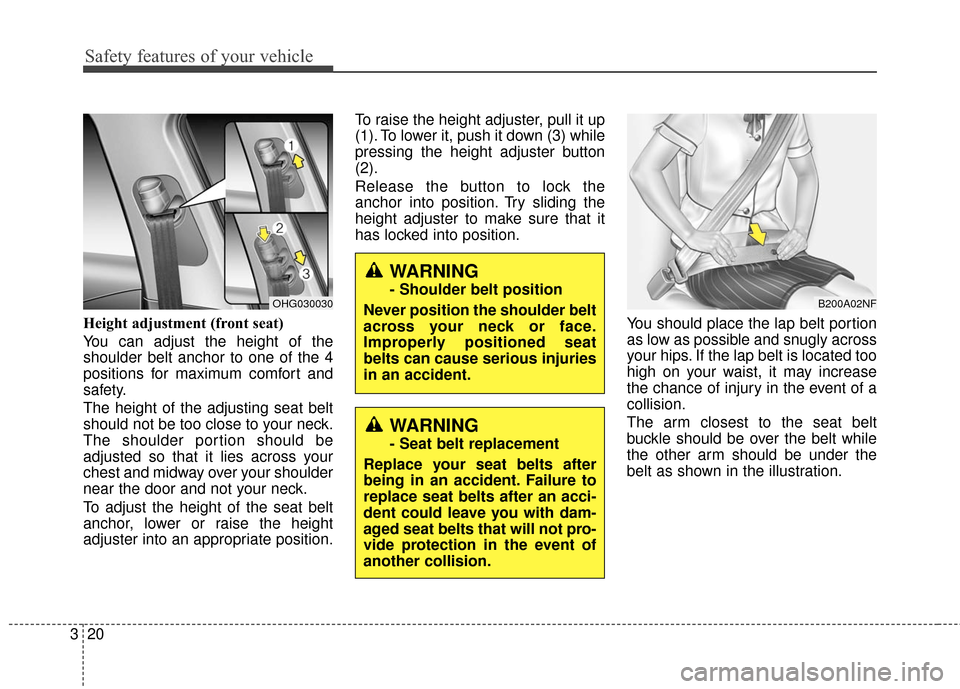
Height adjustment (front seat)
You can adjust the height of the
shoulder belt anchor to one of the 4
positions for maximum comfort and
safety.
The height of the adjusting seat belt
should not be too close to your neck.
The shoulder portion should be
adjusted so that it lies across your
chest and midway over your shoulder
near the door and not your neck.
To adjust the height of the seat belt
anchor, lower or raise the height
adjuster into an appropriate position. To raise the height adjuster, pull it up
(1). To lower it, push it down (3) while
pressing the height adjuster button
(2).
Release the button to lock the
anchor into position. Try sliding the
height adjuster to make sure that it
has locked into position.
You should place the lap belt portion
as low as possible and snugly across
your hips. If the lap belt is located too
high on your waist, it may increase
the chance of injury in the event of a
collision.
The arm closest to the seat belt
buckle should be over the belt while
the other arm should be under the
belt as shown in the illustration.
B200A02NFOHG030030
WARNING
- Shoulder belt position
Never position the shoulder belt
across your neck or face.
Improperly positioned seat
belts can cause serious injuries
in an accident.
WARNING
- Seat belt replacement
Replace your seat belts after
being in an accident. Failure to
replace seat belts after an acci-
dent could leave you with dam-
aged seat belts that will not pro-
vide protection in the event of
another collision.
Page 81 of 521

Features of your vehicle
Keys . . . . . . . . . . . . . . . . . . . . . . . . . . . . . . . . . . . . \
. . 4-3
• Record your key number . . . . . . . . . . . . . . . . . . . . . . . 4-3
. . . . . . . . . . . . . . . . . . . . . . . . . . . . 4-4
Smart key . . . . . . . . . . . . . . . . . . . . . . . . . . . . . . . . . 4-6
. . . . . . . . . . . . . . . . . . . . . . . . . . . 4-6
. . . . . . . . . . . 4-8
. . . . . . . . . . . . . . . . . . . . . . . . . 4-9
. . . . . . . . . . . . . . . . . . . . . . . . . . 4-10
. . . . . . . . . . . . . . . . . . . . . . . . . . . . . . . . . 4-12
Theft-alarm system . . . . . . . . . . . . . . . . . . . . . . . . 4-12
Door locks . . . . . . . . . . . . . . . . . . . . . . . . . . . . . . . 4-15
. . . . 4-15
. . . . . . . . . . . . . . . . . 4-18
Trunk . . . . . . . . . . . . . . . . . . . . . . . . . . . . . . . . . . . . \
4-19
Smart trunk . . . . . . . . . . . . . . . . . . . . . . . . . . . . . . 4-21
Windows . . . . . . . . . . . . . . . . . . . . . . . . . . . . . . . . . 4-25
Hood. . . . . . . . . . . . . . . . . . . . . . . . . . . . . . . . . . . . \
. 4-29
Fuel filler lid . . . . . . . . . . . . . . . . . . . . . . . . . . . . . . 4-31
Panoramic sunroof . . . . . . . . . . . . . . . . . . . . . . . . . 4-35
Driver position memory system . . . . . . . . . . . . . . 4-40Steering wheel . . . . . . . . . . . . . . . . . . . . . . . . . . . . . 4-43
. . . . . . . . . . . . . . . . . . . . 4-44
. . . . . . . . . . . . . . . . . . . . . . . . . . . . . . . . . . . . \
. . . 4-45
Mirrors . . . . . . . . . . . . . . . . . . . . . . . . . . . . . . . . . . 4-46\
. . . . . . . . . . . . . . . . . . . . . . . . 4-46
. . . . . . . . . . . . . . . . . . . . . . . 4-54
. . . . . . . . . . . . . . . . . . . 4-57
Instrument cluster . . . . . . . . . . . . . . . . . . . . . . . . . 4-58
. . . . . . . . . . . . . . . . . . 4-59
. . . . . . . . . . . . . . . . . . . . . . . . . . . . . . . . . . . . \
. 4-59
. . . . . . . . . . . . . . . . . . . . . . . . . . 4-62
LCD display . . . . . . . . . . . . . . . . . . . . . . . . . . . . . . 4-63
. . . . . . . . . . . . . . . . . . . . . . . . . . 4-64
Trip computer . . . . . . . . . . . . . . . . . . . . . . . . . . . . . 4-73
Warnings and indicators (lnstrument cluster) . . 4-77
Rear parking assist system . . . . . . . . . . . . . . . . . . 4-95
Rearview camera . . . . . . . . . . . . . . . . . . . . . . . . . . 4-99
Hazard warning flasher . . . . . . . . . . . . . . . . . . . . 4-100
Lighting . . . . . . . . . . . . . . . . . . . . . . . . . . . . . . . . 4-100
. . . . . . . . . . 4-101
. . . . . . . . 4-101
. . . . . . . . . . . . . . . . . . . . . . . 4-101
. . . . . . . . . . . . . . . . . . . . . . . . . . . . . 4-102
4
Page 83 of 521

43
Features of your vehicle
Record your key number
The key code number
is stamped or printed
on the key code tag
attached to the key
set. Should you lose your keys, con-
tact an authorized HYUNDAI dealer.
Remove the key code tag and store it
in a safe place. Also, record the key
code number and keep it in a safe
and handy place, but not in the vehi-
cle. Key operations
• Used to start the engine.
Used to lock and unlock the doors.
Used to lock and unlock the glove
box.
To remove the mechanical key, press
and hold the release button(1) and
remove the mechanical key(2).
To reinstall the mechanical key, put
the key into the hole and push it until
a click sound is heard.
KEYS
WARNING - Aftermarket
keys
Use only HYUNDAI original
parts for the ignition key in your
vehicle. If an aftermarket key is
used, the ignition switch may
not return to ON after START. If
this happens, the starter will
continue to operate causing
possible fire due to excessive
current in the wiring.
WARNING - Smart key
Leaving children unattended in a
vehicle with the smart key is dan-
gerous even if the ENGINE
START/STOP button is in the
ACC or ON position. Children
copy adults and they could press
the ENGINE START/STOP button.
The smart key would enable chil-
dren to operate power windows
or other controls, or even make
the vehicle move, which could
result in serious bodily injury or
even death. Never leave the keys
in your vehicle with unsuper-
vised children, when the Engine
is running.
OHG045004
Page 84 of 521

Features of your vehicle
44
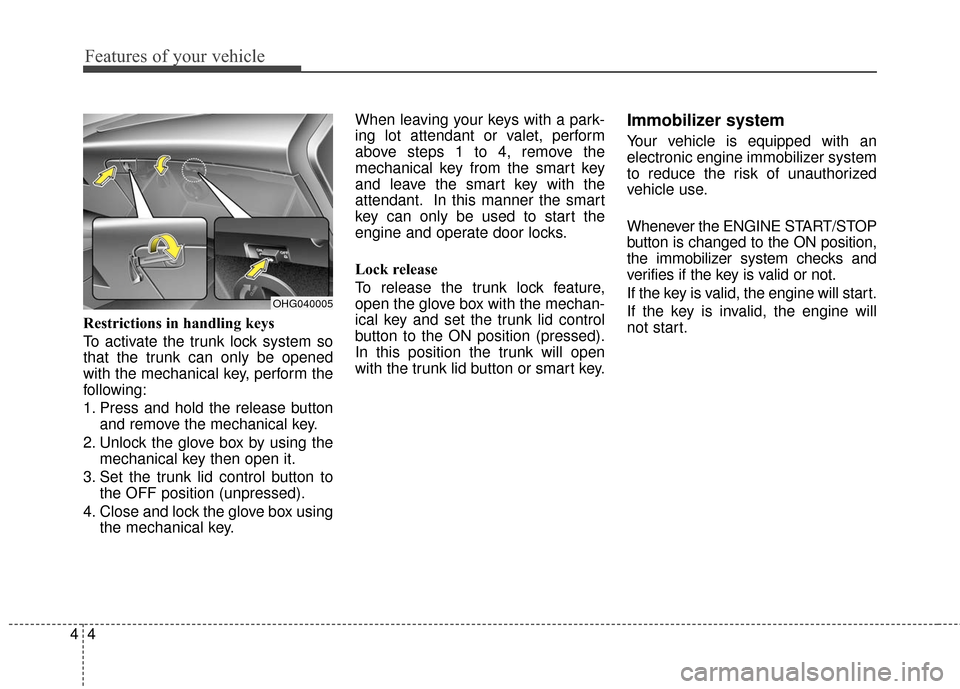
Restrictions in handling keys
To activate the trunk lock system so
that the trunk can only be opened
with the mechanical key, perform the
following:
1.
Press and hold the release button
and remove the mechanical key.
2. Unlock the glove box by using themechanical key then open it.
3. Set the trunk lid control button to the OFF position (unpressed).
4. Close and lock the glove box using the mechanical key. When leaving your keys with a park-
ing lot attendant or valet, perform
above steps 1 to 4, remove the
mechanical key from the smart key
and leave the smart key with the
attendant. In this manner the smart
key can only be used to start the
engine and operate door locks.
Lock release
To release the trunk lock feature,
open the glove box with the mechan-
ical key and set the trunk lid control
button to the ON position (pressed).
In this position the trunk will open
with the trunk lid button or smart key.
Immobilizer system
Your vehicle is equipped with an
electronic engine immobilizer system
to reduce the risk of unauthorized
vehicle use.
Whenever the ENGINE START/STOP
button is changed to the ON position,
the immobilizer system checks and
verifies if the key is valid or not.
If the key is valid, the engine will start.
If the key is invalid, the engine will
not start.
OHG040005
Page 86 of 521

Features of your vehicle
64
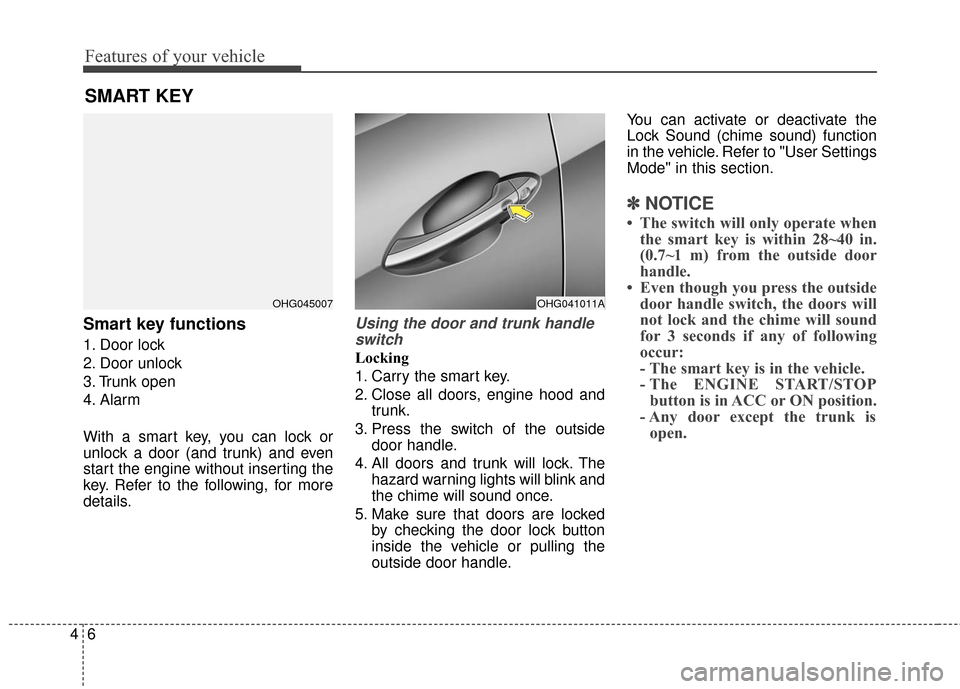
Smart key functions
1. Door lock
2. Door unlock
3. Trunk open
4. Alarm
With a smart key, you can lock or
unlock a door (and trunk) and even
start the engine without inserting the
key. Refer to the following, for more
details.
Using the door and trunk handleswitch
Locking
1. Carry the smart key.
2. Close all doors, engine hood and trunk.
3. Press the switch of the outside door handle.
4. All doors and trunk will lock. The hazard warning lights will blink and
the chime will sound once.
5. Make sure that doors are locked by checking the door lock button
inside the vehicle or pulling the
outside door handle. You can activate or deactivate the
Lock Sound (chime sound) function
in the vehicle. Refer to "User Settings
Mode" in this section.
✽ ✽
NOTICE
• The switch will only operate when
the smart key is within 28~40 in.
(0.7~1 m) from the outside door
handle.
• Even though you press the outside door handle switch, the doors will
not lock and the chime will sound
for 3 seconds if any of following
occur:
- The smart key is in the vehicle.
- The ENGINE START/STOPbutton is in ACC or ON position.
- Any door except the trunk is open.
SMART KEY
OHG045007OHG041011A