2016 Hyundai Azera warning
[x] Cancel search: warningPage 398 of 521

65
What to do in an emergency
EMERGENCY STARTING
Connect cables in numerical order
and disconnect in reverse order.Positive (+) battery terminal on
your vehicle
Positive (+) battery terminal on
the booster battery
Negative (-) battery terminal on
the booster battery
Negative (-) cable to a solid, sta-
tionary metallic point on the
engine (such as the engine lifting
bracket). DO NOT connect it
directly to the negative battery
terminal.
Jump starting
Jump starting can be dangerous if
done incorrectly. Therefore, to avoid
harm to yourself or damage to your
vehicle or battery, follow the jump
starting procedures. If in doubt, we
strongly recommend that you have a
competent technician or towing serv-
ice jump start your vehicle.
1VQA4001
■Engine compartment
CAUTION - 12 volt
battery
Use only a 12-volt jumper sys-tem. You can damage a 12-voltstarting motor, ignition system,and other electrical partsbeyond repair by use of a 24-volt power supply (either two12-volt batteries in series or a24-volt motor generator set).
WARNING - Battery
Never attempt to check the elec-
trolyte level of the battery as this
may cause the battery to rupture
or explode causing serious
injury.
WARNING - Frozen
batteries
Do not attempt to jump start the
vehicle if the discharged battery
is frozen or if the electrolyte level
is low as the battery may rupture
or explode causing serious
injury.
WARNING - Battery
Keep all flames or sparks away
from the battery. The battery
produces hydrogen gas which
will explode if exposed to flame
or sparks causing serious
injury.
WARNING - Sulfuric acid
risk
When jump starting your vehicle
be careful not to get acid on
yourself, your clothing or on the
vehicle. Automobile batteries
contain sulfuric acid. This is poi-
sonous and highly corrosive.
➀
➁
➂
➃
Page 400 of 521

67
What to do in an emergency
IF THE ENGINE OVERHEATS
If your temperature gauge indicates
overheating, you experience a loss
of power, or hear loud pinging or
knocking, the engine is probably too
hot. If this happens, you should:
1. Pull off the road and stop as soonas it is safe to do so.
2. Place the shift lever in P (Park) and set the parking brake. If the air
conditioning is on, turn it off.
3. If engine coolant is running out under the vehicle or steam is com-
ing out from the hood, stop the
engine. Do not open the hood until
the coolant has stopped running
or the steaming has stopped. If
there is no visible loss of engine
coolant and no steam, leave the
engine running and check to be
sure the engine cooling fan is
operating. If the fan is not running,
turn the engine off. 4. Check to see if the water pump
drive belt is missing. If it is not
missing, check to see that it is
tight. If the drive belt seems to be
satisfactory, check for coolant
leaking from the radiator, hoses or
under the vehicle. (If the air condi-
tioning had been in use, it is nor-
mal for clear water to be draining
from it when you stop).
5. If the water pump drive belt is bro- ken or engine coolant is leaking
out, stop the engine immediately
and call the nearest authorized
HYUNDAI dealer for assistance. 6. If you cannot find the cause of the
overheating, wait until the engine
temperature has returned to nor-
mal. Then, if coolant has been lost,
carefully add coolant to the reser-
voir to bring the fluid level in the
reservoir up to the halfway mark.
7. Proceed with caution, keeping alert for further signs of overheat-
ing. If overheating happens again,
call an authorized HYUNDAI deal-
er for assistance.
Serious loss of coolant indicates
there is a leak in the cooling system
and this should be checked as soon
as possible by an authorized
HYUNDAI dealer.
WARNING - Under the
hood
While the engine is running,
keep hair, hands and clothing
away from moving parts such
as the fan and drive belts to pre-
vent injury.
WARNING - Radiator cap
Do not remove the radiator cap
when the engine is hot. This may
result in coolant being blown out
of the opening and cause serious
burns.
Page 402 of 521

69
What to do in an emergency
TPMS malfunctions may occur for a
variety of reasons, including the
installation of replacement or alter-
nate tires or wheels on the vehicle
that prevent the TPMS from function-
ing properly. Always check the TPMS
malfunction telltale after replacing
one or more tires or wheels on your
vehicle to ensure that the replace-
ment or alternate tires and wheels
allow the TPMS to continue to func-
tion properly.
✽ ✽NOTICE
Take your vehicle to the nearest
authorized HYUNDAI dealer and
have the system checked if any of
the below happens:
1.The low tire pressure telltale/
TPMS malfunction indicator do
not illuminate for 3 seconds when
the ignition switch is turned to the
ON position or engine is running.
2. The TPMS malfunction indicator remains illuminated after blinking
for approximately 1 minute.
3. The Low tire pressure position telltale remains illuminated.
Low tire pressure
telltale
Low tire pressure
position telltale
When the tire pressure monitoring
system warning indicators are illumi-
nated, one or more of your tires is
significantly under-inflated. The low
tire pressure position telltale light will
indicate which tire is significantly
under-inflated by illuminating the cor-
responding position light.
If either telltale illuminates, immedi-
ately reduce your speed, avoid hard
cornering and anticipate increased
stopping distances. You should stop
and check your tires as soon as pos-
sible. Inflate the tires to the proper
pressure as indicated on the vehicle’s
placard or tire inflation pressure label
located on the driver’s side center pil-
lar outer panel. If you cannot reach a
service station or if the tire cannot
hold the newly added air, replace the
low pressure tire with a spare tire. After restarting with the spare tire, the
TPMS malfunction indicator and low
tire pressure position telltale light will
remain on about 20 minutes of con-
tinuous driving, then the TPMS mal-
function indicator will blink for approx-
imately 1 minute but the low tire pres-
sure position telltale light will turn off.
✽ ✽
NOTICE
The compact spare tire is not
equipped with a tire pressure sensor.
Page 403 of 521

What to do in an emergency
10
6
TPMS (Tire Pressure
Monitoring System)
malfunction indicator
The TPMS malfunction indicator will
illuminate after it blinks for approxi-
mately one minute when there is a
problem with the Tire Pressure
Monitoring System. If the system is
able to correctly detect an underinfla-
tion warning at the same time as sys-
tem failure then the TPMS malfunction
indicator remains illuminated after
blinking for approximately 1 minute and
the low tire pressure position telltale
will illuminate. For example, if Front Left
sensor fails, the TPMS malfunction
indicator remains illuminated after
blinking for approximately 1 minute, but
if the Front Right, Rear Left, or Rear
Right tire is under-inflated, the low tire
pressure position telltales may illumi-
nate together with the TPMS malfunc-
tion indicator. Have the system
checked by an authorized HYUNDAI
dealer as soon as possible to deter-
mine the cause of the problem.
WARNING - Low pressure
damage
Do not drive on low pressure
tires. Significantly low tire pres-
sure can cause the tires to over-
heat and fail making the vehicle
unstable resulting in increased
braking distances and a loss of
vehicle control.CAUTION
In winter or cold weather, the low tire pressure telltale may beilluminated if the tire pressurewas adjusted to the recom-mended tire inflation pressurein warm weather. It does notmean your TPMS is malfunction-ing because the decreased tem-perature leads to a proportionallowering of tire pressure.
When you drive your vehiclefrom a warm area to a cold areaor from a cold area to a warmarea, or the outside temperatureis greatly higher or lower, youshould check the tire inflationpressure and adjust the tires tothe recommended tire inflationpressure.
Page 406 of 521

613
What to do in an emergency
IF YOU HAVE A FLAT TIRE
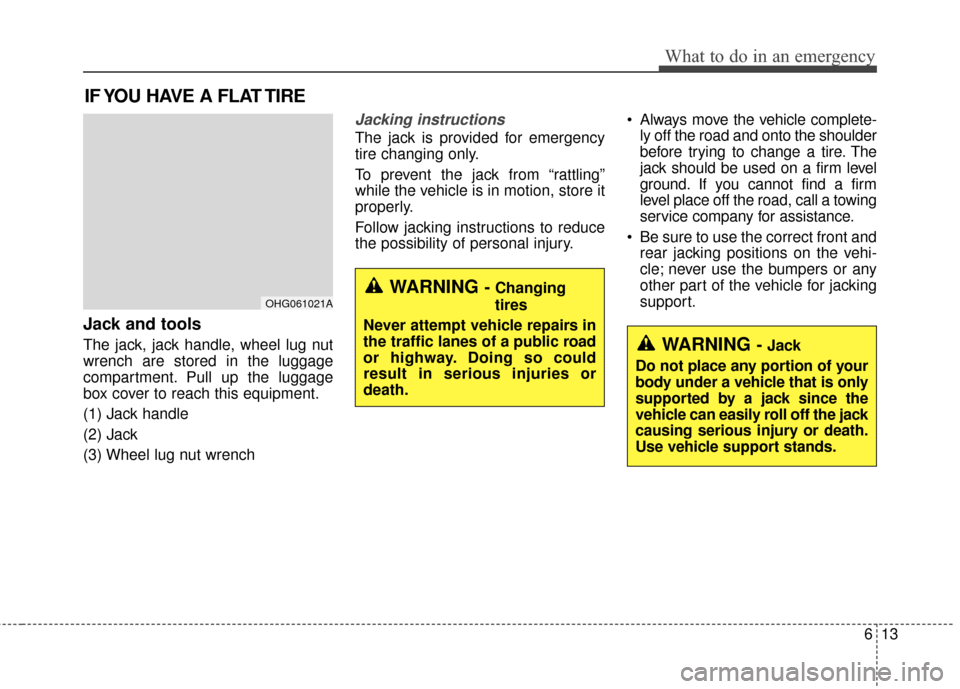
Jack and tools
The jack, jack handle, wheel lug nut
wrench are stored in the luggage
compartment. Pull up the luggage
box cover to reach this equipment.
(1) Jack handle
(2) Jack
(3) Wheel lug nut wrench
Jacking instructions
The jack is provided for emergency
tire changing only.
To prevent the jack from “rattling”
while the vehicle is in motion, store it
properly.
Follow jacking instructions to reduce
the possibility of personal injury. Always move the vehicle complete-
ly off the road and onto the shoulder
before trying to change a tire. The
jack should be used on a firm level
ground. If you cannot find a firm
level place off the road, call a towing
service company for assistance.
Be sure to use the correct front and rear jacking positions on the vehi-
cle; never use the bumpers or any
other part of the vehicle for jacking
support.
WARNING - Changing
tires
Never attempt vehicle repairs in
the traffic lanes of a public road
or highway. Doing so could
result in serious injuries or
death.OHG061021A
WARNING - Jack
Do not place any portion of your
body under a vehicle that is only
supported by a jack since the
vehicle can easily roll off the jack
causing serious injury or death.
Use vehicle support stands.
Page 407 of 521

What to do in an emergency
14
6
Do not allow anyone to remain in
the vehicle while it is on the jack.
Make sure any children present are in a secure place away from
the road and from the vehicle to be
raised with the jack.
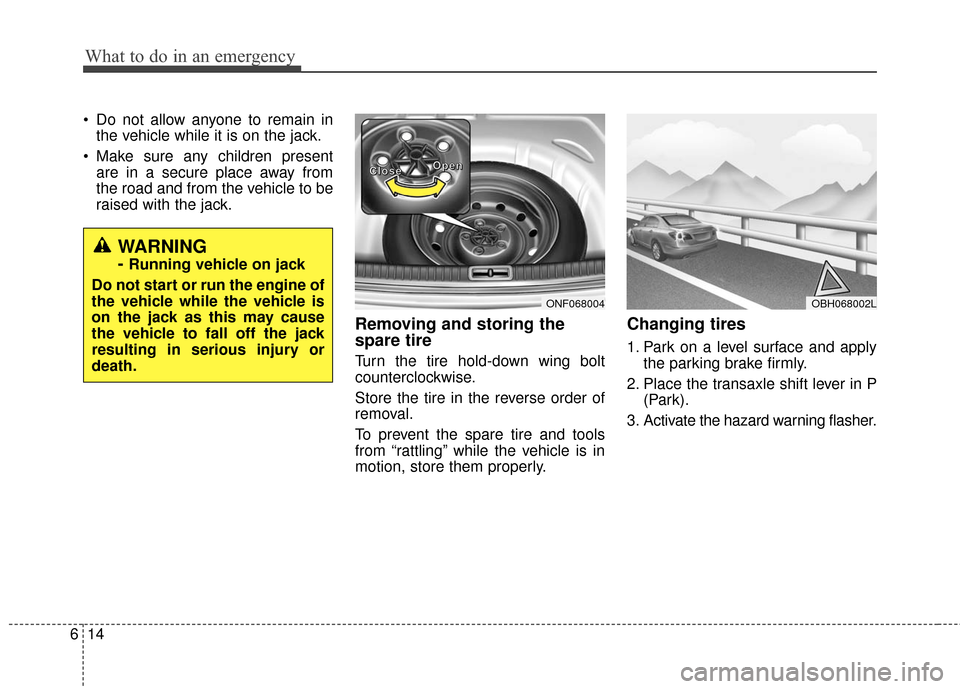
Removing and storing the
spare tire
Turn the tire hold-down wing bolt
counterclockwise.
Store the tire in the reverse order of
removal.
To prevent the spare tire and tools
from “rattling” while the vehicle is in
motion, store them properly.
Changing tires
1. Park on a level surface and apply the parking brake firmly.
2. Place the transaxle shift lever in P (Park).
3. Activate the hazard warning flasher.
WARNING
- Running vehicle on jack
Do not start or run the engine of
the vehicle while the vehicle is
on the jack as this may cause
the vehicle to fall off the jack
resulting in serious injury or
death.
ONF068004
C
C
C
C
l
l
l
l
o
o
o
o
s
s
s
s
e
e
e
e O
O
O
O
p
p
p
p
e
e
e
e
n
n
n
nOBH068002L
Page 409 of 521

What to do in an emergency
16
6
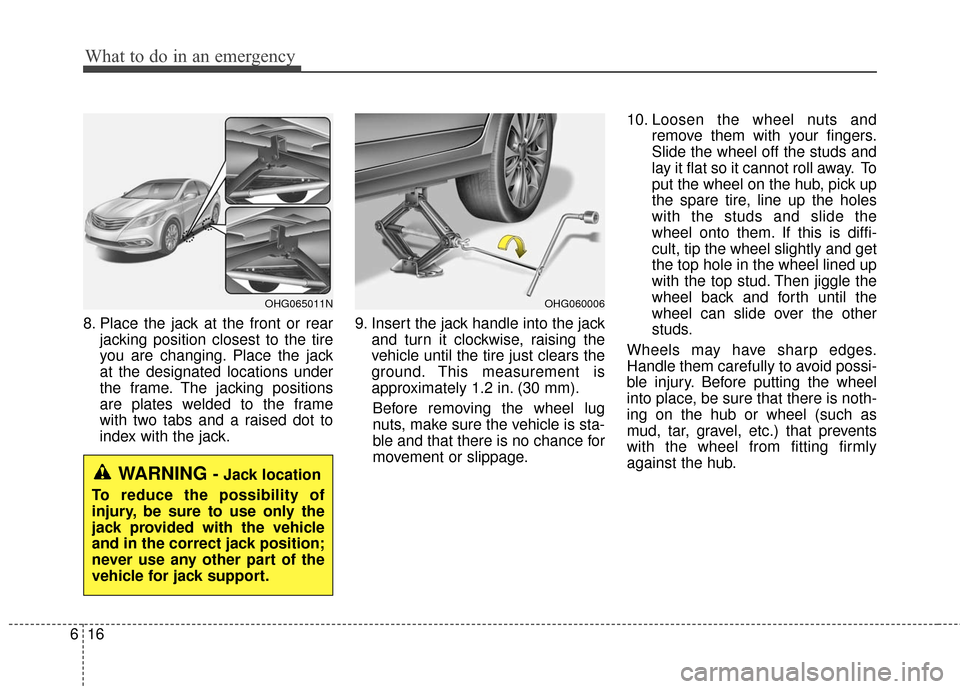
8. Place the jack at the front or rear
jacking position closest to the tire
you are changing. Place the jack
at the designated locations under
the frame. The jacking positions
are plates welded to the frame
with two tabs and a raised dot to
index with the jack. 9. Insert the jack handle into the jack
and turn it clockwise, raising the
vehicle until the tire just clears the
ground. This measurement is
approximately 1.2 in. (30 mm).
Before removing the wheel lug
nuts, make sure the vehicle is sta-
ble and that there is no chance for
movement or slippage. 10. Loosen the wheel nuts and
remove them with your fingers.
Slide the wheel off the studs and
lay it flat so it cannot roll away. To
put the wheel on the hub, pick up
the spare tire, line up the holes
with the studs and slide the
wheel onto them. If this is diffi-
cult, tip the wheel slightly and get
the top hole in the wheel lined up
with the top stud. Then jiggle the
wheel back and forth until the
wheel can slide over the other
studs.
Wheels may have sharp edges.
Handle them carefully to avoid possi-
ble injury. Before putting the wheel
into place, be sure that there is noth-
ing on the hub or wheel (such as
mud, tar, gravel, etc.) that prevents
with the wheel from fitting firmly
against the hub.
OHG060006OHG065011N
WARNING - Jack location
To reduce the possibility of
injury, be sure to use only the
jack provided with the vehicle
and in the correct jack position;
never use any other part of the
vehicle for jack support.
Page 410 of 521

617
What to do in an emergency
11. To install the wheel, hold it on thestuds, put the wheel nuts on the
studs and tighten them finger
tight. The nuts should be installed
with their tappered small diame-
ter ends directed inward. Jiggle
the tire to be sure it is completely
seated, then tighten the nuts as
much as possible with your fin-
gers again.
12. Lower the vehicle to the ground by turning the wheel nut wrench
counterclockwise. Then position the wrench as shown in
the drawing and tighten the wheel
nuts. Be sure the socket is seated
completely over the nut. Do not stand
on the wrench handle or use an exten-
sion pipe over the wrench handle. Go
around the wheel tightening every nut
following the numerical sequence shown in the image until they are all
tight. Then double-check each nut for
tightness. After changing wheels, have
an authorized HYUNDAI dealer tight-
en the wheel nuts to their proper
torque as soon as possible.
Wheel nut tightening torque:
65~79 lb·ft (9~11 kg·m)
If you have a tire gauge, remove the
valve cap and check the air pressure.
If the pressure is lower than recom-
mended, drive slowly to the nearest
service station and inflate to the cor-
rect pressure. If it is too high, adjust
it until it is correct. Always reinstall
the valve cap after checking or
adjusting the tire pressure. If the cap
is not replaced, dust and dirt may get
into the tire valve and air may leak
from the tire. If you lose a valve cap,
buy another and install it as soon as
possible.
After you have changed the wheels,
always secure the flat tire in its place
and return the jack and tools to their
proper storage locations.
WARNING - Installing a
wheel
Make sure the wheel makes
good contact with the hub when
installed. If the contact of the
mounting surface between the
wheel and hub is not good, the
wheel nuts could come loose
and cause the loss of a wheel.
Loss of a wheel may result in
loss of control of the vehicle,
serious injury or death.
OHG060007L■Type B
■Type A
OHG061015A