Page 106 of 521

Features of your vehicle
26
4
Power windows
The ignition switch must be in the ON
position for power windows to operate.
Each door has a power window
switch that controls the door's win-
dow. The driver’s door has a master
power window switch that controls all
the windows in the vehicle. Also, the
driver has a power window lock
switch which can block the operation
of passenger windows.
The power windows can be operated
for approximately 30 seconds after
the ignition key is in the ACC or OFF
position. However, if the front doors
are opened, the power windows can-
not be operated within the 30 second
period.
✽ ✽
NOTICE
While driving with the rear windows
down or with the sunroof (if
equipped) in an open (or partially
open position), your vehicle may
demonstrate a wind buffeting or
pulsation noise. This noise is a nor-
mal occurrence and can be reduced
or eliminated by taking the follow-
ing actions. If the noise occurs with
one or both of the rear windows
down, partially lower both front
windows approximately one inch.
If you experience the noise with the
sunroof open, slightly reduce the
size of the sunroof opening.
Window opening and closing
To open or close a window, press
down or pull up the front portion of
the corresponding switch to the first
detent position(5).
OHG040021
Page 114 of 521
Features of your vehicle
34
4
Make sure to refuel your vehicle
according to the “Fuel requirements”
suggested in section 1.
If the fuel filler cap requires replace-
ment, use only a genuine HYUNDAI
cap or the equivalent specified for
your vehicle. An incorrect fuel filler
cap can result in a serious malfunc-
tion of the fuel system or emission
control system.Emergency fuel filler lid
release
If the fuel filler lid does not open
using the remote fuel filler lid
release, you can open it manually by
pulling the handle outward slightly.
OHG040028
WARNING - Smoking
DO NOT use matches or a
lighter and DO NOT SMOKE or
leave a lit cigarette in your vehi-
cle while at a gas station espe-
cially during refueling.
Automotive fuel is highly flam-
mable and can, when ignited,
result in fire.
CAUTION
Do not pull the handle exces- sively, otherwise the luggagearea trim or release handle maybe damaged.
Page 133 of 521

453
Features of your vehicle
Reprogramming a single
HomeLink®button
To program a device to HomeLink®
using a HomeLink®button previously
trained, follow these steps:
1. Press and hold the desired HomeLink
®button. DO NOT
release the button.
2. The indicator light will begin to flash after 20 seconds. Without
releasing the HomeLink
®button,
proceed with "Programming" step
2.
For questions or comments, contact
HomeLink
®at www.homelink.comor
1-800-355-3515. Erasing HomeLink
®buttons
Individual buttons cannot be erased.
However, to erase all three pro-
grammed buttons:
1. Press and hold the two outer HomeLink
®buttons until the indi-
cator light begins to flash after 10
seconds.
2. Release both buttons. Do not hold for longer than 20 seconds.
The Integrated HomeLink
®Wireless
Control System is now in the training
(learn) mode and can be pro-
grammed at any time following the
appropriate steps in the Programming
sections above. FCC ID: NZLTLMHL4
IC: 4112A-TLMHL4
This device complies with Part 15
of the FCC Rules.
Operation is subject to the following
two conditions:
1. This device may not cause harm-
ful interference, and
2. This device must accept any inter- ference received, including inter-
ference that may cause undesired
operation.
WARNING
The transceiver has been tested
and complies with FCC and
Industry Canada rules. Changes
or modifications not expressly
approved by the party responsi-
ble for compliance could void
the user's authority to operate
the device.
Page 135 of 521

455
Features of your vehicle
Blind zone mirror (if equipped)
The blind zone mirror (BZM) is sup-
plemental mirror to help reduce a dri-
ver's blind zone that will show the
rear side territory of your vehicle. The
blind zone mirror is equipped with
the left-hand outside rearview mirror.
Adjusting the outside rearviewmirror
The electric remote control mirror
switch allows you to adjust the posi-
tion of the left and right outside
rearview mirrors.
To adjust the position of the mirrors:
1. Place the ignition switch in the ACC position.
2. Move the lever(1) to R (right) or L (left) to select the right side mirror
or the left side mirror.
3. Press a corresponding point on the mirror adjustment control to
position the selected mirror up,
down, left or right.
WARNING
Always check the road condi-tion while driving for unex-
pected situations even
though the vehicle is
equipped with a blind zone
mirror.
The blind zone mirror is a device made for convenience.
Do not solely rely on the mir-
ror but always pay attention to
drive safely.
OHG044300A
OFS053068
OHG040044
Page 178 of 521

Features of your vehicle
98
4
This system can only sense objects
within the range and location of the
sensors; it can not detect objects in
other areas where sensors are not
installed. Also, small or slim objects,
such as poles or objects located
between sensors may not be detect-
ed by the sensors.
Always visually check behind the
vehicle when backing up.
Be sure to inform any drivers of the
vehicle that may be unfamiliar with
the system regarding the systems
capabilities and limitations.Self-diagnosis
When you shift the gear to the R
(Reverse) position and if one or more
of the below occurs you may have a
malfunction in the rear parking assist
system.
You do not hear an audible warning
sound or if the buzzer sounds inter-
mittently.
If this occurs, have your vehicle
checked by an authorized HYUNDAI
dealer as soon as possible.
✽ ✽ NOTICE
Your new vehicle warranty does not
cover any accidents or damage to
the vehicle or injuries to its occu-
pants due to a rear parking assist
system malfunction. Always drive
safely and cautiously.
WARNING - Objects
Pay close attention when the
vehicle is driven close to
objects on the road, particularly
pedestrians, and especially
children. Be aware that some
objects may not be detected by
the sensors, due to the object’s
distance, size or material, all of
which can limit the effective-
ness of the sensor. To avoid col-
lisions with children, pedistri-
ans, objects, and vehicles,
always perform a visual inspec-
tion to make sure the vehicle is
clear of all obstructions before
moving the vehicle in any direc-
tion. Otherwise serious injuries
could occur.
(blinks)
is displayed.
Page 179 of 521

499
Features of your vehicle
The rearview camera will activate
when the back-up light is ON with the
ignition switch ON and the shift lever
in the R (Reverse) position.
This system is a supplemental sys-
tem that shows behind the vehicle
through the display monitor while
backing-up.
Always keep the camera lens clean.
If the lens is covered with foreign
matter, the camera may not operate
normally.
REARVIEW CAMERA (IF EQUIPPED)
OHG043095A
WARNING - Rearview
camera
The rear view camera is not a
safety device. It only serves to
assist the driver in identifying
objects directly behind the mid-
dle of the vehicle. The camera
does NOT cover the complete
area behind the vehicle. While
the camera's display is general-
ly accurate, objects can be
much closer than they appear in
the display screen and can be
distorted in both size and pro-
portion.WARNING - Backing &
using camera
Never rely solely on the rear
view camera when reversing.
You must always view the area
behind you including looking
over both shoulders as well as
continuously checking all three
rear view mirrors. Due to the dif-
ficulty of ensuring that the area
behind you remains clear,
always back slowly and stop
immediately if you even suspect
that a person, and especially a
child, might be behind you.
Otherwise serious injury or
death could occur.
Page 181 of 521

4101
Features of your vehicle
Headlight (Headlamp) escort
function
If you turn the ignition switch to the
ACC or OFF position with the head-
lights ON, the headlights (and/or
parking light) remain on for about 5
minutes. However, if the driver’s door
is opened and closed, the headlights
(and/or parking light) turn off after 15
seconds.
The headlights (and/or parking light)
can be turned off by pressing the
lock button on the smart key twice or
turning the light switch to the OFF or
Parking light position.
You can activate or deactivate this
feature. Refer to “User Settings
Mode” in this section.
Headlight (Headlamp) welcome
function
When the headlight is in the ON or
AUTO position and all doors (and
trunk) are closed and locked, if you
press the door unlock button on the
smart key, the headlights (and/or
parking light) will come on for about
15 seconds. At this time, if you press
the door lock or unlock button, the
headlights (and/or parking light) will
turn off immediately.
You can activate or deactivate this
feature. Refer to “User Settings
Mode” in this section.
Daytime running light
Daytime Running Lights (DRL) can
make it easier for others to see the
front of your vehicle during the day.
DRL can be helpful in many different
driving conditions, and it is especially
helpful after dawn and before sunset.
The DRL system turns ON when:1. The light switch is in the AUTO light position.
2. The light switch is in the Parking light position.
The DRL system turns OFF when: 1. The multifunction switch is in the DRL OFF position.
2. The headlights are ON.
3. The turn signal is ON. (the blink- ing side of the DRL will turn off)
4. The hazard warning light is ON.
5. The parking brake is applied.
6. Engine stops.
Page 217 of 521

4137
Features of your vehicle
4. The air conditioning will be turnedon according to the detected
ambient temperature and outside
(fresh) air position will be selected
automatically.
If the air conditioning and outside
(fresh) air position are not selected
automatically, adjust the correspon-
ding button manually. If the posi-
tion is selected, lower fan speed is
adjusted to a higher fan speed.
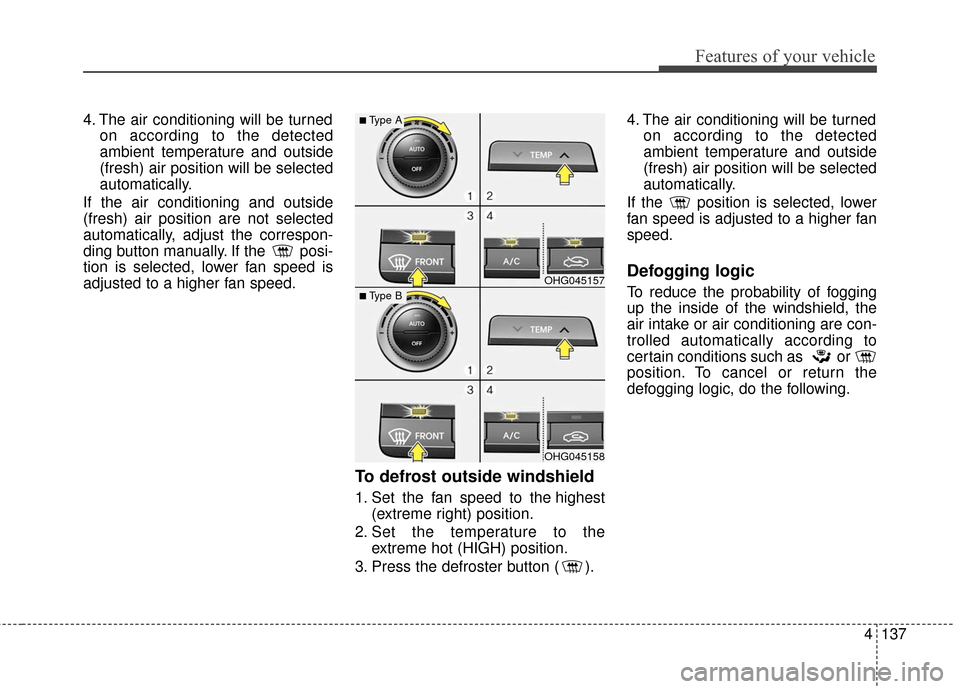
To defrost outside windshield
1. Set the fan speed to the highest (extreme right) position.
2. Set the temperature to the extreme hot (HIGH) position.
3. Press the defroster button ( ). 4. The air conditioning will be turned
on according to the detected
ambient temperature and outside
(fresh) air position will be selected
automatically.
If the position is selected, lower
fan speed is adjusted to a higher fan
speed.
Defogging logic
To reduce the probability of fogging
up the inside of the windshield, the
air intake or air conditioning are con-
trolled automatically according to
certain conditions such as or
position. To cancel or return the
defogging logic, do the following.OHG045157
OHG045158
■Type A
■Type B