Page 160 of 250
159
uu Playing a USB Flash Drive u Audio Screen Control
Audio
Audio Screen Control
H HOME u Audio u SOURCE u USB icon
Control the audio system through the navigation screen. 1.Select the open/close tab on the
operatio
n panel to display the
track list.
u You can also display the list by
selecting the tra
ck name.
2. Select a track.
u Select the t ab
to change songs
in the track list.
The following items are available:
• Folder : Select the previous or next folder.
• Track : Select the previous or next track. Sel
ec
t and hold to move rapidly
within a track.
USB mode
Operation panelOpen/Close tab
Track list
Page 164 of 250
163
uu Playing Bluetooth ® Audio u Audio Screen Control
Audio
Audio Screen Control
H HOME u Audio u SOURCE u Bluetooth icon
Control the audio system through the navigation screen. Select a track.
The following items are available:
• (Play): Plays a song.
• (Pause): Pauses a song.
• Group : Select the previous or next group.
• Track : Select the previous or next track. Sel
ec
t and hold to move rapidly
within a track.
1 Audio Screen Control
The display items may vary depending on the
connected device.
Some devices select a trac k from the list displayed on
the screen.
The following functions may not be available on
some devices:
•Pause function
•Group selection
Bluetooth ® Audio mode
Operation panel
Page 169 of 250

168
Bluetooth® HandsFreeLink ®
Bluetooth® HandsFreeLink ®
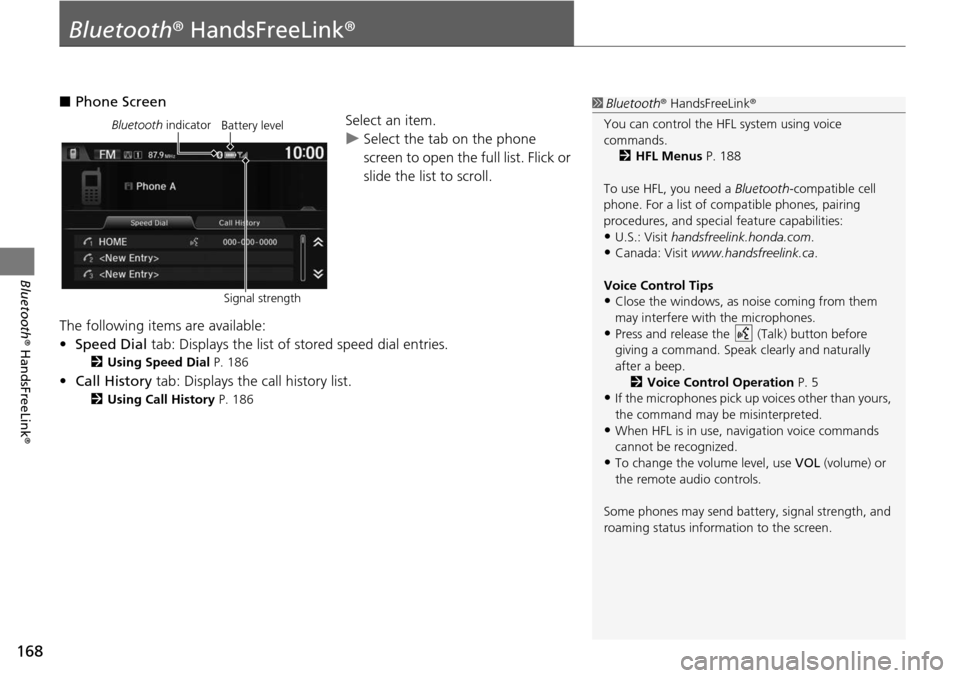
■Phone Screen
Select an item.
uSelect the tab on the phone
scr
een to open the full list. Flick or
slide the list to scroll.
The following items are available:
• Speed Dial tab:
Displays the list of stored speed dial entries.
2Using Speed Dial P. 186
• Call History tab: Displays the call history list.
2 Using Call History P. 186
1 Bluetooth ® HandsFreeLink ®
You can control the HFL system using voice
commands. 2 HFL Menus P. 188
To use HFL, you need a Bluetooth-compatible cell
phone. For a list of compatible phones, pairing
procedures, and special feature capabilities:
•U.S.: Visit handsfreelink.honda.com.
•Canada: Visit www.handsfreelink.ca .
Voice Control Tips
•Close the windows, as noise coming from them
may interfere with the microphones.
•Press and release the (Talk) button before
giving a command. Speak clearly and naturally
after a beep. 2 Voice Control Operation P. 5
•If the microphones pick up vo ices other than yours,
the command may be misinterpreted.
•When HFL is in use, navigation voice commands
cannot be recognized.
•To change the volume level, use VOL (volume) or
the remote audio controls.
Some phones may send batter y, signal strength, and
roaming status information to the screen.
Bluetooth indicator
Signal strengthBattery level
Page 188 of 250

187
uu Bluetooth ® HandsFreeLink ® u Receiving a Call
Bluetooth ® HandsFreeLink ®
Receiving a Call
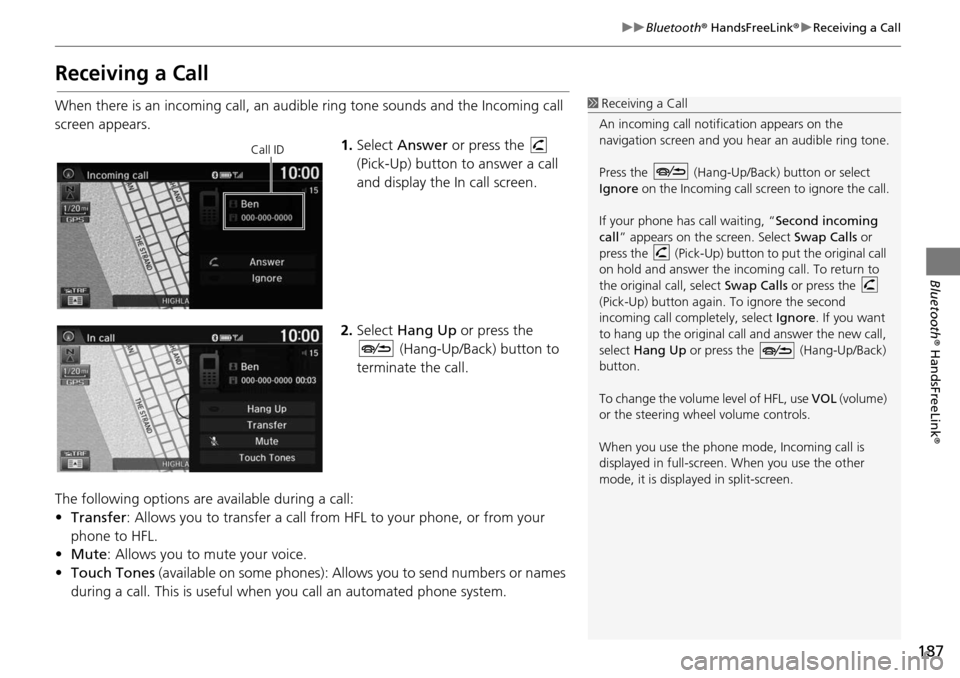
When there is an incoming call, an audible ring tone sounds and the Incoming call
screen appears.
1.Select Answer or press the
(Pick-Up) button to answer a call
and di
splay the In call screen.
2. Select Hang Up or press the
(Hang-Up/Back) button to
terminate the call.
The following options are available during a call:
• Transfer: Allows you to transfer a call from HFL to your phone, or from your
ph
one to HFL.
• Mu te: Allo
ws you to mute your voice.
• Touch Tones (av
ailable on some phones): Allows you to send numbers or names
during a call. This is useful when you call an automated phone system.
1Receiving a Call
An incoming call notif ication appears on the
navigation screen and you h ear an audible ring tone.
Press the (Hang-Up/Back) button or select
Ignore on the Incoming call screen to ignore the call.
If your phone has call waiting, “Second incoming
call” appears on the screen. Select Swap Calls or
press the (Pick-Up) button to put the original call
on hold and answer the incoming call. To return to
the original call, select Swap Calls or press the
(Pick-Up) button again. To ignore the second
incoming call completely, select Ignore. If you want
to hang up the original call and answer the new call,
select Hang Up or press the (Hang-Up/Back)
button.
To change the volume level of HFL, use VOL (volume)
or the steering wheel volume controls.
When you use the phone mode, Incoming call is
displayed in full-screen. When you use the other
mode, it is displaye d in split-screen.
Call ID
Page 198 of 250
197
Other Features
This section describes the useful functions incorporated into the navigation system.
Trip Computer....................................... 198
Information Functions ..........................
199
System/Device Information ................... 200
Multi-View Rear Camera ......................
202
Page 202 of 250
201
uu Information Functions u System/Device Information
Other Features
H HOME u Info u MENU u System/Device Information u System Info
View database, software version, devi ce numb
er, and vehicle identification
information.
H HOME u Info u MENU u System/Device Information u Map Update
Update the map database.
■ System Information1
System Information
You will need this informat ion when ordering a map
update.
2 Obtaining a Navigation Update P. 228
■Map Update1
Map Update
When you order a map update, it is mailed to you on
a USB flash drive. 2 Obtaining a Navigation Update P. 228
Page 203 of 250

202
Other Features
Multi-View Rear Camera
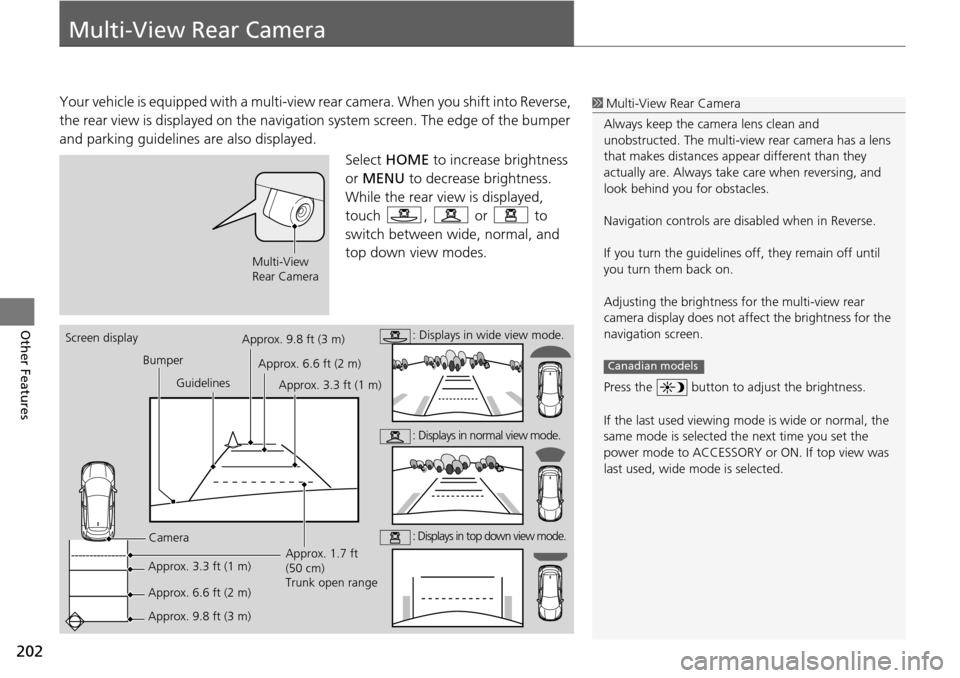
Your vehicle is equipped with a multi-view rear camera. When you shift into Reverse,
the rear view is displayed on the navigati on system screen. The edge of the bumper
and parking guidelines are also displayed.
Select HOME to incr
ease brightness
or MENU to decrease brightness.
While the rear view is displayed,
touc h , or to
switch
between wide, normal, and
top down view modes.
1 Multi-View Rear Camera
Always keep the camera lens clean and
unobstructed. The multi-view rear camera has a lens
that makes distances appear different than they
actually are. Always take care when reversing, and
look behind you for obstacles.
Navigation controls are disabled when in Reverse.
If you turn the guidelines off, they remain off until
you turn them back on.
Adjusting the brightness fo r the multi-view rear
camera display does not a ffect the brightness for the
navigation screen.
Press the button to adjust the brightness.
If the last used viewing m ode is wide or normal, the
same mode is selected th e next time you set the
power mode to ACCESSORY or ON. If top view was
last used, wide mode is selected.
Canadian models
Multi-View
Rear Camera
Screen display
Bumper
Guidelines
Camera
Approx. 3.3 ft (1 m)
Approx. 6.6 ft (2 m)
Approx. 9.8 ft (3 m) Approx. 1.7 ft
(50 cm)
Trunk open range
Approx. 9.8 ft (3 m)
Approx. 6.6 ft (2 m) Approx. 3.3 ft (1 m): Displays in wide view mode.
: Displays in normal view mode.
: Displays in top down view mode.
Page 206 of 250
205
Troubleshooting
Troubleshooting....................................206
Map, Voice, Entering Destinations .........206
Traffic ...................................................208
Guidance, Routing ................................209
Update, Coverage, Map Errors ..............210
Smartphone Connection .......................211
Display, Accessories ..............................212
Multi-View Rear Camera .......................212
Miscellaneous Questions .......................213 Error Messages
......................................
214
Navigation System ................................ 214
Disc Player............................................ 215
Pandora ®...... .....................
.................. 216
iPod/USB Flash Drive............................. 218
Bluetooth ® HandsFreeL i
nk®.................. 219
Smartphone Connection ...................... 220