Page 25 of 75

42 || 43
V
EHICLE CONTROLS
VEHICLE CONTROLS
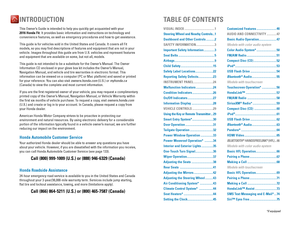
Adjusting the Mirrors
Adjust‚ÄÇthe‚ÄÇangle‚ÄÇof‚ÄÇthe‚ÄÇmirrors‚ÄÇfor‚ÄÇthe‚ÄÇbest‚ÄÇvisibility‚ÄÇwhen‚ÄÇyou‚ÄÇare‚ÄÇsitting‚ÄÇin‚ÄÇthe‚ÄÇ correct driving position.
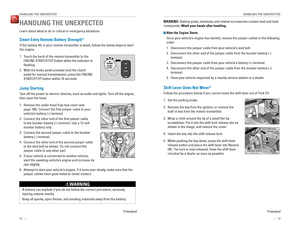
Rearview Mirror with Day/Night Positions
Manually adjust the position to reduce headlight
glare‚ÄÇfrom‚ÄÇvehicles‚ÄÇbehind‚ÄÇyou.‚ÄÇFlip‚ÄÇthe‚ÄÇtab‚ÄÇto‚ÄÇswitch‚ÄÇ between‚ÄÇday‚ÄÇand‚ÄÇnight‚ÄÇpositions.
Power Door Mirrors
Adjust the power door mirrors when the vehicle is on. L/R selector switch: Select the left or right mirror.
After adjusting the mirror, return the switch to the center position. Mirror position adjustment switch: Press the switch
left, right, up, or down to move the mirror.
Adjustment switch Selector switch
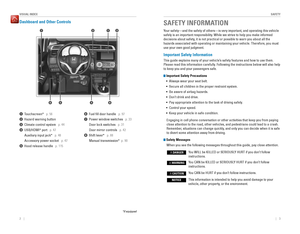
Adjusting the Rear Seats
Pull the release lever on the left or right side to
change‚ÄÇthe‚ÄÇangle‚ÄÇof‚ÄÇthe‚ÄÇseat-back.
Release lever
Adjusting the Steering Wheel
The‚ÄÇsteering‚ÄÇwheel‚ÄÇheight‚ÄÇand‚ÄÇdistance‚ÄÇfrom‚ÄÇyour‚ÄÇbody‚ÄÇcan‚ÄÇbe‚ÄÇadjusted‚ÄÇso‚ÄÇthat‚ÄÇyou‚ÄÇ can‚ÄÇcomfortably‚ÄÇgrip‚ÄÇthe‚ÄÇsteering‚ÄÇwheel‚ÄÇin‚ÄÇan‚ÄÇappropriate‚ÄÇdriving‚ÄÇposture.
1. Pull up the steering wheel adjustment lever.
2. Move the steering wheel up or down, and in or out.
3. Push down the steering wheel adjustment lever to lock the steering wheel in position.
Adjusting the steering wheel position while driving may cause you to lose control‚ÄÇof‚ÄÇthe‚ÄÇvehicle‚ÄÇand‚ÄÇbe‚ÄÇseriously‚ÄÇinjured‚ÄÇin‚ÄÇa‚ÄÇcrash. Adjust the steering wheel only when the vehicle is stopped.
WARNING
To adjust To lock
Night position Ta b
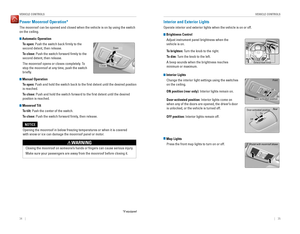
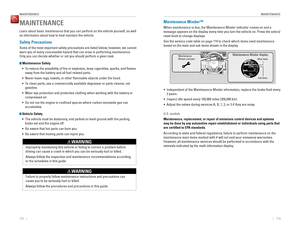
DaypositionAir Conditioning System*
Manually control the front heating and cooling in your vehicle’s interior using the buttons and dials on the dashboard.
Fan control/ OFF dial
A/C button Temperature control dial
Fresh air/recirculation lever:
Recirculation‚ÄÇmode‚ÄÇ(left‚ÄÇside):
Recirculates air from the vehicle’s interior.
Fresh‚ÄÇair‚ÄÇmode‚ÄÇ(right‚ÄÇside): Maintains
outside ventilation. Rear defogger/heated door mirror button*Mode control dial
*if‚ÄÇequipped
Page 26 of 75

44 || 45
V
EHICLE CONTROLS
VEHICLE CONTROLS
Climate Control System*
The automatic climate control system can maintain your preferred interior temperature‚ÄÇby‚ÄÇselecting‚ÄÇthe‚ÄÇproper‚ÄÇmix‚ÄÇof‚ÄÇheated‚ÄÇor‚ÄÇcooled‚ÄÇair‚ÄÇand‚ÄÇfan‚ÄÇspeed.‚ÄÇ
Touch‚ÄÇthe‚ÄÇicons‚ÄÇon‚ÄÇthe‚ÄÇdashboard‚ÄÇto‚ÄÇcontrol‚ÄÇthe‚ÄÇsystem.
*if‚ÄÇequipped
AUTO: Select to
maintain a set temperature. Use the temperature control to set the preferred temperature. ON/OFFA/C
Recirculation mode Rear defogger/heated door mirrors
Windshield defroster
Fan control
Mode control: Change air�ow location.Temperature control
Fresh air mode
Seat Heaters*
Quickly warm the front seats when the vehicle is on. Press‚ÄÇthe‚ÄÇswitch‚ÄÇnext‚ÄÇto‚ÄÇthe‚ÄÇparking‚ÄÇbrake‚ÄÇto‚ÄÇselect‚ÄÇ the‚ÄÇHI‚ÄÇor‚ÄÇLO‚ÄÇsetting.‚ÄÇThe‚ÄÇ‚ÄÇindicator‚ÄÇfor‚ÄÇthe‚ÄÇselected‚ÄÇsetting appears on the switch. In‚ÄÇthe‚ÄÇHI‚ÄÇsetting,‚ÄÇthe‚ÄÇseat‚ÄÇheater‚ÄÇcycles‚ÄÇon‚ÄÇand‚ÄÇoff.In‚ÄÇthe‚ÄÇLO‚ÄÇsetting,‚ÄÇthe‚ÄÇseat‚ÄÇheater‚ÄÇruns‚ÄÇcontinuously‚ÄÇ and does not automatically turn off.
Heat-induced‚ÄÇburns‚ÄÇare‚ÄÇpossible‚ÄÇwhen‚ÄÇusing‚ÄÇseat‚ÄÇheaters.
Persons‚ÄÇwith‚ÄÇa‚ÄÇdiminished‚ÄÇability‚ÄÇto‚ÄÇsense‚ÄÇtemperature‚ÄÇ(e.g.,‚ÄÇpersons‚ÄÇwith‚ÄÇ
diabetes,‚ÄÇlower-limb‚ÄÇnerve‚ÄÇdamage,‚ÄÇor‚ÄÇparalysis)‚ÄÇor‚ÄÇwith‚ÄÇsensitive‚ÄÇskin‚ÄÇshould‚ÄÇnot use the seat heaters.
WARNING
Setting the Clock
Adjust‚ÄÇthe‚ÄÇtime‚ÄÇusing‚ÄÇthe‚ÄÇsteps‚ÄÇdescribed‚ÄÇfor‚ÄÇyour‚ÄÇsystem‚ÄÇtype.
Using the Color Audio System*
Use‚ÄÇthis‚ÄÇmethod‚ÄÇfor‚ÄÇvehicles‚ÄÇwith‚ÄÇcolor‚ÄÇaudio‚ÄÇsystem.‚ÄÇUse‚ÄÇthe‚ÄÇselector‚ÄÇknob‚ÄÇto‚ÄÇ make and enter selections. 1.
Press‚ÄÇand‚ÄÇhold‚ÄÇthe‚ÄÇMENU/CLOCK‚ÄÇbutton.
2. Select the hour and adjust as necessary.
3. Select the minutes and adjust as necessary.
4. Select Set when complete.5. Press‚ÄÇthe‚ÄÇBack‚ÄÇbutton‚ÄÇto‚ÄÇexit‚ÄÇthe‚ÄÇmenu.
Using the Settings Menu*
Use this method for vehicles with touchscreen. Touch items to make selections.
1. From‚ÄÇthe‚ÄÇHOME‚ÄÇscreen,‚ÄÇselect‚ÄÇSettings.
2. Select System. 3. Select‚ÄÇClock/Info.
4. Select Clock Adjustment.
5. Adjust the hour and minute values.
6. Select OK when complete.
On vehicles with navigation, the time is automatically set using GPS signals.
*if‚ÄÇequipped
VO L
HOME
MENU BA CK
Page 27 of 75

46 || 47
AUDIO AND CONNECTIVITY
V EHICLE CONTROLS
Models with touchscreen
Select items on the touchscreen to make selections.
1. From‚ÄÇthe‚ÄÇHOME‚ÄÇscreen,‚ÄÇselect‚ÄÇSETTINGS.
2. Select‚ÄÇan‚ÄÇoption‚ÄÇ(Phone,‚ÄÇAudio,‚ÄÇBluetooth,‚ÄÇInfo,‚ÄÇ Camera,‚ÄÇSystem,‚ÄÇor‚ÄÇNavi*).
3. Select a setting option, and make your preferred changes.
4. Press BACK to exit the menus.
Customized Features
Use‚ÄÇthe‚ÄÇSettings‚ÄÇmenu‚ÄÇto‚ÄÇcustomize‚ÄÇcertain‚ÄÇfeatures‚ÄÇwhen‚ÄÇthe‚ÄÇvehicle‚ÄÇis‚ÄÇstopped.
How to Change Settings
Models with color audio system
Use‚ÄÇthe‚ÄÇselector‚ÄÇknob‚ÄÇto‚ÄÇmake‚ÄÇand‚ÄÇenter‚ÄÇselections.
1. Press‚ÄÇthe‚ÄÇMENU/CLOCK‚ÄÇbutton.
2. Select Settings.
3. Select a setting option, and make your preferred changes.
4. Press‚ÄÇthe‚ÄÇBack‚ÄÇbutton‚ÄÇto‚ÄÇexit‚ÄÇthe‚ÄÇmenus.
VOL
HOME
MENU BA CKClock/Info Phone
Learn how to operate the vehicle’s audio system.
Basic Audio Operation
Connect‚ÄÇaudio‚ÄÇdevices‚ÄÇand‚ÄÇoperate‚ÄÇbuttons‚ÄÇand‚ÄÇdisplays‚ÄÇfor‚ÄÇthe‚ÄÇaudio‚ÄÇsystem.
USB Port
1. Open one of the USB covers in the front console. 2. Insert a USB lash drive or other audio device,  such as an iPod ®
or iPhone ®
, into the USB port.
An additional USB port is located inside the center console.* iPod‚ÄÇand‚ÄÇiPhone‚ÄÇare‚ÄÇtrademarks‚ÄÇof‚ÄÇApple,‚ÄÇInc.
State,‚ÄÇprovincial,‚ÄÇor‚ÄÇlocal‚ÄÇlaws‚ÄÇmay‚ÄÇprohibit‚ÄÇthe‚ÄÇoperation‚ÄÇ‚ÄÇ
of‚ÄÇhandheld‚ÄÇelectronic‚ÄÇdevices‚ÄÇwhile‚ÄÇoperating‚ÄÇa‚ÄÇvehicle.
Accessory Power Socket
Open the socket cover in the front console to use power when the vehicle is on. An additional power socket is located inside the
center‚ÄÇconsole.*
AUDIO AND CONNECTIVITY
*if‚ÄÇequipped
Do‚ÄÇnot‚ÄÇinsert‚ÄÇan‚ÄÇautomotive‚ÄÇtype‚ÄÇcigarette‚ÄÇlighter‚ÄÇelement.‚ÄÇThis‚ÄÇcan‚ÄÇoverheat‚ÄÇ the power socket.
NOTICE
HDMI Port*
1. Open‚ÄÇthe‚ÄÇHDMI‚ÄÇcover‚ÄÇin‚ÄÇthe‚ÄÇfront‚ÄÇconsole.
2. Insert‚ÄÇan‚ÄÇHDMI‚ÄÇcable‚ÄÇinto‚ÄÇthe‚ÄÇHDMI‚ÄÇport.
Additional‚ÄÇcables‚ÄÇand‚ÄÇconnectors‚ÄÇsold‚ÄÇseparately.
*if‚ÄÇequipped
Page 28 of 75
 stereo miniplug.
1.")
48 || 49
AUDIO AND CONNECTIVITY
AUDIO AND CONNECTIVITY
*if‚ÄÇequipped
Auxiliary Input Jack*
Connect‚ÄÇstandard‚ÄÇaudio‚ÄÇdevices‚ÄÇwith‚ÄÇa‚ÄÇ1/8-inch‚ÄÇ
(3.5 mm) stereo miniplug.
1. Open the AUX cover in the front console. 2. Insert‚ÄÇthe‚ÄÇminiplug‚ÄÇattached‚ÄÇto‚ÄÇthe‚ÄÇaudio‚ÄÇdevice‚ÄÇ into the jack. The audio system switches to AUX mode. Use the device to control the audio.
Steering Wheel Controls
You can operate certain functions of the audio system using the steering wheel controls. SOURCE button:
‚ÄÇCycle‚ÄÇthrough‚ÄÇavailable‚ÄÇaudio‚ÄÇ
modes. t /u buttons:
‚ÄÇChange‚ÄÇpresets,‚ÄÇtracks,‚ÄÇalbums,‚ÄÇor‚ÄÇ
folders.+/- buttons: Adjust audio volume.
Menu button*: From the audio screen, press and
hold to choose options for the current audio mode (models‚ÄÇwith‚ÄÇtouchscreen).‚ÄÇUse‚ÄÇthe‚ÄÇ+/-‚ÄÇbuttons‚ÄÇand‚ÄÇ
the‚ÄÇSOURCE‚ÄÇbutton‚ÄÇto‚ÄÇscroll‚ÄÇand‚ÄÇenter‚ÄÇselections.
FM/AM/XM ®
Radio
Press t or u for the next or previous station.
Press and hold t or u for the next or previous strong station.
CD/iPod ®
/USB/ Bluetooth ®
Audio
Press t or u for the next or previous track.
Press and hold t or u
‚ÄÇfor‚ÄÇthe‚ÄÇnext‚ÄÇor‚ÄÇprevious‚ÄÇfolder‚ÄÇ(CD/USB).
Pandora ®
(U.S.‚ÄÇonly)
Press u for the next song.
Press and hold t or u for the next or previous station.
Adjusting the Sound
Adjust various sound settings.
Models with color audio system
Use‚ÄÇthe‚ÄÇselector‚ÄÇknob‚ÄÇto‚ÄÇmake‚ÄÇand‚ÄÇenter‚ÄÇselections.
1. Press‚ÄÇthe‚ÄÇSound‚ÄÇbutton.
2. Select a sound mode to change, and adjust it using‚ÄÇthe‚ÄÇselector‚ÄÇknob.
3. Press‚ÄÇthe‚ÄÇBack‚ÄÇbutton‚ÄÇto‚ÄÇexit‚ÄÇthe‚ÄÇmenu.
Models with touchscreen
Make selections using the touchscreen.
1. From‚ÄÇthe‚ÄÇHOME‚ÄÇscreen,‚ÄÇselect‚ÄÇSettings.
2. Select Audio.
3. Select Sound.4. Select‚ÄÇthe‚ÄÇtabs‚ÄÇto‚ÄÇchange‚ÄÇthe‚ÄÇsound‚ÄÇmode‚ÄÇand‚ÄÇ adjust the setting.
5. Select OK when complete.
Menu button
Selector‚ÄÇknob Sound‚ÄÇbutton
VO
L
HOME
MENU BA CK
Page 29 of 75
50 || 51
AUDIO AND CONNECTIVITY
AUDIO AND CONNECTIVITY
Models with color audio system
Color Audio System*
Use‚ÄÇthe‚ÄÇbuttons‚ÄÇto‚ÄÇcontrol‚ÄÇthe‚ÄÇdisplay‚ÄÇand‚ÄÇaudio‚ÄÇsystem.
Selector knob:
Make and enter selections.
Volume/power knob MENU/CLOCK button:
Display‚ÄÇmenu‚ÄÇ options. Press and hold for clock adjustment. BACK button:
Go‚ÄÇback‚ÄÇto‚ÄÇthe‚ÄÇ
previous display.
Display button:
Adjust display brightness. Sound button:
Adjust sound.
Models with color audio system
FM/AM Radio
Play FM or AM radio stations.
Radio button:
Select‚ÄÇa‚ÄÇband.
Preset buttons (1–6): Press and hold
a‚ÄÇpreset‚ÄÇbutton‚ÄÇto‚ÄÇstore‚ÄÇthe‚ÄÇcurrent‚ÄÇ station.‚ÄÇPress‚ÄÇa‚ÄÇpreset‚ÄÇbutton‚ÄÇto‚ÄÇselect a previously stored station.
Seek/Skip buttons:
Search up and down the selected
band‚ÄÇfor‚ÄÇa‚ÄÇstation‚ÄÇ with a strong signal. Selector knob:
Rotate to tune
radio‚ÄÇfrequency.‚ÄÇ Press for more options.
*if‚ÄÇequipped
Page 30 of 75

The‚ÄÇaudio‚ÄÇsystem‚ÄÇsupports‚ÄÇaudio‚ÄÇCDs,‚ÄÇCD-Rs,‚ÄÇand‚ÄÇCD-RWs‚ÄÇin‚ÄÇMP3,‚")
52 || 53
AUDIO AND CONNECTIVITY
AUDIO AND CONNECTIVITY
Models with color audio system
Compact Disc (CD)
The‚ÄÇaudio‚ÄÇsystem‚ÄÇsupports‚ÄÇaudio‚ÄÇCDs,‚ÄÇCD-Rs,‚ÄÇand‚ÄÇCD-RWs‚ÄÇin‚ÄÇMP3,‚ÄÇWMA,‚ÄÇor‚ÄÇAAC‚ÄÇ formats.
CD eject button
CD slot CD/AUX button: Play‚ÄÇa‚ÄÇCD.
Do‚ÄÇnot‚ÄÇuse‚ÄÇCDs‚ÄÇwith‚ÄÇadhesive‚ÄÇlabels‚ÄÇor‚ÄÇinsert‚ÄÇa‚ÄÇdamaged‚ÄÇCD.‚ÄÇInserting‚ÄÇthese‚ÄÇ types‚ÄÇof‚ÄÇCDs‚ÄÇmay‚ÄÇcause‚ÄÇthem‚ÄÇto‚ÄÇget‚ÄÇstuck‚ÄÇor‚ÄÇdamage‚ÄÇthe‚ÄÇaudio‚ÄÇunit.
NOTICE
Selector knob:
Rotate to change tracks. Press to display a track list.Seek/Skip buttons: Press to change tracks. Press and hold to move rapidly within a track.
Play mode buttons (1–6): Select a play
mode, such as random, repeat, etc. Corresponding‚ÄÇicons‚ÄÇappear‚ÄÇabove‚ÄÇ each‚ÄÇbutton.
Models with color audio system
iPod ®
Play and operate an iPod through the vehicle’s audio system. Connect your device
(see page 47).
Seek/Skip buttons:
Press to change tracks. Press and hold to move rapidly within a track.
CD/AUX button:
Play a connected iPod.
Selector knob:
Rotate to change tracks. Press to enter the music search list.
Play mode buttons (3, 5, 6): Select a play mode,
such as random, repeat, etc. Corresponding icons‚ÄÇappear‚ÄÇabove‚ÄÇeach‚ÄÇbutton.
Searching for Music
Use‚ÄÇthe‚ÄÇselector‚ÄÇknob‚ÄÇto‚ÄÇsearch‚ÄÇfor‚ÄÇtracks‚ÄÇstored‚ÄÇon‚ÄÇthe‚ÄÇiPod.
1. From‚ÄÇthe‚ÄÇaudio‚ÄÇscreen,‚ÄÇpress‚ÄÇthe‚ÄÇselector‚ÄÇknob.
2. Select a search option.
3. Select the track you want to play.
iPod‚ÄÇis‚ÄÇa‚ÄÇtrademark‚ÄÇof‚ÄÇApple,‚ÄÇInc.
Page 31 of 75

54 || 55
AUDIO AND CONNECTIVITY
AUDIO AND CONNECTIVITY
Models with color audio system
USB Flash Drive
Play and operate a USB �ash drive through the vehicle‚Äôs audio system. Connect your device (see page 47).
Selector knob:
Rotate to change tracks. Press to display the folder list.
CD/AUX button:
Play a connected USB �ash drive.
Seek/Skip buttons: Press to change tracks. Press and hold to move rapidly within a track.
Play mode buttons (1–6): Select a play mode,
such as random, repeat, etc. Corresponding icons‚ÄÇappear‚ÄÇabove‚ÄÇeach‚ÄÇbutton.
Searching for Music
Use‚ÄÇthe‚ÄÇselector‚ÄÇknob‚ÄÇto‚ÄÇsearch‚ÄÇfor‚ÄÇtracks‚ÄÇstored‚ÄÇon‚ÄÇthe‚ÄÇlash‚ÄÇdrive.
1. From‚ÄÇthe‚ÄÇaudio‚ÄÇscreen,‚ÄÇpress‚ÄÇthe‚ÄÇselector‚ÄÇknob.
2. Select a folder.
3. Select the track you want to play.
Models with color audio system
Bluetooth ®
Audio
Play streaming or stored audio from your compatible phone through the vehicle’s  audio system. Visit handsfreelink.com (U.S.) or handsfreelink.ca (Canada) to check
phone compatibility. Standard data rates apply with your phone service provider.  Connect your phone to Bluetooth®
HandsFreeLink ®
(see page 67).
Seek/Skip buttons:
Change audio tracks.
CD/AUX button:
Play Bluetooth ®
Audio.
Preset button 1:
Resume audio.
Preset button 2:
Pause audio.
State,‚ÄÇprovincial,‚ÄÇor‚ÄÇlocal‚ÄÇlaws‚ÄÇmay‚ÄÇprohibit‚ÄÇthe‚ÄÇoperation‚ÄÇof‚ÄÇ‚ÄÇ handheld‚ÄÇelectronic‚ÄÇdevices‚ÄÇwhile‚ÄÇoperating‚ÄÇa‚ÄÇvehicle.‚ÄÇ
Only‚ÄÇlaunch‚ÄÇstreaming‚ÄÇaudio‚ÄÇon‚ÄÇyour‚ÄÇphone‚ÄÇwhen‚ÄÇit‚ÄÇis‚ÄÇsafe‚ÄÇto‚ÄÇdo‚ÄÇso.
Searching for Music
Use‚ÄÇthe‚ÄÇselector‚ÄÇknob‚ÄÇto‚ÄÇsearch‚ÄÇfor‚ÄÇtracks‚ÄÇstored‚ÄÇon‚ÄÇthe‚ÄÇdevice.
1. From‚ÄÇthe‚ÄÇaudio‚ÄÇscreen,‚ÄÇpress‚ÄÇthe‚ÄÇselector‚ÄÇknob.
2. Select a category.
3. Select the track you want to play.
Notes: •  Make sure the volume on your phone is properly adjusted.
•  You may need to enable additional settings on your phone for playback.
•  The resume/pause function and remote audio controls are not supported on all  phones. Selector knob:
Press to enter the music search list.
Page 32 of 75

56 || 57
AUDIO AND CONNECTIVITY
AUDIO AND CONNECTIVITY
Models with touchscreen
Touchscreen Operation*
Use simple gestures—including touching, swiping, and scrolling—to operate certain audio functions.
Some‚ÄÇitems‚ÄÇmay‚ÄÇbe‚ÄÇgrayed‚ÄÇout‚ÄÇduring‚ÄÇdriving‚ÄÇto‚ÄÇreduce‚ÄÇthe‚ÄÇpotential‚ÄÇfor‚ÄÇdistraction.‚ÄÇ
You‚ÄÇcan‚ÄÇselect‚ÄÇthem‚ÄÇwhen‚ÄÇthe‚ÄÇvehicle‚ÄÇis‚ÄÇstopped‚ÄÇor‚ÄÇuse‚ÄÇvoice‚ÄÇcommands*.
Wearing gloves may limit or prevent touchscreen response.
*if‚ÄÇequipped
**HondaLink‚ÄÇcan‚ÄÇbe‚ÄÇaccessed‚ÄÇonly‚ÄÇif‚ÄÇthe‚ÄÇapp‚ÄÇis‚ÄÇinstalled‚ÄÇon‚ÄÇyour‚ÄÇ
smartphone,‚ÄÇand‚ÄÇthe‚ÄÇphone‚ÄÇis‚ÄÇconnected‚ÄÇto‚ÄÇthe‚ÄÇsystem‚ÄÇ(see‚ÄÇpage‚ÄÇ57).
VO L
HOME
MENU BA CK
Power button:
Turn audio on or off.
HOME(shown) MENU: ‚ÄÇDisplay‚ÄÇ
menu items for the selected screen. BACK: ‚ÄÇGo‚ÄÇback‚ÄÇto‚ÄÇ
the previous screen. button:
Change screen brightness.
Settings: Choose
Audio for options. HondaLink‚Ñ¢:
View apps when your phone is connected through HondaLink**.
Audio:
‚ÄÇDisplay‚ÄÇ
current audio information.
Volume
Display button:
Change the display.
Changing Icon Order
You can change the order of the icons on the Home screen.
1. From the Home screen, select Settings.
2. Select System.
3. Select Home.4. Select‚ÄÇHome‚ÄÇScreen‚ÄÇEdit‚ÄÇOrder.
5. Select and hold the icon you want to move and slide it to a different position.
HondaLink‚Ñ¢
You‚ÄÇcan‚ÄÇconnect‚ÄÇa‚ÄÇcompatible‚ÄÇsmartphone‚ÄÇto‚ÄÇthe‚ÄÇaudio‚ÄÇsystem‚ÄÇto‚ÄÇenable‚ÄÇintegration‚ÄÇ
between the smartphone’s approved apps and the vehicle. This allows you to control 
the phone’s apps through the touchscreen.
To‚ÄÇcheck‚ÄÇsmartphone‚ÄÇcompatibility‚ÄÇand‚ÄÇconnection‚ÄÇinstructions,‚ÄÇvisit
handsfreelink.com (U.S.) or handsfreelink.ca (Canada).
To get more information on HondaLink features and apps, visit www.hondalink.com
(U.S.) or honda.ca/
handsfreelink (Canada).