2016 HONDA CR-Z height
[x] Cancel search: heightPage 11 of 64

14 || 15
S AFETY
S
AFETY
TABLE OF CONTENTS
INDEX
VISUAL INDEX
VOICE COMMAND
INDEX
SAFETY
INFORMATION
CUSTOMER
INFORMATION
INSTRUMENT PANEL
SPECIFICATIONS
VEHICLE
CONTROLS
MAINTENANCE
AUDIO AND
CONNECTIVITY
HANDLING THE UNEXPECTED
BLUETOOTH®
HANDSFREELINK®
DRIVING
HONDALINK®
NAVIGATION
Protecting Infants
An infant must be properly restrained in a rear-facing, reclining child seat until the
infant reaches the seat maker’s weight or height limit for the seat, and the infant is
at least one year old. Because rear-facing child seats should not be used in this
vehicle, you should never carry an infant in this vehicle.
Children who are unrestrained or improperly restrained can be seriously \
injured or killed in a crash.
Any child too small for a seat belt should be properly restrained in a c\
hild
seat. A larger child should be properly restrained with a seat belt, usi\
ng a
booster seat if necessary.
WARNING
Placing a rear-facing child seat in the passenger’s seat can result in serious
injury or death during a crash.
Never install a rear-facing child seat in this vehicle.
WARNING
Protecting Smaller Children
If a child is at least one year old and within the weight range indicate\
d by the child
seat manufacturer, the child should be properly restrained in a firmly secured
forward-facing child seat.
Since this vehicle does not have a back seat, Honda recommends that you \
do not
carry a child, age 12 or under, as a passenger.
This is because placing a forward-facing child seat in the passenger’\
s seat can
be hazardous, even with advanced front airbags that automatically turn t\
he
passenger’s front airbag off.
If you choose to ignore our warnings and transport a small child in this\
vehicle,
be sure to move the passenger seat as far to the rear as possible, and f\
ollow the
instructions and guidelines in the following pages.
Placing a forward-facing child seat in the passenger’s seat can result in
serious injury or death if the front airbag inflates.
If you must place a forward-facing child seat in the passenger’s seat, move
the vehicle seat as far back as possible, and properly restrain the chil\
d.
WARNING
Selecting a Child Seat Important considerations when selecting a child seat
Make sure the child seat meets the following three requirements:
•
The child seat is the correct type and size for the child.
•
The child seat is the correct type for the seating position.
•
The child seat is compliant with Federal Motor V
ehicle Safety Standard 213 or
Canadian Motor Vehicle Safety Standard 213.
Installing a Child Seat with a Lap/Shoulder Seat Belt
1.
Move the passenger seat to the rearmost
position.
2.
Place the child seat on the passenger seat.
3.
Route the seat belt through the child seat
according to the seat manufacturer’
s
instructions, and insert the latch plate into the
buckle. Insert the latch plate fully until it clicks.
4.
Slowly pull the shoulder part of the belt all the
way out until it stops. This activates the lockable
retractor
.
5.
Let the seat belt completely wind up into the
retractor
, then try to pull it out to make sure the
retractor is locked. If you are able to pull the
shoulder belt out, the lockable retractor is not
activated. Pull the seat belt all the way out, and
repeat steps 4 – 5.
6.
Grab the shoulder part of the seat belt near the
buckle, and pull up to remove any slack from
the lap part of the belt. When doing this, place
your weight on the child seat and push it into the
vehicle seat.
7.
Make sure the child seat is firmly secured by
rocking it forward and back and side to side; little
movement should be felt.
T
o deactivate a lockable retractor, release the
buckle and allow the seat belt to wind up all the
way.
Page 20 of 64

32 || 33
V EHICLE C ONTROLS
V
EHICLE C ONTROLS
TABLE OF CONTENTS
INDEX
VISUAL INDEX
VOICE COMMAND
INDEX
SAFETY
INFORMATION
CUSTOMER
INFORMATION
INSTRUMENT PANEL
SPECIFICATIONS
VEHICLE
CONTROLS
MAINTENANCE
AUDIO AND
CONNECTIVITY
HANDLING THE UNEXPECTED
BLUETOOTH®
HANDSFREELINK®
DRIVING
HONDALINK®
NAVIGATION
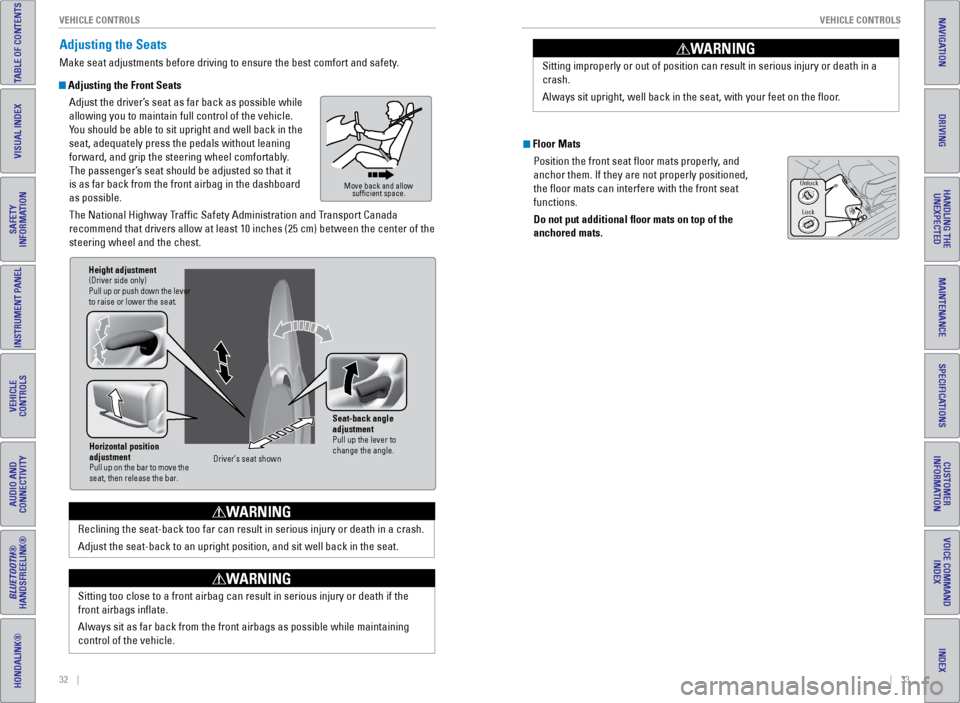
Adjusting the Seats
Make seat adjustments before driving to ensure the best comfort and safe\
ty.
Adjusting the Front Seats
Adjust the driver’s seat as far back as possible while
allowing you to maintain full control of the vehicle.
You should be able to sit upright and well back in the
seat, adequately press the pedals without leaning
forward, and grip the steering wheel comfortably.
The passenger’s seat should be adjusted so that it
is as far back from the front airbag in the dashboard
as possible.
The National Highway Traffic Safety Administration and Transport Canada
recommend that drivers allow at least 10 inches (25 cm) between the ce\
nter of the
steering wheel and the chest.
Move back and allow sufficient space.
Horizontal position
adjustment
Pull up on the bar to move the
seat, then release the bar.
Height adjustment(Driver side only)
Pull up or push down the lever
to raise or lower the seat .
Seat-back angle
adjustment
Pull up the lever to
change the angle.
Driver’s seat show n
Reclining the seat-back too far can result in serious injury or death in\
a crash.
Adjust the seat-back to an upright position, and sit well back in the se\
at.
WARNING
Sitting too close to a front airbag can result in serious injury or deat\
h if the
front airbags inflate.
Always sit as far back from the front airbags as possible while maintain\
ing
control of the vehicle.
WARNING
Sitting improperly or out of position can result in serious injury or de\
ath in a
crash.
Always sit upright, well back in the seat, with your feet on the floor\
.
WARNING
Floor Mats
Position the front seat floor mats properly, and
anchor them. If they are not properly positioned,
the floor mats can interfere with the front seat
functions.
Do not put additional floor mats on top of the
anchored mats.
Unlock
Lock
Page 22 of 64

36 || 37
V EHICLE C ONTROLS
V
EHICLE C ONTROLS
TABLE OF CONTENTS
INDEX
VISUAL INDEX
VOICE COMMAND
INDEX
SAFETY
INFORMATION
CUSTOMER
INFORMATION
INSTRUMENT PANEL
SPECIFICATIONS
VEHICLE
CONTROLS
MAINTENANCE
AUDIO AND
CONNECTIVITY
HANDLING THE UNEXPECTED
BLUETOOTH®
HANDSFREELINK®
DRIVING
HONDALINK®
NAVIGATION
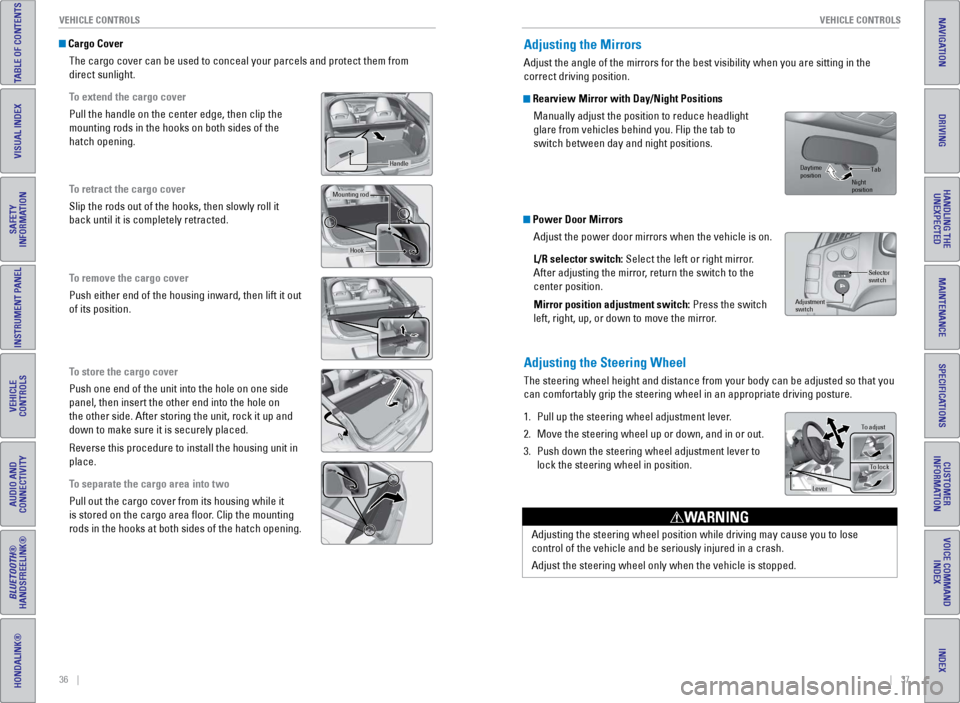
Cargo Cover
The cargo cover can be used to conceal your parcels and protect them fro\
m
direct sunlight.
To extend the cargo cover
Pull the handle on the center edge, then clip the
mounting rods in the hooks on both sides of the
hatch opening.
To retract the cargo cover
Slip the rods out of the hooks, then slowly roll it
back until it is completely retracted.
To remove the cargo cover
Push either end of the housing inward, then lift it out
of its position.
To store the cargo cover
Push one end of the unit into the hole on one side
panel, then insert the other end into the hole on
the other side. After storing the unit, rock it up and
down to make sure it is securely placed.
Reverse this procedure to install the housing unit in
place.
To separate the cargo area into two
Pull out the cargo cover from its housing while it
is stored on the cargo area floor. Clip the mounting
rods in the hooks at both sides of the hatch opening.
Handle
Mounting ro d
Hook
Adjusting the Mirrors
Adjust the angle of the mirrors for the best visibility when you are sit\
ting in the
correct driving position.
Rearview Mirror with Day/Night Positions
Manually adjust the position to reduce headlight
glare from vehicles behind you. Flip the tab to
switch between day and night positions.
Power Door MirrorsAdjust the power door mirrors when the vehicle is on.
L/R selector switch: Select the left or right mirror.
After adjusting the mirror, return the switch to the
center position.
Mirror position adjustment switch: Press the switch
left, right, up, or down to move the mirror.
Adjusting the Steering Wheel
The steering wheel height and distance from your body can be adjusted so\
that you
can comfortably grip the steering wheel in an appropriate driving postur\
e.
1.
Pull up the steering wheel adjustment lever
.
2.
Move the steering wheel up or down, and in or out.
3.
Push down the steering wheel adjustment lever to
lock the steering wheel in position.
Selector
switch
Adjustment
switch
Tab
Daytime
position Night
position
To adjust
To lock
Lever
Adjusting the steering wheel position while driving may cause you to los\
e
control of the vehicle and be seriously injured in a crash.
Adjust the steering wheel only when the vehicle is stopped.
WARNING
Page 35 of 64

62 || 63
DRIVING
DRIVING
TABLE OF CONTENTS
INDEX
VISUAL INDEX
VOICE COMMAND
INDEX
SAFETY
INFORMATION
CUSTOMER
INFORMATION
INSTRUMENT PANEL
SPECIFICATIONS
VEHICLE
CONTROLS
MAINTENANCE
AUDIO AND
CONNECTIVITY
HANDLING THE UNEXPECTED
BLUETOOTH®
HANDSFREELINK®
DRIVING
HONDALINK®
NAVIGATION
Learn about preparation for driving, as well as other features.
Before Driving
Check the following items before you begin driving.
Exterior Checks
•
Make sure there are no obstructions on the windows, door mirrors, exte
rior
lights, or other parts of the vehicle.
•
Remove any frost, snow
, or ice.
•
Make sure the hood is securely closed.
•
Heat from the engine and exhaust can ignite flammable materials left u\
nder
the hood, causing a fire. If you’ve parked your vehicle for an exte\
nded period,
inspect and remove any debris that may have collected, such as dried g
rass
and leaves that have fallen or have been carried in for use as a nest by\
a small
animal. Also check under the hood for leftover flammable materials aft\
er you or
someone else has performed maintenance on your vehicle.
•
Make sure the tires are in good condition.
•
Make sure there are no people or objects behind or around the vehicle.
Interior Checks•
Store or secure all items on board properly
.
•
Do not pile items in the cargo area higher than the seat-back height.
•
Do not place anything in the front seat footwells. Make sure to secure t\
he floor
mats.
•
If you have any animals on board, do not let them move freely around in \
the
vehicle.
•
Securely close and lock both doors and the hatch.
•
Adjust your seating position, mirrors, and steering wheel properly
.
•
Make sure items placed on the floor behind the seats cannot roll under\
the
seats.
•
Everyone in the vehicle must fasten their seat belt.
•
Make sure that the indicators in the instrument panel come on when you s\
tart
the vehicle, and go off soon after
.
DRIVING
If the doors are frozen shut, use warm water around the door edges to me\
lt any
ice. Do not try to force them open, as this can damage the rubber trim a\
round the
doors. When done, wipe dry to avoid further freezing.
NOTICE Improper accessories or modifications can affect your vehicle’s handling, and
stability, and performance, and cause a crash in which you can be seriously hurt
or killed.
Follow all instructions in the vehicle owner’s guide regarding accessories and
modifications.
WARNING
In addition:
•
During the first 600 miles (1,000 km) of operation, avoid sudden acc\
elerat
ion or
full throttle operation so as not to damage the engine or powertrain.
•
A
void hard braking for the first 200 miles (300 km). You should also follow this
when the brake pads are replaced.
Page 51 of 64

94 || 95
MAINTENANCE
MAINTENANCE
TABLE OF CONTENTS
INDEX
VISUAL INDEX
VOICE COMMAND
INDEX
SAFETY
INFORMATION
CUSTOMER
INFORMATION
INSTRUMENT PANEL
SPECIFICATIONS
VEHICLE
CONTROLS
MAINTENANCE
AUDIO AND
CONNECTIVITY
HANDLING THE UNEXPECTED
BLUETOOTH®
HANDSFREELINK®
DRIVING
HONDALINK®
NAVIGATION
Under the Hood
Opening the Hood
1.
Park the vehicle on a level surface, and set the
parking brake.
2.
Pull the hood release handle under the lower left
corner of the dashboard.
3.
Slide the hood latch lever in the center of the
hood to release the lock mechanism, and open
the hood.
4.
Remove the support rod from the clamp using the
grip. Mount the support rod in the hood.
When closing, remove the support rod, and
stow it in the clamp, then gently lower the hood.
Remove your hand at a height of approximately
12 inches (30 cm) and let the hood close.
Brake �uid
(black cap)
Clutch �uid*
(light gray cap)
Washer �uid
(blue cap)
Engine oil dipstick
(orange)
Radiator cap
Engine oil �ll ca
p
Continuously variable transmission
�uid dipstick
(yellow)
Engine coolant reserve tank 12-volt battery
Hood release
handle
Pull
Lever
Support ro d
Grip
Clamp
Do not open the hood when the wiper arms are raised. The hood will strik\
e the
wipers, and may damage either the hood or the wipers.
NOTICE
Recommended Engine Oil
• Honda Genuine Motor Oil
•
Premium-grade 0W
-20 detergent oil with an API Certification Seal on the
container
This seal indicates the oil is energy conserving and
that it meets the American Petroleum Institute’s
latest requirements.
Use Honda Genuine Motor Oil or another
commercial engine oil of suitable viscosity for the
ambient temperature as shown.
You may also use synthetic motor oil if it is labeled with the API Certifi\
cation Seal
and is of the specified viscosity grade.
Engine Oil
Park the vehicle on level ground, and wait approximately three minutes after turning
the engine off before you check the oil.
Checking the Oil 1.
Remove the dipstick (orange).
2.
Wipe the dipstick with a clean cloth or paper
towel.
3.
Insert the dipstick back all the way into its hole.
4.
Remove the dipstick again, and check the level.
It should be between the upper and lower marks.
Add oil if necessary
.
Ambient temperature
Dipstick
Upper mark
Lower mark
Page 56 of 64

104 || 105
MAINTENANCE
MAINTENANCE
TABLE OF CONTENTS
INDEX
VISUAL INDEX
VOICE COMMAND
INDEX
SAFETY
INFORMATION
CUSTOMER
INFORMATION
INSTRUMENT PANEL
SPECIFICATIONS
VEHICLE
CONTROLS
MAINTENANCE
AUDIO AND
CONNECTIVITY
HANDLING THE UNEXPECTED
BLUETOOTH®
HANDSFREELINK®
DRIVING
HONDALINK®
NAVIGATION
Tire Service Life
The life of your tires is dependent on many factors, including driving h\
abits, road
conditions, vehicle loading, inflation pressure, maintenance history, speed, and
environmental conditions (even when the tires are not in use).
In addition to regular inspections and inflation pressure maintenance,\
it is
recommended that you have annual inspections performed once the tires re\
ach
five years old. All tires, including the spare, should be removed from\
service after
10 years from the date of manufacture, regardless of their condition or \
state of
wear.
Winter TiresIf driving on snowy or frozen roads, mount all season tires marked “M\
+S”, snow
tires, or tire chains; reduce speed; and maintain sufficient distance \
between
vehicles when driving. For winter tires, select the size and load ranges\
that are the
same as the original tires, and mount them to all four wheels.
Tire ChainsBecause your vehicle has limited tire clearance, we strongly recommend u\
sing
the following chains:
Models with P195/55 R16 tires: Cable-type: SCC Radial Chain SC1030
Models with 205/45 R17 tires: Do not install tire chains.
Install tire chains on the front tires only. Mount chains as tightly as you can, and
make sure that they do not touch the brake lines or suspension.
Using the wrong chains, or not properly installing chains, can damage th\
e
brake lines and cause a crash in which you can be seriously injured or k\
illed.
Follow all instructions in this guide regarding the selection and use of\
tire
chains.
WARNING
Traction devices that are the wrong size or improperly installed can dama\
ge your
vehicle’s brake lines, suspension, body, and wheels. Stop driving if they are hitting
any part of the vehicle.
NOTICE
Tire Labeling
The tires that came on your vehicle have a number of markings. Those you\
should be aware of are described below.
Here is an example of what each marking means:
P195/55R16 86V
•
P: vehicle type (P indicates passenger
vehicle)
•
195: tire width in millimeters
•
55: aspect ratio (tire section height as a
percentage of its width)
•
R: tire construction code (radial)
•
16: rim diameter in inches
•
86: load index (code indicating maximum
load tire can carry)
•
H: speed symbol (code indicating maximum speed rating)
Tire Identification Number (TIN)The tire identification number
(TIN) is a group of numbers
and letters that look like the
example below. TIN is located
on the sidewall of the tire.
Glossary of Tire TerminologyCold Tire Pressure – The tire air pressure when the vehicle has been
parked for at least three hours or driven less than 1 mile (1.6 km).
Load Rating – The maximum load that a tire is rated to carry for a gi\
ven
inflation pressure.
Maximum Inflation Pressure – The maximum tire air pressure that the\
tire
can hold.
Maximum Load Rating – The load rating for a tire at the maximum
permissible inflation pressure for that tire.
Recommended Inflation Pressure – The cold tire inflation pressure\
recommended by the manufacturer.
Treadwear Indicators (TWI) – The projections within the principal gr\
ooves
designed to give a visual indication of the degrees of wear of the tread\
.
Tire size
Tire
identi�cation
number (TIN)
Maximum
tire load
Maximum
tire pressure
Tire size
DOT B97R FW6X 2209\n
DOT: This in\ficat\bs t\nhat th\b tir\b m\b\bts all
r\bquir\bm\bnts of th\b U.S\n. D\bpartm\bnt of
Transportation.
B97R: Manufactur\br’s \ni\f\bntifcation mar
FW6X: Tir\b typ\b co\f\b
22 09: Dat\b of Transp\nortation
Year
Week