2016 FORD TAURUS ECO mode
[x] Cancel search: ECO modePage 156 of 424
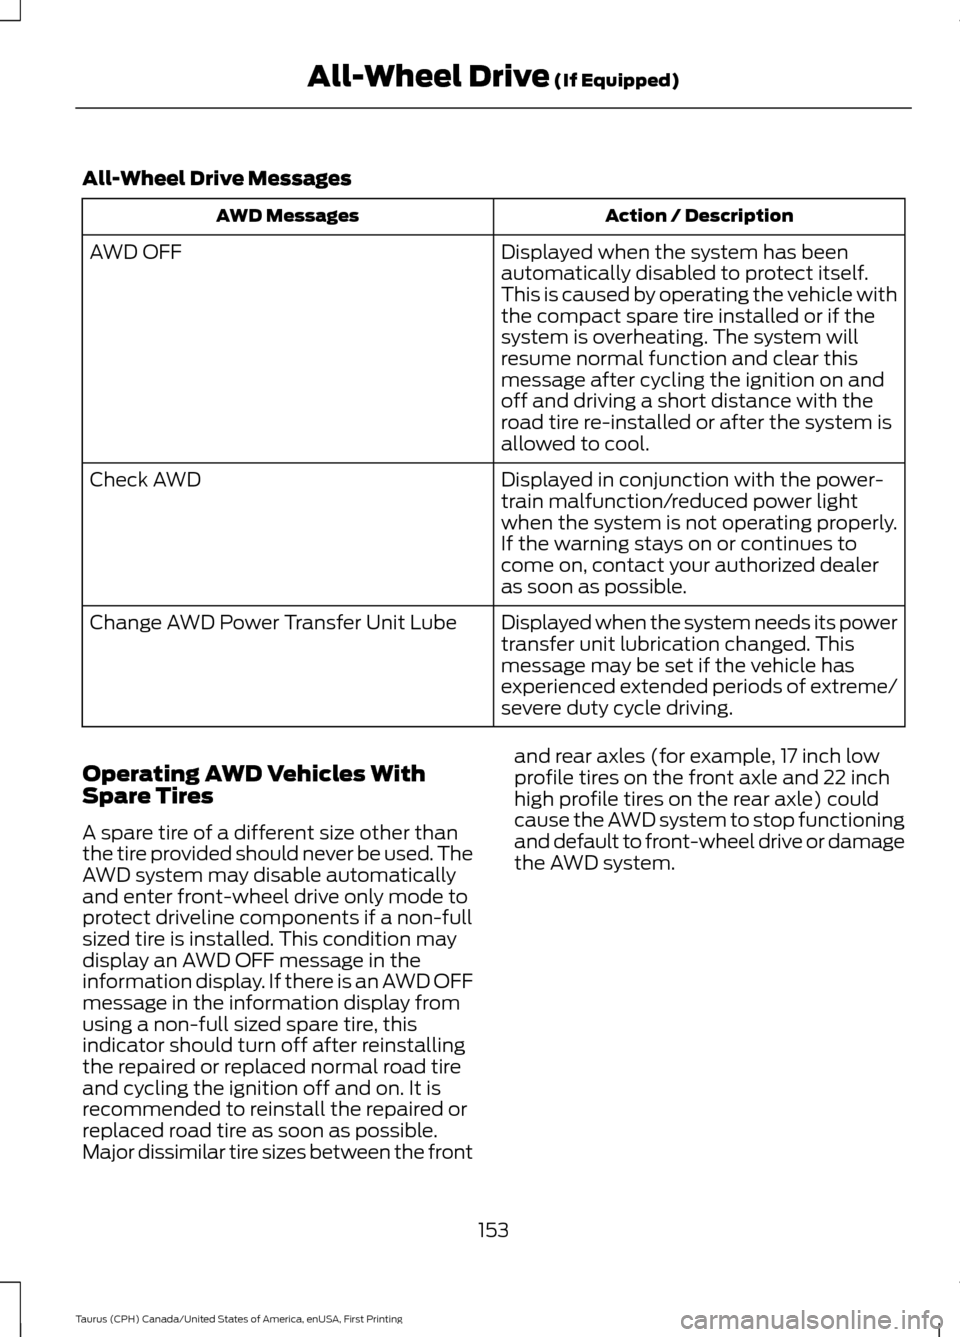
All-Wheel Drive Messages
Action / Description
AWD Messages
Displayed when the system has been
automatically disabled to protect itself.
This is caused by operating the vehicle with
the compact spare tire installed or if the
system is overheating. The system will
resume normal function and clear this
message after cycling the ignition on and
off and driving a short distance with the
road tire re-installed or after the system is
allowed to cool.
AWD OFF
Displayed in conjunction with the power-
train malfunction/reduced power light
when the system is not operating properly.
If the warning stays on or continues to
come on, contact your authorized dealer
as soon as possible.
Check AWD
Displayed when the system needs its power
transfer unit lubrication changed. This
message may be set if the vehicle has
experienced extended periods of extreme/
severe duty cycle driving.
Change AWD Power Transfer Unit Lube
Operating AWD Vehicles With
Spare Tires
A spare tire of a different size other than
the tire provided should never be used. The
AWD system may disable automatically
and enter front-wheel drive only mode to
protect driveline components if a non-full
sized tire is installed. This condition may
display an AWD OFF message in the
information display. If there is an AWD OFF
message in the information display from
using a non-full sized spare tire, this
indicator should turn off after reinstalling
the repaired or replaced normal road tire
and cycling the ignition off and on. It is
recommended to reinstall the repaired or
replaced road tire as soon as possible.
Major dissimilar tire sizes between the front and rear axles (for example, 17 inch low
profile tires on the front axle and 22 inch
high profile tires on the rear axle) could
cause the AWD system to stop functioning
and default to front-wheel drive or damage
the AWD system.
153
Taurus (CPH) Canada/United States of America, enUSA, First Printing All-Wheel Drive
(If Equipped)
Page 166 of 424
Traction Control
The system enhances your vehicle
’s ability
to maintain traction of the wheels by
detecting and controlling wheel spin. See
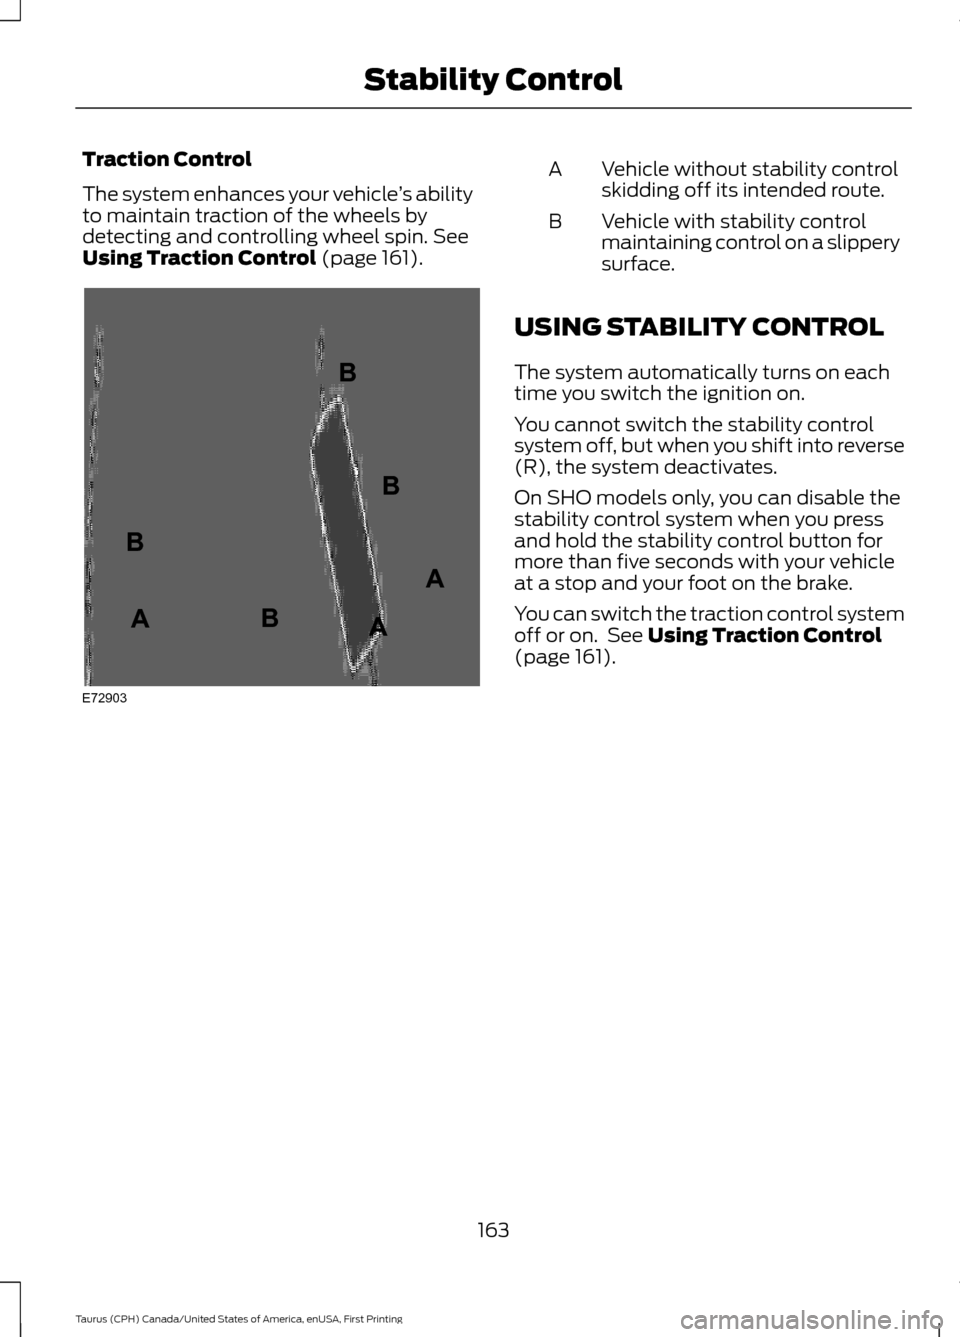
Using Traction Control (page 161). Vehicle without stability control
skidding off its intended route.
A
Vehicle with stability control
maintaining control on a slippery
surface.
B
USING STABILITY CONTROL
The system automatically turns on each
time you switch the ignition on.
You cannot switch the stability control
system off, but when you shift into reverse
(R), the system deactivates.
On SHO models only, you can disable the
stability control system when you press
and hold the stability control button for
more than five seconds with your vehicle
at a stop and your foot on the brake.
You can switch the traction control system
off or on. See
Using Traction Control
(page 161).
163
Taurus (CPH) Canada/United States of America, enUSA, First Printing Stability ControlE72903A
AA
B
BB
B
Page 167 of 424
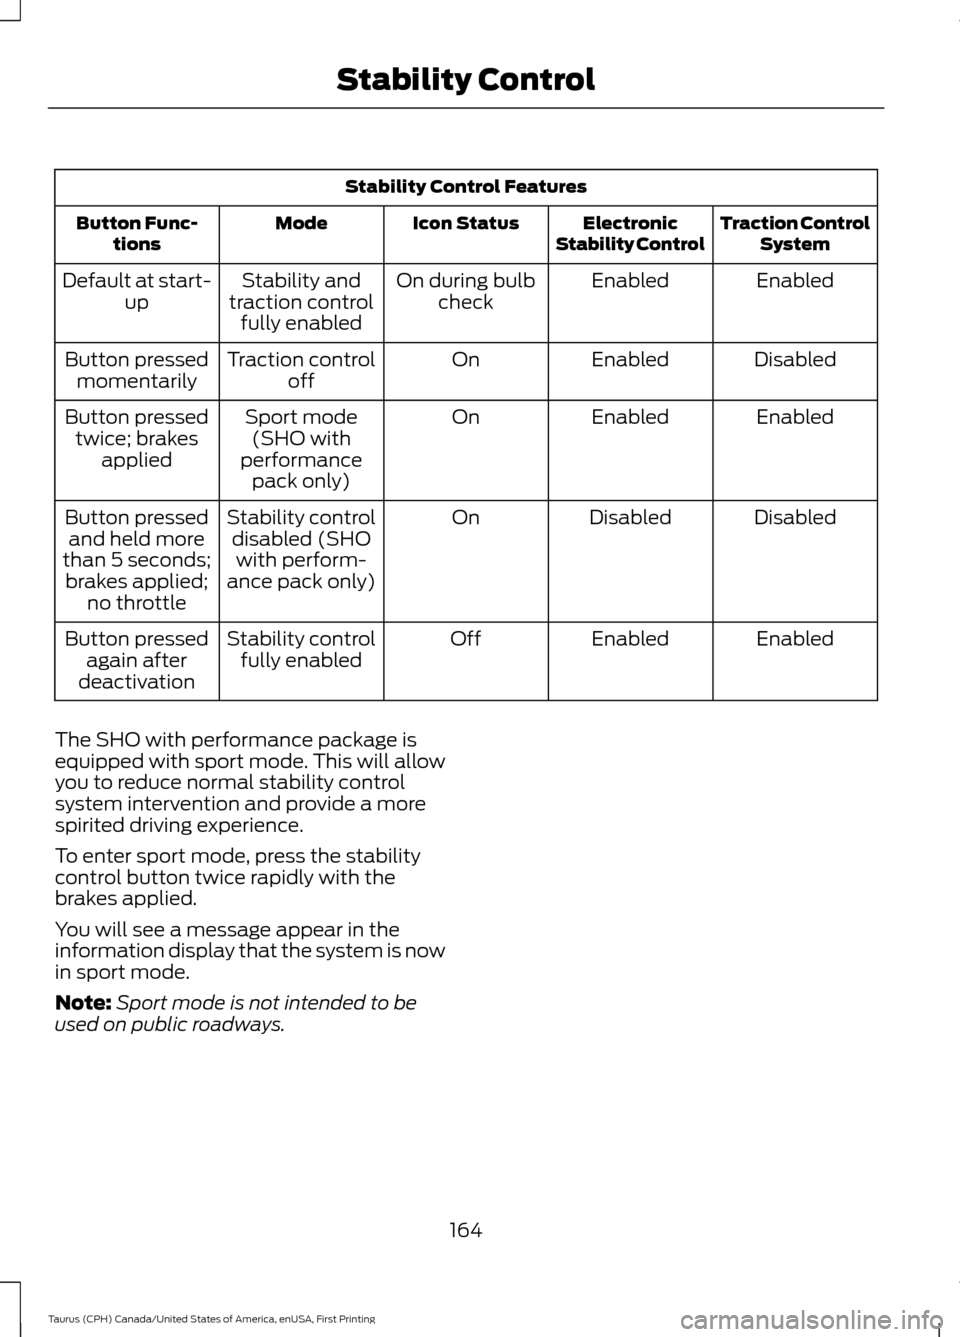
Stability Control Features
Traction ControlSystem
Electronic
Stability Control
Icon Status
Mode
Button Func-
tions
Enabled
Enabled
On during bulb
check
Stability and
traction control fully enabled
Default at start-
up
Disabled
Enabled
On
Traction control
off
Button pressed
momentarily
Enabled
Enabled
On
Sport mode
(SHO with
performance pack only)
Button pressed
twice; brakes applied
Disabled
Disabled
On
Stability control
disabled (SHOwith perform-
ance pack only)
Button pressed
and held more
than 5 seconds; brakes applied; no throttle
Enabled
Enabled
Off
Stability control
fully enabled
Button pressed
again after
deactivation
The SHO with performance package is
equipped with sport mode. This will allow
you to reduce normal stability control
system intervention and provide a more
spirited driving experience.
To enter sport mode, press the stability
control button twice rapidly with the
brakes applied.
You will see a message appear in the
information display that the system is now
in sport mode.
Note: Sport mode is not intended to be
used on public roadways.
164
Taurus (CPH) Canada/United States of America, enUSA, First Printing Stability Control
Page 177 of 424
Switching Cruise Control Off
Press and release OFF when the system
is in stand by mode or switch the ignition
off.
Note: You erase the set speed when you
switch the system off.
USING ADAPTIVE CRUISE
CONTROL
(If Equipped) WARNINGS
Always pay close attention to
changing road conditions when using
adaptive cruise control. The system
does not replace attentive driving. Failing
to pay attention to the road may result in
a crash, serious injury or death. Adaptive cruise control is not a crash
warning or avoidance system.
Adaptive cruise control will not
detect stationary or slow moving
vehicles below 6 mph (10 km/h).
Adaptive cruise control does not
detect pedestrians or objects in the
road.
Adaptive cruise control does not
detect oncoming vehicles in the
same lane.
Do not use the adaptive cruise
control when entering or leaving a
highway, in heavy traffic or on roads
that are winding, slippery or unpaved. Do not use the system in poor
visibility, for example fog, heavy rain,
spray or snow. WARNINGS
Do not use adaptive cruise control
when towing a trailer that has trailer
brakes. The auto-brake component
of the adaptive cruise control system does
not operate the trailer brakes. Using
adaptive cruise control when towing a
trailer that has trailer brakes may result in
the loss of vehicle control, which could
result in serious injury. Do not use tire sizes other than those
recommended because this can
affect the normal operation of the
system. Failing to do so may result in a loss
of vehicle control, which could result in
serious injury. Note:
It is your responsibility to stay alert,
drive safely and be in control of the vehicle
at all times.
The system adjusts your speed to maintain
a proper distance between you and the
vehicle in front of you in the same lane. You
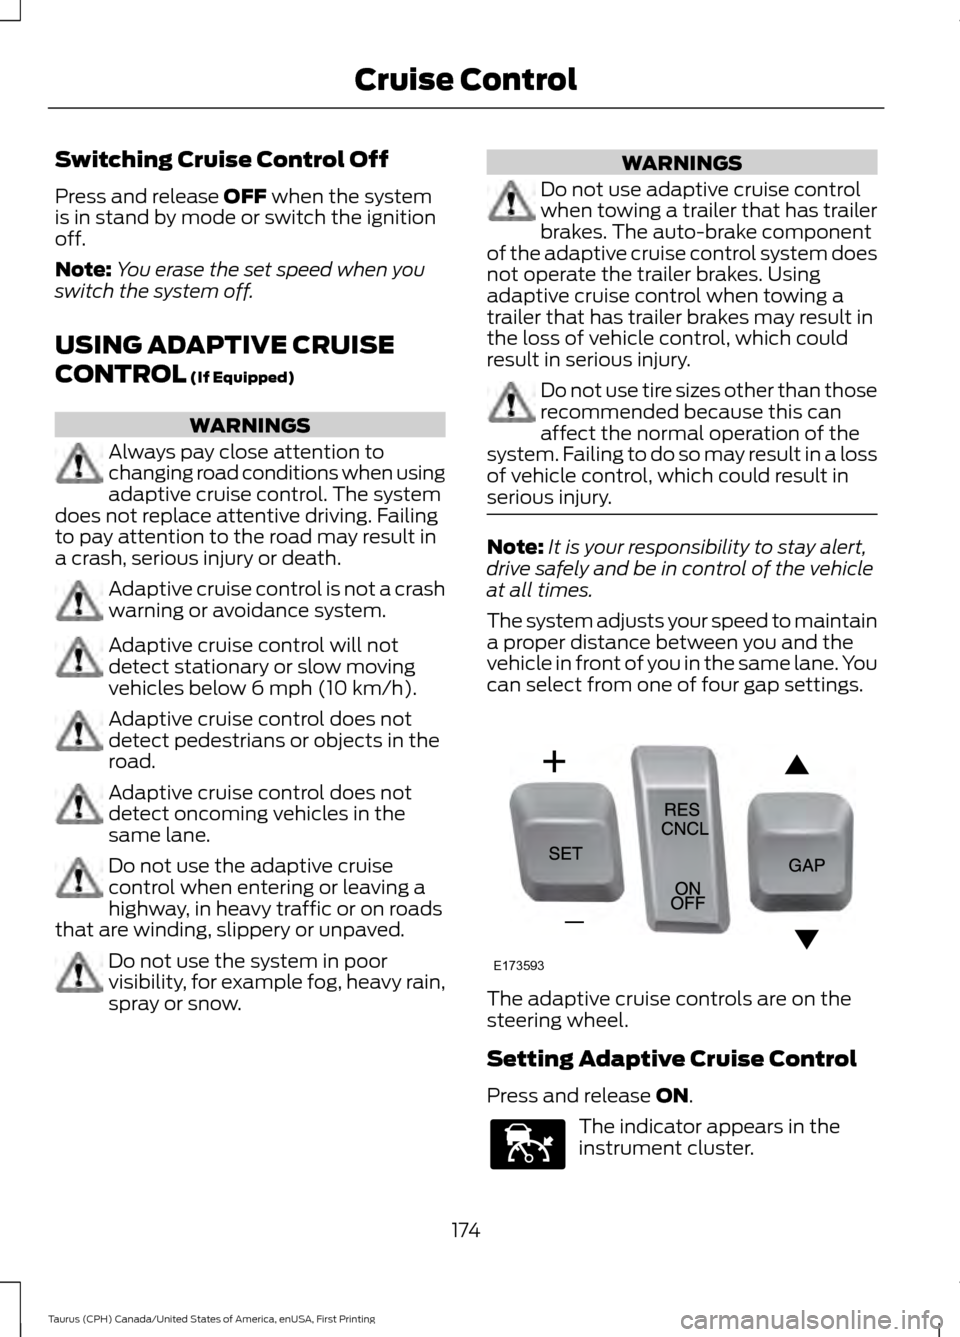
can select from one of four gap settings. The adaptive cruise controls are on the
steering wheel.
Setting Adaptive Cruise Control
Press and release
ON.
The indicator appears in the
instrument cluster.
174
Taurus (CPH) Canada/United States of America, enUSA, First Printing Cruise ControlE173593 E144529
Page 185 of 424

The current assessment of your alertness
indicates that you should rest as soon as
safely possible.
The status bar will travel from left to right
as the calculated alertness level
decreases. As the rest icon is approached
the color turns from green to yellow to red.
The yellow position indicates the first
warning is active and the red position
indicates the second warning is active.
Note:
If you have recently received a
warning; you should consider resting, even
if the current assessment is within the
typical range.
Note: If the camera sensor cannot track the
road lane markings or if your vehicle speed
drops below approximately 40 mph
(64 km/h), the alertness level will change
to grey for a short time and the information
display will inform you that the system is
unavailable.
Resetting the System
You can reset the system by either:
• Switching the ignition off and on.
• Stopping the vehicle and then opening
and closing the driver ’s door.
LANE KEEPING SYSTEM
(If
Equipped) WARNINGS
The system does not relieve you of
your responsibility to drive with due
care and attention. WARNINGS
At all times you are responsible for
controlling your vehicle, supervising
the system and intervening if
required. The system is designed to aid the
driver. It is not intended to replace
the driver's attention and judgement.
The driver is still responsible to drive with
due care and attention. In cold and severe weather
conditions the system may not
function. Rain, snow, spray can all
limit sensor performance. Large contrasts in lighting can limit
sensor performance.
The system will not operate if the
sensor cannot track the road lane
markings.
The vehicle should be taken to an
authorized dealer for inspection if
damage occurs in the immediate
area surrounding the sensor. Note:
The system works above
40 mph
(64 km/h).
Note: The system works as long as the
camera can detect one lane marking.
Note: The system may not function if the
camera is blocked or there is damage to the
windshield.
Note: When Aid mode is on and the system
detects no steering activity for a short
period, the system will alert you to put your
hands on the steering wheel. The system
may detect a light grip or touch on the
steering wheel as hands off driving.
182
Taurus (CPH) Canada/United States of America, enUSA, First Printing Driving AidsE131359
Page 189 of 424
Why does the vehicle not come back toward the middle of the lane, as expected, in the
Aid or Aid + Alert mode?
High cross winds
Large road crown
Rough roads, grooves, shoulder drop-offs
Heavy uneven loading of the vehicle or improper tire inflation pressure
If the tires have been exchanged (including snow tires), or the suspension has been
modified
BLIND SPOT INFORMATION
SYSTEM WARNING
To help avoid injuries, NEVER use the
Blind Spot Information System as a
replacement for using the interior
and exterior mirrors or looking over your
shoulder before changing lanes. The Blind
Spot Information System is not a
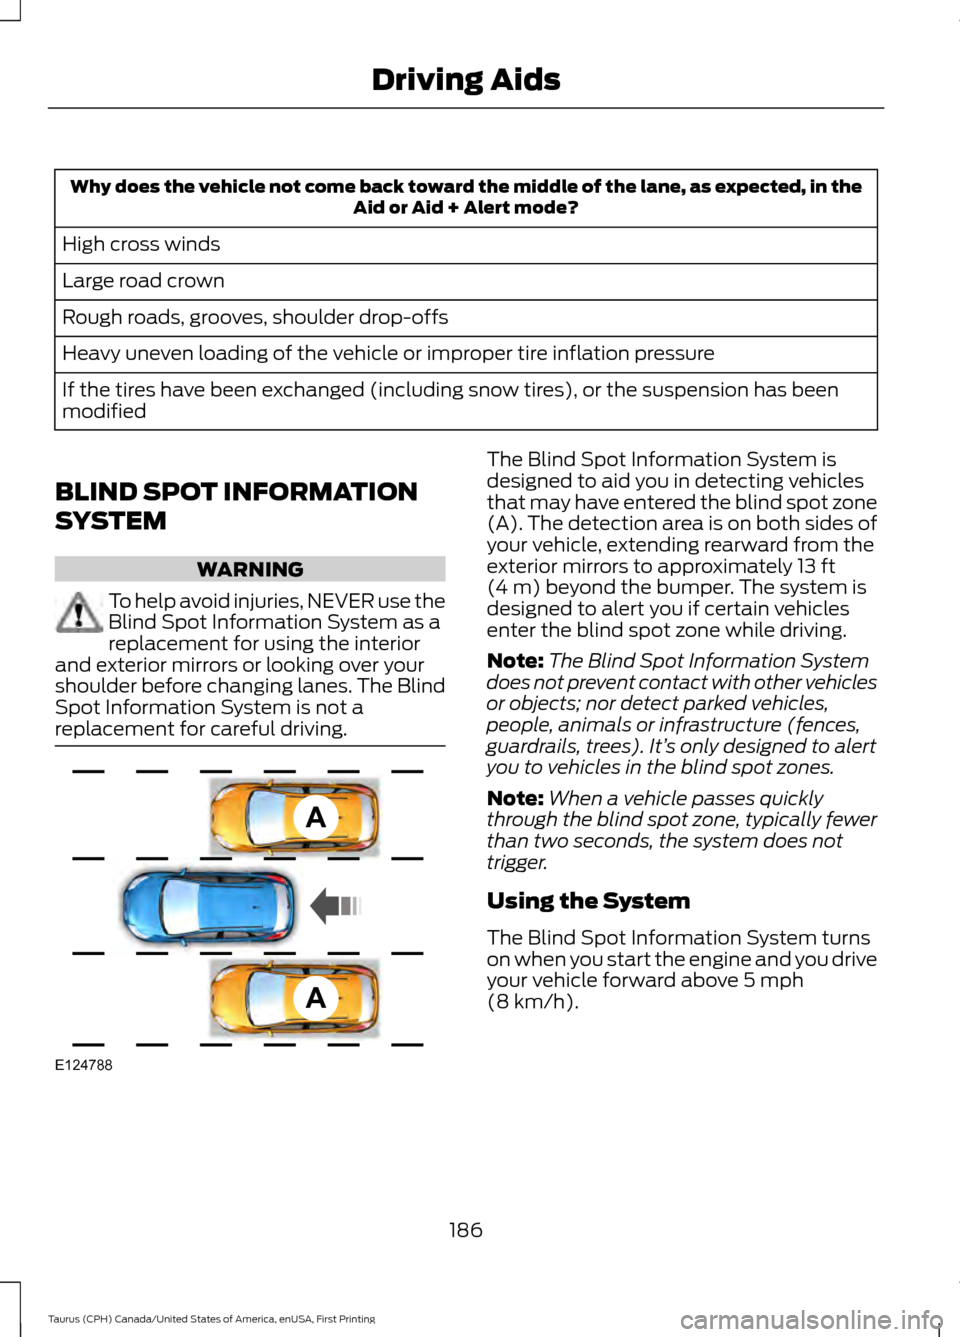
replacement for careful driving. The Blind Spot Information System is
designed to aid you in detecting vehicles
that may have entered the blind spot zone
(A). The detection area is on both sides of
your vehicle, extending rearward from the
exterior mirrors to approximately 13 ft
(4 m) beyond the bumper. The system is
designed to alert you if certain vehicles
enter the blind spot zone while driving.
Note: The Blind Spot Information System
does not prevent contact with other vehicles
or objects; nor detect parked vehicles,
people, animals or infrastructure (fences,
guardrails, trees). It’ s only designed to alert
you to vehicles in the blind spot zones.
Note: When a vehicle passes quickly
through the blind spot zone, typically fewer
than two seconds, the system does not
trigger.
Using the System
The Blind Spot Information System turns
on when you start the engine and you drive
your vehicle forward above
5 mph
(8 km/h).
186
Taurus (CPH) Canada/United States of America, enUSA, First Printing Driving AidsA
A
E124788
Page 212 of 424
BREAKING-IN
You need to break in new tires for
approximately 300 miles (480
kilometers). During this time, your vehicle
may exhibit some unusual driving
characteristics.
Avoid driving too fast during the first 1000
miles (1600 kilometers). Vary your speed
frequently and change up through the
gears early. Do not labor the engine.
Do not tow during the first 1000 miles
(1600 kilometers).
ECONOMICAL DRIVING
Your fuel economy is affected by several
things, such as how you drive, the
conditions you drive under, and how you
maintain your vehicle.
You may improve your fuel economy by
keeping these things in mind:
•
Accelerate and slow down in a smooth,
moderate fashion.
• Drive at steady speeds without
stopping.
• Anticipate stops; slowing down may
eliminate the need to stop.
• Combine errands and minimize
stop-and-go driving.
• Close the windows for high-speed
driving.
• Drive at reasonable speeds (traveling
at 55 mph [88 km/h] uses 15% less
fuel than traveling at 65 mph [105
km/h]).
• Keep the tires properly inflated and use
only the recommended size.
• Use the recommended engine oil.
• Perform all regularly scheduled
maintenance. Avoid these actions; they reduce your fuel
economy:
•
Sudden accelerations or hard
accelerations.
• Revving the engine before turning it off.
• Idle for periods longer than one minute.
• Warm up your vehicle on cold
mornings.
• Use the air conditioner or front
defroster.
• Use the speed control in hilly terrain.
• Rest your foot on the brake pedal while
driving.
• Drive a heavily loaded vehicle or tow a
trailer.
• Carry unnecessary weight
(approximately 1 mpg [0.4 km/L] is
lost for every 400 lb [180 kilogram] of
weight carried).
• Driving with the wheels out of
alignment.
Conditions
• Heavily loading a vehicle or towing a
trailer may reduce fuel economy at any
speed.
• Adding certain accessories to your
vehicle (for example bug deflectors,
rollbars, light bars, running boards, ski
racks or luggage racks) may reduce
fuel economy.
• To maximize the fuel economy, drive
with the tonneau cover installed (if
equipped).
• Using fuel blended with alcohol may
lower fuel economy.
• Fuel economy may decrease with lower
temperatures during the first 8– 10
miles (12 –16 kilometers) of driving.
• Driving on flat terrain offers improved
fuel economy as compared to driving
on hilly terrain.
209
Taurus (CPH) Canada/United States of America, enUSA, First Printing Driving Hints
Page 216 of 424
This program is separate from the New
Vehicle Limited Warranty, but the coverage
is concurrent with the powertrain coverage
period of your vehicle.
Canadian customers who require roadside
assistance, call 1-800-665-2006.
Vehicles Sold in Canada: Using
Roadside Assistance
Complete the roadside assistance
identification card and place it in your
wallet for quick reference.
In Canada, this card is found in the
Warranty Guide in the glove compartment
of your vehicle.
Vehicles Sold in Canada: Roadside
Assistance Program Coverage
The service is available 24 hours a day,
seven days a week.
Canadian roadside coverage and benefits
may differ from the U.S. coverage.
For complete program coverage details
you may contact your dealer, you can call
us in Canada at 1-800-665-2006, or visit
our website at www.ford.ca.
HAZARD WARNING FLASHERS
Note:
If used when the vehicle is not
running, the battery will lose charge. There
may be insufficient power to restart your
vehicle. The hazard warning button is
located on the instrument panel.
Use it when your vehicle is
creating a safety hazard for other
motorists.
• Press the button to turn on the hazard
warning function, and the front and
rear direction indicators will flash.
• Press the button again to turn them
off. FUEL SHUTOFF WARNING
Failure to inspect and, if necessary,
repair fuel leaks after a collision may
increase the risk of fire and serious
injury. Ford Motor Company recommends
that the fuel system be inspected by an
authorized dealer after any collision. In the event of a moderate to severe
collision, this vehicle includes a fuel pump
shutoff feature that stops the flow of fuel
to the engine. Not every impact will cause
a shutoff.
Should your vehicle shut off after a
collision, you may restart your vehicle. For
vehicles equipped with a key system:
1. Switch off the ignition.
2. Switch on the ignition.
3. Repeat Steps 1 and 2 to re-enable the
fuel pump.
For vehicles equipped with a push button
start system:
1. Press the START/STOP button to
switch off the ignition.
2. Press the brake pedal and press the START/STOP
button to switch on the
ignition.
3. Remove your foot from the brake pedal
and press the
START/STOP button
to switch off the ignition.
4. You can either attempt to start the engine by pressing the brake pedal and
the
START/STOP button, or switch
on the ignition only by pressing the
START/STOP
button without
pressing the brake pedal. Both ways
re-enable the fuel system.
213
Taurus (CPH) Canada/United States of America, enUSA, First Printing Roadside Emergencies