2016 FORD SUPER DUTY mirror
[x] Cancel search: mirrorPage 112 of 510
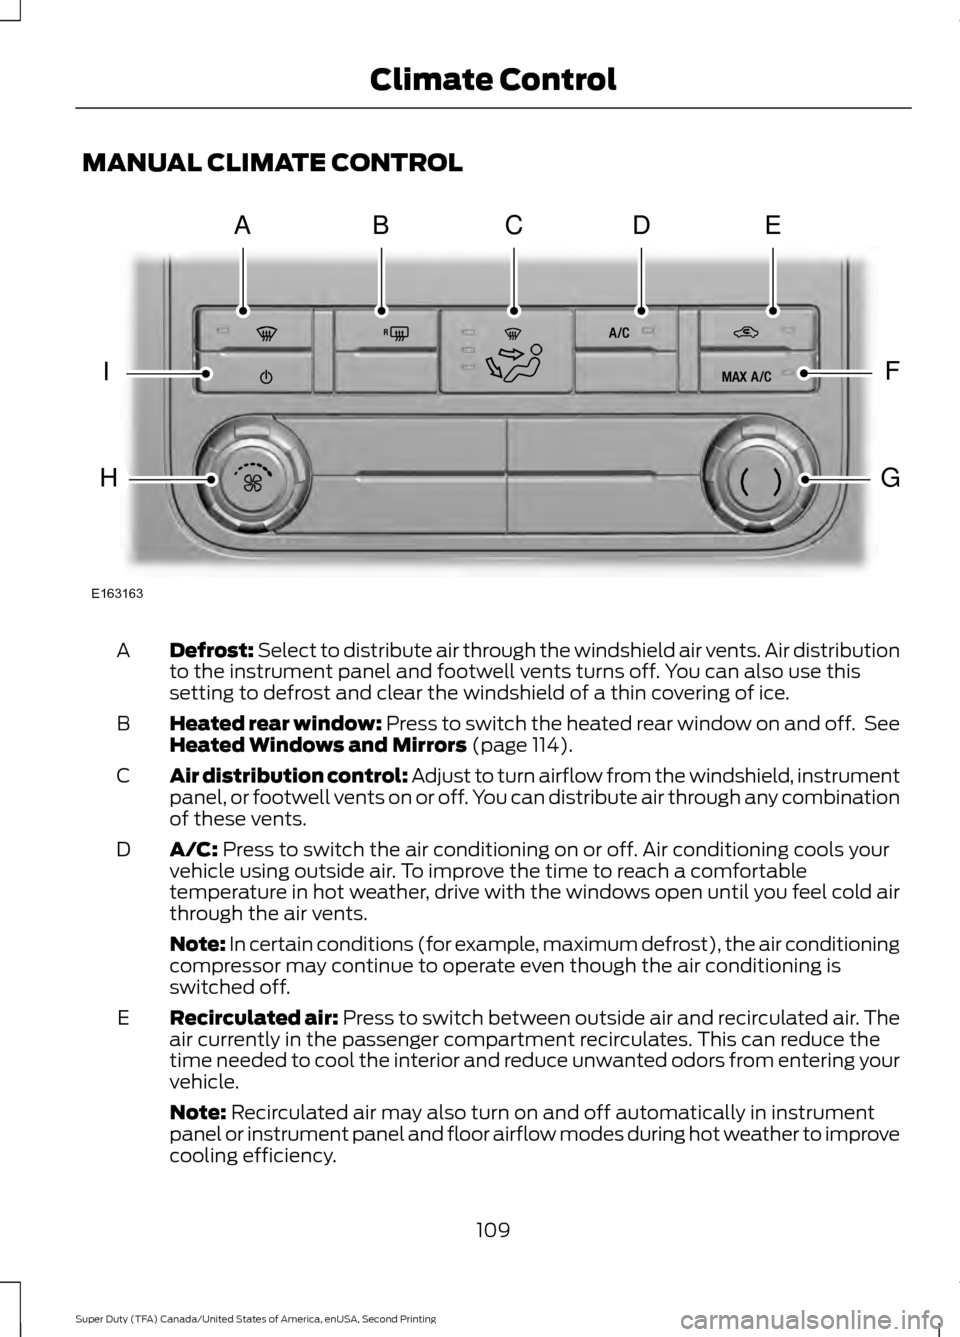
MANUAL CLIMATE CONTROL
Defrost: Select to distribute air through the windshield air vents. Air distribution
to the instrument panel and footwell vents turns off. You can also use this
setting to defrost and clear the windshield of a thin covering of ice.
A
Heated rear window: Press to switch the heated rear window on and off. See
Heated Windows and Mirrors (page 114).
B
Air distribution control: Adjust to turn airflow from the windshield, instrument
panel, or footwell vents on or off. You can distribute air through any combination
of these vents.
C
A/C:
Press to switch the air conditioning on or off. Air conditioning cools your
vehicle using outside air. To improve the time to reach a comfortable
temperature in hot weather, drive with the windows open until you feel cold air
through the air vents.
D
Note: In certain conditions (for example, maximum defrost), the air conditioning
compressor may continue to operate even though the air conditioning is
switched off.
Recirculated air:
Press to switch between outside air and recirculated air. The
air currently in the passenger compartment recirculates. This can reduce the
time needed to cool the interior and reduce unwanted odors from entering your
vehicle.
E
Note:
Recirculated air may also turn on and off automatically in instrument
panel or instrument panel and floor airflow modes during hot weather to improve
cooling efficiency.
109
Super Duty (TFA) Canada/United States of America, enUSA, Second Printing Climate ControlE163163
ABDCE
F
G
I
H
Page 113 of 510
MAX A/C: Adjust for maximum cooling. Recirculated air flows through the
instrument panel vents and air conditioning automatically turns on.
F
Temperature control:
Controls the temperature of the air circulated in your
vehicle.
G
Fan speed control:
Adjusts the volume of air circulated in the vehicle.
H
Power:
Press to switch the system on and off. When the system is off, it
prevents outside air from entering the vehicle.
I
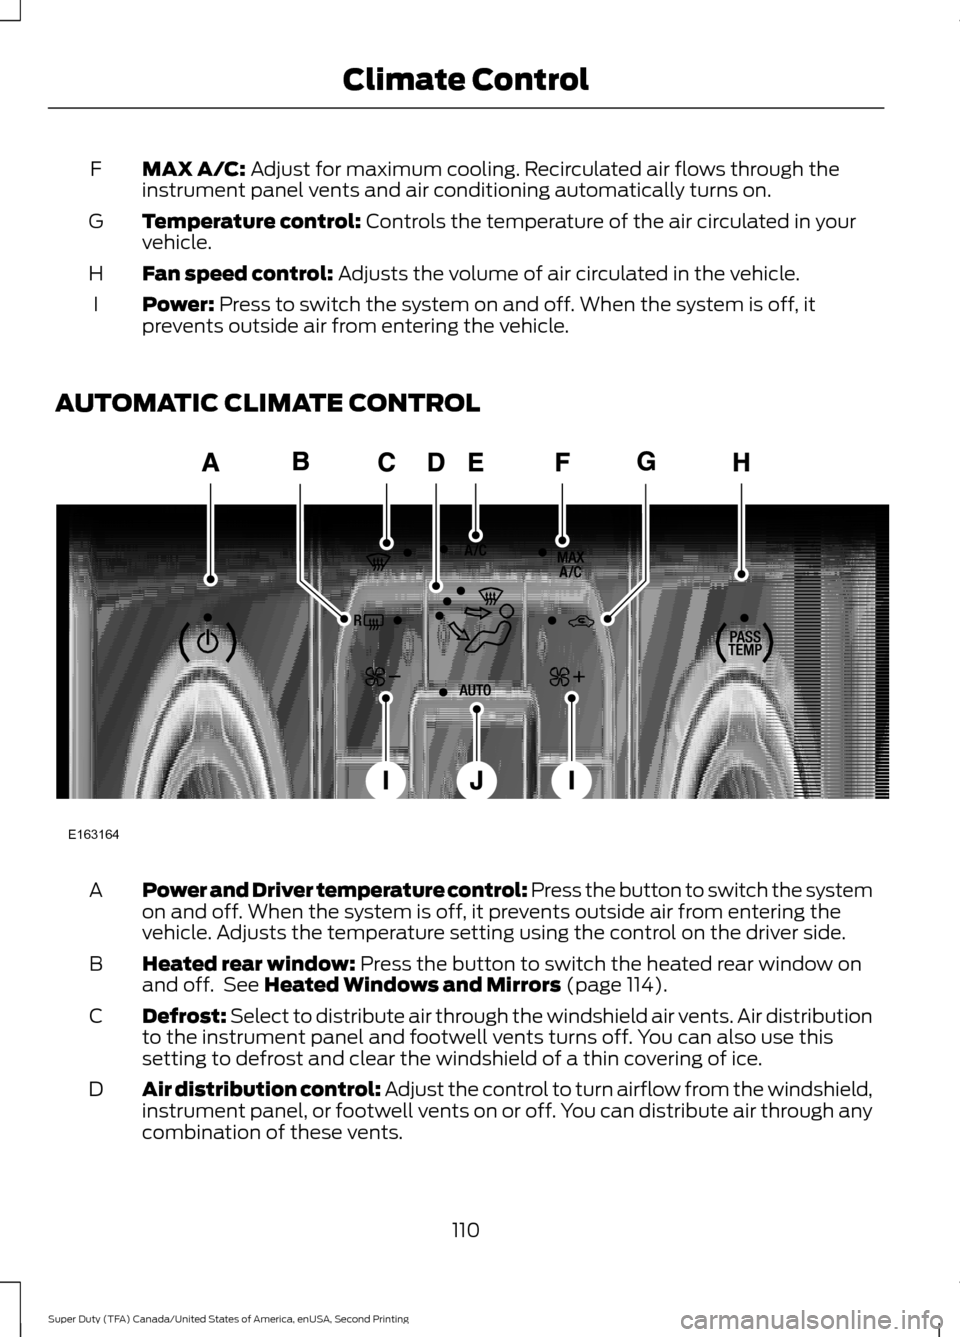
AUTOMATIC CLIMATE CONTROL Power and Driver temperature control: Press the button to switch the system
on and off. When the system is off, it prevents outside air from entering the
vehicle. Adjusts the temperature setting using the control on the driver side.
A
Heated rear window:
Press the button to switch the heated rear window on
and off. See Heated Windows and Mirrors (page 114).
B
Defrost: Select to distribute air through the windshield air vents. Air distribution
to the instrument panel and footwell vents turns off. You can also use this
setting to defrost and clear the windshield of a thin covering of ice.
C
Air distribution control: Adjust the control to turn airflow from the windshield,
instrument panel, or footwell vents on or off. You can distribute air through any
combination of these vents.
D
110
Super Duty (TFA) Canada/United States of America, enUSA, Second Printing Climate ControlE163164
Page 117 of 510
HEATED WINDOWS AND
MIRRORS
Heated Rear Window (If Equipped)
Note: Make sure the engine is running
before operating the heated windows.
Note: If your vehicle is equipped with a
sliding rear window, the feature still
operates when you open the window. Press the button to clear the
heated rear window of thin ice
and fog. The heated rear window
will automatically turn off after a short
period of time. Start the engine before you
switch the heated rear window on.
Do not use razor blades or other sharp
objects to clean or remove decals from
the inside of the heated rear window.
The vehicle warranty does not cover
damage caused to the heated rear
window grid lines.
Heated Exterior Mirror
When you switch the heated rear window
on, the heated exterior mirrors will
automatically turn on.
Note: Do not remove ice from the mirrors
with a scraper or adjust the mirror glass
when it is frozen in place.
Note: Do not clean the mirror housing or
glass with harsh abrasives, fuel or other
petroleum-based cleaning products.
REMOTE START
(If Equipped)
The remote start feature allows you to
pre-condition the interior of your vehicle.
The climate control system works to
achieve comfort according to your previous
settings.
Note: You cannot adjust the system during
remote start operation. Turn the ignition on to return the system
to its previous settings. You can now make
adjustments normally, but you need to turn
certain vehicle-dependent features back
on, such as:
•
Heated seats.
• Cooled seats.
• Heated steering wheel.
• Heated mirrors.
• Heated rear window.
You can adjust the default remote start
settings using the information display
controls. See
Information Displays
(page 88).
Automatic Settings
In hot weather, the system is set to
72°F
(22°C). The cooled seats are set to high
(if available, and selected to AUTO in the
information display).
In moderate weather, the system either
heats or cools (based on previous
settings). The rear defroster, heated
mirrors and heated seats do not
automatically turn on.
In cold weather, the system is set to
72°F
(22°C). The heated seats are set to high
(if available, and selected to AUTO in the
information display). The rear defroster
and heated mirrors automatically turn on.
114
Super Duty (TFA) Canada/United States of America, enUSA, Second Printing Climate ControlE184884
Page 122 of 510
WARNINGS
Do not use the memory function
when your vehicle is moving.
This feature automatically recalls the
position of the following:
•
Driver seat.
• Power mirrors.
• Optional adjustable pedals.
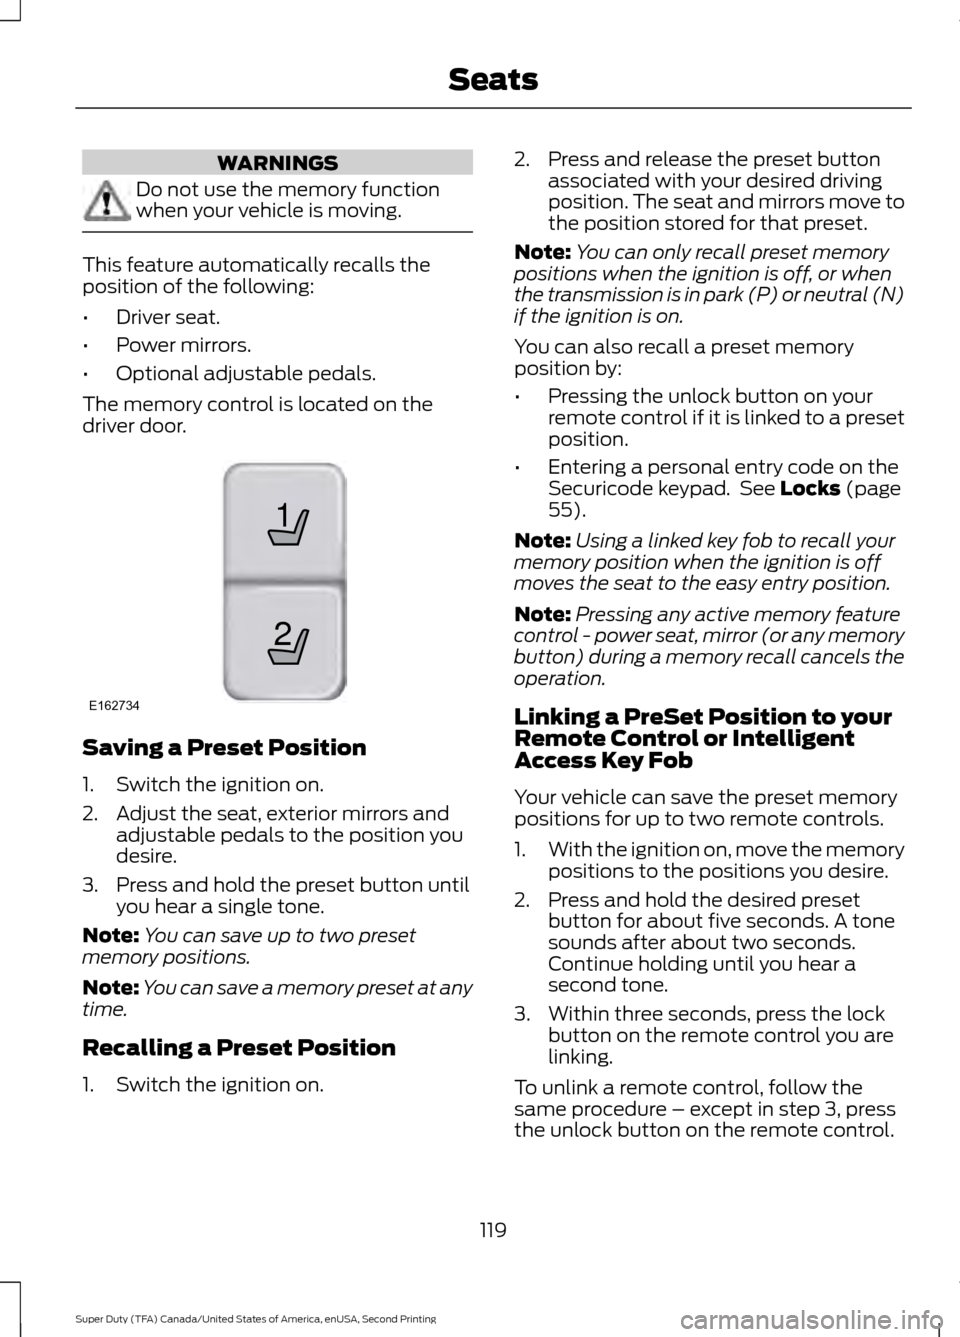
The memory control is located on the
driver door. Saving a Preset Position
1. Switch the ignition on.
2. Adjust the seat, exterior mirrors and
adjustable pedals to the position you
desire.
3. Press and hold the preset button until you hear a single tone.
Note: You can save up to two preset
memory positions.
Note: You can save a memory preset at any
time.
Recalling a Preset Position
1. Switch the ignition on. 2. Press and release the preset button
associated with your desired driving
position. The seat and mirrors move to
the position stored for that preset.
Note: You can only recall preset memory
positions when the ignition is off, or when
the transmission is in park (P) or neutral (N)
if the ignition is on.
You can also recall a preset memory
position by:
• Pressing the unlock button on your
remote control if it is linked to a preset
position.
• Entering a personal entry code on the
Securicode keypad. See Locks (page
55).
Note: Using a linked key fob to recall your
memory position when the ignition is off
moves the seat to the easy entry position.
Note: Pressing any active memory feature
control - power seat, mirror (or any memory
button) during a memory recall cancels the
operation.
Linking a PreSet Position to your
Remote Control or Intelligent
Access Key Fob
Your vehicle can save the preset memory
positions for up to two remote controls.
1. With the ignition on, move the memory
positions to the positions you desire.
2. Press and hold the desired preset button for about five seconds. A tone
sounds after about two seconds.
Continue holding until you hear a
second tone.
3. Within three seconds, press the lock button on the remote control you are
linking.
To unlink a remote control, follow the
same procedure – except in step 3, press
the unlock button on the remote control.
119
Super Duty (TFA) Canada/United States of America, enUSA, Second Printing Seats21
E162734
Page 181 of 510
The system detects certain objects while
the transmission is in reverse (R):
•
Your vehicle is moving toward a
stationary object at a speed of 3 mph
(5 km/h) or less.
• Your vehicle is not moving, but a
moving object is approaching the rear
of your vehicle at a speed of
3 mph
(5 km/h) or less.
• Your vehicle is moving at a speed of
less than 3 mph (5 km/h) and a moving
object is approaching the rear of your
vehicle at a speed of less than
3 mph
(5 km/h).
REAR VIEW CAMERA
(If Equipped) WARNINGS
The rear view camera system is a
reverse aid supplement device that
still requires the driver to use it in
conjunction with the interior and exterior
mirrors for maximum coverage. Objects that are close to either
corner of the bumper or under the
bumper, might not be seen on the
screen due to the limited coverage of the
camera system. Back up as slow as possible since
higher speeds might limit your
reaction time to stop the vehicle.
Use caution when using the rear
video camera and the tailgate is ajar.
If the tailgate is ajar, the camera will
be out of position and the video image may
be incorrect. All guidelines will be removed
when the tailgate is ajar. Use caution when turning camera
features on or off while in reverse
(R). Make sure your vehicle is not
moving. The rear view camera system provides a
video image of the area behind your
vehicle.
During operation, lines appear in the
display which represent your vehicle
’s path
and proximity to objects behind your
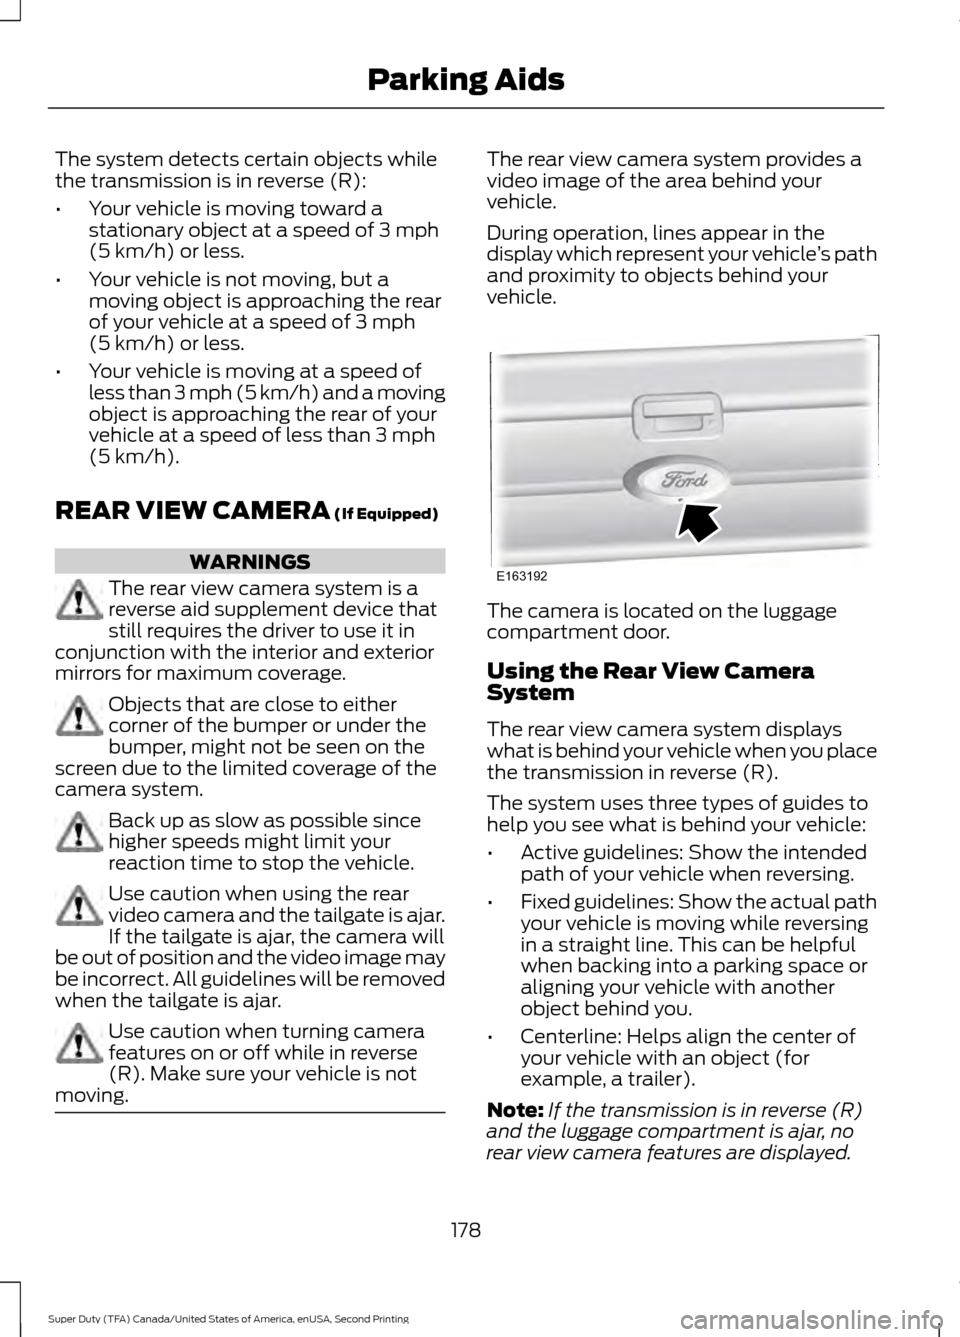
vehicle. The camera is located on the luggage
compartment door.
Using the Rear View Camera
System
The rear view camera system displays
what is behind your vehicle when you place
the transmission in reverse (R).
The system uses three types of guides to
help you see what is behind your vehicle:
•
Active guidelines: Show the intended
path of your vehicle when reversing.
• Fixed guidelines: Show the actual path
your vehicle is moving while reversing
in a straight line. This can be helpful
when backing into a parking space or
aligning your vehicle with another
object behind you.
• Centerline: Helps align the center of
your vehicle with an object (for
example, a trailer).
Note: If the transmission is in reverse (R)
and the luggage compartment is ajar, no
rear view camera features are displayed.
178
Super Duty (TFA) Canada/United States of America, enUSA, Second Printing Parking AidsE163192
Page 183 of 510
Always use caution while reversing.
Objects in the red zone are closest to your
vehicle and objects in the green zone are
farther away. Objects are getting closer to
your vehicle as they move from the green
zone to the yellow or red zones. Use the
side view mirrors and rear view mirror to
get better coverage on both sides and rear
of your vehicle.
Enhanced Park Aids or Park Pilot
Note:
Enhanced park aids is only available
when the transmission is in reverse (R).
Note: The reverse sensing system is not
effective at speeds above 3 mph (5 km/h)
and may not detect certain angular or
moving objects.
The system uses red, yellow and green
highlights which appear on top of the video
image when an object is detected by the
reverse sensing system. The alert highlights
the closest object detected. The reverse
sensing alert can be disabled and if visual
park aid alert is enabled, highlighted areas
are still displayed.
Selectable settings for this feature are ON
and OFF.
Rear Camera Delay
Selectable settings for this feature are ON
and OFF.
When shifting the transmission out of
reverse (R) and into any gear other than
park (P), the camera image remains in the
display until:
• Your vehicle speed sufficiently
increases.
• You shift your vehicle into park (P).
180
Super Duty (TFA) Canada/United States of America, enUSA, Second Printing Parking Aids
Page 199 of 510
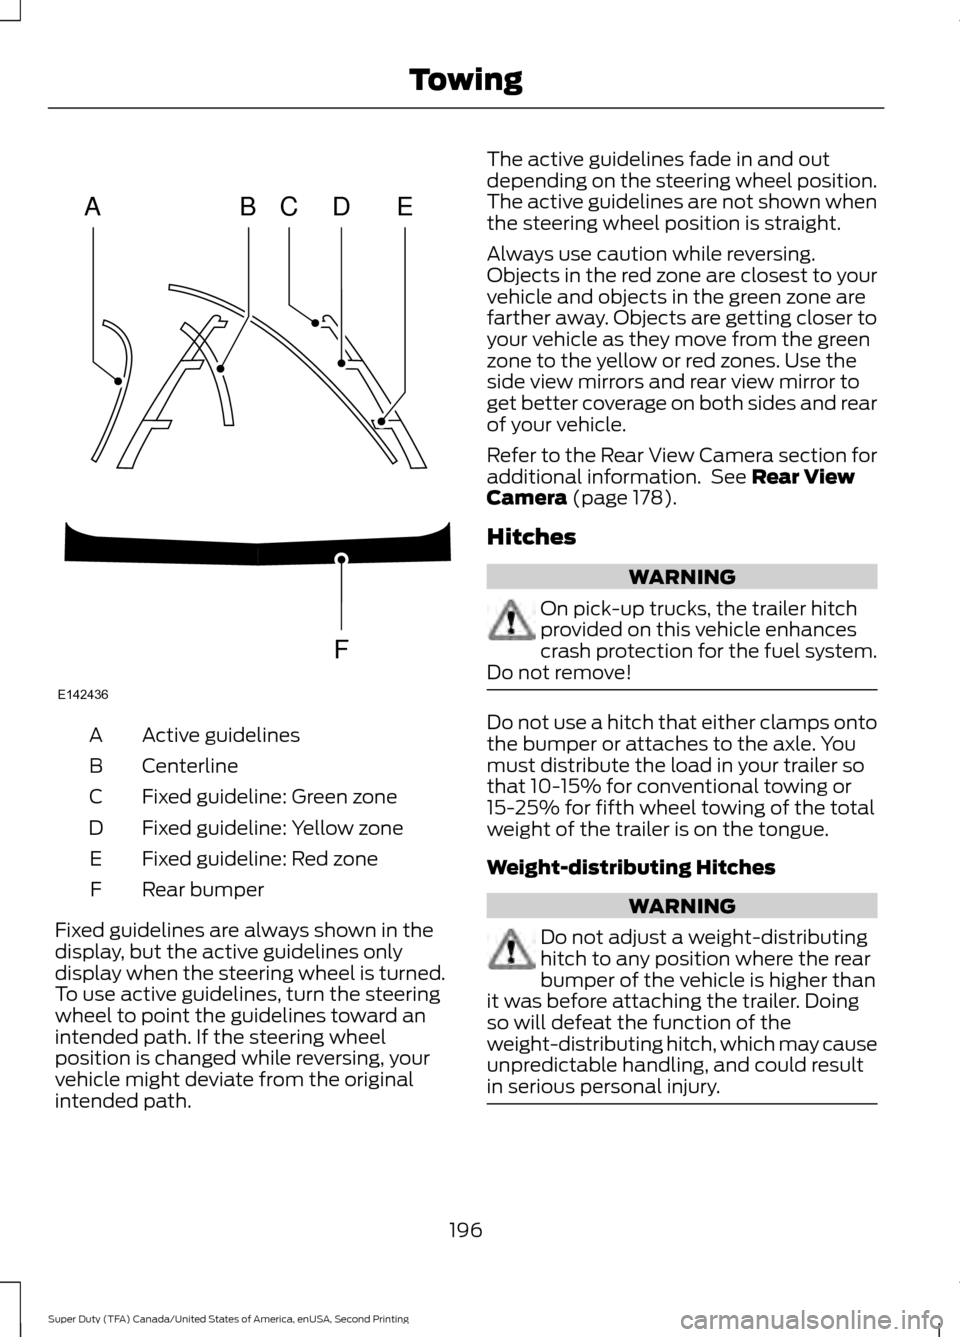
Active guidelines
A
Centerline
B
Fixed guideline: Green zone
C
Fixed guideline: Yellow zone
D
Fixed guideline: Red zone
E
Rear bumper
F
Fixed guidelines are always shown in the
display, but the active guidelines only
display when the steering wheel is turned.
To use active guidelines, turn the steering
wheel to point the guidelines toward an
intended path. If the steering wheel
position is changed while reversing, your
vehicle might deviate from the original
intended path. The active guidelines fade in and out
depending on the steering wheel position.
The active guidelines are not shown when
the steering wheel position is straight.
Always use caution while reversing.
Objects in the red zone are closest to your
vehicle and objects in the green zone are
farther away. Objects are getting closer to
your vehicle as they move from the green
zone to the yellow or red zones. Use the
side view mirrors and rear view mirror to
get better coverage on both sides and rear
of your vehicle.
Refer to the Rear View Camera section for
additional information. See Rear View
Camera (page 178).
Hitches WARNING
On pick-up trucks, the trailer hitch
provided on this vehicle enhances
crash protection for the fuel system.
Do not remove! Do not use a hitch that either clamps onto
the bumper or attaches to the axle. You
must distribute the load in your trailer so
that 10-15% for conventional towing or
15-25% for fifth wheel towing of the total
weight of the trailer is on the tongue.
Weight-distributing Hitches
WARNING
Do not adjust a weight-distributing
hitch to any position where the rear
bumper of the vehicle is higher than
it was before attaching the trailer. Doing
so will defeat the function of the
weight-distributing hitch, which may cause
unpredictable handling, and could result
in serious personal injury. 196
Super Duty (TFA) Canada/United States of America, enUSA, Second Printing TowingABCD
F
E
E142436
Page 226 of 510

FUSE SPECIFICATION CHART
Power Distribution Box
WARNINGS
Always disconnect the battery before
servicing high current fuses.
To reduce risk of electrical shock,
always replace the cover to the
power distribution box before
reconnecting the battery or refilling fluid
reservoirs. The power distribution box is located in
the engine compartment. It has
high-current fuses that protect your
vehicle's main electrical systems from
overloads.
If you disconnect and reconnect the
battery, you will need to reset some
features. See Changing the 12V Battery
(page 245).
Protected components
Fuse amp rating
Fuse or relay number
Blower motor
Relay
1
Not used
—
2
Urea heaters (diesel engine)
Relay
3
Not used
—
4
Heated mirrors
Relay
5
Rear window defroster
Not used
—
6
Heated mirrors
50A*
7
Rear window defroster
Passenger seat
30A*
8
Driver seat
30A*
9
223
Super Duty (TFA) Canada/United States of America, enUSA, Second Printing FusesE163101