2016 FORD SUPER DUTY change time
[x] Cancel search: change timePage 103 of 510
Diesel Messages
WARNING
When the CLEANING EXHAUST
FILTER message appears in the
information display, do not park near
flammable materials, vapors or structures
until filter cleaning is complete. Action
Message
The coolant additive needs checking. Refer to your dieselsupplement for more information.
CHECK COOLANT
ADDITIVE
Your vehicle has entered the cleaning mode. Various engineactions will raise the exhaust temperature in the Diesel
Particulate Filter system to burn off the particles (exhaust soot). After the vehicle burns the particles off the exhaust temperature will return to normal levels. This message is
NORMAL. Refer to your diesel supplement for more informa- tion.
CLEANING EXHAUST
FILTER
The diesel particulate filter is full of particles (exhaust soot)
and you are not operating the vehicle in a manner that allows
normal cleaning. One of these messages will stay on until the
exhaust filter cleaning has begun, at which time the CLEANING EXHAUST FILTER message displays. We recommend you
drive the vehicle above 30 mph (48 km/h) until the CLEANING EXHAUST FILTER message turns off. Refer to your diesel supplement for more information.
EXHAUST OVER-
LOADED DRIVE TO CLEAN
EXHAUST AT LIMIT
DRIVE TO CLEAN NOW
The diesel particulate filter will continue to fill with particles
(exhaust soot) if you ignore this message. The service engine soon light will illuminate and engine power may be limited, if
cleaning is not permitted. Dealer service will then be required to restore your vehicle to full-power operation.
Your vehicle exhaust system temperature exceeds intended operating range. If this warning occurs, a chime will sound,
followed by reduced engine power. The engine will shut down when your vehicle speed is below 3 mph (5 km/h). Stop the
vehicle as soon as safely possible. Have the system checked by an authorized dealer.
STOP SAFELY NOW
The diluted engine oil needs to be changed. Refer to yourdiesel supplement for more information.
ENGINE OIL DILUTED
The powertrain control module will intentionally turn the
engine off due to your vehicle being in the final second of a
countdown. The diesel engine shutdown is an optional feature. Refer to your diesel supplement for more information.
ENGINE TURNS OFF IN
1 SECOND
100
Super Duty (TFA) Canada/United States of America, enUSA, Second Printing Information Displays
Page 136 of 510
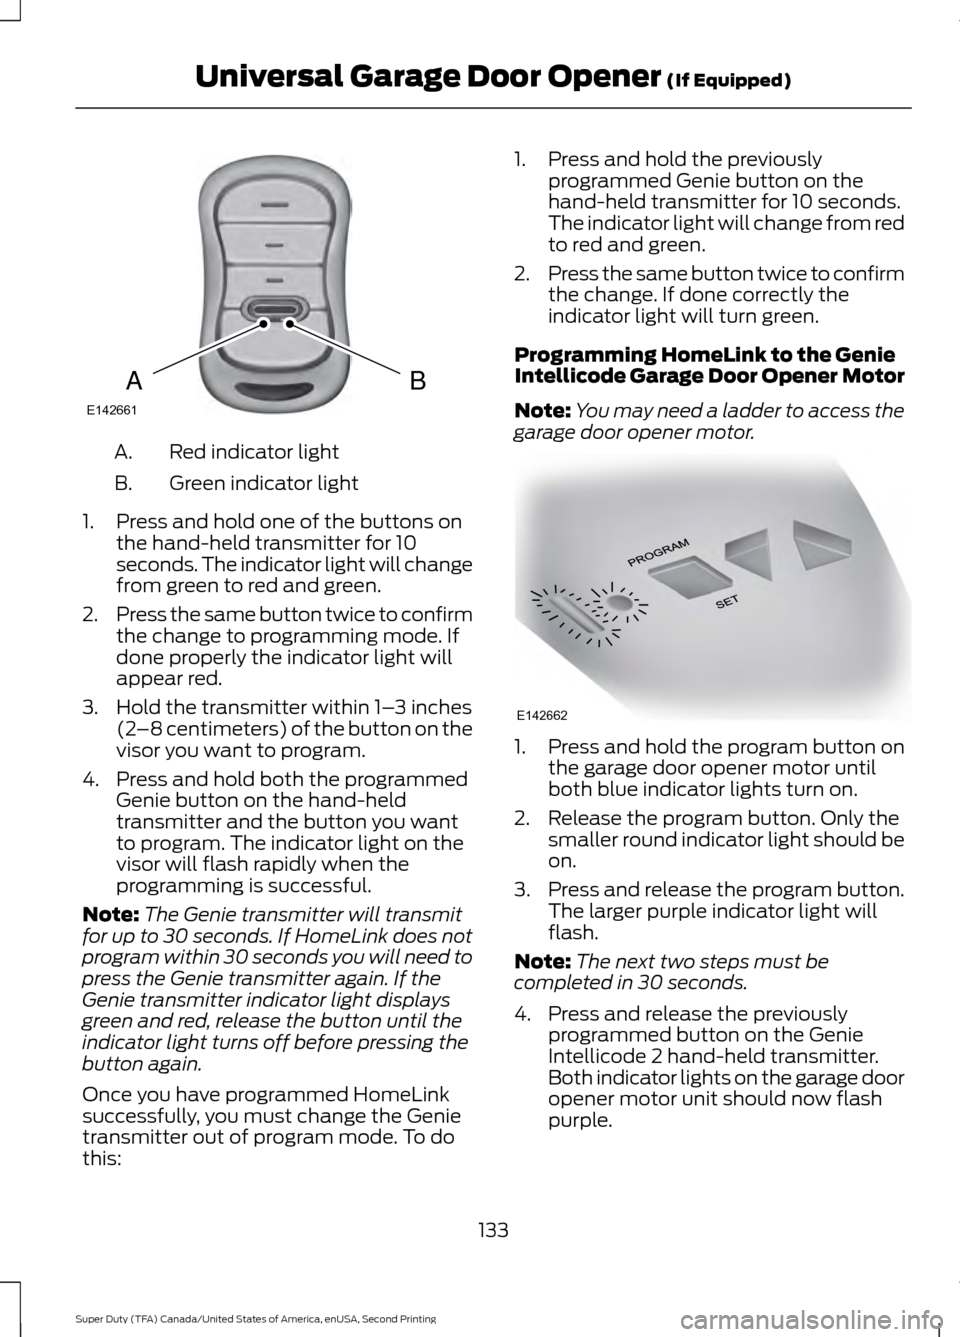
Red indicator light
A.
Green indicator light
B.
1. Press and hold one of the buttons on the hand-held transmitter for 10
seconds. The indicator light will change
from green to red and green.
2. Press the same button twice to confirm
the change to programming mode. If
done properly the indicator light will
appear red.
3. Hold the transmitter within 1– 3 inches
(2 –8 centimeters) of the button on the
visor you want to program.
4. Press and hold both the programmed Genie button on the hand-held
transmitter and the button you want
to program. The indicator light on the
visor will flash rapidly when the
programming is successful.
Note: The Genie transmitter will transmit
for up to 30 seconds. If HomeLink does not
program within 30 seconds you will need to
press the Genie transmitter again. If the
Genie transmitter indicator light displays
green and red, release the button until the
indicator light turns off before pressing the
button again.
Once you have programmed HomeLink
successfully, you must change the Genie
transmitter out of program mode. To do
this: 1. Press and hold the previously
programmed Genie button on the
hand-held transmitter for 10 seconds.
The indicator light will change from red
to red and green.
2. Press the same button twice to confirm
the change. If done correctly the
indicator light will turn green.
Programming HomeLink to the Genie
Intellicode Garage Door Opener Motor
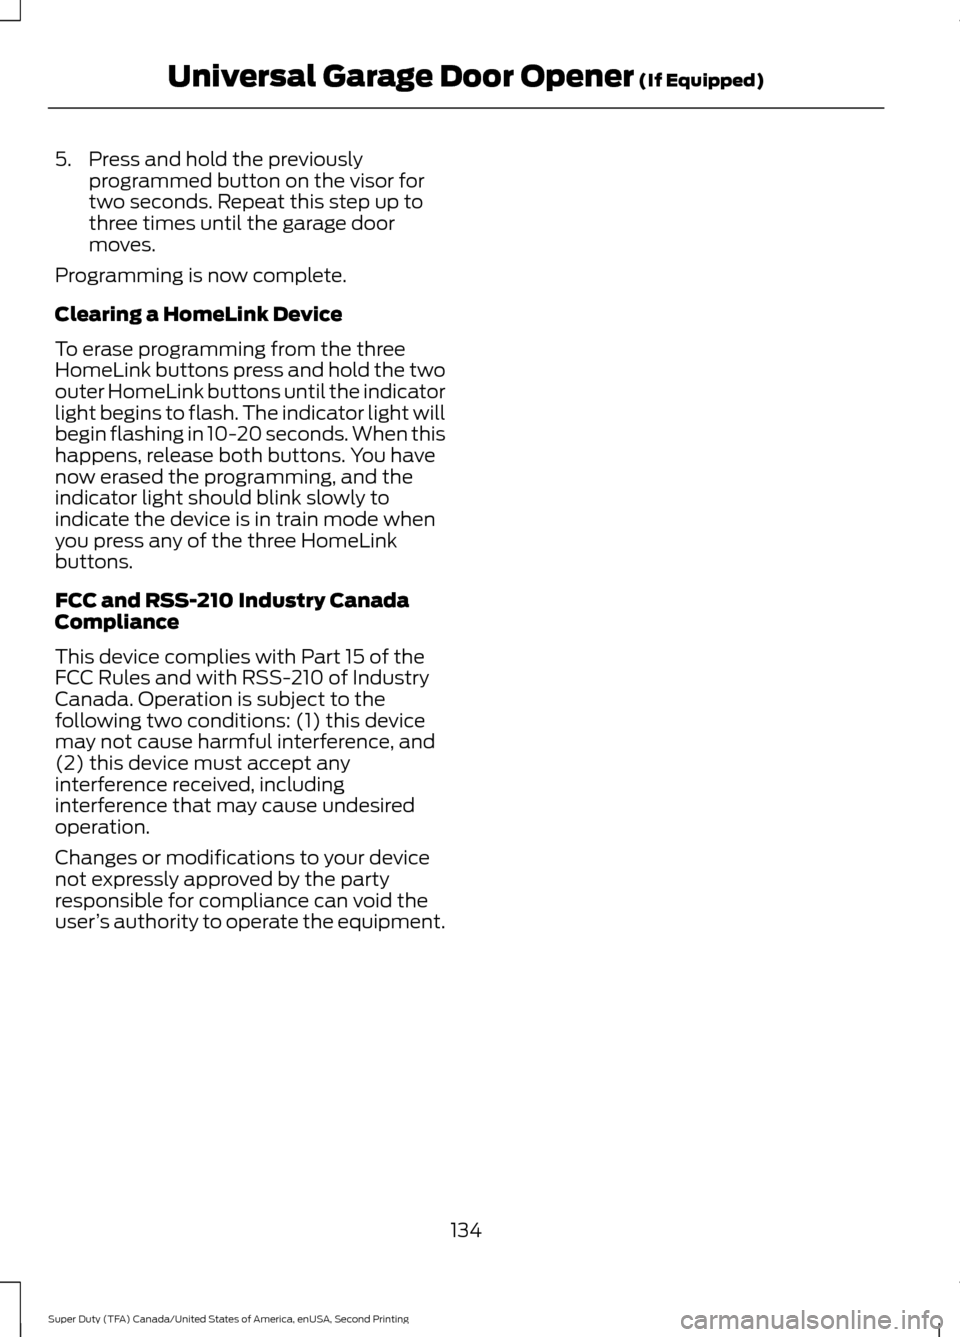
Note: You may need a ladder to access the
garage door opener motor. 1. Press and hold the program button on
the garage door opener motor until
both blue indicator lights turn on.
2. Release the program button. Only the smaller round indicator light should be
on.
3. Press and release the program button.
The larger purple indicator light will
flash.
Note: The next two steps must be
completed in 30 seconds.
4. Press and release the previously programmed button on the Genie
Intellicode 2 hand-held transmitter.
Both indicator lights on the garage door
opener motor unit should now flash
purple.
133
Super Duty (TFA) Canada/United States of America, enUSA, Second Printing Universal Garage Door Opener (If Equipped)BAE142661 E142662
Page 137 of 510
5. Press and hold the previously
programmed button on the visor for
two seconds. Repeat this step up to
three times until the garage door
moves.
Programming is now complete.
Clearing a HomeLink Device
To erase programming from the three
HomeLink buttons press and hold the two
outer HomeLink buttons until the indicator
light begins to flash. The indicator light will
begin flashing in 10-20 seconds. When this
happens, release both buttons. You have
now erased the programming, and the
indicator light should blink slowly to
indicate the device is in train mode when
you press any of the three HomeLink
buttons.
FCC and RSS-210 Industry Canada
Compliance
This device complies with Part 15 of the
FCC Rules and with RSS-210 of Industry
Canada. Operation is subject to the
following two conditions: (1) this device
may not cause harmful interference, and
(2) this device must accept any
interference received, including
interference that may cause undesired
operation.
Changes or modifications to your device
not expressly approved by the party
responsible for compliance can void the
user ’s authority to operate the equipment.
134
Super Duty (TFA) Canada/United States of America, enUSA, Second Printing Universal Garage Door Opener (If Equipped)
Page 150 of 510
The scheduled maintenance items listed
in scheduled maintenance information are
essential to the life and performance of
your vehicle and to its emissions system.
See Scheduled Maintenance (page 456).
If you use parts other than Ford, Motorcraft
or Ford-authorized parts for maintenance
replacements, or for service of
components affecting emission control,
such non-Ford parts should be the
equivalent to genuine Ford Motor Company
parts in performance and durability.
Illumination of the service engine soon
indicator, charging system warning light or
the temperature warning light, fluid leaks,
strange odors, smoke or loss of engine
power could indicate that the emission
control system is not working properly.
An improperly operating or damaged
exhaust system may allow exhaust to
enter the vehicle. Have a damaged or
improperly operating exhaust system
inspected and repaired immediately.
Do not make any unauthorized changes to
your vehicle or engine. By law, vehicle
owners and anyone who manufactures,
repairs, services, sells, leases, trades
vehicles, or supervises a fleet of vehicles
are not permitted to intentionally remove
an emission control device or prevent it
from working. Information about your
vehicle
’s emission system is on the Vehicle
Emission Control Information Decal
located on or near the engine. This decal
also lists engine displacement
Please consult your warranty information
for complete details. On-Board Diagnostics (OBD-II)
Your vehicle has a computer known as the
on-board diagnostics system (OBD-II) that
monitors the engine
’s emission control
system. The system protects the
environment by making sure that your
vehicle continues to meet government
emission standards. The OBD-II system
also assists a service technician in properly
servicing your vehicle. When the service engine soon
indicator illuminates, the OBD-II
system has detected a
malfunction. Temporary malfunctions may
cause the service engine soon indicator to
illuminate.
Examples of temporary malfunctions are:
• the vehicle has run out of fuel —the
engine may misfire or run poorly
• poor fuel quality or water in the
fuel —the engine may misfire or run
poorly
• the fuel fill inlet may not have closed
properly. See Refueling (page 144).
• driving through deep water —the
electrical system may be wet.
You can correct these temporary
malfunctions by filling the fuel tank with
good quality fuel, properly closing the fuel
fill inlet or letting the electrical system dry
out. After three driving cycles without these
or any other temporary malfunctions
present, the service engine soon indicator
should stay off the next time you start the
engine. A driving cycle consists of a cold
engine startup followed by mixed
city/highway driving. No additional vehicle
service is required.
147
Super Duty (TFA) Canada/United States of America, enUSA, Second Printing Fuel and Refueling
Page 155 of 510
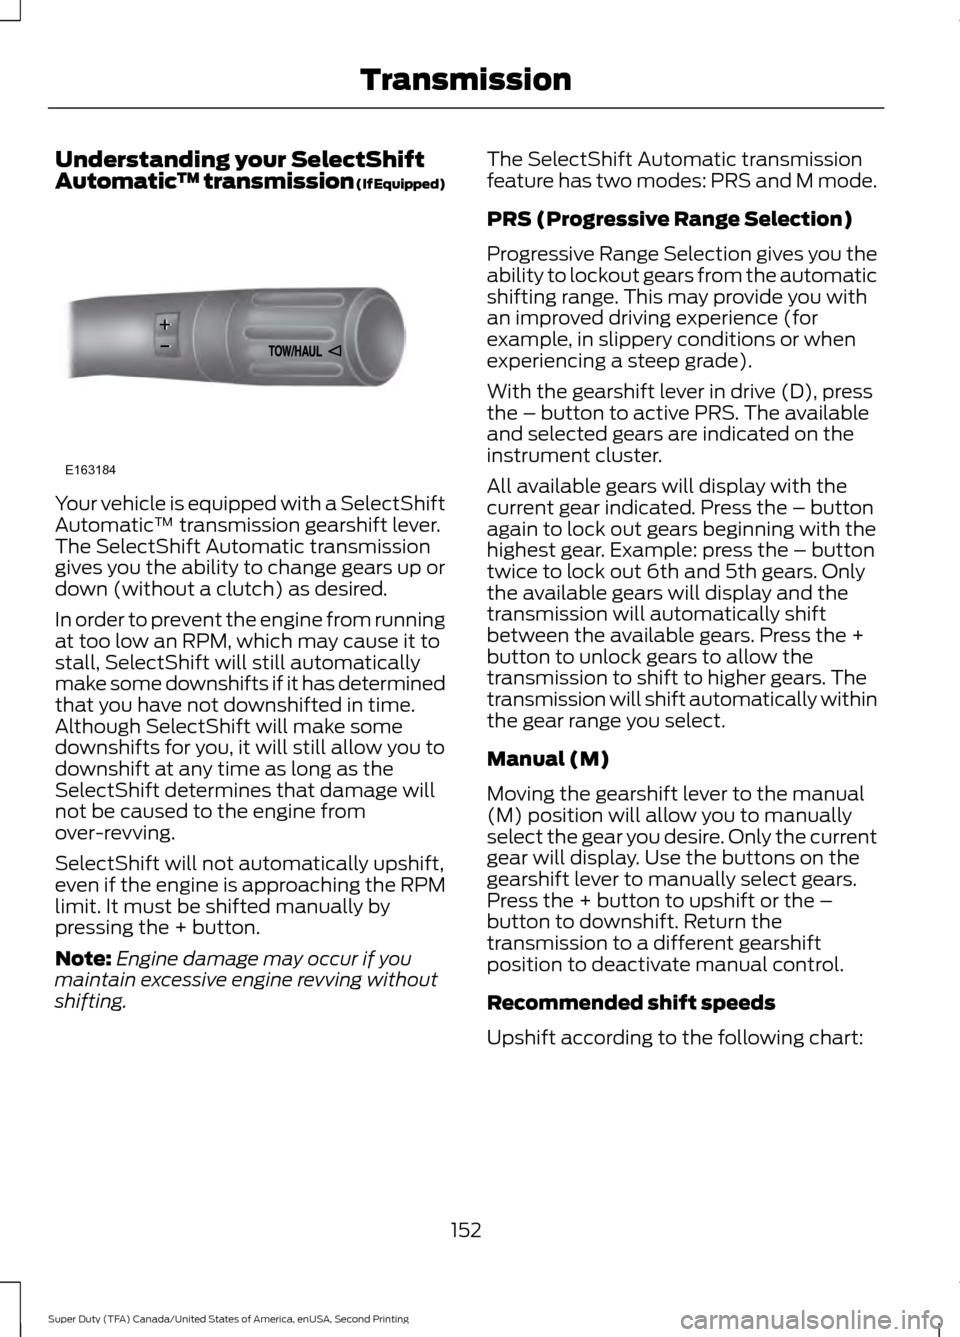
Understanding your SelectShift
Automatic
™ transmission (If Equipped)Your vehicle is equipped with a SelectShift
Automatic
™ transmission gearshift lever.
The SelectShift Automatic transmission
gives you the ability to change gears up or
down (without a clutch) as desired.
In order to prevent the engine from running
at too low an RPM, which may cause it to
stall, SelectShift will still automatically
make some downshifts if it has determined
that you have not downshifted in time.
Although SelectShift will make some
downshifts for you, it will still allow you to
downshift at any time as long as the
SelectShift determines that damage will
not be caused to the engine from
over-revving.
SelectShift will not automatically upshift,
even if the engine is approaching the RPM
limit. It must be shifted manually by
pressing the + button.
Note: Engine damage may occur if you
maintain excessive engine revving without
shifting. The SelectShift Automatic transmission
feature has two modes: PRS and M mode.
PRS (Progressive Range Selection)
Progressive Range Selection gives you the
ability to lockout gears from the automatic
shifting range. This may provide you with
an improved driving experience (for
example, in slippery conditions or when
experiencing a steep grade).
With the gearshift lever in drive (D), press
the – button to active PRS. The available
and selected gears are indicated on the
instrument cluster.
All available gears will display with the
current gear indicated. Press the – button
again to lock out gears beginning with the
highest gear. Example: press the – button
twice to lock out 6th and 5th gears. Only
the available gears will display and the
transmission will automatically shift
between the available gears. Press the +
button to unlock gears to allow the
transmission to shift to higher gears. The
transmission will shift automatically within
the gear range you select.
Manual (M)
Moving the gearshift lever to the manual
(M) position will allow you to manually
select the gear you desire. Only the current
gear will display. Use the buttons on the
gearshift lever to manually select gears.
Press the + button to upshift or the –
button to downshift. Return the
transmission to a different gearshift
position to deactivate manual control.
Recommended shift speeds
Upshift according to the following chart:
152
Super Duty (TFA) Canada/United States of America, enUSA, Second Printing TransmissionE163184
Page 163 of 510
If SHIFT DELAYED PULL FORWARD is
displayed in the information display,
transfer case gear tooth blockage is
present. To alleviate this condition, place
the transmission in a forward gear, move
the vehicle forward approximately
5 ft
(1.5 m), and shift the transmission back to
neutral to allow the transfer case to
complete the range shift.
How Your Vehicle Differs From
Other Vehicles WARNING
Vehicles with a higher center of
gravity such as utility and four-wheel
drive vehicles handle differently than
vehicles with a lower center of gravity.
Utility and four-wheel drive vehicles are
not designed for cornering at speeds as
high as passenger cars any more than
low-slung sports cars are designed to
perform satisfactorily under off-road
conditions. Avoid sharp turns, excessive
speed and abrupt maneuvers in these
vehicles. Failure to drive cautiously could
result in an increased risk of loss of vehicle
control, vehicle rollover, personal injury and
death. Truck and utility vehicles can differ from
some other vehicles. Your vehicle may be
higher to allow it to travel over rough
terrain without getting hung up or
damaging underbody components.
The differences that make your vehicle so
versatile also make it handle differently
than an ordinary passenger car.
Maintain steering wheel control at all
times, especially in rough terrain. Since
sudden changes in terrain can result in
abrupt steering wheel motion, make sure
you grip the steering wheel from the
outside. Do not grip the spokes. Drive cautiously to avoid vehicle damage
from concealed objects such as rocks and
stumps.
You should either know the terrain or
examine maps of the area before driving.
Map out your route before driving in the
area. To maintain steering and braking
control of your vehicle, you must have all
four wheels on the ground and they must
be rolling, not sliding or spinning.
Driving Off-Road With Truck and
Utility Vehicles
Note:
On some models, the initial shift from
two-wheel drive to four-wheel drive while
the vehicle is moving can cause some
momentary clunk and ratcheting sounds.
This is the front drivetrain coming up to
speed and the automatic locking hubs
engaging and is not cause for concern.
Note: Your vehicle may be equipped with
a front air dam that can become damaged
(due to reduced ground clearance) when
taking your vehicle off-road. This air dam
can be taken off by removing two bolts.
Four-wheel drive vehicles are specially
equipped for driving on sand, snow, mud
and rough terrain and have operating
characteristics that are somewhat
different from conventional vehicles, both
on and off the road.
Power is supplied to all four wheels
through a transfer case. On four-wheel
drive vehicles, the transfer case allows you
to select 4WD when necessary.
Information on transfer case operation and
shifting procedures can be found in this
chapter. Information on transfer case
maintenance can be found in the
Maintenance chapter. You should become
thoroughly familiar with this information
before you operate your vehicle.
160
Super Duty (TFA) Canada/United States of America, enUSA, Second Printing Four-Wheel Drive
(If Equipped)
Page 182 of 510
Note:
If the image does not turn off while
the transmission is not in reverse (R) and
your driving over a speed of 5 mph (8 km/h),
have the system inspected by an authorized
dealer.
Note: When towing, the camera only sees
what is being towed behind your vehicle.
This might not provide adequate coverage
as it usually provides in normal operation
and some objects might not be seen. In
some vehicles, the guidelines may disappear
once the trailer tow connector is engaged.
The camera may not operate correctly
under the following conditions:
• Nighttime or dark areas if the reverse
lamps are not operating.
• Mud, water or debris obstructs the
camera's view. Clean the lens with a
soft, lint-free cloth and non-abrasive
cleaner.
• The camera is misaligned due to
damage to the rear of your vehicle.
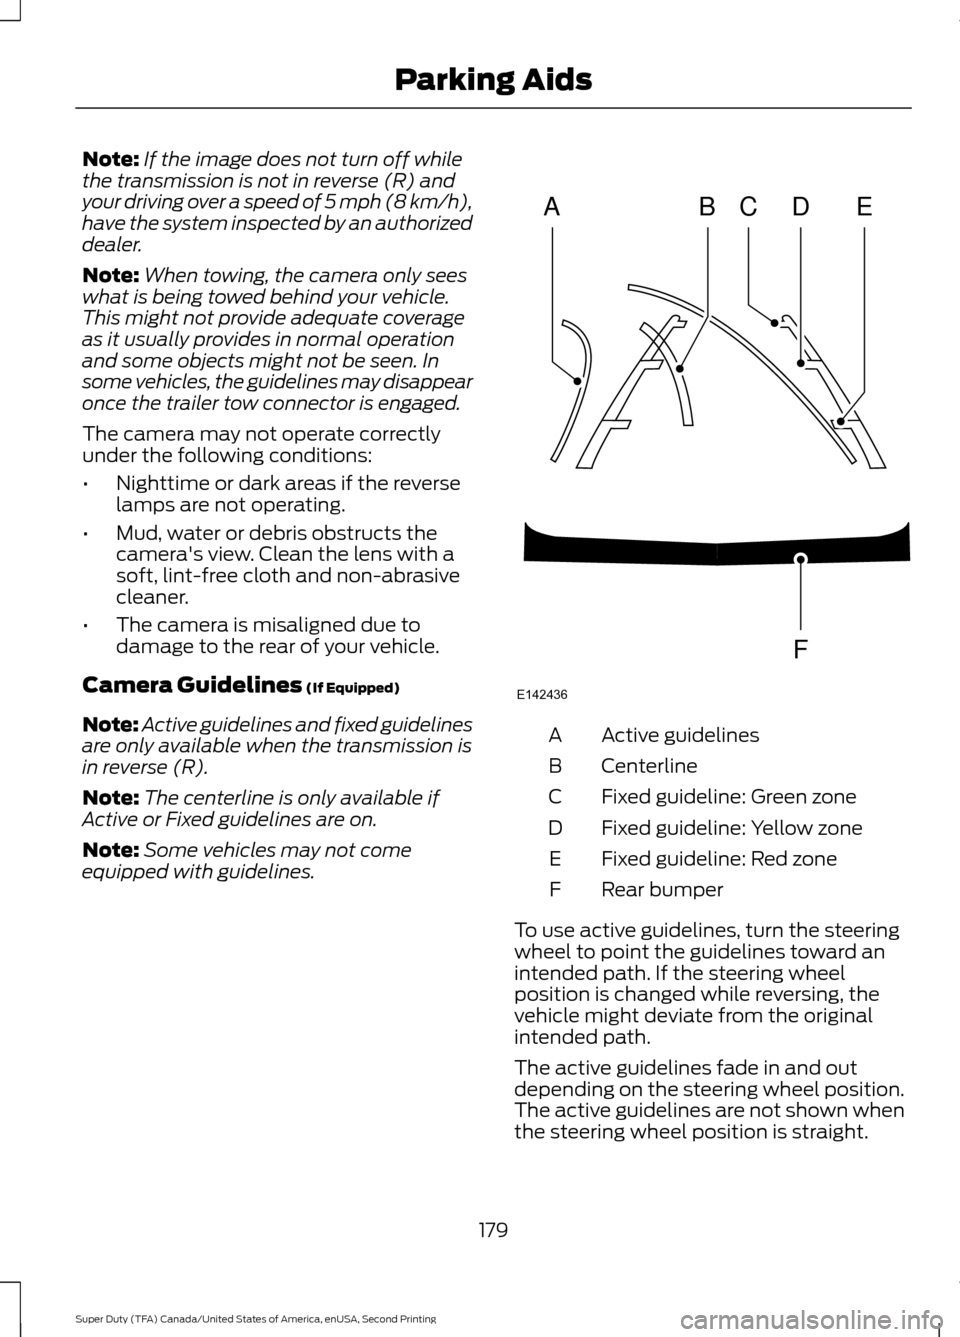
Camera Guidelines (If Equipped)
Note: Active guidelines and fixed guidelines
are only available when the transmission is
in reverse (R).
Note: The centerline is only available if
Active or Fixed guidelines are on.
Note: Some vehicles may not come
equipped with guidelines. Active guidelines
A
Centerline
B
Fixed guideline: Green zone
C
Fixed guideline: Yellow zone
D
Fixed guideline: Red zone
E
Rear bumper
F
To use active guidelines, turn the steering
wheel to point the guidelines toward an
intended path. If the steering wheel
position is changed while reversing, the
vehicle might deviate from the original
intended path.
The active guidelines fade in and out
depending on the steering wheel position.
The active guidelines are not shown when
the steering wheel position is straight.
179
Super Duty (TFA) Canada/United States of America, enUSA, Second Printing Parking AidsABCD
F
E
E142436
Page 205 of 510
1. Turn the steering wheel to point your
vehicle tires away from traffic flow.
2. Set your vehicle parking brake.
3. Place the automatic transmission in position P.
4. Place wheel chocks in front and back of the trailer wheels. (Chocks not
included with vehicle.)
Your vehicle may be equipped with a
temporary or conventional spare tire. A
"temporary" spare tire is different in size
(diameter or width), tread-type
(All-Season or All Terrain) or is from a
different manufacturer than the road tires
on your vehicle. Consult information on the
tire label or Safety Compliance label for
limitations when using.
Launching or Retrieving a Boat or
Personal Watercraft (PWC)
Note: Disconnect the wiring to the trailer
before
backing the trailer into the water.
Note: Reconnect the wiring to the trailer
after
you remove the trailer from the water.
When backing down a ramp during boat
launching or retrieval:
• Do not allow the static water level to
rise above the bottom edge of the rear
bumper.
• Do not allow waves to break higher
than
6 in (15 cm) above the bottom
edge of the rear bumper.
Exceeding these limits may allow water to
enter vehicle components:
• Causing internal damage to the
components.
• Affecting driveability, emissions, and
reliability. Replace the rear axle lubricant anytime
the rear axle has been submerged in water.
Water may have contaminated the rear
axle lubricant, which is not normally
checked or changed unless a leak is
suspected or other axle repair is required.
TOWING POINTS WARNINGS
Using recovery hooks is dangerous
and should only be done by a person
familiar with proper vehicle recovery
safety practices. Improper use of recovery
hooks may cause hook failure or separation
from the vehicle and could result in serious
injury or death. Always slowly remove the slack from
the recovery strap prior to pulling.
Failure to do so can introduce
significantly higher loads which can cause
the recovery hooks to break off, or the
recovery strap to fail which can cause
serious injury or death. Never link two straps together with
a clevis pin. These heavy metal
objects could become projectiles if
the strap breaks and can cause serious
injury or death. Your vehicle comes equipped with
frame-mounted front recovery hooks.
These hooks should never have a load
applied to them greater than the gross
vehicle weight rating of your vehicle.
Before using recovery hooks:
•
Make sure all attaching points are
secure and capable of withstanding
the applied load.
• Never use chains, cables or tow straps
with metal hook ends.
202
Super Duty (TFA) Canada/United States of America, enUSA, Second Printing Towing