2016 FORD FUSION (AMERICAS) tow
[x] Cancel search: towPage 280 of 518
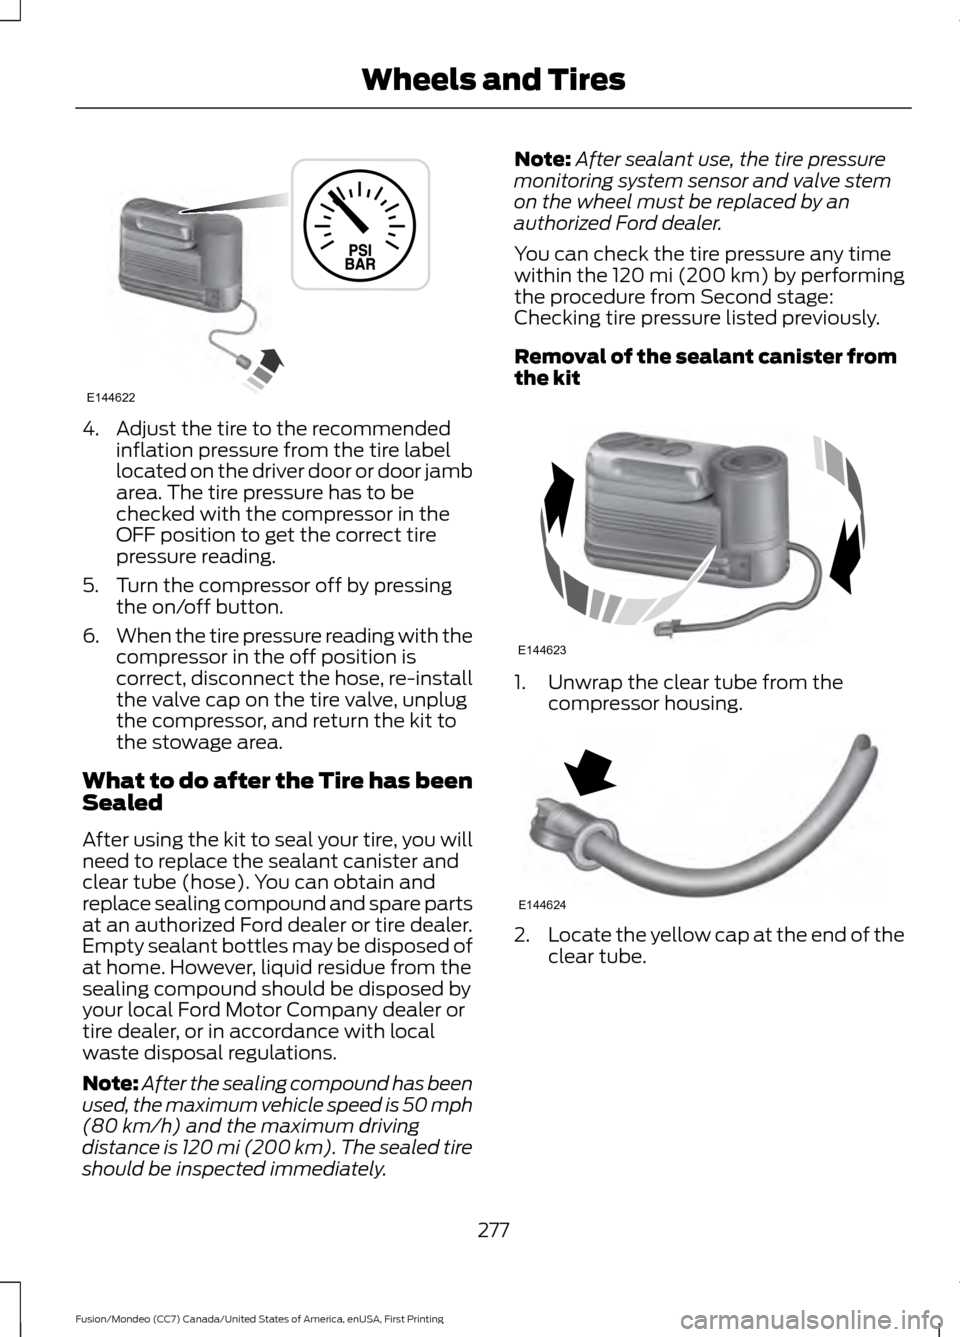
4. Adjust the tire to the recommended
inflation pressure from the tire label
located on the driver door or door jamb
area. The tire pressure has to be
checked with the compressor in the
OFF position to get the correct tire
pressure reading.
5. Turn the compressor off by pressing the on/off button.
6. When the tire pressure reading with the
compressor in the off position is
correct, disconnect the hose, re-install
the valve cap on the tire valve, unplug
the compressor, and return the kit to
the stowage area.
What to do after the Tire has been
Sealed
After using the kit to seal your tire, you will
need to replace the sealant canister and
clear tube (hose). You can obtain and
replace sealing compound and spare parts
at an authorized Ford dealer or tire dealer.
Empty sealant bottles may be disposed of
at home. However, liquid residue from the
sealing compound should be disposed by
your local Ford Motor Company dealer or
tire dealer, or in accordance with local
waste disposal regulations.
Note: After the sealing compound has been
used, the maximum vehicle speed is 50 mph
(80 km/h) and the maximum driving
distance is 120 mi (200 km). The sealed tire
should be inspected immediately. Note:
After sealant use, the tire pressure
monitoring system sensor and valve stem
on the wheel must be replaced by an
authorized Ford dealer.
You can check the tire pressure any time
within the 120 mi (200 km) by performing
the procedure from Second stage:
Checking tire pressure listed previously.
Removal of the sealant canister from
the kit 1. Unwrap the clear tube from the
compressor housing. 2.
Locate the yellow cap at the end of the
clear tube.
277
Fusion/Mondeo (CC7) Canada/United States of America, enUSA, First Printing Wheels and TiresE144622 E144623 E144624
Page 282 of 518
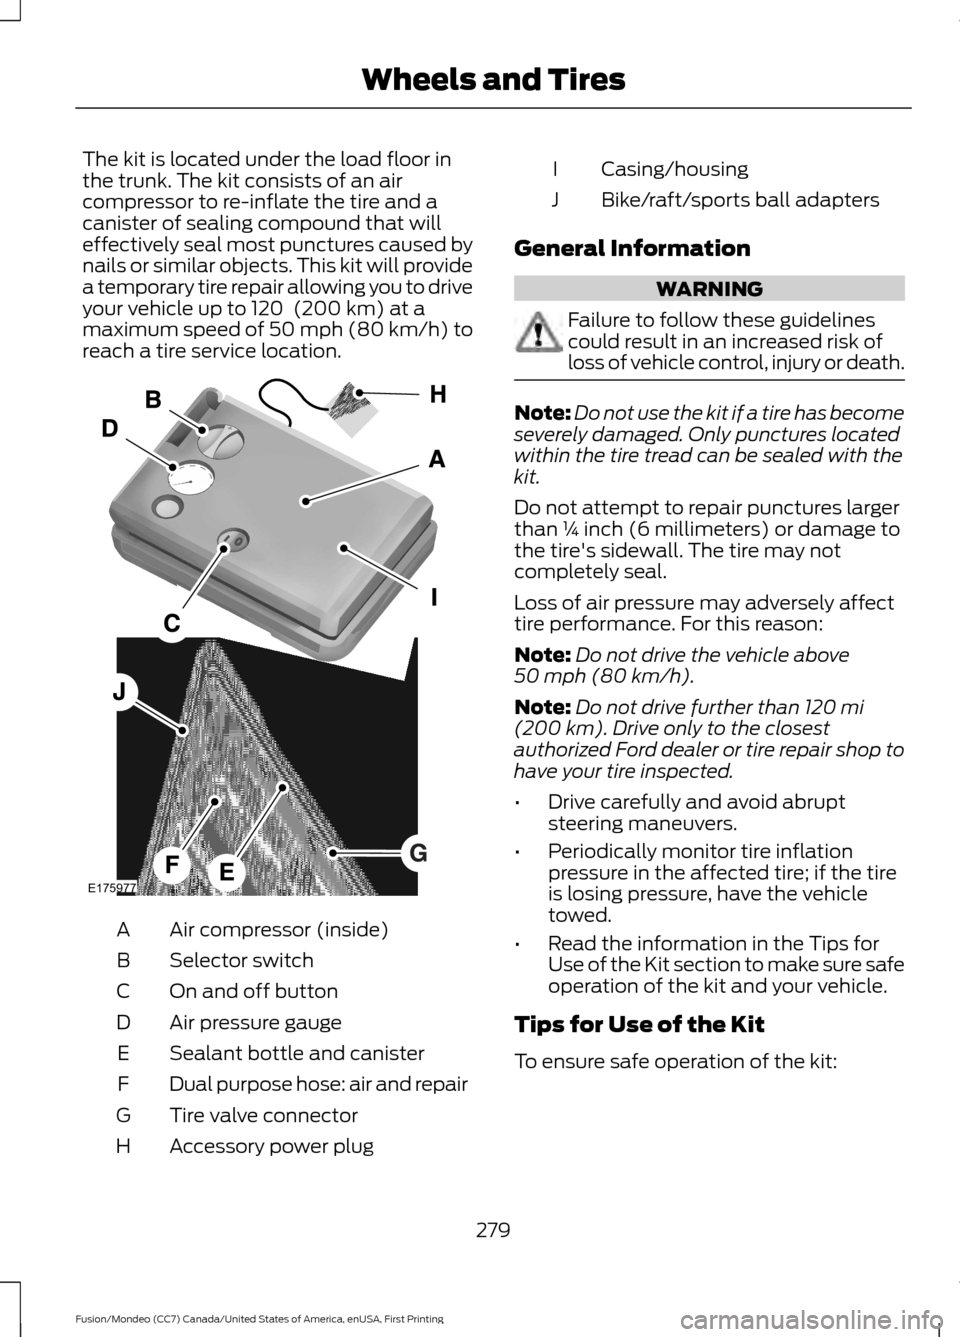
The kit is located under the load floor in
the trunk. The kit consists of an air
compressor to re-inflate the tire and a
canister of sealing compound that will
effectively seal most punctures caused by
nails or similar objects. This kit will provide
a temporary tire repair allowing you to drive
your vehicle up to 120 (200 km) at a
maximum speed of 50 mph (80 km/h) to
reach a tire service location. Air compressor (inside)
A
Selector switch
B
On and off button
C
Air pressure gauge
D
Sealant bottle and canister
E
Dual purpose hose: air and repair
F
Tire valve connector
G
Accessory power plug
H Casing/housing
I
Bike/raft/sports ball adapters
J
General Information WARNING
Failure to follow these guidelines
could result in an increased risk of
loss of vehicle control, injury or death.
Note:
Do not use the kit if a tire has become
severely damaged. Only punctures located
within the tire tread can be sealed with the
kit.
Do not attempt to repair punctures larger
than ¼ inch (6 millimeters) or damage to
the tire's sidewall. The tire may not
completely seal.
Loss of air pressure may adversely affect
tire performance. For this reason:
Note: Do not drive the vehicle above
50 mph (80 km/h)
.
Note: Do not drive further than
120 mi
(200 km). Drive only to the closest
authorized Ford dealer or tire repair shop to
have your tire inspected.
• Drive carefully and avoid abrupt
steering maneuvers.
• Periodically monitor tire inflation
pressure in the affected tire; if the tire
is losing pressure, have the vehicle
towed.
• Read the information in the Tips for
Use of the Kit section to make sure safe
operation of the kit and your vehicle.
Tips for Use of the Kit
To ensure safe operation of the kit:
279
Fusion/Mondeo (CC7) Canada/United States of America, enUSA, First Printing Wheels and TiresE175977
Page 285 of 518
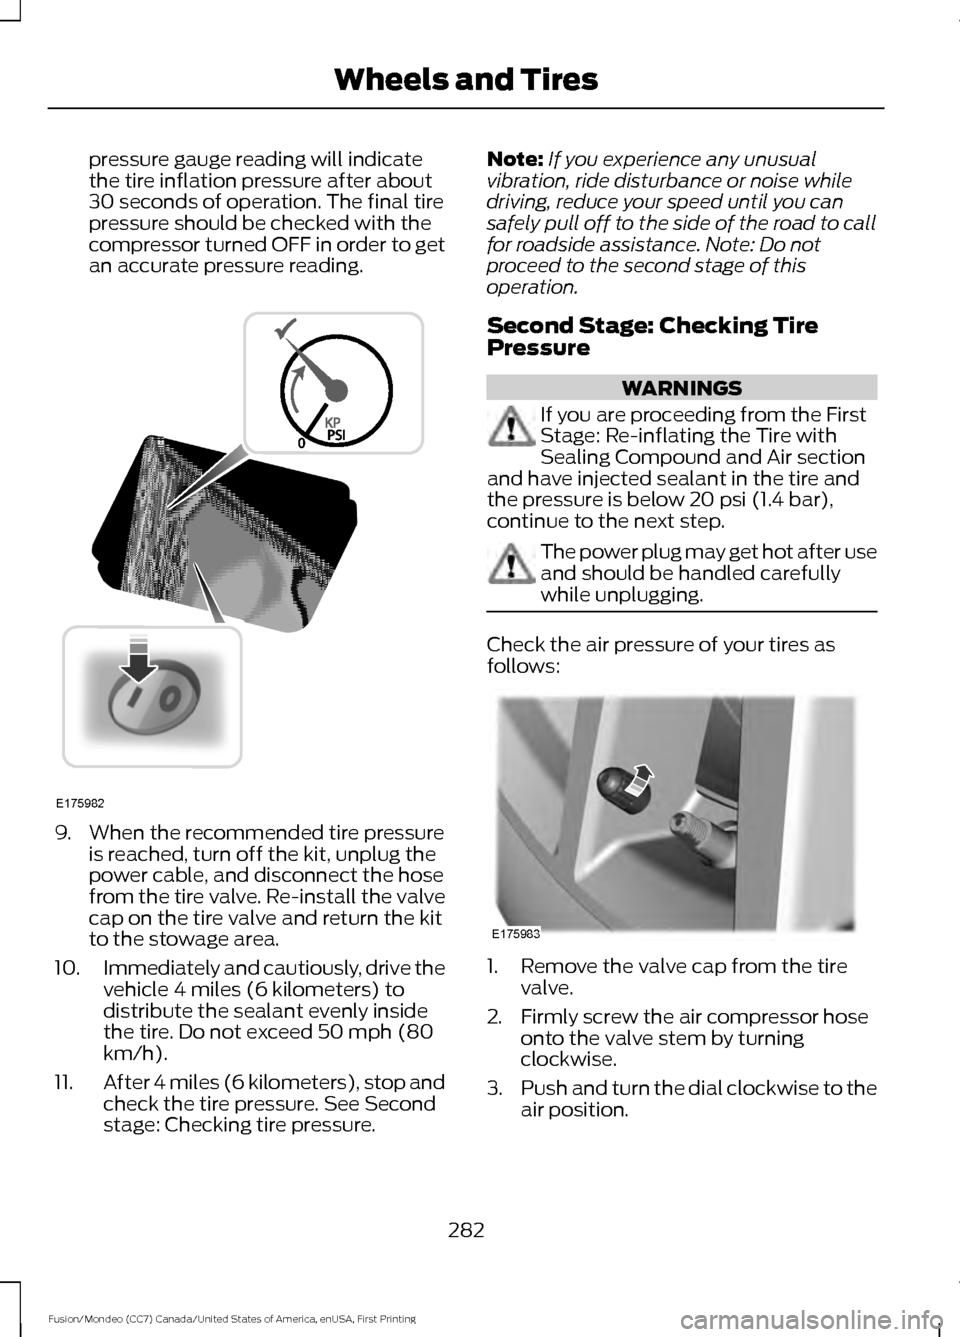
pressure gauge reading will indicate
the tire inflation pressure after about
30 seconds of operation. The final tire
pressure should be checked with the
compressor turned OFF in order to get
an accurate pressure reading.
9. When the recommended tire pressure
is reached, turn off the kit, unplug the
power cable, and disconnect the hose
from the tire valve. Re-install the valve
cap on the tire valve and return the kit
to the stowage area.
10. Immediately and cautiously, drive the
vehicle 4 miles (6 kilometers) to
distribute the sealant evenly inside
the tire. Do not exceed 50 mph (80
km/h).
11. After 4 miles (6 kilometers), stop and
check the tire pressure. See Second
stage: Checking tire pressure. Note:
If you experience any unusual
vibration, ride disturbance or noise while
driving, reduce your speed until you can
safely pull off to the side of the road to call
for roadside assistance. Note: Do not
proceed to the second stage of this
operation.
Second Stage: Checking Tire
Pressure WARNINGS
If you are proceeding from the First
Stage: Re-inflating the Tire with
Sealing Compound and Air section
and have injected sealant in the tire and
the pressure is below 20 psi (1.4 bar),
continue to the next step. The power plug may get hot after use
and should be handled carefully
while unplugging.
Check the air pressure of your tires as
follows:
1. Remove the valve cap from the tire
valve.
2. Firmly screw the air compressor hose onto the valve stem by turning
clockwise.
3. Push and turn the dial clockwise to the
air position.
282
Fusion/Mondeo (CC7) Canada/United States of America, enUSA, First Printing Wheels and TiresE175982 E175983
Page 286 of 518
4.
If required, turn on the compressor and
adjust the tire to the recommended
inflation pressure shown on the tire
label located on the driver's door or
door jamb area. The tire pressure
should be checked with the
compressor turned OFF in order to get
an accurate pressure reading.
5. Unplug the hoses, re-install the valve cap on the tire and return the kit to the
stowage area.
What to do after the Tire has been
Sealed
After using the kit to seal your tire, you will
need to replace the sealant canister.
Sealant canisters and spare parts can be
obtained at an authorized Ford dealer.
Empty sealant canisters may be disposed
of at home. However, canisters still
containing liquid sealant should be
disposed of by your local authorized Ford
dealer or tire dealer, or in accordance with
local waste disposal regulation.
Note: After the sealing compound has been
used, the maximum vehicle speed is 50 mph
(80 km/h) and the maximum driving
distance is 120 mi (200 km). The sealed tire
should be inspected immediately.
You can check the tire pressure any time
within the 120 mi (200 km) by performing
the steps listed previously in the Second
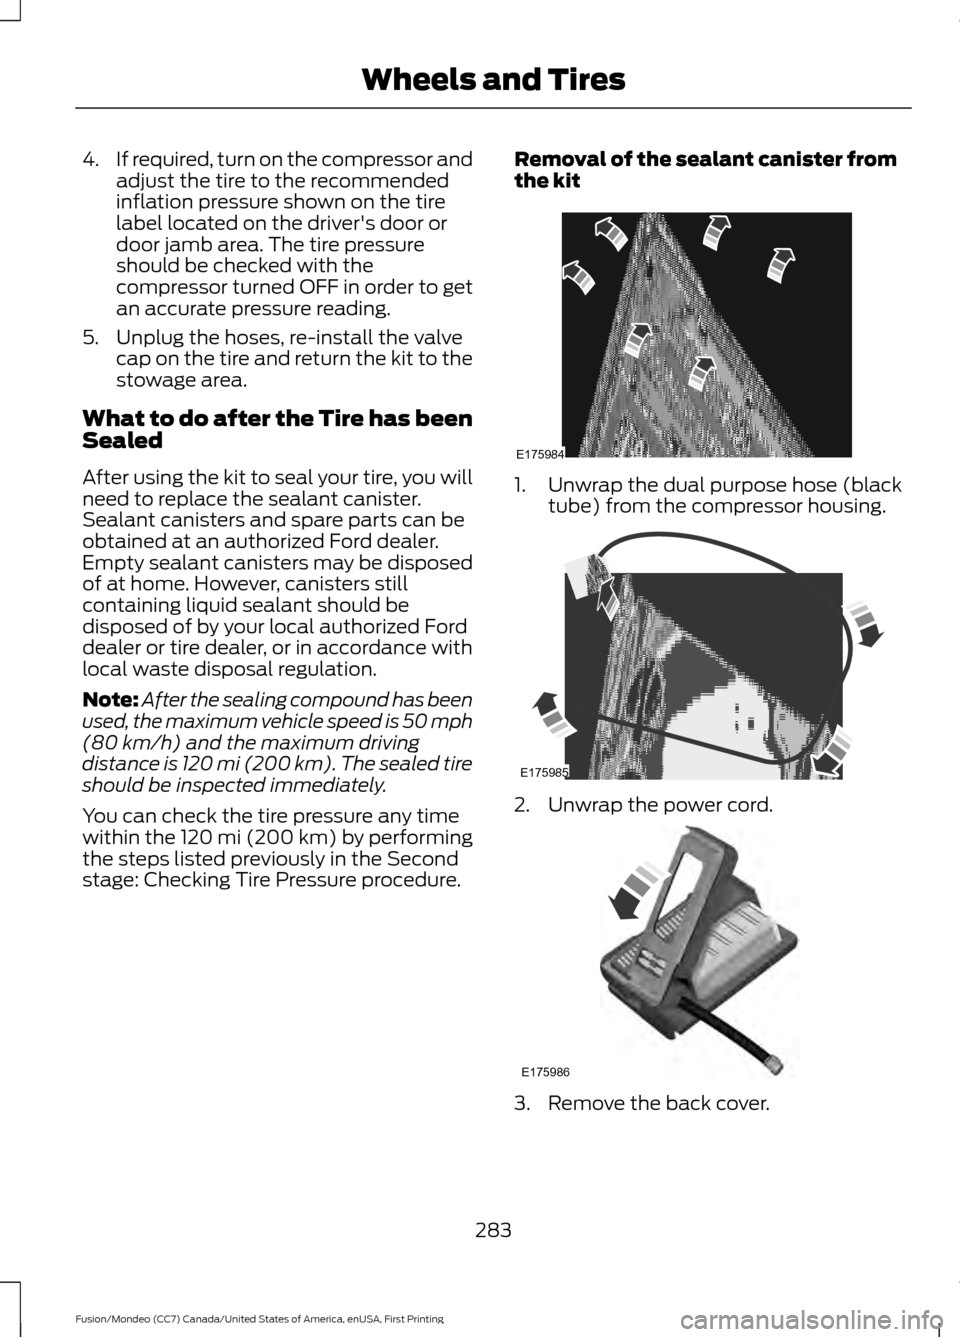
stage: Checking Tire Pressure procedure. Removal of the sealant canister from
the kit 1. Unwrap the dual purpose hose (black
tube) from the compressor housing. 2. Unwrap the power cord.
3. Remove the back cover.
283
Fusion/Mondeo (CC7) Canada/United States of America, enUSA, First Printing Wheels and TiresE175984 E175985 E175986
Page 287 of 518
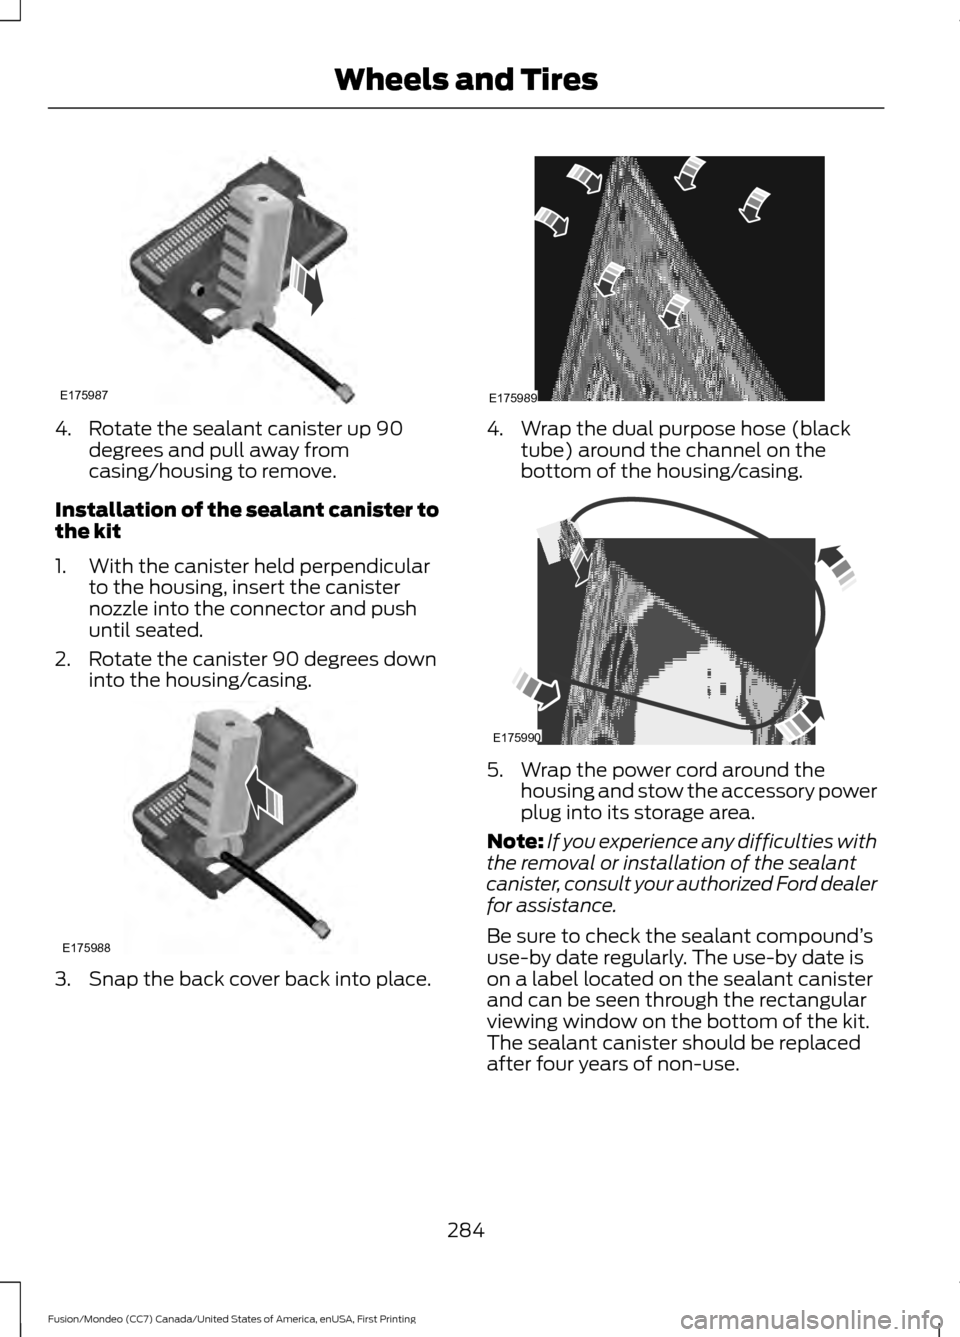
4. Rotate the sealant canister up 90
degrees and pull away from
casing/housing to remove.
Installation of the sealant canister to
the kit
1. With the canister held perpendicular to the housing, insert the canister
nozzle into the connector and push
until seated.
2. Rotate the canister 90 degrees down into the housing/casing. 3. Snap the back cover back into place. 4. Wrap the dual purpose hose (black
tube) around the channel on the
bottom of the housing/casing. 5. Wrap the power cord around the
housing and stow the accessory power
plug into its storage area.
Note: If you experience any difficulties with
the removal or installation of the sealant
canister, consult your authorized Ford dealer
for assistance.
Be sure to check the sealant compound ’s
use-by date regularly. The use-by date is
on a label located on the sealant canister
and can be seen through the rectangular
viewing window on the bottom of the kit.
The sealant canister should be replaced
after four years of non-use.
284
Fusion/Mondeo (CC7) Canada/United States of America, enUSA, First Printing Wheels and TiresE175987 E175988 E175989 E175990
Page 301 of 518

It is recommended that the two
front tires or two rear tires
generally be replaced as a pair.
The tire pressure sensors mounted
in the wheels (originally installed
on your vehicle) are not designed
to be used in aftermarket wheels.
The use of wheels or tires not
recommended by Ford Motor
Company may affect the
operation of your tire pressure
monitoring system.
If the TPMS indicator is flashing,
your TPMS is malfunctioning. Your
replacement tire might be
incompatible with your TPMS, or
some component of the TPMS
may be damaged.
Safety Practices
WARNINGS
If your vehicle is stuck in
snow, mud or sand, do not
rapidly spin the tires; spinning the
tires can tear the tire and cause
an explosion. A tire can explode in
as little as three to five seconds. Do not spin the wheels at
over 35 mph (56 km/h). The
tires may fail and injure a
passenger or bystander. Driving habits have a great deal
to do with your tire mileage and
safety.
*Observe posted speed limits
*Avoid fast starts, stops and turns *Avoid potholes and objects on
the road
*Do not run over curbs or hit the
tire against a curb when parking
Highway Hazards
No matter how carefully you drive
there
’s always the possibility that
you may eventually have a flat tire
on the highway. Drive slowly to the
closest safe area out of traffic.
This may further damage the flat
tire, but your safety is more
important.
If you feel a sudden vibration or
ride disturbance while driving, or
you suspect your tire or vehicle
has been damaged, immediately
reduce your speed. Drive with
caution until you can safely pull
off the road. Stop and inspect the
tires for damage. If a tire is
under-inflated or damaged,
deflate it, remove wheel and
replace it with your spare tire and
wheel. If you cannot detect a
cause, have the vehicle towed to
the nearest repair facility or tire
dealer to have the vehicle
inspected.
298
Fusion/Mondeo (CC7) Canada/United States of America, enUSA, First Printing Wheels and Tires
Page 309 of 518
1.
T-type mini-spare: This spare tire
begins with the letter T for tire size and
may have Temporary Use Only molded in
the sidewall.
2. Full-size dissimilar spare with label
on wheel:
This spare tire has a label on
the wheel that states: THIS WHEEL AND
TIRE ASSEMBLY FOR TEMPORARY USE
ONLY.
When driving with one of the dissimilar
spare tires listed above, do not:
• Exceed 50 mph (80 km/h)
• Load the vehicle beyond maximum
vehicle load rating listed on the Safety
Compliance Label.
• Tow a trailer.
• Use snow chains on the end of the
vehicle with the dissimilar spare tire.
• Use more than one dissimilar spare tire
at a time.
• Use commercial car washing
equipment.
• Try to repair the dissimilar spare tire.
Use of one of the dissimilar spare tires
listed above at any one wheel location can
lead to impairment of the following:
• Handling, stability and braking
performance.
• Comfort and noise.
• Ground clearance and parking at curbs.
• Winter weather driving capability.
• Wet weather driving capability.
• All-wheel driving capability (if
applicable).
3. Full-size dissimilar spare without
label on wheel
When driving with the full-size dissimilar
spare wheel and tire assembly, do not:
• Exceed 70 mph (113 km/h).
• Use more than one dissimilar spare
wheel and tire assembly at a time. •
Use commercial car washing
equipment.
• Use snow chains on the end of the
vehicle with the dissimilar spare wheel
and tire assembly.
The usage of a full-size dissimilar spare
wheel and tire assembly can lead to
impairment of the following:
• Handling, stability and braking
performance.
• Comfort and noise.
• Ground clearance and parking at curbs.
• Winter weather driving capability.
• Wet weather driving capability.
• All-wheel driving capability
When driving with the full-size dissimilar
spare wheel and tire assembly additional
caution should be given to:
• Towing a trailer.
• Driving vehicles equipped with a
camper body.
• Driving vehicles with a load on the
cargo rack.
Drive cautiously when using a full-size
dissimilar spare wheel and tire assembly
and seek service as soon as possible.
Tire Change Procedure
(If Equipped) WARNINGS
When one of the front wheels is off
the ground, the transmission alone
will not prevent the vehicle from
moving or slipping off the jack, even if the
transmission is in park (P). To help prevent your vehicle from
moving when you change a tire, be
sure to place the transmission in park
(P), set the parking brake and block (in
both directions) the wheel that is
diagonally opposite (other side and end of
the vehicle) to the tire being changed.
306
Fusion/Mondeo (CC7) Canada/United States of America, enUSA, First Printing Wheels and Tires
Page 313 of 518
10. Place the jack at the jacking point
next to the tire you are changing. Turn
the jack handle clockwise until the
wheel is completely off the ground.
11. Remove the lug nuts with the lug wrench.
12. Replace the flat tire with the spare tire, making sure the valve stem is
facing outward. Reinstall the lug nuts
until the wheel is snug against the
hub. Do not fully tighten the lug nuts
until the wheel has been lowered. If
you are using the temporary tire, the
lug nut washers will not appear to be
flush with the rim. This is normal only
when using the temporary spare tire.
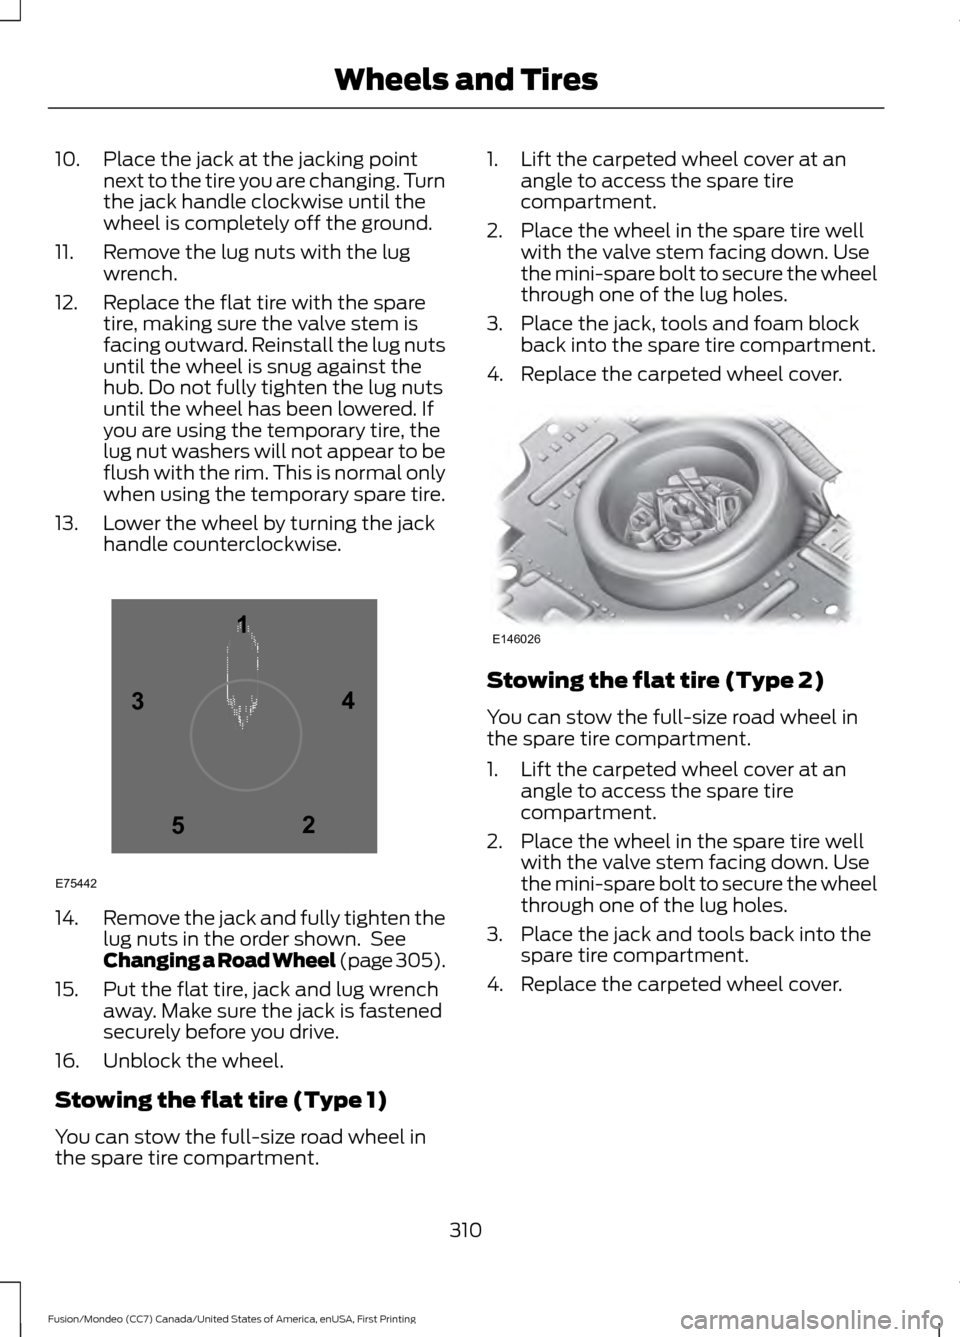
13. Lower the wheel by turning the jack handle counterclockwise.14.
Remove the jack and fully tighten the
lug nuts in the order shown. See
Changing a Road Wheel (page 305).
15. Put the flat tire, jack and lug wrench away. Make sure the jack is fastened
securely before you drive.
16. Unblock the wheel.
Stowing the flat tire (Type 1)
You can stow the full-size road wheel in
the spare tire compartment. 1. Lift the carpeted wheel cover at an
angle to access the spare tire
compartment.
2. Place the wheel in the spare tire well with the valve stem facing down. Use
the mini-spare bolt to secure the wheel
through one of the lug holes.
3. Place the jack, tools and foam block back into the spare tire compartment.
4. Replace the carpeted wheel cover. Stowing the flat tire (Type 2)
You can stow the full-size road wheel in
the spare tire compartment.
1. Lift the carpeted wheel cover at an
angle to access the spare tire
compartment.
2. Place the wheel in the spare tire well with the valve stem facing down. Use
the mini-spare bolt to secure the wheel
through one of the lug holes.
3. Place the jack and tools back into the spare tire compartment.
4. Replace the carpeted wheel cover.
310
Fusion/Mondeo (CC7) Canada/United States of America, enUSA, First Printing Wheels and Tires12
3
4
5
E75442 E146026