2016 FORD FUSION (AMERICAS) automatic transmission
[x] Cancel search: automatic transmissionPage 186 of 518

When you think your vehicle has enough
space in front and behind it, or you hear a
solid tone from the parking aid
(accompanied by a touchscreen display
message and a chime), bring your vehicle
to a complete stop.
When automatic steering is finished, the
touch screen displays a message and a
tone sounds, indicating that the active park
assist process is done. The driver is
responsible for checking the parking job
and making any necessary corrections
before putting the transmission in park (P).
Deactivating the Park Assist
Feature
Manually deactivate the system by:
•
Pressing the active park assist button.
• Grabbing the steering wheel. •
Driving above approximately 50 mph
(80 km/h) for 10 seconds during an
active park search.
• Driving above
6 mph (9 km/h) during
automatic steering.
• Turning off the traction control system.
Certain vehicle conditions can also
deactivate the system, such as:
• Traction control has activated on a
slippery or loose surface.
• There is an anti-lock brake system
activation or failure.
• Something touches the steering wheel.
If a problem occurs with the system, a
warning message is displayed, followed
by a tone. Occasional system messages
may occur in normal operation. For
recurring or frequent system faults, contact
an authorized dealer to have your vehicle
serviced.
Troubleshooting the System The system does not look for a space
The traction control system may be off
The transmission is in Reverse ( R); your vehicle must be moving forward to detect a
parking space The system does not offer a particular space
Something may be contacting the front bumper or side sensors
There is not enough room on both sides of your vehicle in order to park
There is not enough space for the parking maneuver on the opposite side of the parking
space
The parking space is farther than
4.9 ft (1.5 m) or closer than 15.7 in (0.4 m) away.
The transmission is in Reverse ( R); your vehicle must be moving forward to detect a
parking space
Your vehicle is going faster than
22 mph (35 km/h)
183
Fusion/Mondeo (CC7) Canada/United States of America, enUSA, First Printing Parking Aids
Page 195 of 518
Disengaging the System
Press the brake pedal or press CNCL. The
last set speed displays in grey but does not
erase.
Overriding the System WARNING
Whenever the driver presses the
accelerator pedal and overrides the
system, the system does not
automatically apply the brakes to maintain
the set distance from any vehicle ahead. Press the accelerator pedal to override the
set speed and gap distance.
When you override the system,
the green indicator light
illuminates and the lead vehicle
graphic does not show in the
information display.
The system resumes operation when you
release the accelerator pedal. The vehicle
speed decreases to the set speed, or a
slower speed if following a slower vehicle.
Changing the Set Speed
• Press and release
SET+ or SET-. The
set speed changes in approximately
1 mph (2 km/h)
increments.
• Press the accelerator or brake pedal
until you reach the desired speed. Press
and release
SET+.
• Press and hold SET+ or SET-. Release
the control when you reach the desired
speed.
The system may apply the brakes to slow
the vehicle to the new set speed. The set
speed displays continuously in the
information display when the system is
active. Canceling the Set Speed
Press the brake pedal or press and release
CNCL
. The last set speed displays with a
strikethrough.
Resuming the Set Speed
Note: Only use resume if you are aware of
the set speed and intend to return to it.
Press and release RES. The vehicle returns
to the previously set speed. The set speed
displays continuously in the information
display while the system is active.
Automatic Cancellation
The system does not operate below
12 mph (20 km/h)
. An audible warning
sounds and the automatic braking releases
if the vehicle drops below this speed.
Automatic cancellation can also occur if:
• The tires lose traction.
• The engine speed is too low.
• You apply the parking brake.
Note: If the engine speed drops too low,
the information display indicates low engine
speed. Shift to a lower gear (manual
transmission only) to avoid automatic
cancellation.
Hilly Condition Usage
Note: An audible alarm sounds and the
system shuts down if it is applying brakes
for an extended period of time. This allows
the brakes to cool. The system functions
normally again when the brakes cool.
Select a lower gear during prolonged
downhill driving on steep slopes, such as
mountainous areas, when the system is
active. In such situations, the system needs
additional engine braking to reduce the
load on the vehicle ’s regular brake system
to prevent the brakes from overheating.
192
Fusion/Mondeo (CC7) Canada/United States of America, enUSA, First Printing Cruise ControlE144529
Page 223 of 518
When Towing a Trailer
•
Do not drive faster than 70 mph (113
km/h) during the first 500 miles (800
kilometers).
• Do not make full-throttle starts.
• Check your hitch, electrical connections
and trailer wheel lug nuts thoroughly
after you have traveled 50 miles (80
kilometers).
• When stopped in congested or heavy
traffic during hot weather, place the
gearshift in position P to aid engine and
transmission cooling and to help A/C
performance.
• Turn off the speed control with heavy
loads or in hilly terrain. The speed
control may turn off automatically
when you are towing on long, steep
grades.
• Shift to a lower gear when driving down
a long or steep hill. Do not apply the
brakes continuously, as they may
overheat and become less effective.
• If your transmission is equipped with a
Grade Assist or Tow/Haul feature, use
this feature when towing. This provides
engine braking and helps eliminate
excessive transmission shifting for
optimum fuel economy and
transmission cooling.
• Allow more distance for stopping with
a trailer attached. Anticipate stops and
brake gradually.
• Avoid parking on a grade. However, if
you must park on a grade:
1. Turn the steering wheel to point your vehicle tires away from traffic flow.
2. Set your vehicle parking brake.
3. Place the automatic transmission in position P.
4. Place wheel chocks in front and back of the trailer wheels. (Chocks not
included with vehicle.) Launching or Retrieving a Boat or
Personal Watercraft (PWC)
Note:
Disconnect the wiring to the trailer
before
backing the trailer into the water.
Note: Reconnect the wiring to the trailer
after
removing the trailer from the water.
When backing down a ramp during boat
launching or retrieval:
• Do not allow the static water level to
rise above the bottom edge of the rear
bumper.
• Do not allow waves to break higher
than 6 inches (15 centimeters) above
the bottom edge of the rear bumper.
Exceeding these limits may allow water to
enter vehicle components:
• Causing internal damage to the
components.
• Affecting driveability, emissions, and
reliability.
Any time the rear axle submerges in water,
replace the rear axle lubricant. Water may
contaminate the rear axle lubricant, which
is not a normal maintenance inspection
item unless there is a possibility of a leak
or other axle repair is required.
TOWING POINTS
Due to local market requirements in some
countries, some vehicles may be equipped
with a recovery hook.
Recovery Hook Location
If your vehicle is equipped with a screw-in
recovery hook, it is located with the spare
tire kit.
Installing the Recovery Hook
There is an installation point for the
recovery hook located behind the fascia.
220
Fusion/Mondeo (CC7) Canada/United States of America, enUSA, First Printing Towing
Page 231 of 518
3.
Remove your foot from the brake pedal
and press the START/STOP button
to switch off the ignition.
4. You can either attempt to start the engine by pressing the brake pedal and
the
START/STOP button, or switch
on the ignition only by pressing the
START/STOP
button without
pressing the brake pedal. Both ways
re-enable the fuel system.
Note: When you try to restart your vehicle
after a fuel shutoff, the vehicle makes sure
that various systems are safe to restart.
Once your vehicle determines that the
systems are safe, then the vehicle will allow
you to restart.
Note: In the event that your vehicle does
not restart after your third attempt, contact
an authorized dealer.
JUMP STARTING THE VEHICLE WARNINGS
Batteries normally produce explosive
gases which can cause personal
injury. Therefore, do not allow
flames, sparks or lighted substances to
come near the battery. When working near
the battery, always shield your face and
protect your eyes. Always provide correct
ventilation. Keep batteries out of reach of
children. Batteries contain sulfuric
acid. Avoid contact with skin, eyes or
clothing. Shield your eyes when working
near the battery to protect against possible
splashing of acid solution. In case of acid
contact with skin or eyes, flush
immediately with water for a minimum of
15 minutes and get prompt medical
attention. If acid is swallowed, call a
physician immediately. Use only adequately sized cables
with insulated clamps. Preparing Your Vehicle
Do not attempt to push-start your
automatic transmission vehicle.
Note:
Attempting to push-start a vehicle
with an automatic transmission may cause
transmission damage.
Note: Use only a 12-volt supply to start your
vehicle.
Note: Do not disconnect the battery of the
disabled vehicle as this could damage the
vehicle electrical system.
Park the booster vehicle close to the hood
of the disabled vehicle, making sure the
two vehicles do not touch.
Connecting the Jumper Cables WARNINGS
Do not attach the cables to fuel lines,
engine rocker covers, the intake
manifold or electrical components
as grounding points. Stay clear of moving
parts. To avoid reverse polarity
connections, make sure that you correctly
identify the positive (+) and negative (-)
terminals on both the disabled and booster
vehicles before connecting the cables. Do not attach the end of the positive
cable to the studs or L-shaped eyelet
located above the positive (+)
terminal of your vehicle ’s battery. High
current may flow through and cause
damage to the fuses. Do not connect the end of the
second cable to the negative (-)
terminal of the battery to be jumped.
A spark may cause an explosion of the
gases that surround the battery. Note:
In the illustration, the bottom vehicle
represents the booster vehicle.
228
Fusion/Mondeo (CC7) Canada/United States of America, enUSA, First Printing Roadside Emergencies
Page 258 of 518

When Fail-Safe Mode Is Activated
WARNINGS
Fail-safe mode is for use during
emergencies only. Operate your
vehicle in fail-safe mode only as long
as necessary to bring your vehicle to rest
in a safe location and seek immediate
repairs. When in fail-safe mode, your
vehicle will have limited power, will not be
able to maintain high-speed operation, and
may completely shut down without
warning, potentially losing engine power,
power steering assist, and power brake
assist, which may increase the possibility
of a crash resulting in serious injury. Never remove the coolant reservoir
cap while the engine is running or hot.
Your vehicle has limited engine power
when in the fail-safe mode. Drive your
vehicle with caution. Your vehicle does not
maintain high-speed operation and the
engine operates poorly.
Remember that the engine is capable of
automatically shutting down to prevent
engine damage. In this situation:
1. Pull off the road as soon as safely
possible and switch off the engine.
2. Tow your vehicle to an authorized dealer.
3. If this is not possible, wait a short period for the engine to cool.
4. Check the coolant level and add if low.
5. Re-start the engine and drive your vehicle to an authorized dealer.
Note: Driving your vehicle without repair
increases the chance of engine damage. See
an authorized dealer as soon as possible. AUTOMATIC TRANSMISSION
FLUID CHECK
The automatic transmission does not have
a transmission fluid dipstick.
Have an authorized dealer check and
change the transmission fluid at the
correct service interval. See Scheduled
Maintenance (page 464). Your
transmission does not consume fluid.
However, if the transmission slips, shifts
slowly or if you notice a sign of leaking
fluid, contact an authorized dealer.
Do not use supplemental transmission
fluid additives, treatments or cleaning
agents. The use of these materials may
affect transmission operation and result
in damage to internal transmission
components.
BRAKE FLUID CHECK
Fluid levels between the MIN and MAX
lines are within the normal operating range;
there is no need to add fluid. If the fluid
levels are outside of the normal operating
range, the performance of the system
could be compromised; seek service from
your authorized dealer immediately.
POWER STEERING FLUID
CHECK
Your vehicle is equipped with an electric
power steering (EPS) system. There is no
fluid reservoir to check or fill.
255
Fusion/Mondeo (CC7) Canada/United States of America, enUSA, First Printing Maintenance
Page 319 of 518
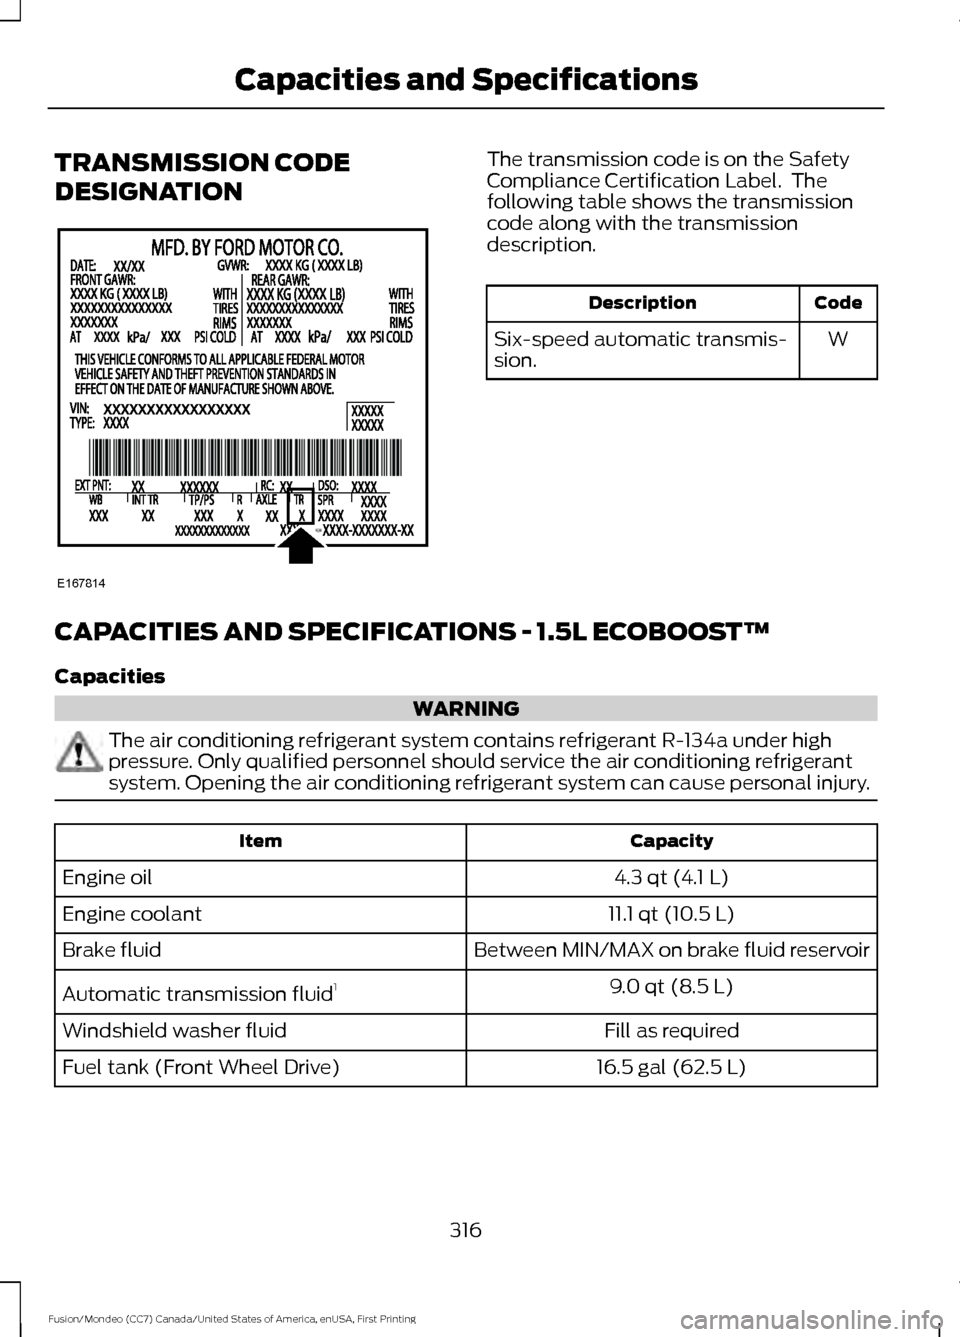
TRANSMISSION CODE
DESIGNATION The transmission code is on the Safety
Compliance Certification Label. The
following table shows the transmission
code along with the transmission
description.
Code
Description
W
Six-speed automatic transmis-
sion.
CAPACITIES AND SPECIFICATIONS - 1.5L ECOBOOST™
Capacities WARNING
The air conditioning refrigerant system contains refrigerant R-134a under high
pressure. Only qualified personnel should service the air conditioning refrigerant
system. Opening the air conditioning refrigerant system can cause personal injury.
Capacity
Item
4.3 qt (4.1 L)
Engine oil
11.1 qt (10.5 L)
Engine coolant
Between MIN/MAX on brake fluid reservoir
Brake fluid
9.0 qt (8.5 L)
Automatic transmission fluid 1
Fill as required
Windshield washer fluid
16.5 gal (62.5 L)
Fuel tank (Front Wheel Drive)
316
Fusion/Mondeo (CC7) Canada/United States of America, enUSA, First Printing Capacities and SpecificationsE167814
Page 320 of 518
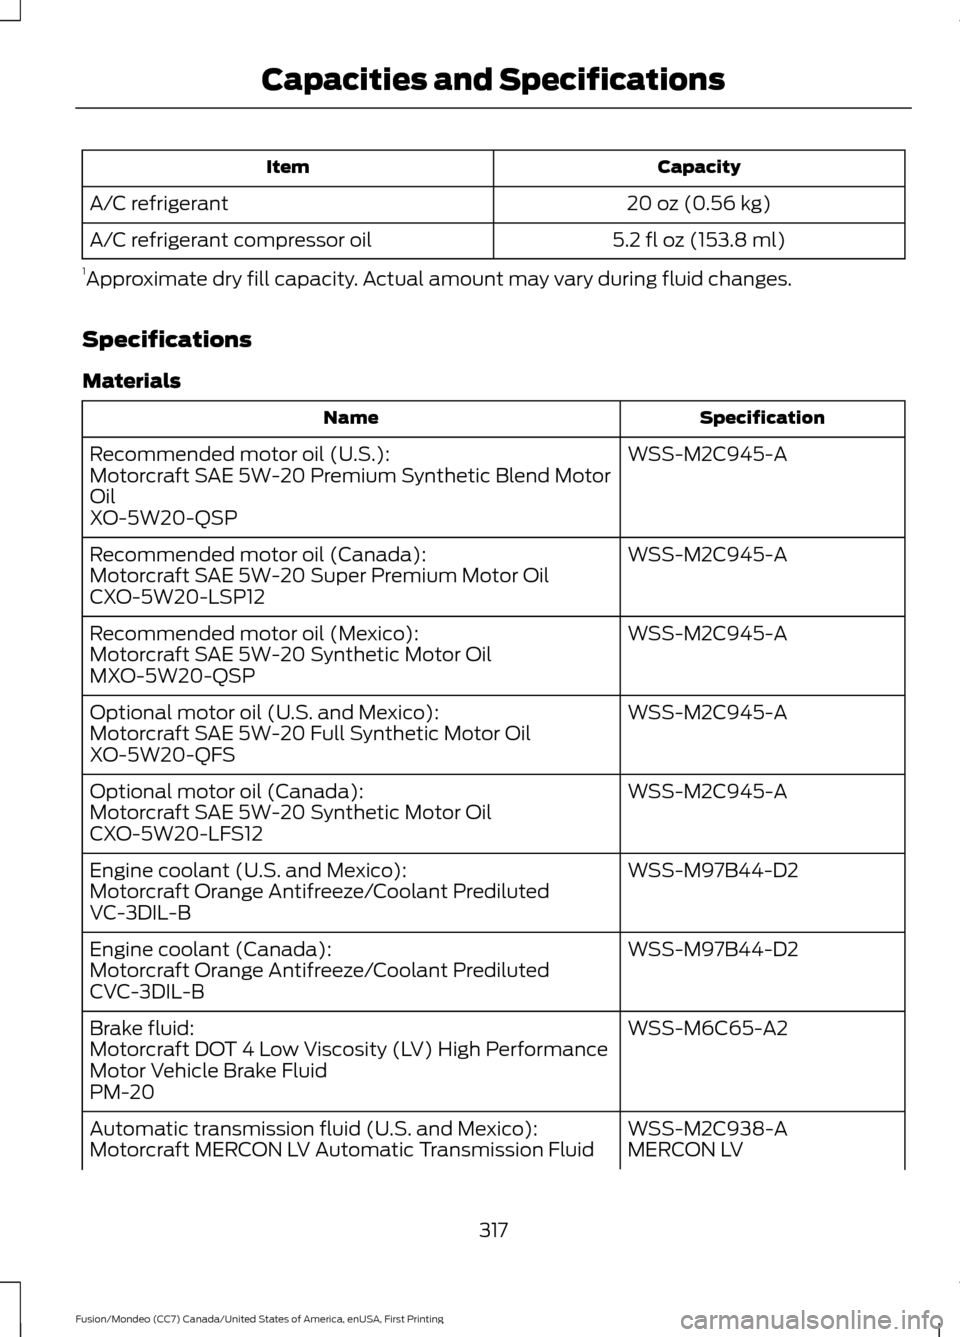
Capacity
Item
20 oz (0.56 kg)
A/C refrigerant
5.2 fl oz (153.8 ml)
A/C refrigerant compressor oil
1 Approximate dry fill capacity. Actual amount may vary during fluid changes.
Specifications
Materials Specification
Name
WSS-M2C945-A
Recommended motor oil (U.S.):
Motorcraft SAE 5W-20 Premium Synthetic Blend Motor
Oil
XO-5W20-QSP
WSS-M2C945-A
Recommended motor oil (Canada):
Motorcraft SAE 5W-20 Super Premium Motor Oil
CXO-5W20-LSP12
WSS-M2C945-A
Recommended motor oil (Mexico):
Motorcraft SAE 5W-20 Synthetic Motor Oil
MXO-5W20-QSP
WSS-M2C945-A
Optional motor oil (U.S. and Mexico):
Motorcraft SAE 5W-20 Full Synthetic Motor Oil
XO-5W20-QFS
WSS-M2C945-A
Optional motor oil (Canada):
Motorcraft SAE 5W-20 Synthetic Motor Oil
CXO-5W20-LFS12
WSS-M97B44-D2
Engine coolant (U.S. and Mexico):
Motorcraft Orange Antifreeze/Coolant Prediluted
VC-3DIL-B
WSS-M97B44-D2
Engine coolant (Canada):
Motorcraft Orange Antifreeze/Coolant Prediluted
CVC-3DIL-B
WSS-M6C65-A2
Brake fluid:
Motorcraft DOT 4 Low Viscosity (LV) High Performance
Motor Vehicle Brake Fluid
PM-20
WSS-M2C938-A
Automatic transmission fluid (U.S. and Mexico):
MERCON LV
Motorcraft MERCON LV Automatic Transmission Fluid
317
Fusion/Mondeo (CC7) Canada/United States of America, enUSA, First Printing Capacities and Specifications
Page 321 of 518
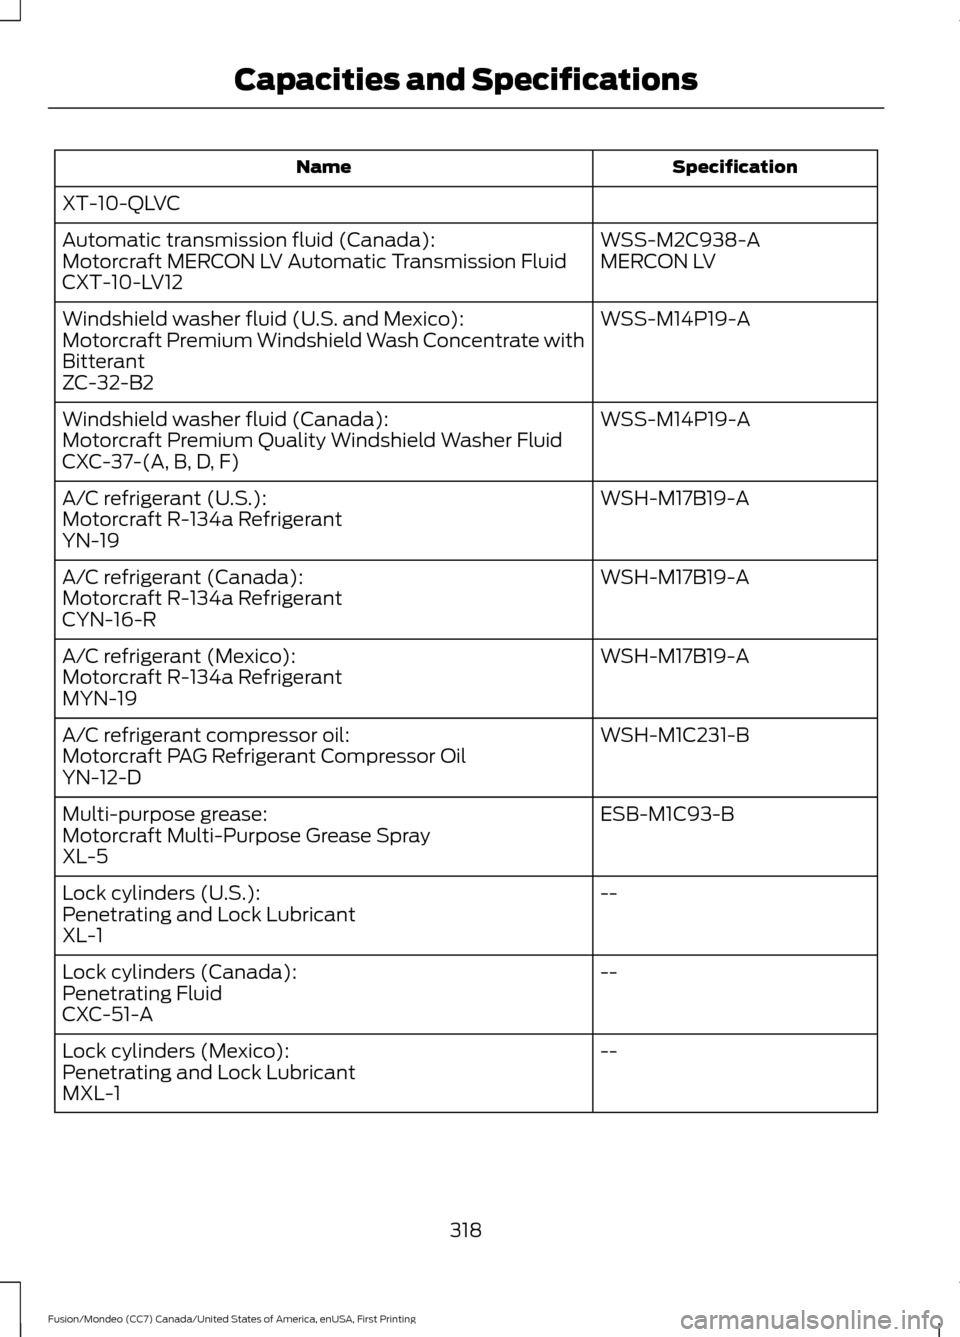
Specification
Name
XT-10-QLVC WSS-M2C938-A
Automatic transmission fluid (Canada):
MERCON LV
Motorcraft MERCON LV Automatic Transmission Fluid
CXT-10-LV12
WSS-M14P19-A
Windshield washer fluid (U.S. and Mexico):
Motorcraft Premium Windshield Wash Concentrate with
Bitterant
ZC-32-B2
WSS-M14P19-A
Windshield washer fluid (Canada):
Motorcraft Premium Quality Windshield Washer Fluid
CXC-37-(A, B, D, F)
WSH-M17B19-A
A/C refrigerant (U.S.):
Motorcraft R-134a Refrigerant
YN-19
WSH-M17B19-A
A/C refrigerant (Canada):
Motorcraft R-134a Refrigerant
CYN-16-R
WSH-M17B19-A
A/C refrigerant (Mexico):
Motorcraft R-134a Refrigerant
MYN-19
WSH-M1C231-B
A/C refrigerant compressor oil:
Motorcraft PAG Refrigerant Compressor Oil
YN-12-D
ESB-M1C93-B
Multi-purpose grease:
Motorcraft Multi-Purpose Grease Spray
XL-5
--
Lock cylinders (U.S.):
Penetrating and Lock Lubricant
XL-1
--
Lock cylinders (Canada):
Penetrating Fluid
CXC-51-A
--
Lock cylinders (Mexico):
Penetrating and Lock Lubricant
MXL-1
318
Fusion/Mondeo (CC7) Canada/United States of America, enUSA, First Printing Capacities and Specifications