2016 FORD F450 SUPER DUTY remove seats
[x] Cancel search: remove seatsPage 22 of 507
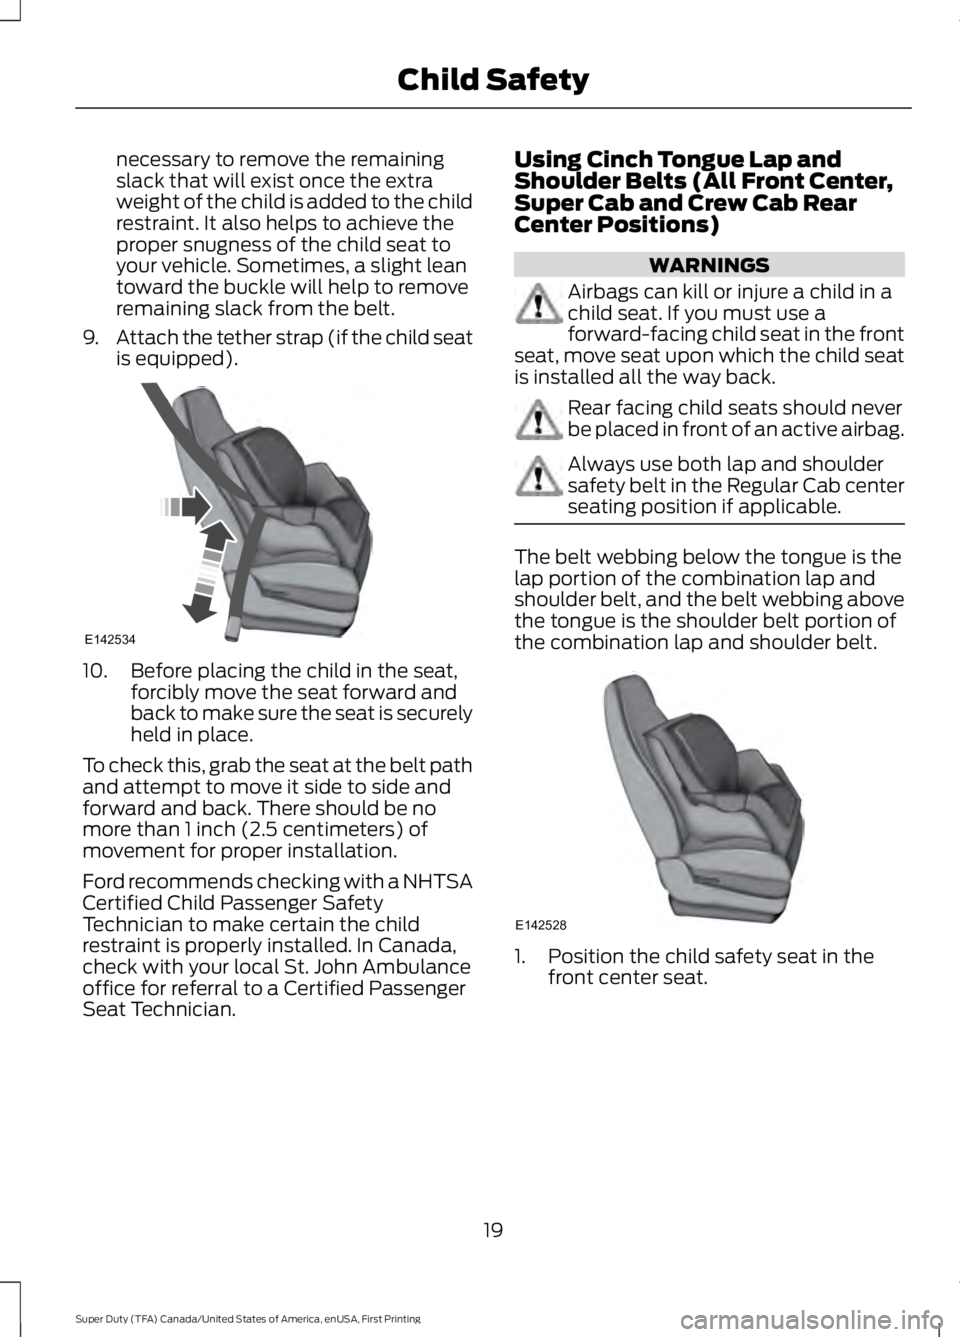
necessary to remove the remainingslack that will exist once the extraweight of the child is added to the childrestraint. It also helps to achieve theproper snugness of the child seat toyour vehicle. Sometimes, a slight leantoward the buckle will help to removeremaining slack from the belt.
9.Attach the tether strap (if the child seatis equipped).
10. Before placing the child in the seat,forcibly move the seat forward andback to make sure the seat is securelyheld in place.
To check this, grab the seat at the belt pathand attempt to move it side to side andforward and back. There should be nomore than 1 inch (2.5 centimeters) ofmovement for proper installation.
Ford recommends checking with a NHTSACertified Child Passenger SafetyTechnician to make certain the childrestraint is properly installed. In Canada,check with your local St. John Ambulanceoffice for referral to a Certified PassengerSeat Technician.
Using Cinch Tongue Lap andShoulder Belts (All Front Center,Super Cab and Crew Cab RearCenter Positions)
WARNINGS
Airbags can kill or injure a child in achild seat. If you must use aforward-facing child seat in the frontseat, move seat upon which the child seatis installed all the way back.
Rear facing child seats should neverbe placed in front of an active airbag.
Always use both lap and shouldersafety belt in the Regular Cab centerseating position if applicable.
The belt webbing below the tongue is thelap portion of the combination lap andshoulder belt, and the belt webbing abovethe tongue is the shoulder belt portion ofthe combination lap and shoulder belt.
1. Position the child safety seat in thefront center seat.
19
Super Duty (TFA) Canada/United States of America, enUSA, First Printing
Child SafetyE142534 E142528
Page 26 of 507
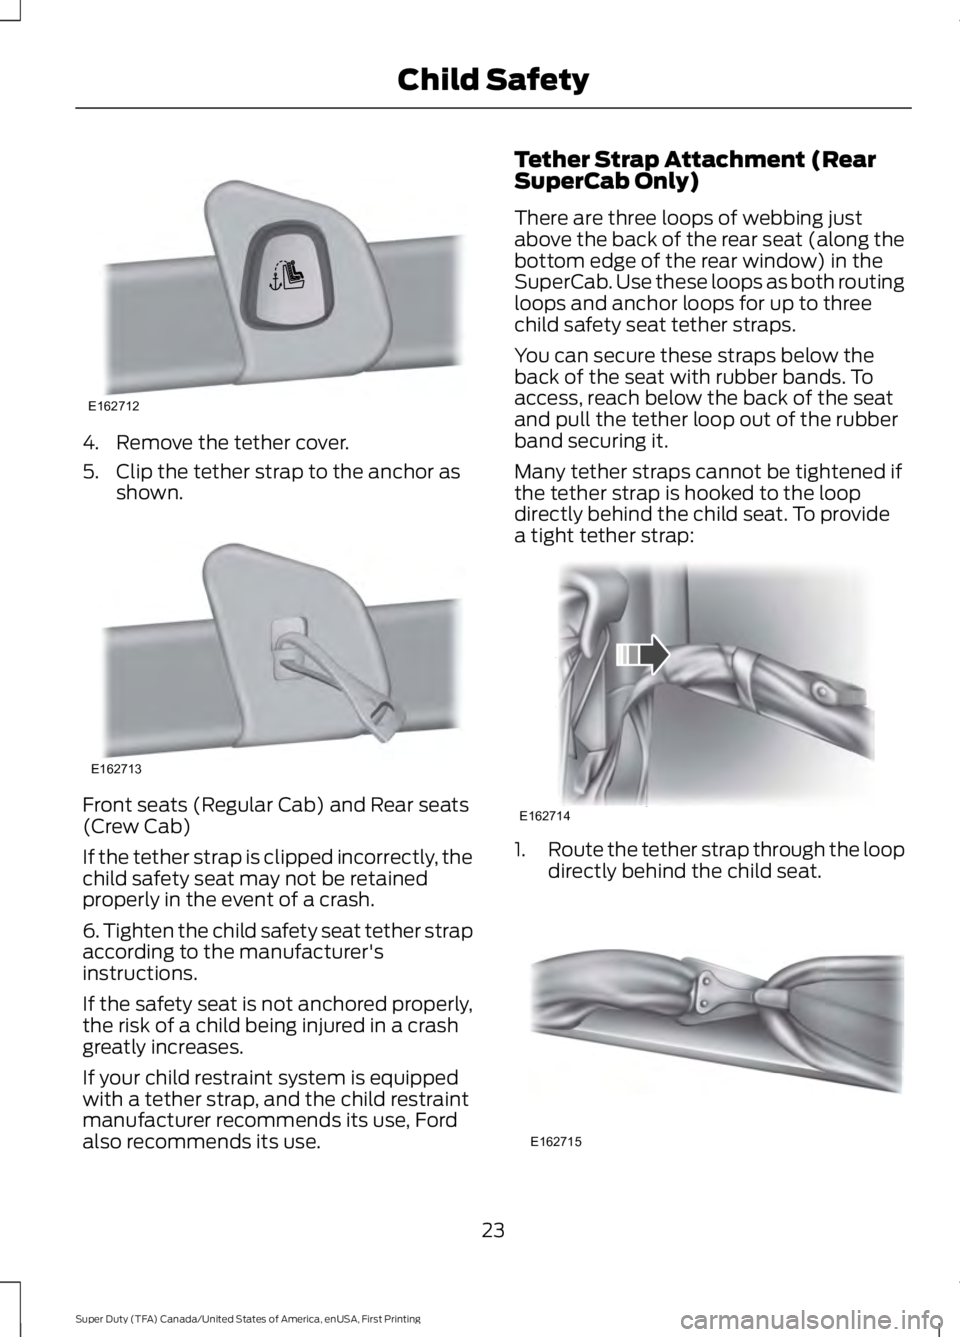
4. Remove the tether cover.
5. Clip the tether strap to the anchor asshown.
Front seats (Regular Cab) and Rear seats(Crew Cab)
If the tether strap is clipped incorrectly, thechild safety seat may not be retainedproperly in the event of a crash.
6. Tighten the child safety seat tether strapaccording to the manufacturer'sinstructions.
If the safety seat is not anchored properly,the risk of a child being injured in a crashgreatly increases.
If your child restraint system is equippedwith a tether strap, and the child restraintmanufacturer recommends its use, Fordalso recommends its use.
Tether Strap Attachment (RearSuperCab Only)
There are three loops of webbing justabove the back of the rear seat (along thebottom edge of the rear window) in theSuperCab. Use these loops as both routingloops and anchor loops for up to threechild safety seat tether straps.
You can secure these straps below theback of the seat with rubber bands. Toaccess, reach below the back of the seatand pull the tether loop out of the rubberband securing it.
Many tether straps cannot be tightened ifthe tether strap is hooked to the loopdirectly behind the child seat. To providea tight tether strap:
1.Route the tether strap through the loopdirectly behind the child seat.
23
Super Duty (TFA) Canada/United States of America, enUSA, First Printing
Child SafetyE162712 E162713 E162714 E162715
Page 28 of 507
Types of Booster Seats
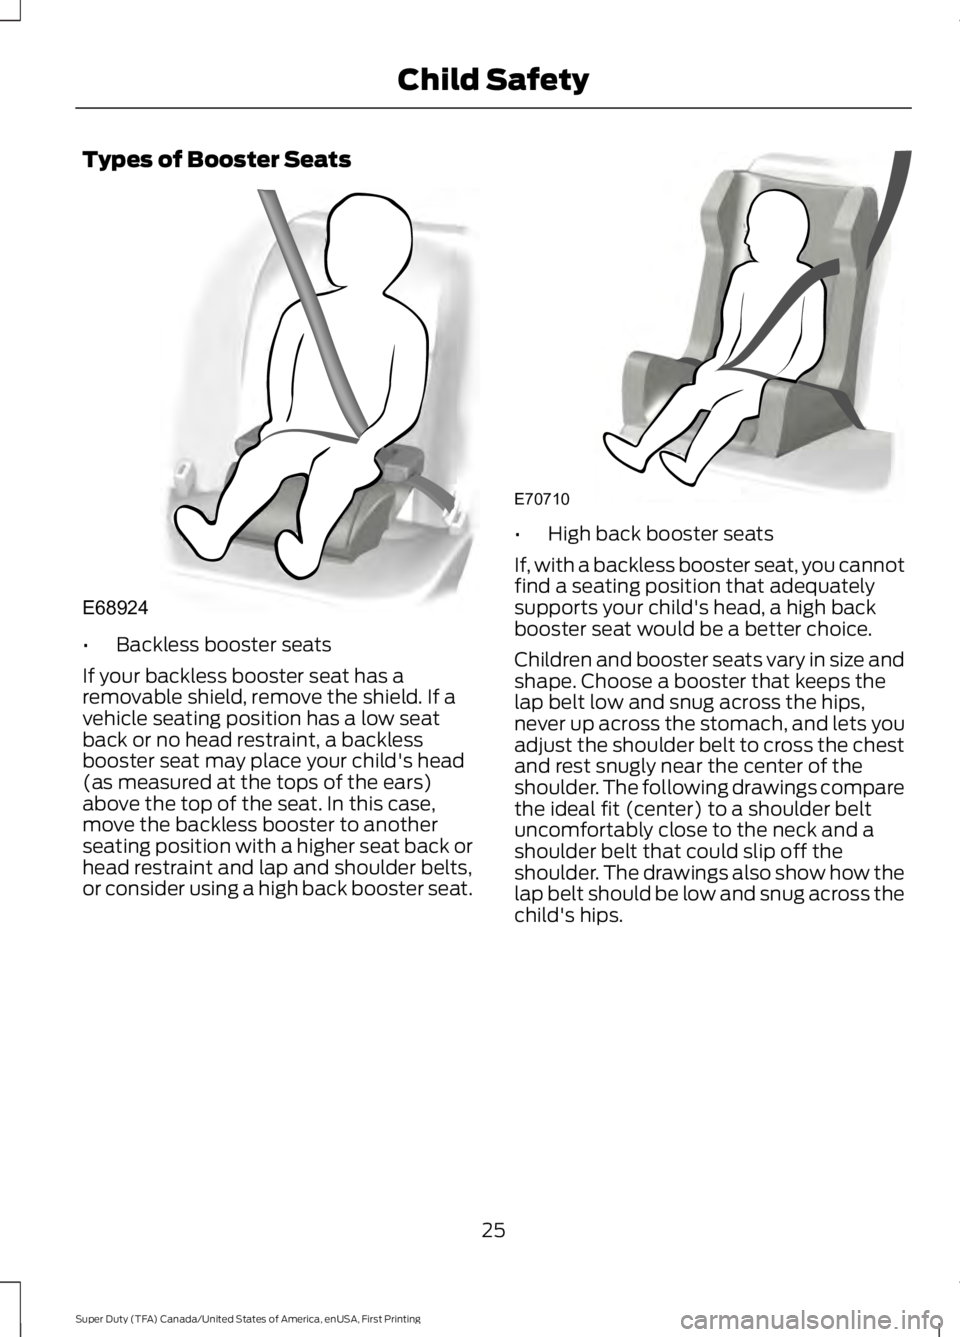
•Backless booster seats
If your backless booster seat has aremovable shield, remove the shield. If avehicle seating position has a low seatback or no head restraint, a backlessbooster seat may place your child's head(as measured at the tops of the ears)above the top of the seat. In this case,move the backless booster to anotherseating position with a higher seat back orhead restraint and lap and shoulder belts,or consider using a high back booster seat.
•High back booster seats
If, with a backless booster seat, you cannotfind a seating position that adequatelysupports your child's head, a high backbooster seat would be a better choice.
Children and booster seats vary in size andshape. Choose a booster that keeps thelap belt low and snug across the hips,never up across the stomach, and lets youadjust the shoulder belt to cross the chestand rest snugly near the center of theshoulder. The following drawings comparethe ideal fit (center) to a shoulder beltuncomfortably close to the neck and ashoulder belt that could slip off theshoulder. The drawings also show how thelap belt should be low and snug across thechild's hips.
25
Super Duty (TFA) Canada/United States of America, enUSA, First Printing
Child SafetyE68924 E70710
Page 33 of 507
The safety belt pretensioners at the frontseating positions are designed to tightenthe safety belts when activated. In frontaland near-frontal crashes, side crashes androllovers, the safety belt pretensioners maybe activated alone or, if the crash is ofsufficient severity, together with the frontairbags.
FASTENING THE SAFETY
BELTS
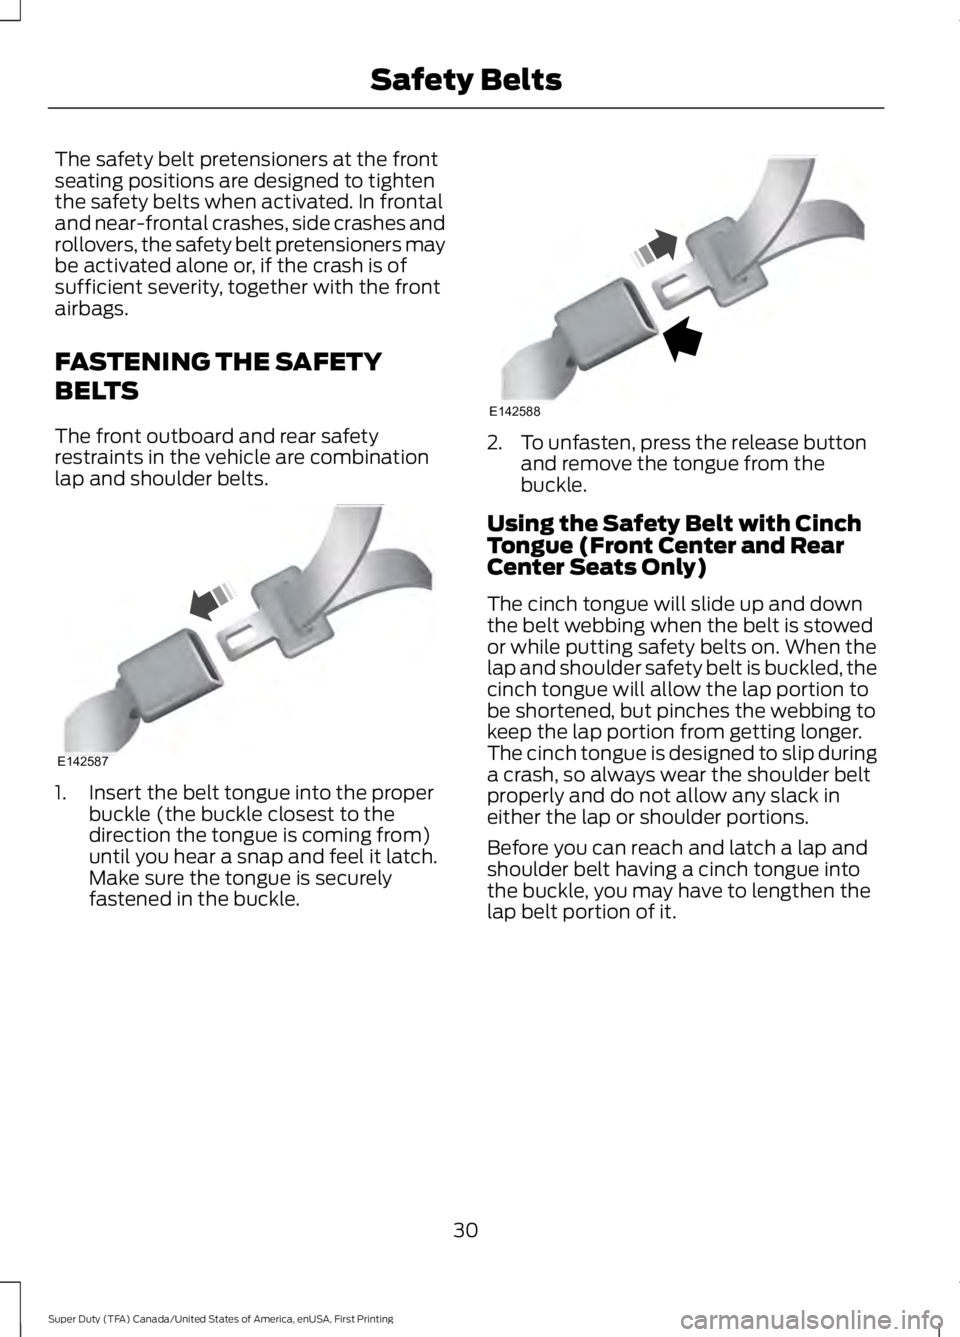
The front outboard and rear safetyrestraints in the vehicle are combinationlap and shoulder belts.
1. Insert the belt tongue into the properbuckle (the buckle closest to thedirection the tongue is coming from)until you hear a snap and feel it latch.Make sure the tongue is securelyfastened in the buckle.
2. To unfasten, press the release buttonand remove the tongue from thebuckle.
Using the Safety Belt with CinchTongue (Front Center and RearCenter Seats Only)
The cinch tongue will slide up and downthe belt webbing when the belt is stowedor while putting safety belts on. When thelap and shoulder safety belt is buckled, thecinch tongue will allow the lap portion tobe shortened, but pinches the webbing tokeep the lap portion from getting longer.The cinch tongue is designed to slip duringa crash, so always wear the shoulder beltproperly and do not allow any slack ineither the lap or shoulder portions.
Before you can reach and latch a lap andshoulder belt having a cinch tongue intothe buckle, you may have to lengthen thelap belt portion of it.
30
Super Duty (TFA) Canada/United States of America, enUSA, First Printing
Safety BeltsE142587 E142588
Page 35 of 507
Safety Belt Locking Modes
WARNINGS
After any vehicle crash, the safetybelt system at all passenger seatingpositions must be checked by anauthorized dealer to verify that theautomatic locking retractor feature forchild seats is still functioning properly. Inaddition, all safety belts should be checkedfor proper function.
The belt and retractor must bereplaced if the safety belt assemblyautomatic locking retractor featureor any other safety belt function is notoperating properly when checked by anauthorized dealer. Failure to replace thebelt and retractor assembly could increasethe risk of injury in crashes.
All safety restraints in the vehicle arecombination lap and shoulder belts. Thedriver safety belt has the first type oflocking mode. The front outboardpassenger and rear outboard seat safetybelts have both types of locking modesdescribed as follows:
Vehicle Sensitive Mode
This is the normal retractor mode, whichallows free shoulder belt lengthadjustment to your movements andlocking in response to vehicle movement.For example, if the driver brakes suddenlyor turns a corner sharply, or the vehiclereceives an impact of about 5 mph(8 km/h) or more, the combination safetybelts will lock to help reduce forwardmovement of the driver and passengers.
In addition, the retractor is designed to lockif the webbing is pulled out too quickly. Ifthis occurs, let the belt retract slightly andpull webbing out again in a slow andcontrolled manner.
Automatic Locking Mode
In this mode, the shoulder belt isautomatically pre-locked. The belt will stillretract to remove any slack in the shoulderbelt. The automatic locking mode is notavailable on the driver safety belt.
When to Use the Automatic LockingMode
Use this mode any time a child safety seat,except a booster, is installed in passengerfront or rear seating positions. You shouldproperly restrain children 12 years old andunder in a rear seating position wheneverpossible. See Child Safety (page 15).
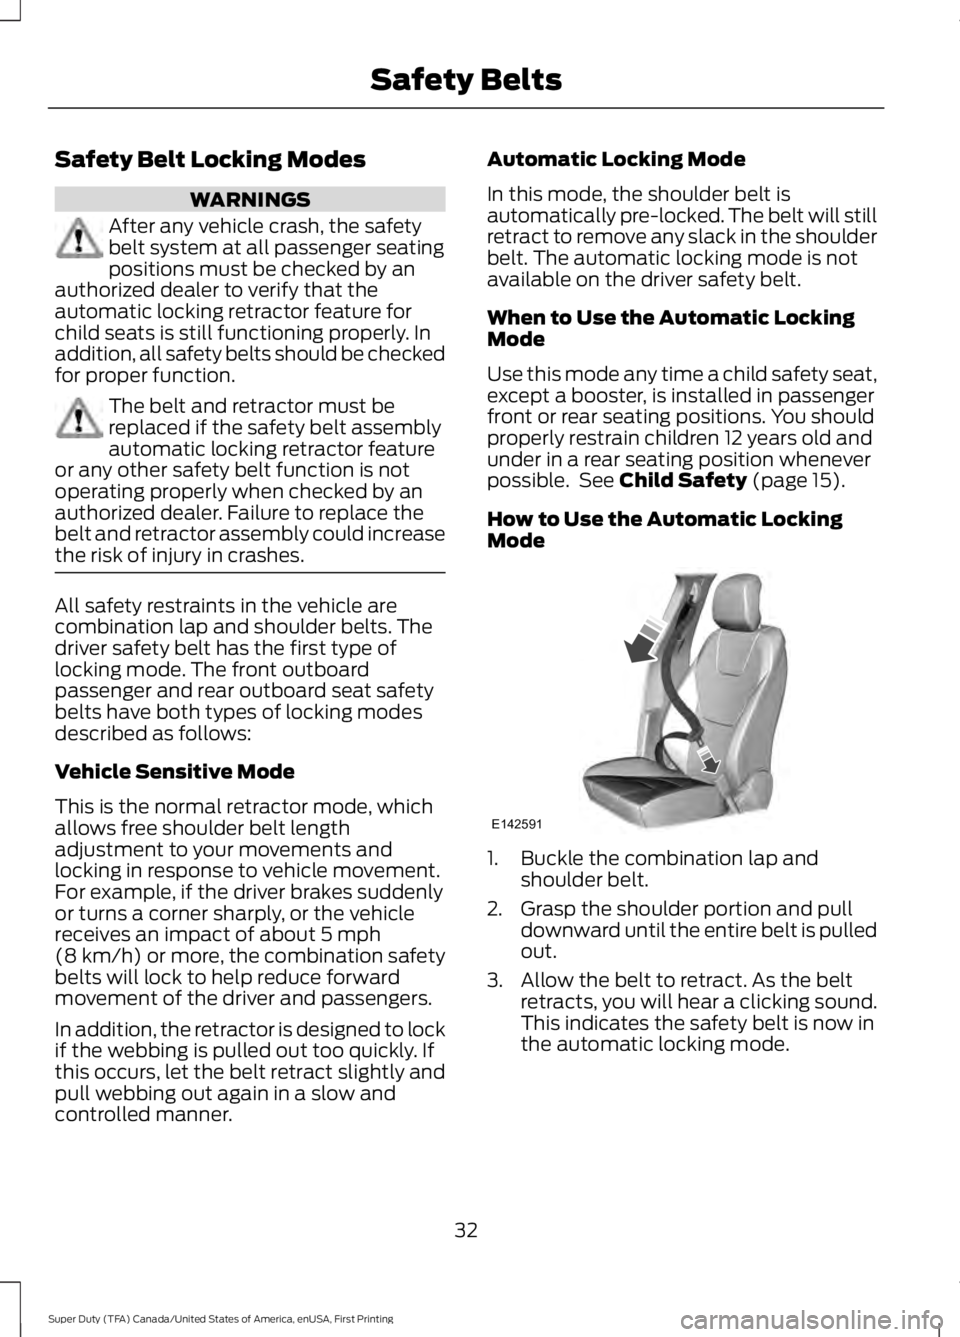
How to Use the Automatic LockingMode
1. Buckle the combination lap andshoulder belt.
2. Grasp the shoulder portion and pulldownward until the entire belt is pulledout.
3. Allow the belt to retract. As the beltretracts, you will hear a clicking sound.This indicates the safety belt is now inthe automatic locking mode.
32
Super Duty (TFA) Canada/United States of America, enUSA, First Printing
Safety BeltsE142591
Page 42 of 507

Passenger airbagPassenger airbag statusindicatorSwitch position
DisabledOFF: LitOff
ON: Unlit
EnabledOFF: UnlitOn
ON: Lit
Low-series vehicles (if equipped)
The front passenger airbag on and offswitch has an indicator that will illuminateand stay lit to remind you that the frontpassenger frontal airbag is off. Theindicator lamp is located by the radio.
Note:The indicator lamp will illuminate fora short period of time when the ignition isfirst turned on to confirm it is functional.
Turning the Passenger Airbag Off
WARNINGS
If the light fails to illuminate whenthe passenger air bag switch is offand the ignition is on, have thepassenger air bag switch serviced at yourauthorized dealer immediately.
In order to avoid inadvertentactivation of the switch, alwaysremove the ignition key from thepassenger air bag on and off switch.
WARNINGS
An infant in a rear-facing seat facesa high risk of serious or fatal injuriesfrom a deploying passenger airbag.Rear facing infant seats should never beplaced in the front seats, unless thepassenger airbag is turned off.
1. Insert the ignition key, turn the switchto OFF and hold in OFF while removingthe key.
2.When the ignition is turned on, the passairbag off light illuminates briefly,momentarily shuts off and then turnsback on. This indicates that thepassenger airbag is deactivated.
39
Super Duty (TFA) Canada/United States of America, enUSA, First Printing
Supplementary Restraints SystemE162721 E162722
Page 115 of 507
Air distribution control: Adjust the control to turn airflow from the windshield,instrument panel, or footwell vents on or off. You can distribute air through anycombination of these vents.
D
A/C: Press the button to switch the air conditioning on or off. Air conditioningcools your vehicle using outside air. To improve the time to reach a comfortabletemperature in hot weather, drive with the windows open until you feel cold airthrough the air vents.
E
Note: In certain conditions (for example, maximum defrost), the air conditioningcompressor may continue to operate even though the air conditioning isswitched off.
MAX A/C: Press the button for maximum cooling. Recirculated air flows throughthe instrument panel vents, air conditioning automatically turns on and the fanautomatically adjusts to the highest speed.
F
Recirculated air: Press the button to switch between outside air andrecirculated air. The air currently in the passenger compartment recirculates.This can reduce the time needed to cool the interior and reduce unwanted odorsfrom entering your vehicle.
G
Note: Recirculated air may also turn on and off automatically in instrumentpanel or instrument panel and floor airflow modes during hot weather to improvecooling efficiency.
Passenger temperature control: Adjusts the temperature on the passengerside.H
Fan speed control: Adjusts the volume of air circulated in the vehicle.I
AUTO: Press the button to switch on automatic operation. Adjust to select thedesired temperature. Fan speed, air distribution, air conditioning operation, andoutside or recirculated air are automatically adjusted to heat or cool the vehicleto maintain the desired temperature. You can also turn off dual zone mode bypressing and holding the button for greater than two seconds.
J
HINTS ON CONTROLLING THE
INTERIOR CLIMATE
General Hints
Note:Prolonged use of recirculated air maycause the windows to fog up.
Note:You may feel a small amount of airfrom the footwell air vents regardless of theair distribution setting.
Note:To reduce humidity build-up insideyour vehicle, do not drive with the systemswitched off or with recirculated air alwaysswitched on.
Note:Do not place objects under the frontseats as this may interfere with the airflowto the rear seats.
Note:Remove any snow, ice or leaves fromthe air intake area at the base of thewindshield.
112
Super Duty (TFA) Canada/United States of America, enUSA, First Printing
Climate Control
Page 121 of 507
WARNINGS
Install the head restraint properly tohelp minimize the risk of neck injuryin the event of a crash.
Note:Adjust the seat back to an uprightdriving position before adjusting the headrestraint. Adjust the head restraint so thatthe top of it is level with the top of your headand as far forward as possible. Make surethat you remain comfortable. If you areextremely tall, adjust the head restraint toits highest position.
Front Seat Head Restraint
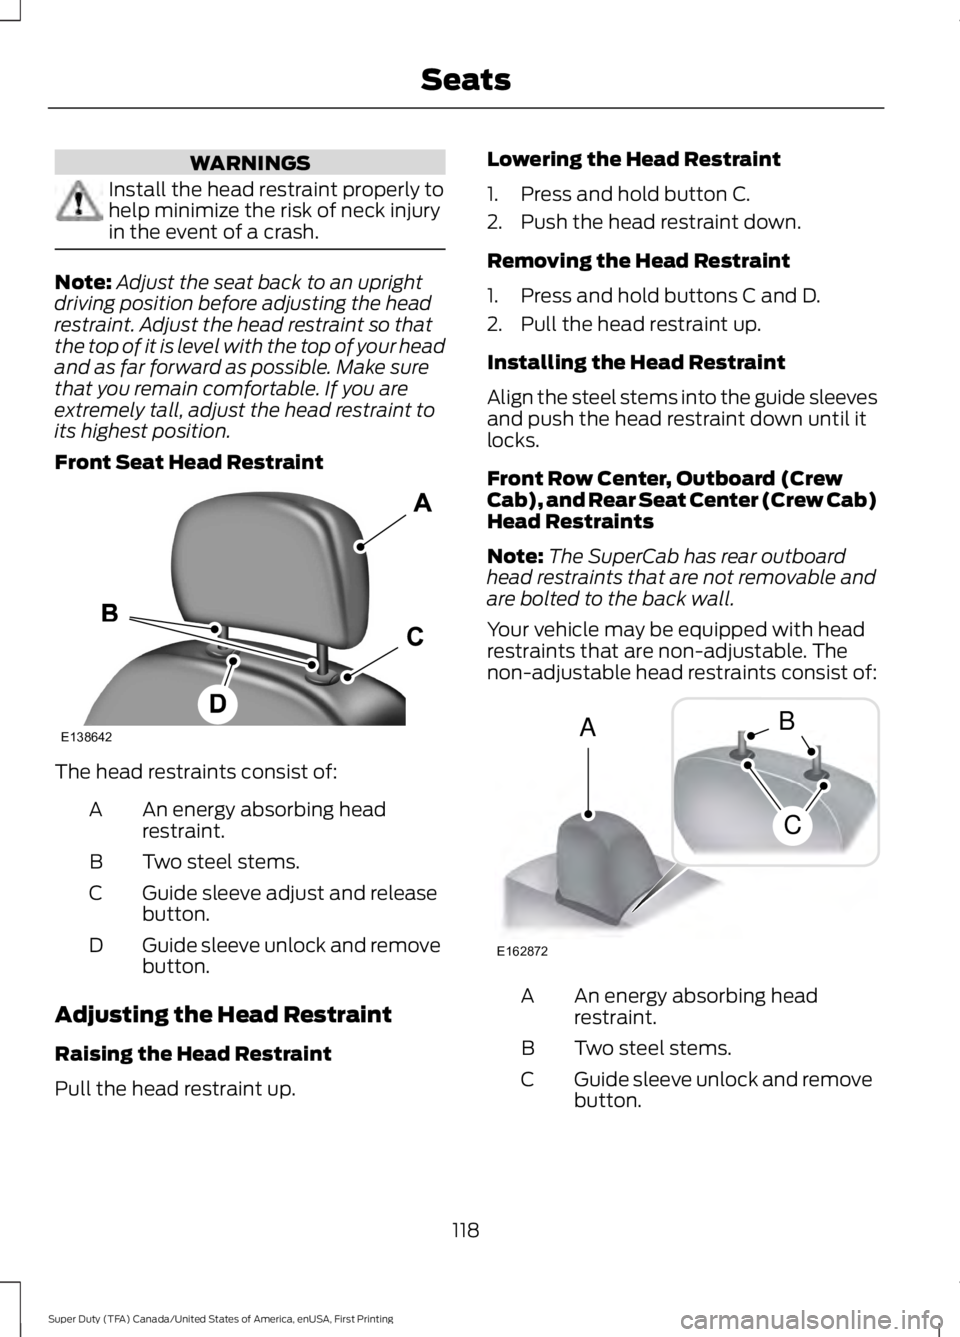
The head restraints consist of:
An energy absorbing headrestraint.A
Two steel stems.B
Guide sleeve adjust and releasebutton.C
Guide sleeve unlock and removebutton.D
Adjusting the Head Restraint
Raising the Head Restraint
Pull the head restraint up.
Lowering the Head Restraint
1. Press and hold button C.
2. Push the head restraint down.
Removing the Head Restraint
1. Press and hold buttons C and D.
2. Pull the head restraint up.
Installing the Head Restraint
Align the steel stems into the guide sleevesand push the head restraint down until itlocks.
Front Row Center, Outboard (CrewCab), and Rear Seat Center (Crew Cab)Head Restraints
Note:The SuperCab has rear outboardhead restraints that are not removable andare bolted to the back wall.
Your vehicle may be equipped with headrestraints that are non-adjustable. Thenon-adjustable head restraints consist of:
An energy absorbing headrestraint.A
Two steel stems.B
Guide sleeve unlock and removebutton.C
118
Super Duty (TFA) Canada/United States of America, enUSA, First Printing
SeatsE138642 E162872
A
C
B