2016 FORD F450 SUPER DUTY horn
[x] Cancel search: hornPage 51 of 507

Note:Replacing the battery will not deletethe transmitter from the vehicle. Thetransmitter should operate normally.
The remote control uses one coin-typethree-volt lithium battery CR2032 orequivalent.
Integrated Keyhead Transmitter
1. Twist a thin coin in the slot of thetransmitter near the key ring to removethe battery cover.
2. Carefully peel up the rubber gasketfrom the transmitter. It may come offwith the battery cover.
3. Remove the old battery
4. Insert the new battery. Refer to theinstructions inside the transmitter forthe correct orientation of the battery.Press the battery down to make sureit is fully in the housing.
5. Reinstall the rubber gasket.
6. Snap the battery cover back onto thetransmitter.
Memory Feature (If Equipped)
You can program your integrated keyheadtransmitter to recall memory settings forthe driver seat, power mirrors and powerfoot pedals. See Memory Function (page120).
Car Finder
Press the button twice withinthree seconds. The horn willsound and the turn signals willflash. We recommend you use this methodto locate your vehicle, rather than usingthe panic alarm.
Sounding a Panic Alarm
Note:The panic alarm will only operatewhen the ignition is off.
Press the button to activate thealarm. Press the button again orturn the ignition on to deactivateit.
Remote Start (If Equipped)
WARNING
To avoid exhaust fumes, do not useremote start if your vehicle is parkedindoors or areas that are not wellventilated.
Note:Do not use remote start if your vehicleis low on fuel.
The remote start button is on thetransmitter.
This feature allows you to start yourvehicle from outside the vehicle. Thetransmitter has an extended operatingrange.
Vehicles with automatic climate controlcan be set to operate when you remotestart the vehicle. See Climate Control(page 110). A manual climate controlsystem will run at the setting it was set towhen you switch the vehicle off.
48
Super Duty (TFA) Canada/United States of America, enUSA, First Printing
Keys and Remote ControlsE163048
3
2
1 E138623 E138624 E138625
Page 52 of 507
Many states and provinces haverestrictions for the use of remote start.Check your local and state or provinciallaws for specific requirements regardingremote start systems.
The remote start system will not work if:
•the ignition is on
•the alarm system is triggered
•you disable the feature
•the hood is open
•the transmission is not in P
•the vehicle battery voltage is too low
•the service engine soon indicator is on.
Remote Starting the Vehicle
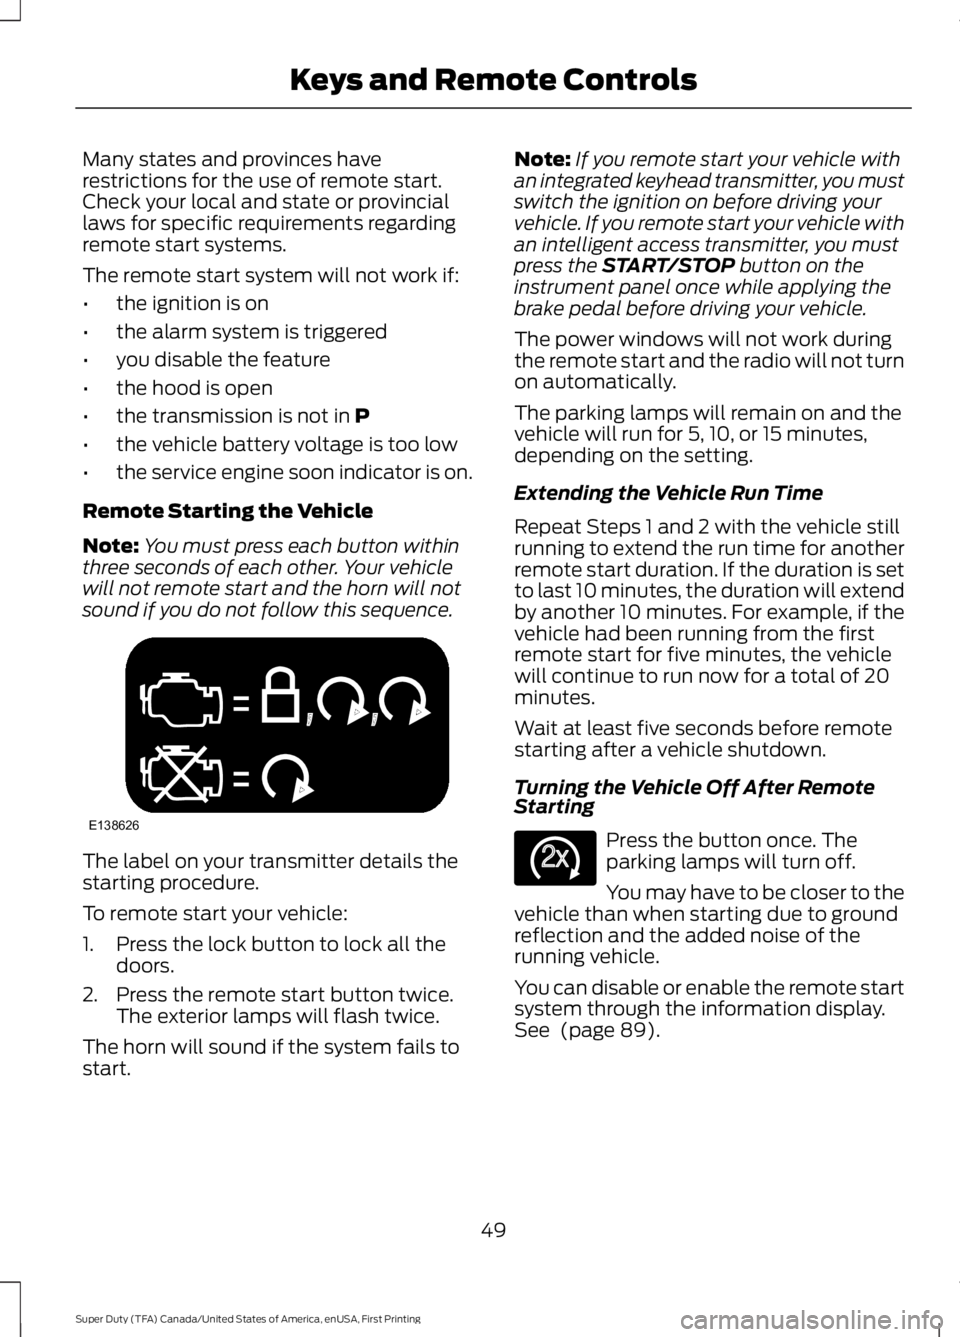
Note:You must press each button withinthree seconds of each other. Your vehiclewill not remote start and the horn will notsound if you do not follow this sequence.
The label on your transmitter details thestarting procedure.
To remote start your vehicle:
1. Press the lock button to lock all thedoors.
2. Press the remote start button twice.The exterior lamps will flash twice.
The horn will sound if the system fails tostart.
Note:If you remote start your vehicle withan integrated keyhead transmitter, you mustswitch the ignition on before driving yourvehicle. If you remote start your vehicle withan intelligent access transmitter, you mustpress the START/STOP button on theinstrument panel once while applying thebrake pedal before driving your vehicle.
The power windows will not work duringthe remote start and the radio will not turnon automatically.
The parking lamps will remain on and thevehicle will run for 5, 10, or 15 minutes,depending on the setting.
Extending the Vehicle Run Time
Repeat Steps 1 and 2 with the vehicle stillrunning to extend the run time for anotherremote start duration. If the duration is setto last 10 minutes, the duration will extendby another 10 minutes. For example, if thevehicle had been running from the firstremote start for five minutes, the vehiclewill continue to run now for a total of 20minutes.
Wait at least five seconds before remotestarting after a vehicle shutdown.
Turning the Vehicle Off After RemoteStarting
Press the button once. Theparking lamps will turn off.
You may have to be closer to thevehicle than when starting due to groundreflection and the added noise of therunning vehicle.
You can disable or enable the remote startsystem through the information display.See (page 89).
49
Super Duty (TFA) Canada/United States of America, enUSA, First Printing
Keys and Remote ControlsE138626 E138625
Page 59 of 507

LOCKING AND UNLOCKING
You can use the power door lock controlor the remote control to lock and unlockyour vehicle.
Power Door Locks (If Equipped)
The power door lock control is on the driverand front passenger door panels.
UnlockA
LockB
Remote Control (If Equipped)
Unlocking the Doors (Two-StageUnlock)
Press the button to unlock thedriver door.
Press the button again withinthree seconds to unlock all doors. The turnsignals will flash.
Press and hold both the lock and unlockbuttons on the remote control for fourseconds to disable or enable two-stageunlocking. Disabling two-stage unlockingallows all vehicle doors to unlock with onepress of the button. The turn signals willflash twice to indicate a change to theunlocking mode. The unlocking modeapplies to the remote control and keylessentry keypad.
Locking the Doors
Press the button to lock all thedoors. The turn signals willilluminate.
Press the button again within threeseconds to confirm that all the doors areclosed. The doors will lock again, the hornwill sound and the turn signals willilluminate if all the doors are closed.
Mislock
If any door is open or if the hood is open onvehicles with an anti-theft alarm or remotestart, the horn will sound twice and thelamps will not flash.
Smart Unlocks (If Equipped)
This feature helps to prevent you fromlocking yourself out of your vehicle if yourkey is still in the ignition.
When you open the driver door and lockyour vehicle with the power door lockcontrol, all the doors will lock then unlockif your key is still in the ignition.
Your can still lock your vehicle with the keyin the ignition by:
•using the manual lock on the door
•locking the driver door with a key
•using the keyless entry keypad
•using the lock button on the remotecontrol
Autolock and Autounlock (If Equipped)
The autolock feature will lock all the doorswhen:
•all doors are closed, and
•the ignition is on, and
•you shift into any gear putting yourvehicle in motion, and
•your vehicle attains a speed greaterthan 12 mph (20 km/h).
56
Super Duty (TFA) Canada/United States of America, enUSA, First Printing
LocksABE163049 E138629 E138623
Page 68 of 507
1.Insert the first previously programmedcoded key into the ignition.
2.Switch the ignition from off to on. Keepthe ignition on for at least threeseconds, but no more than 10 seconds.
3.Switch the ignition off and remove thefirst coded key from the ignition.
4. After three seconds but within 10seconds of switching the ignition off,insert the second previously coded keyinto the ignition.
5.Switch the ignition from off to on. Keepthe ignition on for at least threeseconds, but no more than 10 seconds.
6.Switch the ignition off and remove thesecond previously programmed codedkey from the ignition.
7. After three seconds but within 10seconds of switching the ignition offand removing the previouslyprogrammed coded key, insert the newunprogrammed key into the ignition.
8.Switch the ignition from off to on. Keepthe ignition on for at least six secondsuntil you hear the door locks cycle.
9.Remove the newly programmed codedkey from the ignition.
The key will start the engine ifprogramming is successful. You canoperate the remote entry system if the newkey is an integrated keyhead transmitter.
If programming was not successful, wait20 seconds and repeat Steps 1 through 8.If you are still unsuccessful, take yourvehicle to an authorized dealer.
ANTI-THEFT ALARM (If Equipped)
The system warns you of an unauthorizedentry to your vehicle. It triggers if any dooror the hood opens without using the key,remote control or keyless entry keypad.
The direction indicators flash and the hornsounds if the system triggers while thealarm is armed.
Take all remote controls to an authorizeddealer if there is any potential alarmproblem with your vehicle.
Arming the Alarm
The alarm is ready to arm when there isnot a key in the ignition. Electronically lockthe vehicle to arm the alarm.
The direction indicators flash once afteryou lock the vehicle. This indicates thealarm is in the pre-armed mode. It will fullyarm in 20 seconds.
Disarming the Alarm
Disarm the alarm by any of the followingactions:
•Press the power door unlock buttonwithin the 20-second pre-armed mode.
•Unlock the doors with the remotecontrol or keyless entry keypad.
•Switch the ignition on or start thevehicle.
•Use a key in the driver door to unlockthe vehicle, then switch the ignition onwithin 12 seconds.
Note:Pressing the panic button on theremote control will stop the horn and signalindicators, but will not disarm the system.
65
Super Duty (TFA) Canada/United States of America, enUSA, First Printing
Security
Page 211 of 507
•Transmissions give their best fueleconomy when operated in the topcruise gear and with steady pressureon the gas pedal.
•Four-wheel-drive operation (ifequipped) is less fuel efficient thantwo-wheel-drive operation.
•Close the windows for high-speeddriving.
DRIVING THROUGH WATER
WARNING
Do not drive through flowing or deepwater as you may lose control of yourvehicle.
Note:Driving through standing water cancause vehicle damage.
Note:Engine damage can occur if waterenters the air filter.
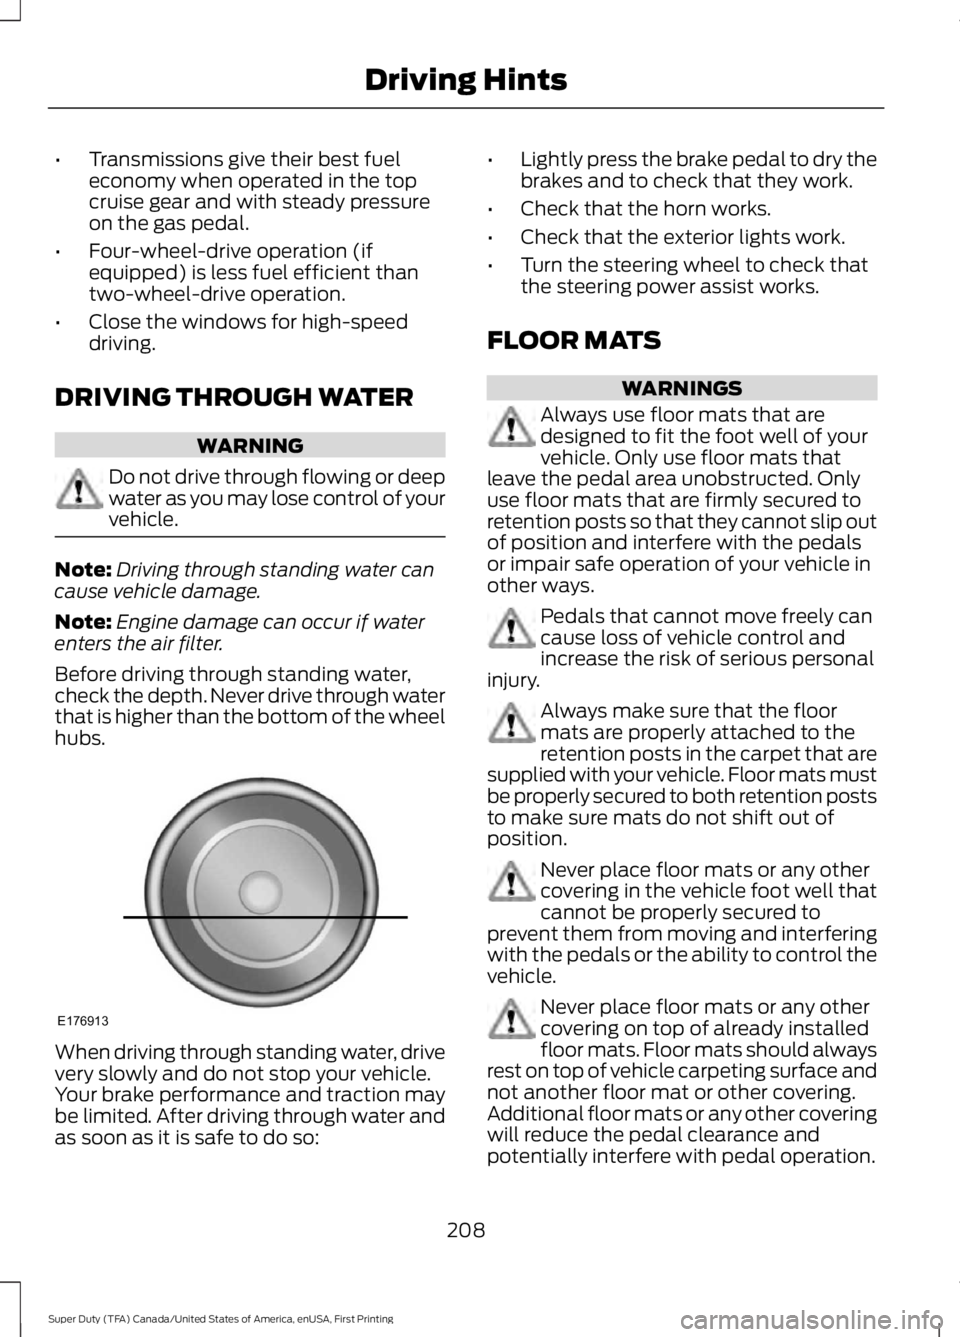
Before driving through standing water,check the depth. Never drive through waterthat is higher than the bottom of the wheelhubs.
When driving through standing water, drivevery slowly and do not stop your vehicle.Your brake performance and traction maybe limited. After driving through water andas soon as it is safe to do so:
•Lightly press the brake pedal to dry thebrakes and to check that they work.
•Check that the horn works.
•Check that the exterior lights work.
•Turn the steering wheel to check thatthe steering power assist works.
FLOOR MATS
WARNINGS
Always use floor mats that aredesigned to fit the foot well of yourvehicle. Only use floor mats thatleave the pedal area unobstructed. Onlyuse floor mats that are firmly secured toretention posts so that they cannot slip outof position and interfere with the pedalsor impair safe operation of your vehicle inother ways.
Pedals that cannot move freely cancause loss of vehicle control andincrease the risk of serious personalinjury.
Always make sure that the floormats are properly attached to theretention posts in the carpet that aresupplied with your vehicle. Floor mats mustbe properly secured to both retention poststo make sure mats do not shift out ofposition.
Never place floor mats or any othercovering in the vehicle foot well thatcannot be properly secured toprevent them from moving and interferingwith the pedals or the ability to control thevehicle.
Never place floor mats or any othercovering on top of already installedfloor mats. Floor mats should alwaysrest on top of vehicle carpeting surface andnot another floor mat or other covering.Additional floor mats or any other coveringwill reduce the pedal clearance andpotentially interfere with pedal operation.
208
Super Duty (TFA) Canada/United States of America, enUSA, First Printing
Driving HintsE176913
Page 219 of 507
2. Remove the jumper cable on thenegative (-) terminal of the boostervehicle battery.
3. Remove the jumper cable from thepositive (+) terminal of the boostervehicle battery.
4. Remove the jumper cable from thepositive (+) terminal of the disabledvehicle battery.
5.Allow the engine to idle for at least oneminute.
POST-CRASH ALERT SYSTEM
The system flashes the direction indicatorsand sounds the horn (intermittently) in theevent of a serious impact that deploys anairbag (front, side, side curtain or SafetyCanopy) or the safety belt pretensioners.
The horn and indicators will turn off when:
•You press the hazard control button.
•You press the panic button on theremote entry transmitter (if equipped).
•Your vehicle runs out of power.
216
Super Duty (TFA) Canada/United States of America, enUSA, First Printing
Roadside Emergencies
Page 232 of 507
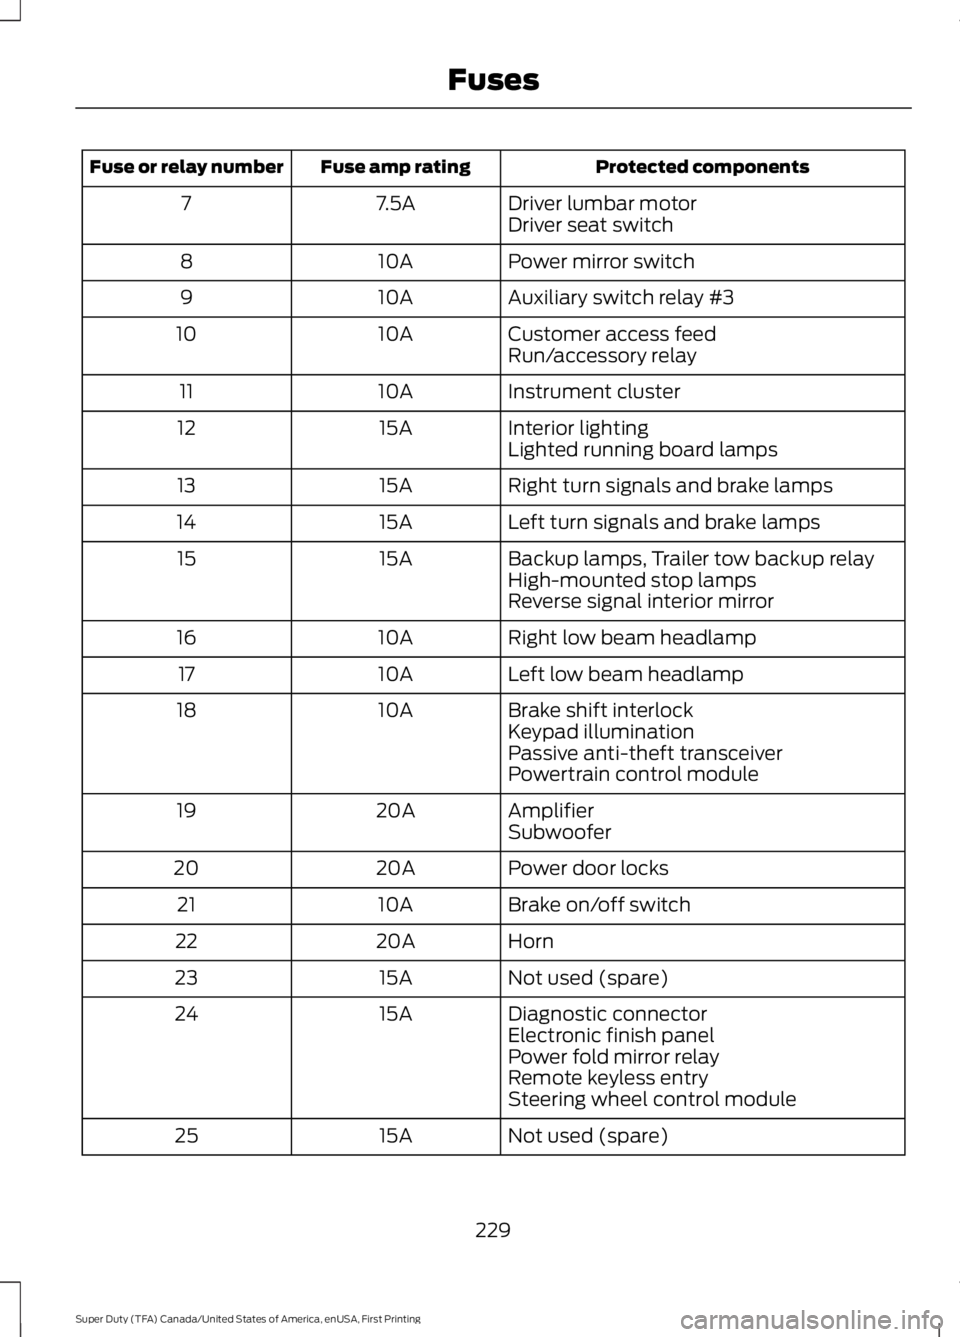
Protected componentsFuse amp ratingFuse or relay number
Driver lumbar motor7.5A7Driver seat switch
Power mirror switch10A8
Auxiliary switch relay #310A9
Customer access feed10A10Run/accessory relay
Instrument cluster10A11
Interior lighting15A12Lighted running board lamps
Right turn signals and brake lamps15A13
Left turn signals and brake lamps15A14
Backup lamps, Trailer tow backup relay15A15High-mounted stop lampsReverse signal interior mirror
Right low beam headlamp10A16
Left low beam headlamp10A17
Brake shift interlock10A18Keypad illuminationPassive anti-theft transceiverPowertrain control module
Amplifier20A19Subwoofer
Power door locks20A20
Brake on/off switch10A21
Horn20A22
Not used (spare)15A23
Diagnostic connector15A24Electronic finish panelPower fold mirror relayRemote keyless entrySteering wheel control module
Not used (spare)15A25
229
Super Duty (TFA) Canada/United States of America, enUSA, First Printing
Fuses
Page 292 of 507

•To reduce the chances of interferencefrom another vehicle, perform thesystem reset procedure at least threefeet (one meter) away from anotherFord Motor Company vehicleundergoing the system reset procedureat the same time.
•Do not wait more than two minutesbetween resetting each tire sensor orthe system will time-out and the entireprocedure will have to be repeated onall four wheels.
•A double horn will sound indicating theneed to repeat the procedure.
Performing the System Reset Procedure
Read the entire procedure beforeattempting.
1. Drive the vehicle above 20 mph (32km/h) for at least two minutes, thenpark in a safe location where you caneasily get to all four tires and haveaccess to an air pump.
2.Place the ignition in the off position andkeep the key in the ignition.
3. Cycle the ignition to the on positionwith the engine off.
4. Turn the hazard flashers on then offthree times. You must accomplish thiswithin 10 seconds. If the reset modehas been entered successfully, the hornwill sound once, the system indicatorwill flash and a message is shown inthe information display. If this does notoccur, please try again starting at Step2. If after repeated attempts to enterthe reset mode, the horn does notsound, the system indicator does notflash and no message is shown in theinformation display, seek service fromyour authorized dealer.
5. Train the tire pressure monitoringsystem sensors in the tires using thefollowing system reset sequencestarting with the left front tire in thefollowing clockwise order: Left front(driver's side front tire), Right front(passenger's side front tire), Right rear(passenger's side rear tire), Left rear(driver's side rear tire).
6. Remove the valve cap from the valvestem on the left front tire. Decrease theair pressure until the horn sounds.Note: The single horn chirp confirmsthat the sensor identification code hasbeen learned by the module for thisposition. If a double horn is heard, thereset procedure was unsuccessful, andyou must repeat it.
7. Remove the valve cap from the valvestem on the right front tire. Decreasethe air pressure until the horn sounds.
8. Remove the valve cap from the valvestem on the right rear tire. Decrease theair pressure until the horn sounds.
9. Remove the valve cap from the valvestem on the left rear tire. Decrease theair pressure until the horn sounds.Training is complete after the hornsounds for the last tire trained (driver'sside rear tire), the system indicatorstops flashing, and a message is shownin the information display.
10.Turn the ignition off. If two short hornbeeps are heard, the reset procedurewas unsuccessful and you mustrepeat it. If after repeating theprocedure and two short beeps areheard when the ignition is turned tooff, seek assistance from yourauthorized dealer.
289
Super Duty (TFA) Canada/United States of America, enUSA, First Printing
Wheels and Tires