2016 FORD F450 SUPER DUTY hood release
[x] Cancel search: hood releasePage 145 of 507
You may experience a decrease in peakperformance when the engine is cold whenoperating on E85 ethanol.
Do not crank the engine for more than 10seconds at a time as starter damage mayoccur. If the engine fails to start, turn thekey to off and wait 30 seconds beforetrying again.
Do not use starting fluid such as ether inthe air intake system. Such fluid couldcause immediate explosive damage to theengine and possible personal injury.
If you should experience cold weatherstarting problems on E85 ethanol, andneither an alternative brand of E85 ethanolnor an engine block heater is available, theaddition of unleaded gasoline to your tankimproves cold starting performance. Yourvehicle is designed to operate on E85ethanol alone, unleaded gasoline alone, orany mixture of the two.
If the Engine Fails to Start Using thePreceding Instructions (Flexible FuelVehicles Only)
1. Press and hold down the acceleratorone-third to one-half the way to thefloor, then crank the engine.
2. When the engine starts, release thekey, then gradually release theaccelerator pedal as the engine speedsup. If the engine still fails to start,repeat Step 1.
Guarding Against Exhaust Fumes
WARNING
If you smell exhaust fumes insideyour vehicle, have your vehiclechecked by your authorized dealerimmediately. Do not drive your vehicle ifyou smell exhaust fumes. Carbonmonoxide is present in exhaust fumes.Take precautions to avoid its dangerouseffects.
Important Ventilating Information
If you stop your vehicle and then leave theengine idling for long periods of time, werecommend that you do one of thefollowing:
•Open the windows at least 1 inch (2.5centimeters).
•Set your climate control to outside air.
ENGINE BLOCK HEATER (If
Equipped)
WARNINGS
Failure to follow engine block heaterinstructions could result in propertydamage or serious personal injury.
Do not use your heater withungrounded electrical systems ortwo-pronged adapters. There is a riskof electrical shock.
Do not fully close the hood, or allowit to drop under its own weight whenusing the engine block heater. Thiscould damage the power cable and maycause an electrical short resulting in fire,injury and property damage.
Note:The heater is most effective whenoutdoor temperatures are below 0°F(-18°C).
The heater acts as a starting aid bywarming the engine coolant. This allowsthe climate control system to respondquickly. The equipment includes a heaterelement (installed in the engine block) anda wire harness. You can connect thesystem to a grounded 120-volt ACelectrical source.
142
Super Duty (TFA) Canada/United States of America, enUSA, First Printing
Starting and Stopping the Engine
Page 235 of 507
GENERAL INFORMATION
Have your vehicle serviced regularly to helpmaintain its roadworthiness and resalevalue. There is a large network ofauthorized dealers that are there to helpyou with their professional servicingexpertise. We believe that their speciallytrained technicians are best qualified toservice your vehicle properly and expertly.They are supported by a wide range ofhighly specialized tools developedspecifically for servicing your vehicle.
To help you service your vehicle, weprovide scheduled maintenanceinformation which makes tracking routineservice easy. See ScheduledMaintenance (page 453).
If your vehicle requires professional service,an authorized dealer can provide thenecessary parts and service. Check yourwarranty information to find out whichparts and services are covered.
Use only recommended fuels, lubricants,fluids and service parts conforming tospecifications. Motorcraft® parts aredesigned and built to provide the bestperformance in your vehicle.
Precautions
•Do not work on a hot engine.
•Make sure that nothing gets caught inmoving parts.
•Do not work on a vehicle with theengine running in an enclosed space,unless you are sure you have enoughventilation.
•Keep all open flames and other burningmaterial (such as cigarettes) awayfrom the battery and all fuel relatedparts.
Working with the Engine Off
1.Set the parking brake and shift to park(P).
2. Switch off the engine.
3. Block the wheels.
Working with the Engine On
WARNING
To reduce the risk of vehicle damageand/or personal burn injuries, do notstart your engine with the air cleanerremoved and do not remove it while theengine is running.
1.Set the parking brake and shift to park(P).
2. Block the wheels
OPENING AND CLOSING THE
HOOD
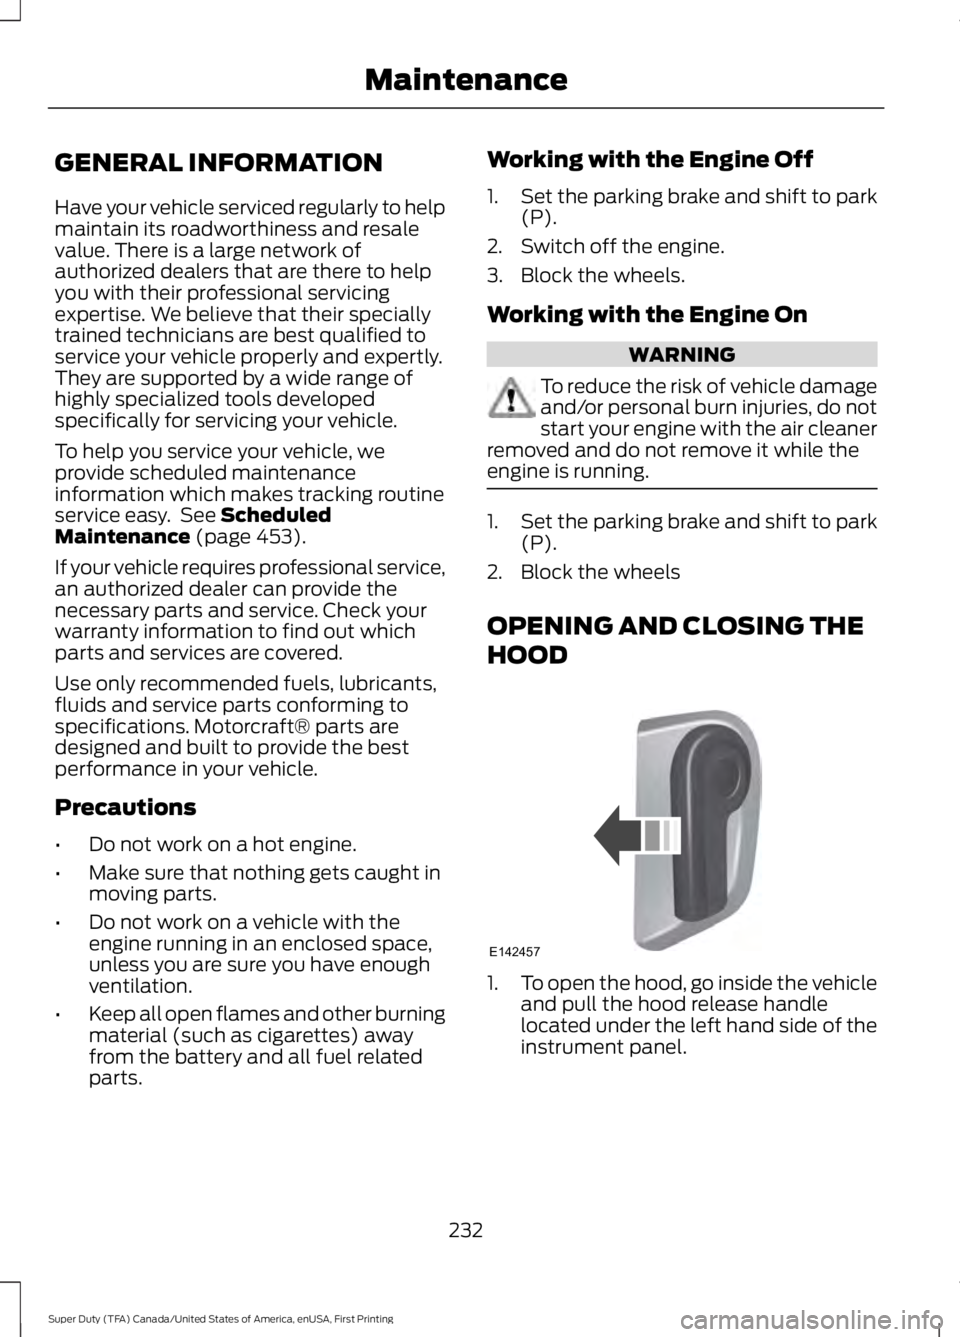
1.To open the hood, go inside the vehicleand pull the hood release handlelocated under the left hand side of theinstrument panel.
232
Super Duty (TFA) Canada/United States of America, enUSA, First Printing
MaintenanceE142457
Page 236 of 507
2. Go to the front of the vehicle andlocate the secondary release lever,which is located under the front of thehood, to your right of the center of thevehicle (driver's side), toward theheadlight.
3. Release the hood latch by pushing thesecondary release lever to your left,toward the center of the vehicle.
4. Raise the hood.
5.To close the hood, lower the hood andallow it to drop the last 8 to 11 inches(20 to 30 centimeters).
Note:Make sure that the hood is closedproperly.
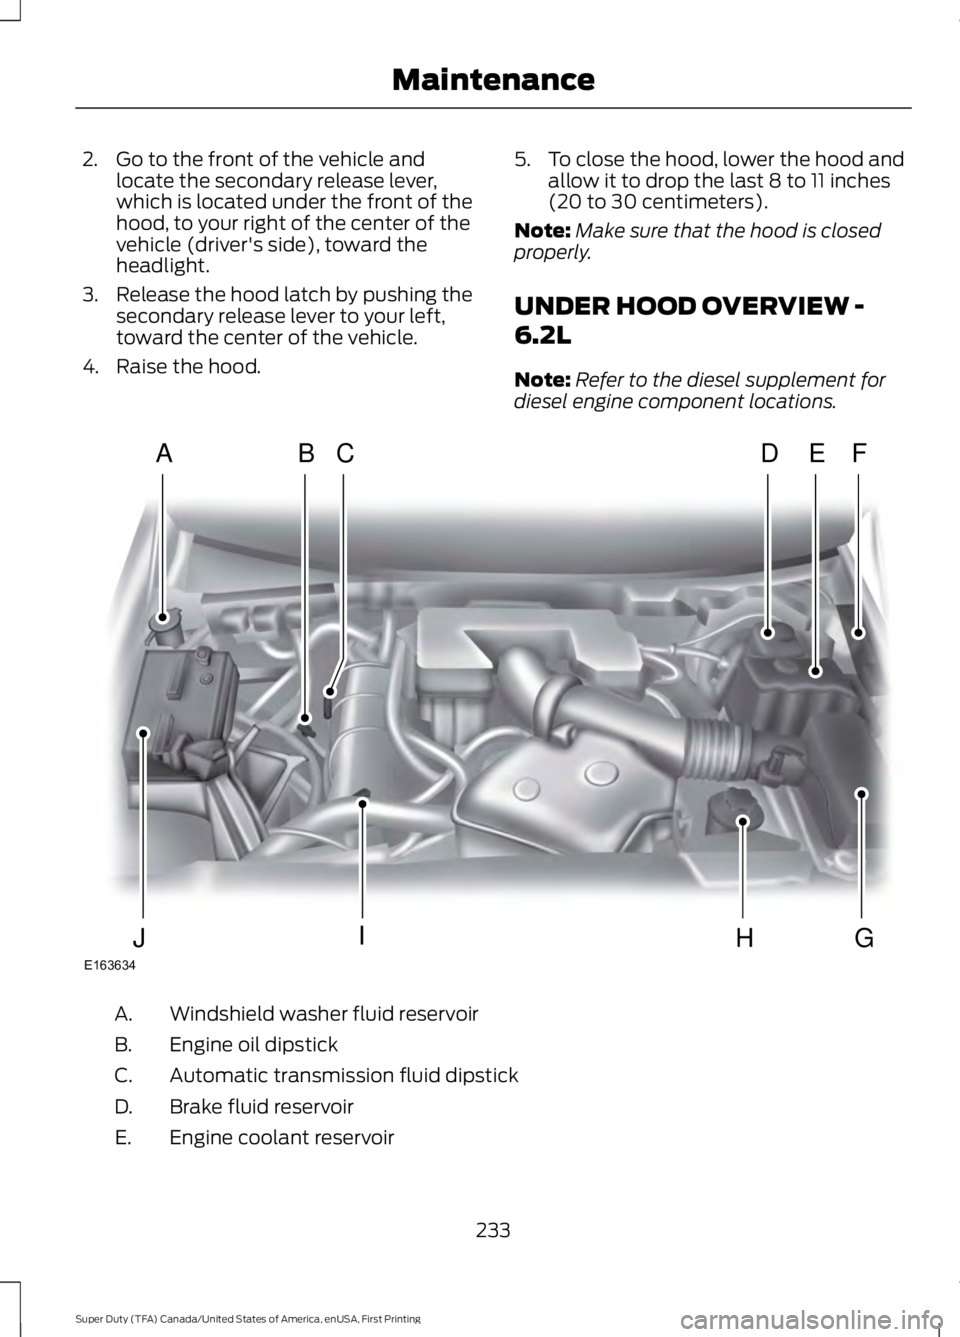
UNDER HOOD OVERVIEW -
6.2L
Note:Refer to the diesel supplement fordiesel engine component locations.
Windshield washer fluid reservoirA.
Engine oil dipstickB.
Automatic transmission fluid dipstickC.
Brake fluid reservoirD.
Engine coolant reservoirE.
233
Super Duty (TFA) Canada/United States of America, enUSA, First Printing
MaintenanceE163634
ADFEBC
GHIJ
Page 252 of 507
REMOVING A HEADLAMP
WARNING
Handle a halogen headlamp bulbcarefully and keep out of children’sreach. Grasp the bulb only by itsplastic base and do not touch the glass.The oil from your hand could cause thebulb to break the next time the headlampsare operated.
Note:If the bulb is accidentally touched, itshould be cleaned with rubbing alcoholbefore being used.
Note:This procedure is for replacing theheadlamps, park lamps or turn lamps.
1. Make sure the headlamp control is inthe off position and open the hood.
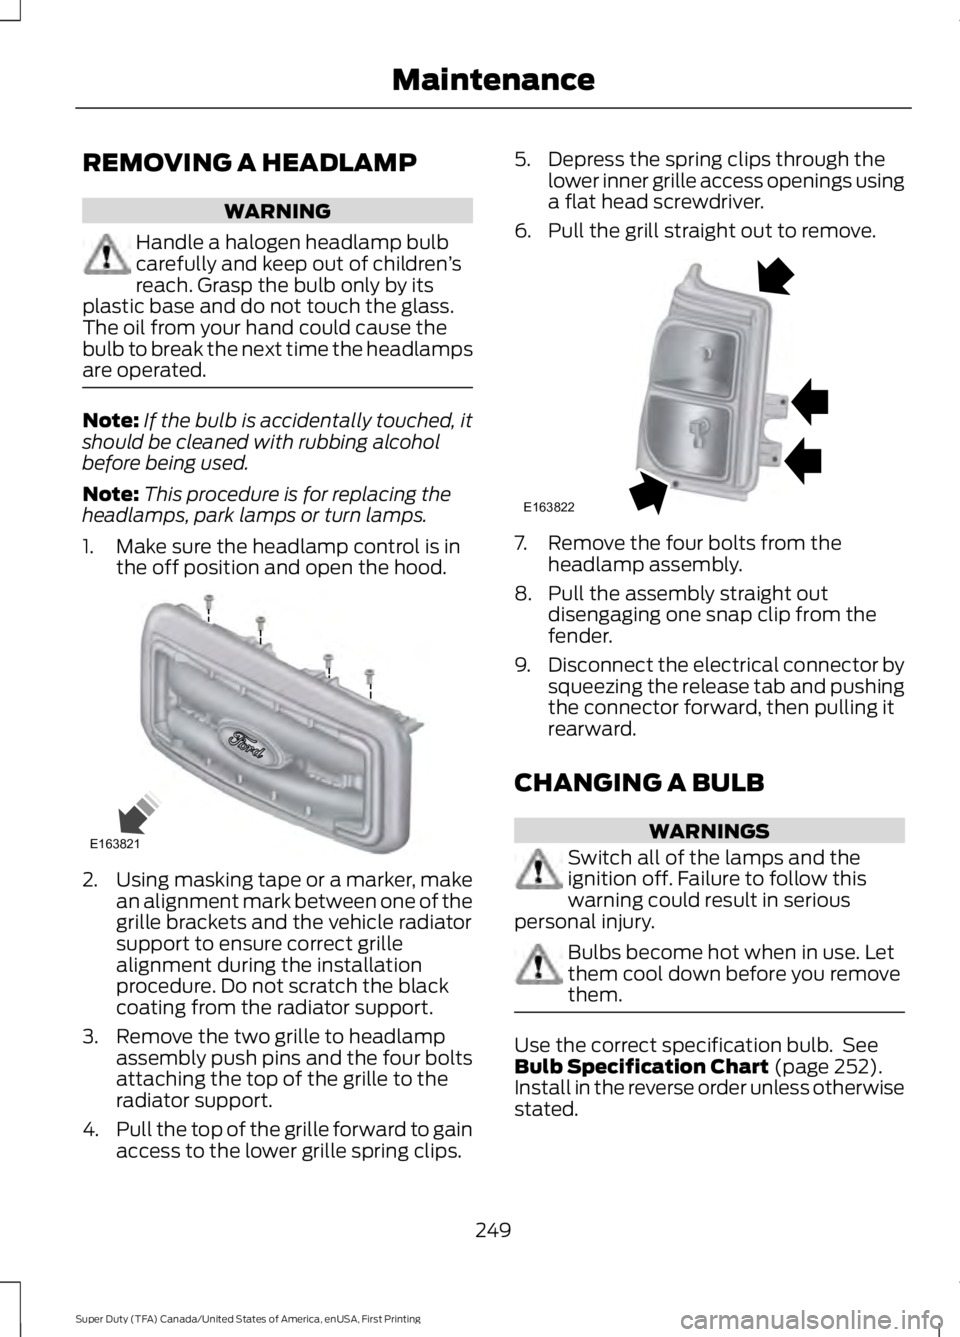
2.Using masking tape or a marker, makean alignment mark between one of thegrille brackets and the vehicle radiatorsupport to ensure correct grillealignment during the installationprocedure. Do not scratch the blackcoating from the radiator support.
3. Remove the two grille to headlampassembly push pins and the four boltsattaching the top of the grille to theradiator support.
4.Pull the top of the grille forward to gainaccess to the lower grille spring clips.
5. Depress the spring clips through thelower inner grille access openings usinga flat head screwdriver.
6. Pull the grill straight out to remove.
7. Remove the four bolts from theheadlamp assembly.
8. Pull the assembly straight outdisengaging one snap clip from thefender.
9.Disconnect the electrical connector bysqueezing the release tab and pushingthe connector forward, then pulling itrearward.
CHANGING A BULB
WARNINGS
Switch all of the lamps and theignition off. Failure to follow thiswarning could result in seriouspersonal injury.
Bulbs become hot when in use. Letthem cool down before you removethem.
Use the correct specification bulb. SeeBulb Specification Chart (page 252).Install in the reverse order unless otherwisestated.
249
Super Duty (TFA) Canada/United States of America, enUSA, First Printing
MaintenanceE163821 E163822
Page 265 of 507
•Touch-up exposed or primed metal toprevent rust.
•Cover chrome and stainless steel partswith a thick coat of auto wax to preventdiscoloration. Re-wax as necessarywhen you wash your vehicle.
•Lubricate all hood, door and luggagecompartment hinges and latches witha light grade oil.
•Cover interior trim to prevent fading.
•Keep all rubber parts free from oil andsolvents.
Engine
•Change the engine oil and filter prior tostorage because used engine oilcontains contaminates which maycause engine damage.
•Start the engine every 15 days for aminimum of 15 minutes. Run at fast idlewith the climate controls set to defrostuntil the engine reaches normaloperating temperature.
•With your foot on the brake, shiftthrough all the gears while the engineis running.
•We recommend that you change theengine oil before you use your vehicleagain.
Fuel system
•Fill the fuel tank with high-quality fueluntil the first automatic shutoff of thefuel pump nozzle.
Cooling system
•Protect against freezing temperatures.
•When removing your vehicle fromstorage, check coolant fluid level.Confirm that there are no coolingsystem leaks and that fluid is at therecommended level.
Battery
•Check and recharge as necessary. Keepconnections clean.
•If storing your vehicle for more than 30days without recharging the battery,we recommend that you disconnectthe battery cables to maintain batterycharge for quick starting.
Note:It is necessary to reset memoryfeatures if battery cables are disconnected.
Brakes
•Make sure the brakes and parking brakerelease fully.
Tires
•Maintain recommended air pressure.
Miscellaneous
•Make sure all linkages, cables, leversand pins under your vehicle are coveredwith grease to prevent rust.
•Move vehicles at least 25 ft (7.5 m)every 15 days to lubricate working partsand prevent corrosion.
Removing Vehicle From Storage
When your vehicle is ready to come out ofstorage, do the following:
•Wash your vehicle to remove any dirtor grease film build-up on windowsurfaces.
•Check windshield wipers for anydeterioration.
•Check under the hood for any foreignmaterial that may have collectedduring storage such as mice or squirrelnests.
•Check the exhaust for any foreignmaterial that may have collectedduring storage.
262
Super Duty (TFA) Canada/United States of America, enUSA, First Printing
Vehicle Care