2016 FORD F450 SUPER DUTY light
[x] Cancel search: lightPage 205 of 507
If the message only displays with a trailerconnected, the problem is with the trailerwiring. Consult your trailer dealer forassistance. This can be a short to ground(such as a chaffed wire), short to voltage(such as a pulled pin on trailer emergencybreakaway battery) or the trailer brakesmay be drawing too much current.
Points to Remember
Note:Do not attempt removal of the trailerbrake controller without consulting theWorkshop Manual. Damage to the unit mayresult.
•Adjust gain setting before using thetrailer brake controller.
•Adjust gain setting, using the procedureabove, whenever road, weather, traileror vehicle loading conditions changefrom when the gain was initially set.
•Only use the manual control lever forproper adjustment of the gain duringtrailer setup. Misuse, such asapplication during trailer sway, couldcause instability of trailer or towvehicle.
•Avoid towing in adverse weatherconditions. The trailer brake controllerdoes not provide anti-lock control ofthe trailer wheels. Trailer wheels canlock up on slippery surfaces, resultingin reduced stability of trailer and towvehicle.
•The trailer brake controller is equippedwith a feature that reduces output atvehicle speeds below 11 mph (18 km/h)so trailer and vehicle braking is not jerkyor harsh. This feature is only activewhen applying the brakes using yourvehicle's brake pedal, not thecontroller.
•The controller interacts with the brakecontrol system and powertrain controlsystem of your vehicle to provide thebest performance on different roadconditions.
•Your vehicle's brake system and thetrailer brake system workindependently of each other. Changingthe gain setting on the controller doesnot affect the operation of yourvehicle's brakes.
•When you switch the engine off, thecontroller output is disabled and thedisplay and module shut down.
Trailer Lamps
WARNING
Never connect any trailer lamp wiringto the vehicle's tail lamp wiring; thismay damage the electrical systemresulting in fire. Contact your authorizeddealer as soon as possible for assistancein proper trailer tow wiring installation.Additional electrical equipment may berequired.
Trailer lamps are required on most towedvehicles. Make sure all running lights, brakelights, turn signals and hazard lights areworking.
Before Towing a Trailer
Practice turning, stopping and backing upto get the feel of your vehicle-trailercombination before starting on a trip.When turning, make wider turns so thetrailer wheels clear curbs and otherobstacles.
When Towing a Trailer
•Do not drive faster than 70 mph (113km/h) during the first 500 miles (800kilometers).
•Do not make full-throttle starts.
202
Super Duty (TFA) Canada/United States of America, enUSA, First Printing
Towing
Page 210 of 507
BREAKING-IN
You need to break in new tires forapproximately 300 miles (480kilometers). During this time, your vehiclemay exhibit some unusual drivingcharacteristics.
Avoid driving too fast during the first 1000miles (1600 kilometers). Vary your speedfrequently and change up through thegears early. Do not labor the engine.
Do not tow during the first 1000 miles(1600 kilometers).
ECONOMICAL DRIVING
Your fuel economy is affected by severalthings, such as how you drive, theconditions you drive under, and how youmaintain your vehicle.
You may improve your fuel economy bykeeping these things in mind:
•Accelerate and slow down in a smooth,moderate fashion.
•Drive at steady speeds withoutstopping.
•Anticipate stops; slowing down mayeliminate the need to stop.
•Combine errands and minimizestop-and-go driving.
•Close the windows for high-speeddriving.
•Drive at reasonable speeds (travelingat 55 mph [88 km/h] uses 15% lessfuel than traveling at 65 mph [105km/h]).
•Keep the tires properly inflated and useonly the recommended size.
•Use the recommended engine oil.
•Perform all regularly scheduledmaintenance.
Avoid these actions; they reduce your fueleconomy:
•Sudden accelerations or hardaccelerations.
•Revving the engine before turning it off.
•Idle for periods longer than one minute.
•Warm up your vehicle on coldmornings.
•Use the air conditioner or frontdefroster.
•Use the speed control in hilly terrain.
•Rest your foot on the brake pedal whiledriving.
•Drive a heavily loaded vehicle or tow atrailer.
•Carry unnecessary weight(approximately 1 mpg [0.4 km/L] islost for every 400 lb [180 kilogram] ofweight carried).
•Driving with the wheels out ofalignment.
Conditions
•Heavily loading a vehicle or towing atrailer may reduce fuel economy at anyspeed.
•Adding certain accessories to yourvehicle (for example bug deflectors,rollbars, light bars, running boards, skiracks or luggage racks) may reducefuel economy.
•To maximize the fuel economy, drivewith the tonneau cover installed (ifequipped).
•Using fuel blended with alcohol maylower fuel economy.
•Fuel economy may decrease with lowertemperatures during the first 8–10miles (12–16 kilometers) of driving.
•Driving on flat terrain offers improvedfuel economy as compared to drivingon hilly terrain.
207
Super Duty (TFA) Canada/United States of America, enUSA, First Printing
Driving Hints
Page 211 of 507
•Transmissions give their best fueleconomy when operated in the topcruise gear and with steady pressureon the gas pedal.
•Four-wheel-drive operation (ifequipped) is less fuel efficient thantwo-wheel-drive operation.
•Close the windows for high-speeddriving.
DRIVING THROUGH WATER
WARNING
Do not drive through flowing or deepwater as you may lose control of yourvehicle.
Note:Driving through standing water cancause vehicle damage.
Note:Engine damage can occur if waterenters the air filter.
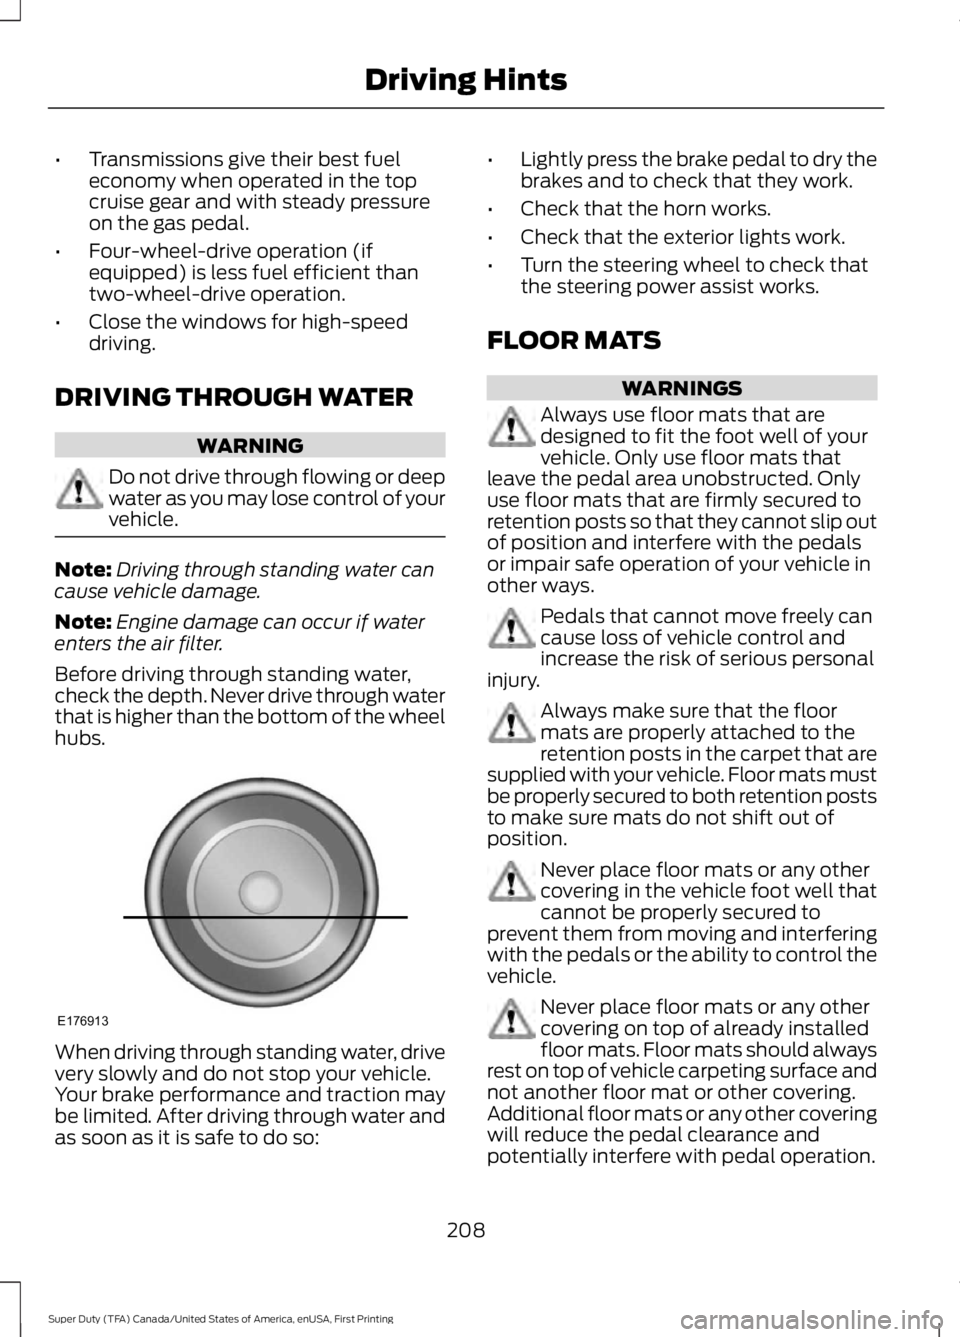
Before driving through standing water,check the depth. Never drive through waterthat is higher than the bottom of the wheelhubs.
When driving through standing water, drivevery slowly and do not stop your vehicle.Your brake performance and traction maybe limited. After driving through water andas soon as it is safe to do so:
•Lightly press the brake pedal to dry thebrakes and to check that they work.
•Check that the horn works.
•Check that the exterior lights work.
•Turn the steering wheel to check thatthe steering power assist works.
FLOOR MATS
WARNINGS
Always use floor mats that aredesigned to fit the foot well of yourvehicle. Only use floor mats thatleave the pedal area unobstructed. Onlyuse floor mats that are firmly secured toretention posts so that they cannot slip outof position and interfere with the pedalsor impair safe operation of your vehicle inother ways.
Pedals that cannot move freely cancause loss of vehicle control andincrease the risk of serious personalinjury.
Always make sure that the floormats are properly attached to theretention posts in the carpet that aresupplied with your vehicle. Floor mats mustbe properly secured to both retention poststo make sure mats do not shift out ofposition.
Never place floor mats or any othercovering in the vehicle foot well thatcannot be properly secured toprevent them from moving and interferingwith the pedals or the ability to control thevehicle.
Never place floor mats or any othercovering on top of already installedfloor mats. Floor mats should alwaysrest on top of vehicle carpeting surface andnot another floor mat or other covering.Additional floor mats or any other coveringwill reduce the pedal clearance andpotentially interfere with pedal operation.
208
Super Duty (TFA) Canada/United States of America, enUSA, First Printing
Driving HintsE176913
Page 212 of 507
WARNINGS
Check attachment of floor mats ona regular basis. Always properlyreinstall and secure floor mats thathave been removed for cleaning orreplacement.
Always make sure that objectscannot fall into the driver foot wellwhile the vehicle is moving. Objectsthat are loose can become trapped underthe pedals causing a loss of vehicle control.
Failure to properly follow floor matinstallation or attachmentinstructions can potentially causeinterference with pedal operation causinga loss of vehicle control.
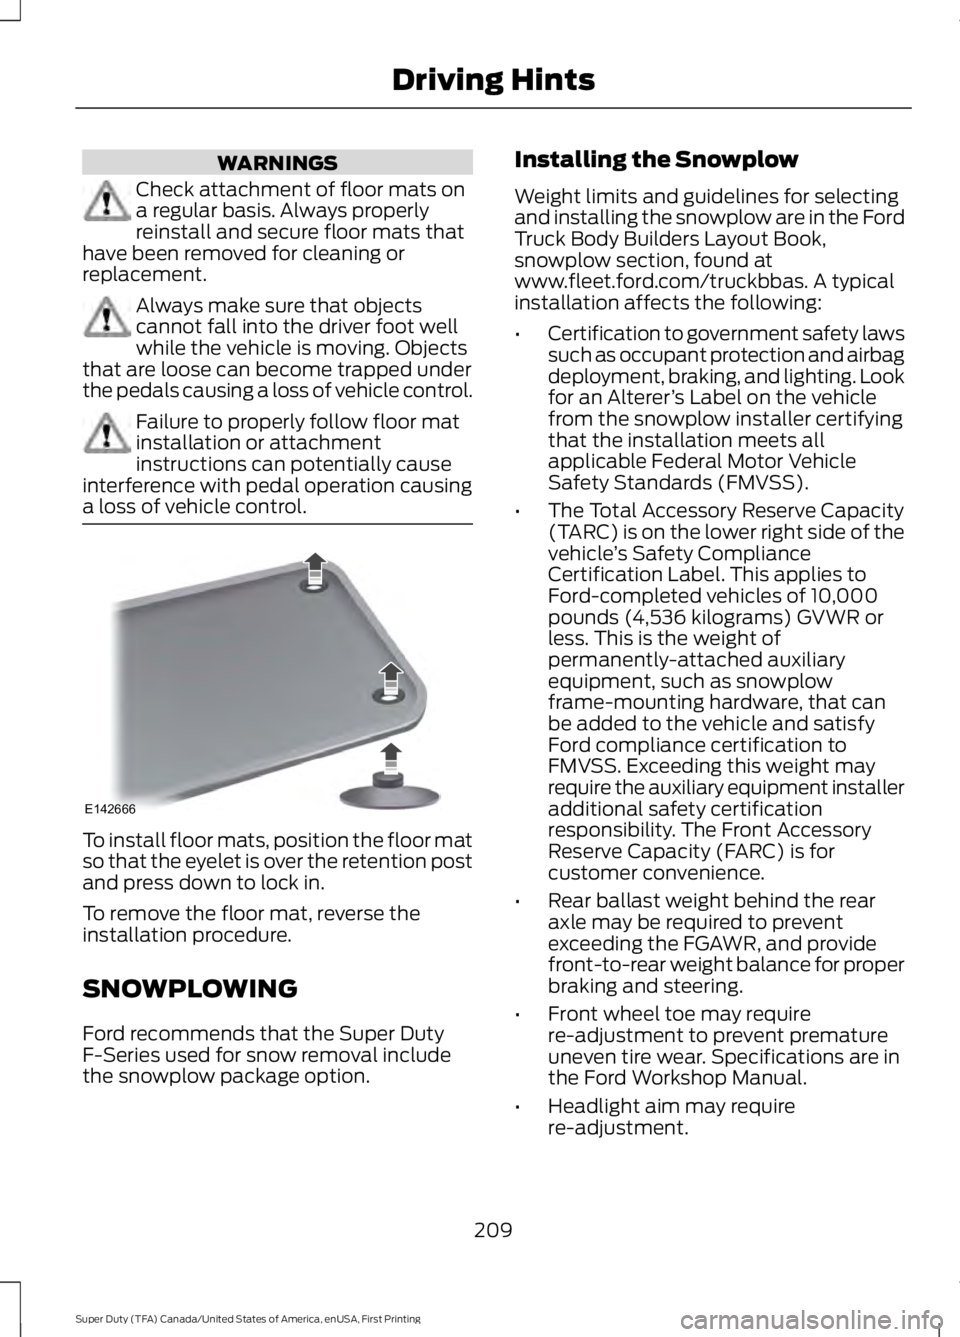
To install floor mats, position the floor matso that the eyelet is over the retention postand press down to lock in.
To remove the floor mat, reverse theinstallation procedure.
SNOWPLOWING
Ford recommends that the Super DutyF-Series used for snow removal includethe snowplow package option.
Installing the Snowplow
Weight limits and guidelines for selectingand installing the snowplow are in the FordTruck Body Builders Layout Book,snowplow section, found atwww.fleet.ford.com/truckbbas. A typicalinstallation affects the following:
•Certification to government safety lawssuch as occupant protection and airbagdeployment, braking, and lighting. Lookfor an Alterer’s Label on the vehiclefrom the snowplow installer certifyingthat the installation meets allapplicable Federal Motor VehicleSafety Standards (FMVSS).
•The Total Accessory Reserve Capacity(TARC) is on the lower right side of thevehicle’s Safety ComplianceCertification Label. This applies toFord-completed vehicles of 10,000pounds (4,536 kilograms) GVWR orless. This is the weight ofpermanently-attached auxiliaryequipment, such as snowplowframe-mounting hardware, that canbe added to the vehicle and satisfyFord compliance certification toFMVSS. Exceeding this weight mayrequire the auxiliary equipment installeradditional safety certificationresponsibility. The Front AccessoryReserve Capacity (FARC) is forcustomer convenience.
•Rear ballast weight behind the rearaxle may be required to preventexceeding the FGAWR, and providefront-to-rear weight balance for properbraking and steering.
•Front wheel toe may requirere-adjustment to prevent prematureuneven tire wear. Specifications are inthe Ford Workshop Manual.
•Headlight aim may requirere-adjustment.
209
Super Duty (TFA) Canada/United States of America, enUSA, First Printing
Driving HintsE142666
Page 214 of 507
•If you are driving more than 15 mi(24 km) at temperatures abovefreezing, angle the plow blade eitherfull left or full right to providemaximum airflow to the radiator.
•If you are driving less than 15 mi(24 km) at speeds up to 45 mph(72 km/h) in cold weather, you will notneed to worry about blade position toprovide maximum airflow.
Transmission operation whileplowing
WARNING
Do not spin the wheels at over34 mph (55 km/h). The tires may failand injure a passenger or bystander.
•Shift transfer case to 4L (4WD Low)when plowing in small areas at speedsbelow 5 mph (8 km/h).
•Shift transfer case to 4H (4WD High)when plowing larger areas or light snowat higher speeds. Do not exceed 15 mph(24 km/h).
•Do not shift the transmission from aforward gear to R (Reverse) until theengine is at idle and the wheels havestopped.
211
Super Duty (TFA) Canada/United States of America, enUSA, First Printing
Driving Hints
Page 217 of 507
In the event of a moderate to severecollision, this vehicle is equipped with afuel pump shut-off feature that stops theflow of fuel to the engine. Not every impactwill cause a shut-off.
Should your vehicle shut off after acollision, you may restart your vehicle bydoing the following:
1. Turn the ignition off.
2. Turn the ignition to crank.
3. Turn the ignition off.
4.Turn the ignition on again to re-enablethe fuel pump.
JUMP STARTING THE VEHICLE
WARNINGS
Batteries normally produce explosivegases which can cause personalinjury. Therefore, do not allowflames, sparks or lighted substances tocome near the battery. When working nearthe battery, always shield your face andprotect your eyes. Always provide correctventilation.
Keep batteries out of reach ofchildren. Batteries contain sulfuricacid. Avoid contact with skin, eyes orclothing. Shield your eyes when workingnear the battery to protect against possiblesplashing of acid solution. In case of acidcontact with skin or eyes, flushimmediately with water for a minimum of15 minutes and get prompt medicalattention. If acid is swallowed, call aphysician immediately.
Use only adequately sized cableswith insulated clamps.
Preparing Your Vehicle
Do not attempt to push-start yourautomatic transmission vehicle.
Note:Attempting to push-start a vehiclewith an automatic transmission may causetransmission damage.
Note:Use only a 12-volt supply to start yourvehicle.
Note:Do not disconnect the battery of thedisabled vehicle as this could damage thevehicle electrical system.
Park the booster vehicle close to the hoodof the disabled vehicle, making sure thetwo vehicles do not touch.
Connecting the Jumper Cables
WARNINGS
Do not attach the cables to fuel lines,engine rocker covers, the intakemanifold or electrical componentsas grounding points. Stay clear of movingparts. To avoid reverse polarityconnections, make sure that you correctlyidentify the positive (+) and negative (-)terminals on both the disabled and boostervehicles before connecting the cables.
Do not attach the end of the positivecable to the studs or L-shaped eyeletlocated above the positive (+)terminal of your vehicle’s battery. Highcurrent may flow through and causedamage to the fuses.
Do not connect the end of thesecond cable to the negative (-)terminal of the battery to be jumped.A spark may cause an explosion of thegases that surround the battery.
Note:In the illustration, the bottom vehiclerepresents the booster vehicle.
214
Super Duty (TFA) Canada/United States of America, enUSA, First Printing
Roadside Emergencies
Page 231 of 507
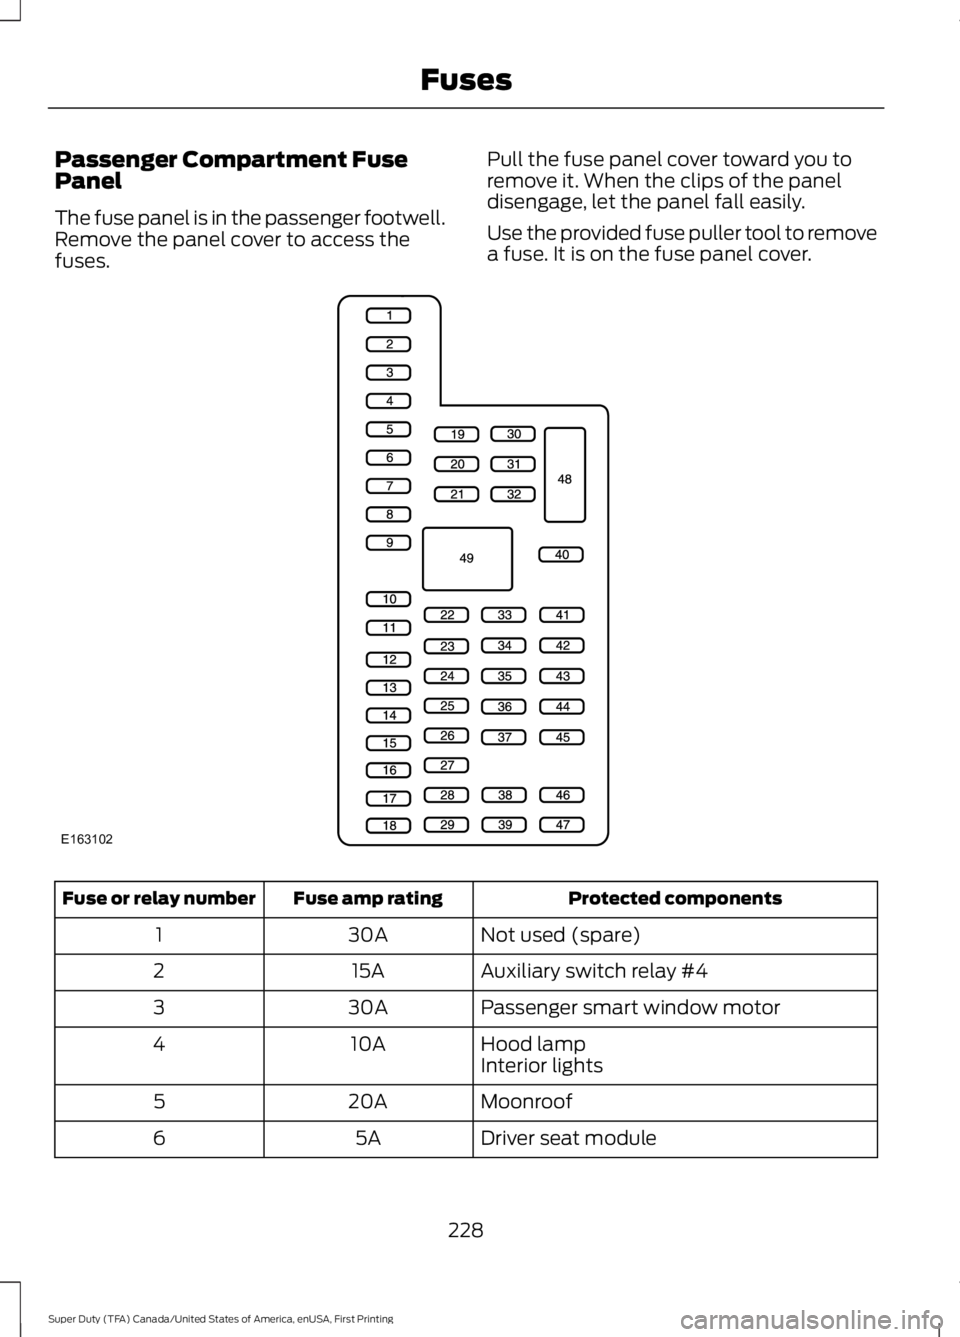
Passenger Compartment FusePanel
The fuse panel is in the passenger footwell.Remove the panel cover to access thefuses.
Pull the fuse panel cover toward you toremove it. When the clips of the paneldisengage, let the panel fall easily.
Use the provided fuse puller tool to removea fuse. It is on the fuse panel cover.
Protected componentsFuse amp ratingFuse or relay number
Not used (spare)30A1
Auxiliary switch relay #415A2
Passenger smart window motor30A3
Hood lamp10A4Interior lights
Moonroof20A5
Driver seat module5A6
228
Super Duty (TFA) Canada/United States of America, enUSA, First Printing
FusesE163102
Page 232 of 507
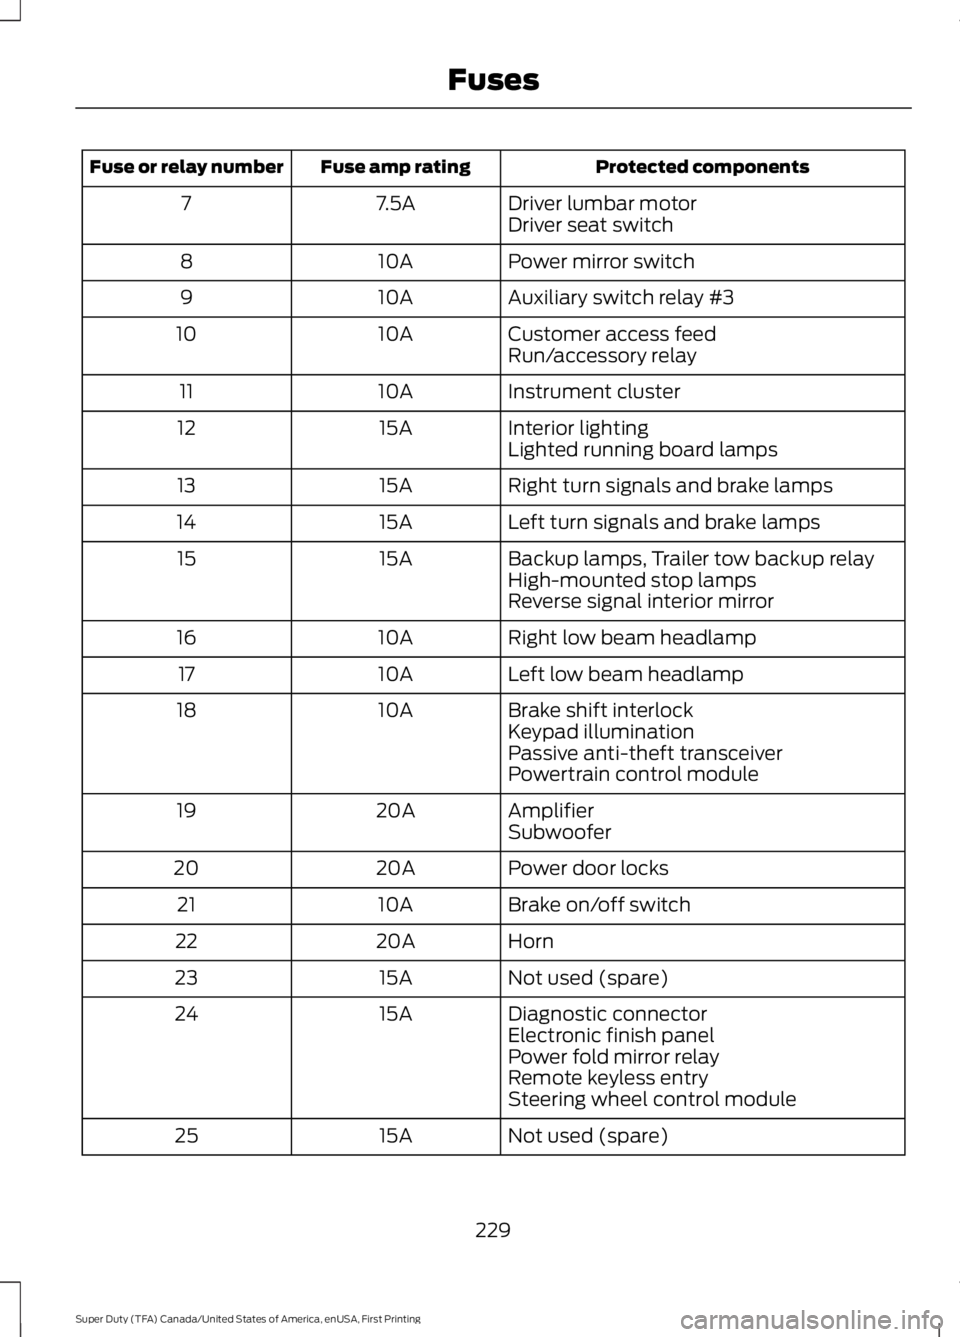
Protected componentsFuse amp ratingFuse or relay number
Driver lumbar motor7.5A7Driver seat switch
Power mirror switch10A8
Auxiliary switch relay #310A9
Customer access feed10A10Run/accessory relay
Instrument cluster10A11
Interior lighting15A12Lighted running board lamps
Right turn signals and brake lamps15A13
Left turn signals and brake lamps15A14
Backup lamps, Trailer tow backup relay15A15High-mounted stop lampsReverse signal interior mirror
Right low beam headlamp10A16
Left low beam headlamp10A17
Brake shift interlock10A18Keypad illuminationPassive anti-theft transceiverPowertrain control module
Amplifier20A19Subwoofer
Power door locks20A20
Brake on/off switch10A21
Horn20A22
Not used (spare)15A23
Diagnostic connector15A24Electronic finish panelPower fold mirror relayRemote keyless entrySteering wheel control module
Not used (spare)15A25
229
Super Duty (TFA) Canada/United States of America, enUSA, First Printing
Fuses