2016 FORD F250 SUPER DUTY trailer
[x] Cancel search: trailerPage 100 of 507
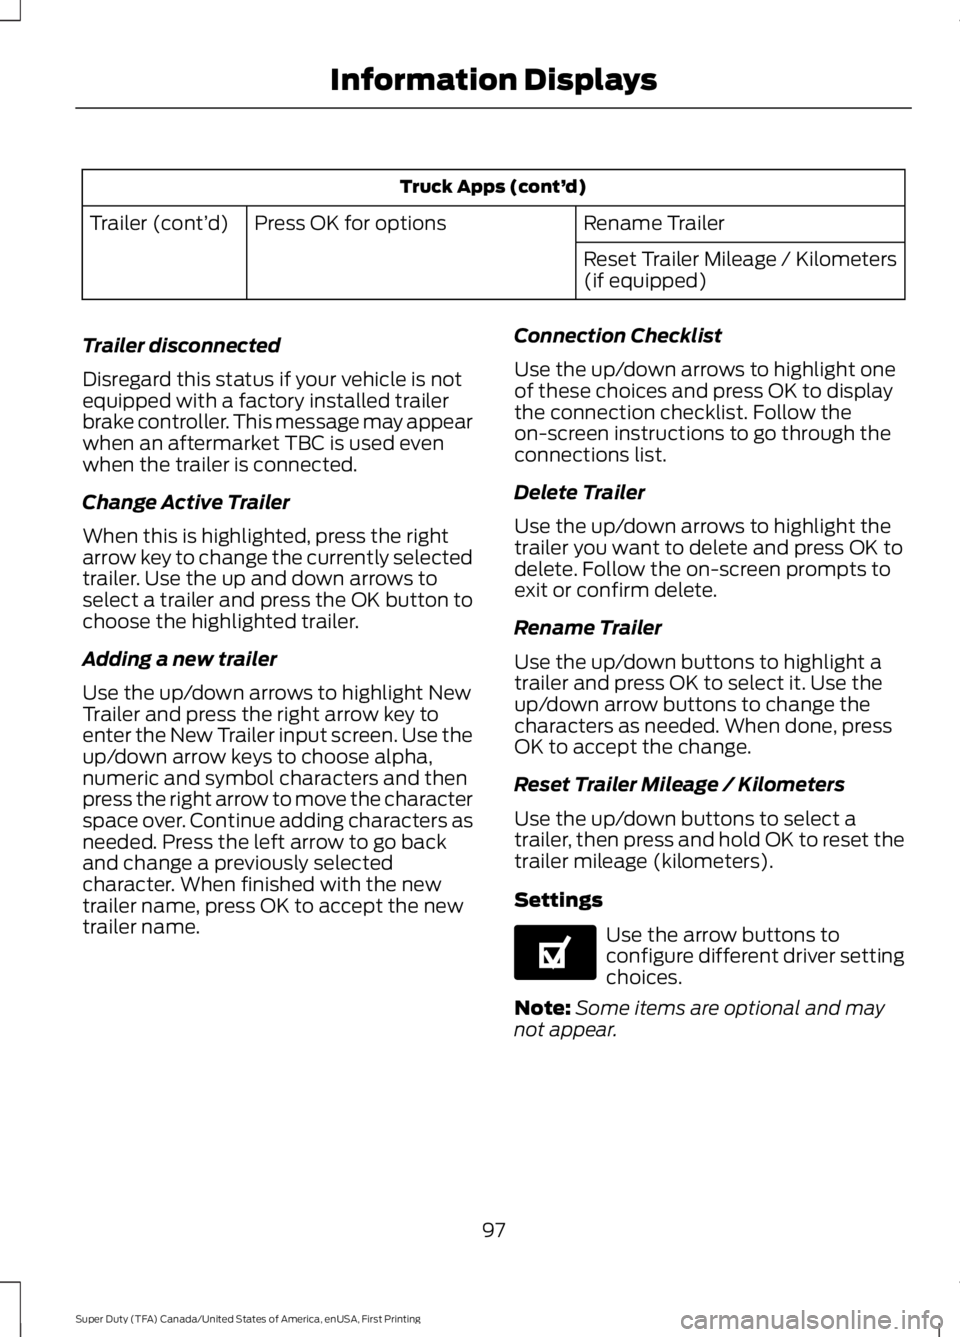
Truck Apps (cont’d)
Rename TrailerPress OK for optionsTrailer (cont’d)
Reset Trailer Mileage / Kilometers(if equipped)
Trailer disconnected
Disregard this status if your vehicle is notequipped with a factory installed trailerbrake controller. This message may appearwhen an aftermarket TBC is used evenwhen the trailer is connected.
Change Active Trailer
When this is highlighted, press the rightarrow key to change the currently selectedtrailer. Use the up and down arrows toselect a trailer and press the OK button tochoose the highlighted trailer.
Adding a new trailer
Use the up/down arrows to highlight NewTrailer and press the right arrow key toenter the New Trailer input screen. Use theup/down arrow keys to choose alpha,numeric and symbol characters and thenpress the right arrow to move the characterspace over. Continue adding characters asneeded. Press the left arrow to go backand change a previously selectedcharacter. When finished with the newtrailer name, press OK to accept the newtrailer name.
Connection Checklist
Use the up/down arrows to highlight oneof these choices and press OK to displaythe connection checklist. Follow theon-screen instructions to go through theconnections list.
Delete Trailer
Use the up/down arrows to highlight thetrailer you want to delete and press OK todelete. Follow the on-screen prompts toexit or confirm delete.
Rename Trailer
Use the up/down buttons to highlight atrailer and press OK to select it. Use theup/down arrow buttons to change thecharacters as needed. When done, pressOK to accept the change.
Reset Trailer Mileage / Kilometers
Use the up/down buttons to select atrailer, then press and hold OK to reset thetrailer mileage (kilometers).
Settings
Use the arrow buttons toconfigure different driver settingchoices.
Note:Some items are optional and maynot appear.
97
Super Duty (TFA) Canada/United States of America, enUSA, First Printing
Information DisplaysE144641
Page 101 of 507
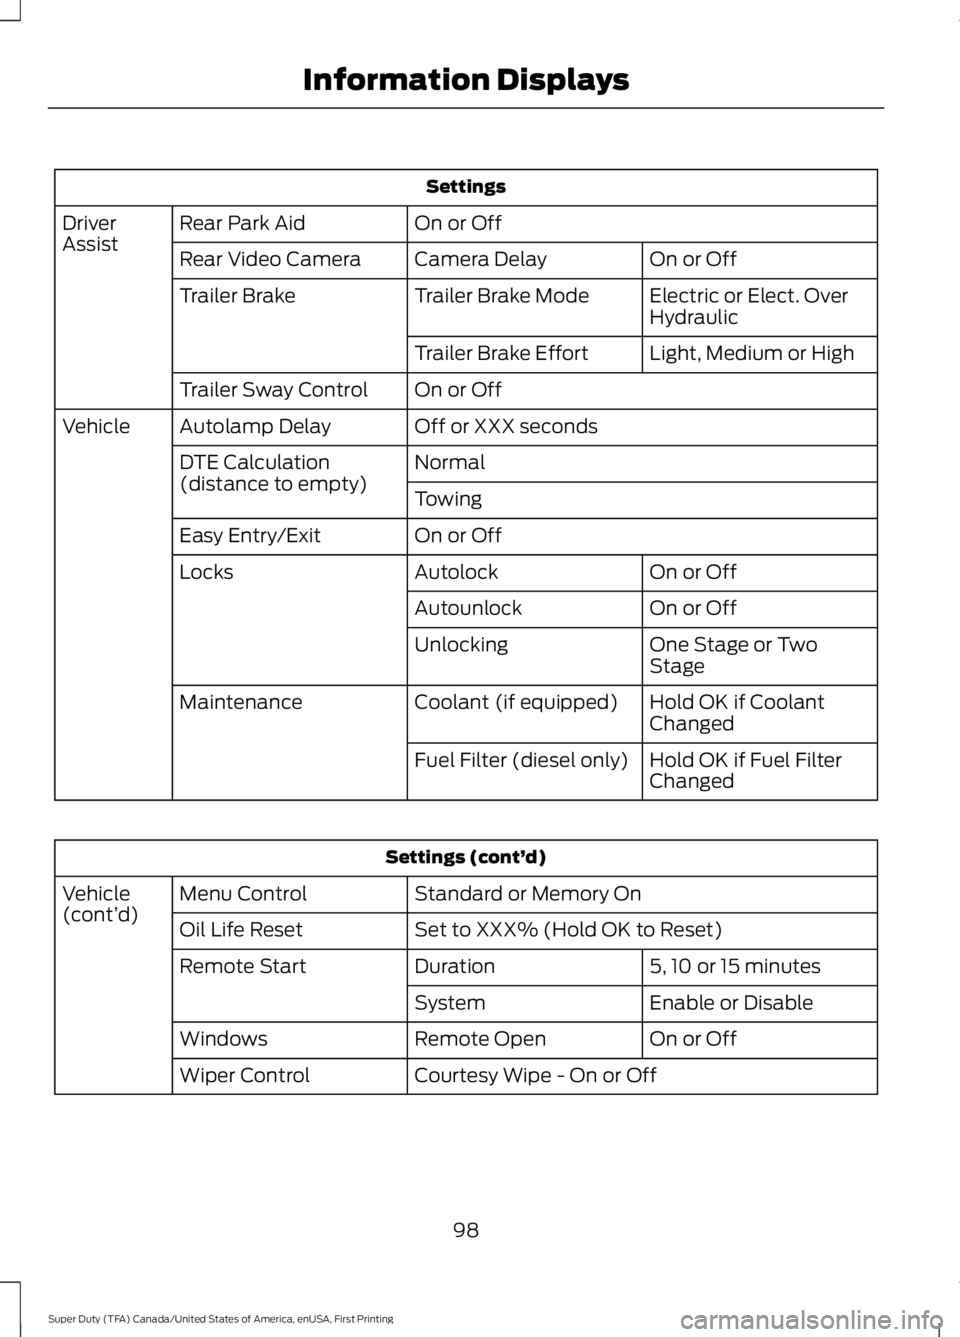
Settings
On or OffRear Park AidDriverAssistOn or OffCamera DelayRear Video Camera
Electric or Elect. OverHydraulicTrailer Brake ModeTrailer Brake
Light, Medium or HighTrailer Brake Effort
On or OffTrailer Sway Control
Off or XXX secondsAutolamp DelayVehicle
NormalDTE Calculation(distance to empty)Towing
On or OffEasy Entry/Exit
On or OffAutolockLocks
On or OffAutounlock
One Stage or TwoStageUnlocking
Hold OK if CoolantChangedCoolant (if equipped)Maintenance
Hold OK if Fuel FilterChangedFuel Filter (diesel only)
Settings (cont’d)
Standard or Memory OnMenu ControlVehicle(cont’d)Set to XXX% (Hold OK to Reset)Oil Life Reset
5, 10 or 15 minutesDurationRemote Start
Enable or DisableSystem
On or OffRemote OpenWindows
Courtesy Wipe - On or OffWiper Control
98
Super Duty (TFA) Canada/United States of America, enUSA, First Printing
Information Displays
Page 111 of 507
ActionMessage
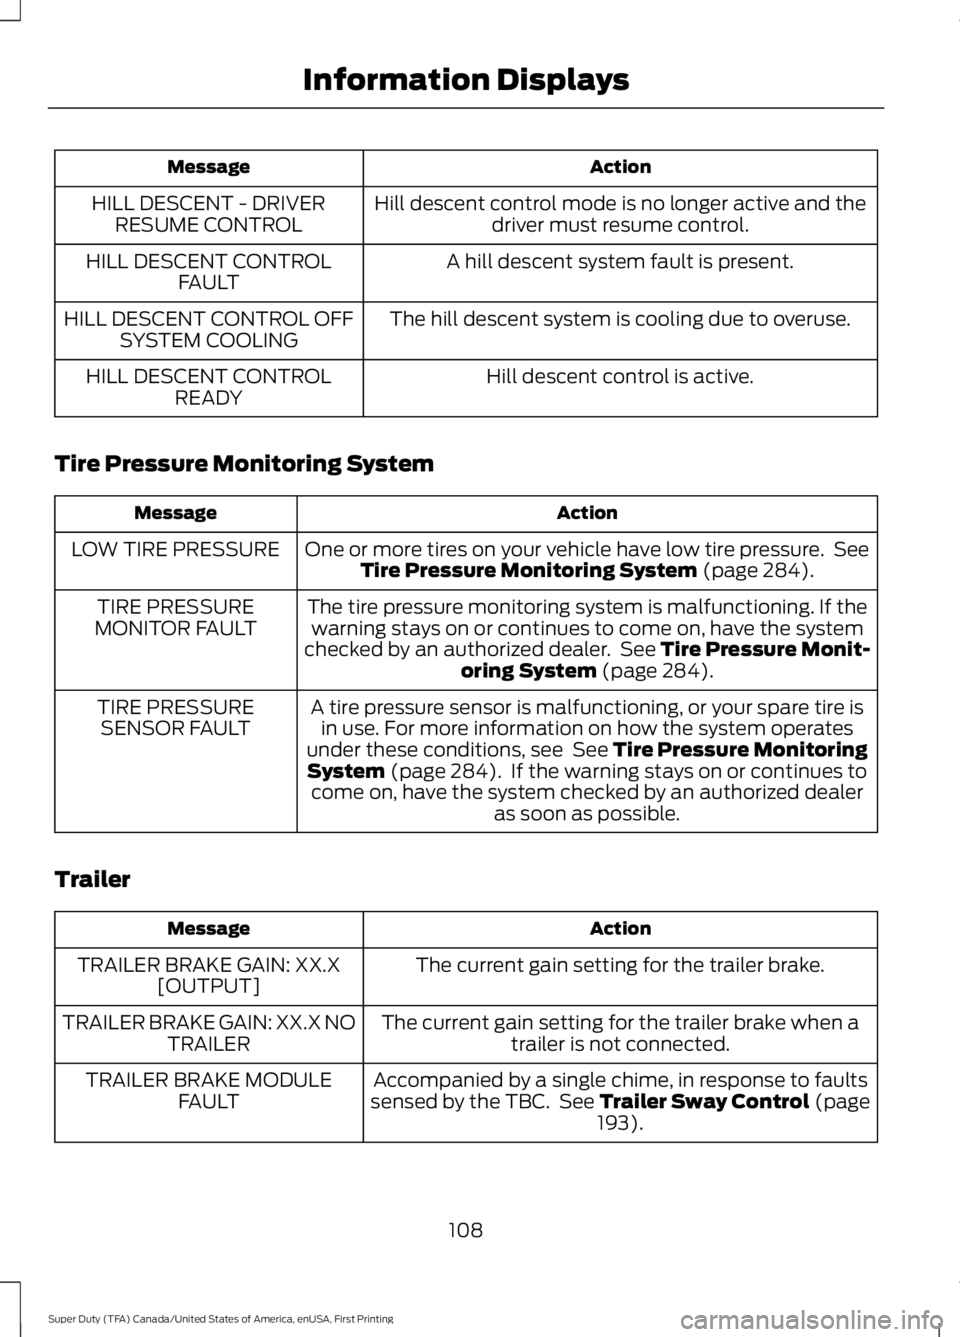
Hill descent control mode is no longer active and thedriver must resume control.HILL DESCENT - DRIVERRESUME CONTROL
A hill descent system fault is present.HILL DESCENT CONTROLFAULT
The hill descent system is cooling due to overuse.HILL DESCENT CONTROL OFFSYSTEM COOLING
Hill descent control is active.HILL DESCENT CONTROLREADY
Tire Pressure Monitoring System
ActionMessage
One or more tires on your vehicle have low tire pressure. SeeTire Pressure Monitoring System (page 284).LOW TIRE PRESSURE
The tire pressure monitoring system is malfunctioning. If thewarning stays on or continues to come on, have the systemchecked by an authorized dealer. See Tire Pressure Monit-oring System (page 284).
TIRE PRESSUREMONITOR FAULT
A tire pressure sensor is malfunctioning, or your spare tire isin use. For more information on how the system operatesunder these conditions, see See Tire Pressure MonitoringSystem (page 284). If the warning stays on or continues tocome on, have the system checked by an authorized dealeras soon as possible.
TIRE PRESSURESENSOR FAULT
Trailer
ActionMessage
The current gain setting for the trailer brake.TRAILER BRAKE GAIN: XX.X[OUTPUT]
The current gain setting for the trailer brake when atrailer is not connected.TRAILER BRAKE GAIN: XX.X NOTRAILER
Accompanied by a single chime, in response to faultssensed by the TBC. See Trailer Sway Control (page193).
TRAILER BRAKE MODULEFAULT
108
Super Duty (TFA) Canada/United States of America, enUSA, First Printing
Information Displays
Page 112 of 507
ActionMessage
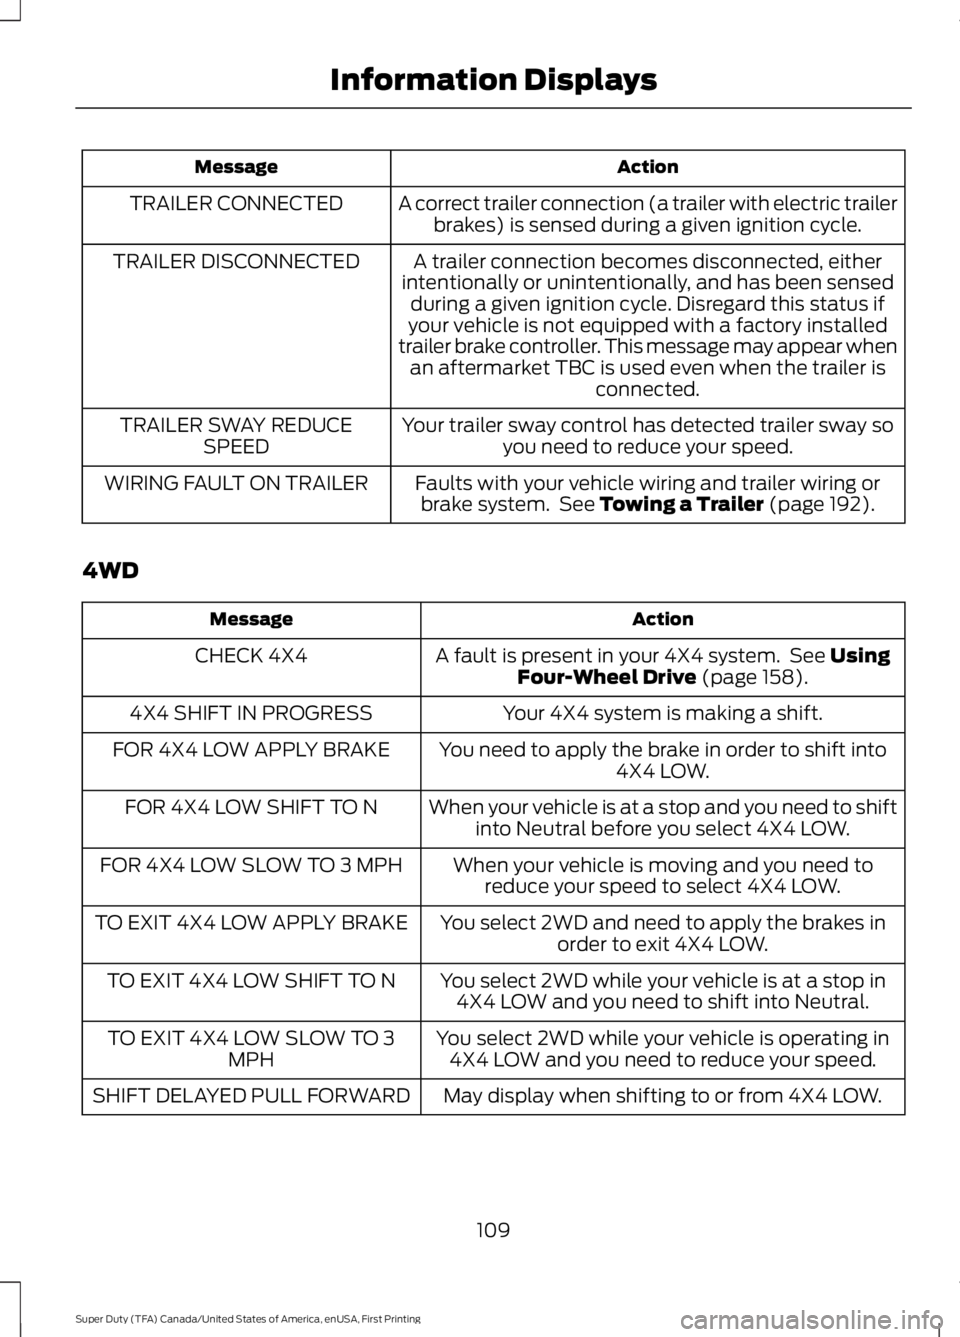
A correct trailer connection (a trailer with electric trailerbrakes) is sensed during a given ignition cycle.TRAILER CONNECTED
A trailer connection becomes disconnected, eitherintentionally or unintentionally, and has been sensedduring a given ignition cycle. Disregard this status ifyour vehicle is not equipped with a factory installedtrailer brake controller. This message may appear whenan aftermarket TBC is used even when the trailer isconnected.
TRAILER DISCONNECTED
Your trailer sway control has detected trailer sway soyou need to reduce your speed.TRAILER SWAY REDUCESPEED
Faults with your vehicle wiring and trailer wiring orbrake system. See Towing a Trailer (page 192).WIRING FAULT ON TRAILER
4WD
ActionMessage
A fault is present in your 4X4 system. See UsingFour-Wheel Drive (page 158).CHECK 4X4
Your 4X4 system is making a shift.4X4 SHIFT IN PROGRESS
You need to apply the brake in order to shift into4X4 LOW.FOR 4X4 LOW APPLY BRAKE
When your vehicle is at a stop and you need to shiftinto Neutral before you select 4X4 LOW.FOR 4X4 LOW SHIFT TO N
When your vehicle is moving and you need toreduce your speed to select 4X4 LOW.FOR 4X4 LOW SLOW TO 3 MPH
You select 2WD and need to apply the brakes inorder to exit 4X4 LOW.TO EXIT 4X4 LOW APPLY BRAKE
You select 2WD while your vehicle is at a stop in4X4 LOW and you need to shift into Neutral.TO EXIT 4X4 LOW SHIFT TO N
You select 2WD while your vehicle is operating in4X4 LOW and you need to reduce your speed.TO EXIT 4X4 LOW SLOW TO 3MPH
May display when shifting to or from 4X4 LOW.SHIFT DELAYED PULL FORWARD
109
Super Duty (TFA) Canada/United States of America, enUSA, First Printing
Information Displays
Page 151 of 507
Results are most accurate when the fillingmethod is consistent.
Calculating Fuel Economy
Do not measure fuel economy during thefirst 1000 miles (1600 kilometers) ofdriving (this is your engine’s break-inperiod); a more accurate measurement isobtained after 2000 miles - 3000 miles(3200 kilometers - 4800 kilometers). Also,fuel expense, frequency of fill ups or fuelgauge readings are not accurate ways tomeasure fuel economy.
1.Fill the fuel tank completely and recordthe initial odometer reading.
2. Each time you fill the tank, record theamount of fuel added.
3.After at least 3 to 5 tank fill ups, fill thefuel tank and record the currentodometer reading.
4. Subtract your initial odometer readingfrom the current odometer reading.
5. Calculate fuel economy by dividingmiles traveled by gallons used (ForMetric: Multiply liters used by 100, thendivide by kilometers traveled).
Keep a record for at least 1 month andrecord the type of driving (city or highway).This provides an accurate estimate of thevehicle’s fuel economy under currentdriving conditions. Additionally, keepingrecords during summer and winter showhow temperature impacts fuel economy.In general, lower temperatures mean lowerfuel economy.
Conditions
•Heavily loading a vehicle or towing atrailer may reduce fuel economy at anyspeed.
•Carrying unnecessary weight mayreduce fuel economy (approximately1 mpg [0.4 km/L] is lost for every 400pounds [180 kilograms] of weightcarried).
•Adding certain accessories to yourvehicle (for example bug deflectors,rollbars/light bars, running boards, skiracks) may reduce fuel economy.
•Using fuel blended with alcohol maylower fuel economy.
•Fuel economy may decrease with lowertemperatures during the first 8–10miles (12–16 kilometers) of driving.
•Driving on flat terrain offers improvedfuel economy as compared to drivingon hilly terrain.
•Transmissions give their best fueleconomy when operated in the topcruise gear and with steady pressureon the gas pedal.
•Close windows for high speed driving.
EMISSION CONTROL SYSTEM
WARNINGS
Do not park, idle, or drive your vehiclein dry grass or other dry ground cover.The emission system heats up theengine compartment and exhaust system,which can start a fire.
Exhaust leaks may result in entry ofharmful and potentially lethal fumesinto the passenger compartment. Ifyou smell exhaust fumes inside yourvehicle, have your dealer inspect yourvehicle immediately. Do not drive if yousmell exhaust fumes.
148
Super Duty (TFA) Canada/United States of America, enUSA, First Printing
Fuel and Refueling
Page 155 of 507
Tow/Haul Mode
To activate tow/haul, press thebutton on the gearshift leveronce. The TOW HAUL indicatorlight illuminates in the instrument cluster.
The tow/haul feature:
•Delays upshifts to reduce the frequencyof transmission shifting.
•Provides engine braking in all forwardgears, which slows your vehicle andassists you in controlling your vehiclewhen descending a grade.
•Depending on driving conditions andload conditions, may downshift thetransmission, slow your vehicle andcontrol your vehicle speed whendescending a hill, without pressing theaccelerator pedal. The amount ofdownshift braking provided variesbased upon the amount you press thebrake pedal.
The tow/haul feature improvestransmission operation when towing atrailer or a heavy load. All transmissiongear ranges are available when usingtow/haul.
To deactivate the tow/haul feature andreturn to normal driving mode, press thebutton on the gearshift lever twice. TheTOW HAUL light deactivates. Tow/haulalso deactivates when you power downyour vehicle.
WARNING
Do not use the tow/haul featurewhen driving in icy or slipperyconditions as the increased enginebraking can cause the rear wheels to slideand your vehicle to swing around with thepossible loss of vehicle control.
Understanding the Shift Positionsof a 6–Speed AutomaticTransmission (If Equipped)
Putting your vehicle in or out of gear:
1. Fully press down the brake pedal.
2. Move the gearshift lever into thedesired gear.
3. Come to a complete stop.
4. Move the gearshift lever and securelylatch it in park (P).
Park (P)
This position locks the transmission andprevents the rear wheels from turning.
Reverse (R)
With the gearshift lever in reverse (R), yourvehicle moves backward. Always come toa complete stop before shifting into andout of reverse (R).
Neutral (N)
With the gearshift lever in neutral (N), youcan start your vehicle and it is free to roll.Hold the brake pedal down while in thisposition.
Drive (D)
Drive (D) is the normal driving position forthe best fuel economy. The overdrivefunction allows automatic upshifts anddownshifts through gears one through six.
152
Super Duty (TFA) Canada/United States of America, enUSA, First Printing
TransmissionE161509 E163183
Page 156 of 507
M (Manual)
With the gearshift lever in manual (M), thedriver can change gears up or down asdesired. By moving the gearshift lever fromdrive position drive (D) to manual (M) younow have control of selecting the gear youdesire using buttons on the shift lever. SeeUnderstanding your SelectShiftAutomatic™ transmission later in thissection.
To return to normal drive (D) position,move the shift lever back from manual (M)to drive (D).
The transmission operates in gears onethrough six.
Second (2)
Transmission operates in second (2) gearonly. Use second (2) gear to start-up onslippery roads.
First (1)
•Transmission operates in first (1) gearonly.
•Provides maximum engine braking.
•Allows upshifts by moving gearshiftlever.
•Does not downshift into first (1) gearat high speeds; allows for first (1) gearwhen vehicle reaches slower speeds.
Forced downshifts
•Allowed in drive (D) with the tow/haulfeature on or off.
•Press the accelerator to the floor.
•Allows transmission to select anappropriate gear.
Tow/Haul Mode
To activate tow/haul, press thebutton on the gearshift leveronce. The TOW HAUL indicatorlight illuminates in the instrument cluster.
The tow/haul feature:
•Delays upshifts to reduce the frequencyof transmission shifting.
•Provides engine braking in all forwardgears, which slows your vehicle andassists you in controlling your vehiclewhen descending a grade.
•Depending on driving conditions andload conditions, may downshift thetransmission, slow your vehicle andcontrol your vehicle speed whendescending a hill, without pressing theaccelerator pedal. The amount ofdownshift braking provided will varybased upon the amount you press thebrake pedal.
The tow/haul feature improvestransmission operation when towing atrailer or a heavy load. All transmissiongear ranges are available when usingtow/haul.
To deactivate the tow/haul feature andreturn to normal driving mode, press thebutton on the gearshift lever twice. TheTOW HAUL light deactivates. Tow/haulalso deactivates when you power downyour vehicle.
WARNING
Do not use the tow/haul featurewhen driving in icy or slipperyconditions as the increased enginebraking can cause the rear wheels to slideand your vehicle to swing around with thepossible loss of vehicle control.
153
Super Duty (TFA) Canada/United States of America, enUSA, First Printing
TransmissionE161509
Page 173 of 507
PARKING BRAKE
WARNING
Always set the parking brake fullyand make sure the transmission isplaced in park (P). Failure to set theparking brake and engage park could resultin vehicle roll-away, property damage orbodily injury. Turn the ignition to the lockposition and remove the key whenever youleave your vehicle.
Apply the parking brake whenever yourvehicle is parked. Press the pedaldownward to set the parking brake. Thebrake warning lamp in the instrumentcluster will illuminate and remainsilluminated until the parking brake isreleased.
To release, pull the brake release leverlocated at the lower left side of theinstrument panel.
If you are parking your vehicle on a gradeor with a trailer, press and hold the brakepedal down, then set the parking brake.There may be a little vehicle movement asthe parking brake sets to hold the vehicle'sweight. This is normal and should be noreason for concern. If needed, press andhold the service brake pedal down, thentry reapplying the parking brake. Chock thewheels if required. If the parking brakecannot hold the weight of the vehicle, theparking brake may need to be serviced orthe vehicle may be overloaded.
HILL START ASSIST
WARNINGS
The system does not replace theparking brake. When you leave yourvehicle, always apply the parkingbrake. Failure to leave your vehicle securelyparked may lead to a crash or injury. SeeParking Brake (page 170).
WARNINGS
You must remain in your vehiclewhen the system turns on. At alltimes, you are responsible forcontrolling your vehicle, supervising thesystem and intervening, if required. Failureto take care may result in the loss ofcontrol of your vehicle, serious personalinjury or death.
The system will turn off if amalfunction is apparent or if you revthe engine excessively. Failure totake care may result in the loss of controlof your vehicle, serious personal injury ordeath.
The system makes it easier to pull awaywhen your vehicle is on a slope without theneed to use the parking brake.
When the system is active, your vehicleremains stationary on the slope for two tothree seconds after you release the brakepedal. This allows time to move your footfrom the brake to the accelerator pedal.The system releases the brakesautomatically once the engine hasdeveloped sufficient drive to prevent yourvehicle from rolling down the slope. Thisis an advantage when pulling away on aslope, for example from a car park ramp,traffic lights or when reversing uphill intoa parking space.
Note:The system only functions when youbring your vehicle to a complete standstillin an uphill gear (for example, drive whenfacing uphill or reverse when facingdownhill).
Note:There is no warning light to indicatethe system is either on or off.
Using Hill Start Assist
1. Press the brake pedal to bring yourvehicle to a complete standstill. Keepthe brake pedal pressed.
170
Super Duty (TFA) Canada/United States of America, enUSA, First Printing
Brakes