2016 FORD F250 tailgate
[x] Cancel search: tailgatePage 4 of 507
Introduction
About This Manual...........................................7
Symbols Glossary
.............................................7
Data Recording
..................................................9
California Proposition 65..............................11
Perchlorate.........................................................11
Ford Credit
..........................................................11
Replacement Parts Recommendation
........................................11
Special Notices................................................12
Mobile Communications Equipment.....................................................13
Export Unique Options..................................13
Environment
Protecting the Environment........................14
Child Safety
General Information
.......................................15
Installing Child Seats.....................................16
Booster Seats
..................................................24
Child Seat Positioning..................................26
Child Safety Locks..........................................27
Safety Belts
Principle of Operation..................................29
Fastening the Safety Belts
.........................30
Safety Belt Height Adjustment.................33
Safety Belt Warning Lamp and Indicator Chime
.............................................................33
Safety Belt Minder.........................................34
Child Restraint and Safety Belt Maintenance................................................36
Supplementary Restraints System
Principle of Operation...................................37
Driver and Passenger Airbags...................38
Side Airbags
.....................................................43
Safety Canopy ™
............................................44Crash Sensors and Airbag Indicator.......45
Airbag Disposal
..............................................46
Keys and Remote Controls
General Information on Radio Frequencies..................................................47
Remote Control
...............................................47
Replacing a Lost Key or Remote Control...........................................................50
MyKey ™
Principle of Operation
...................................51
Creating a MyKey............................................52
Clearing All MyKeys.......................................53
Checking MyKey System Status...............53
Using MyKey With Remote Start Systems.........................................................55
MyKey Troubleshooting...............................55
Locks
Locking and Unlocking
.................................56
Keyless Entry
....................................................57
Tailgate
Tailgate Lock
...................................................60
Removing the Tailgate.................................60
Tailgate Step.....................................................61
Bed Extender...................................................62
Security
Passive Anti-Theft System........................64
Anti-Theft Alarm
............................................65
Steering Wheel
Adjusting the Steering Wheel...................66
Audio Control
..................................................66
Voice Control....................................................67
Cruise Control
..................................................67
Information Display Control
.......................67
Heated Steering Wheel
...............................68
1
Super Duty (TFA) Canada/United States of America, enUSA, First Printing Table of Contents
Page 63 of 507
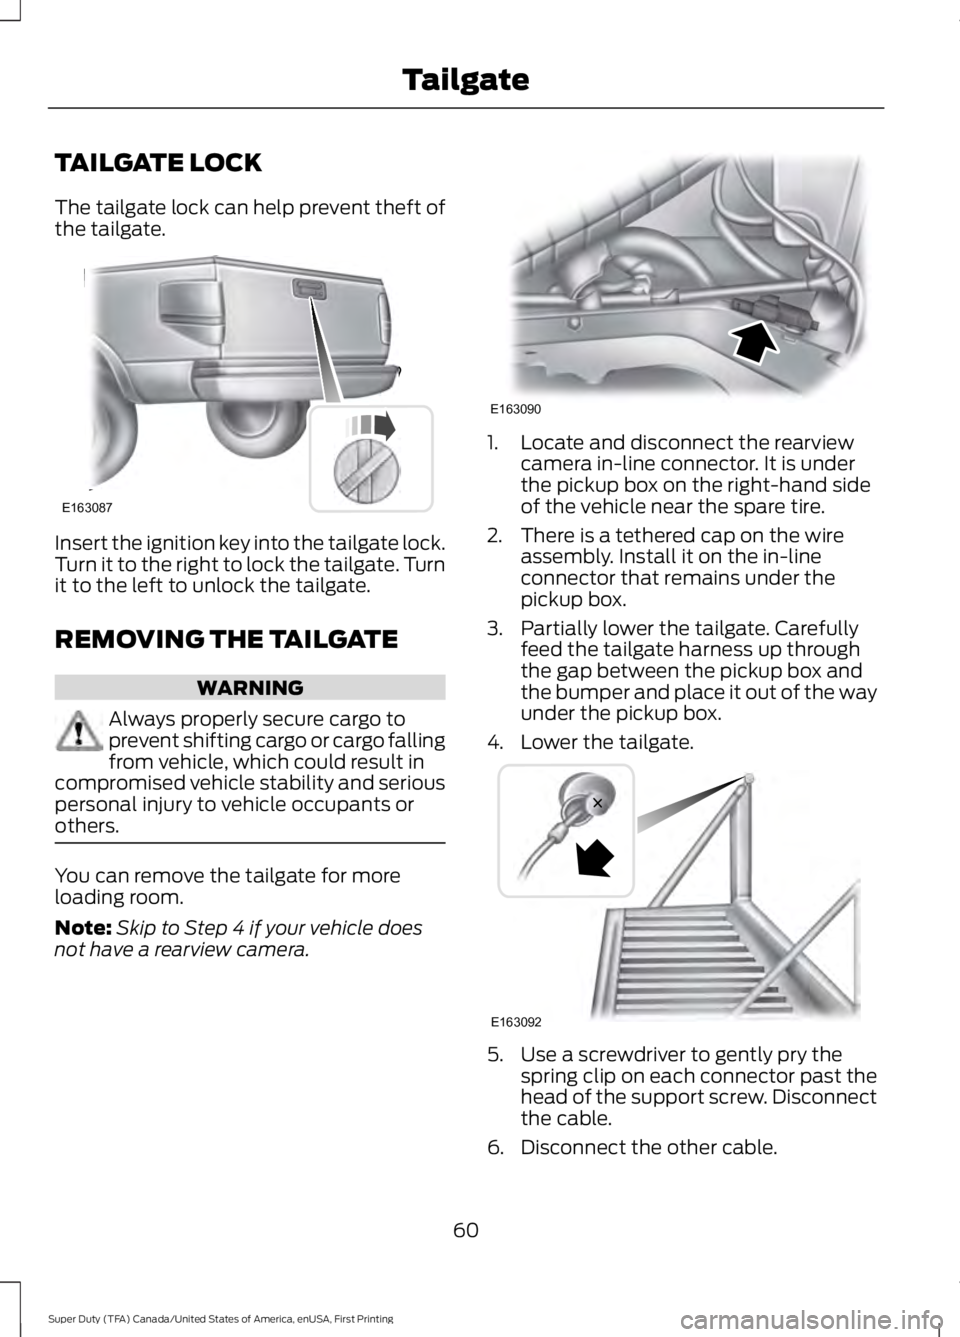
TAILGATE LOCK
The tailgate lock can help prevent theft of
the tailgate.
Insert the ignition key into the tailgate lock.
Turn it to the right to lock the tailgate. Turn
it to the left to unlock the tailgate.
REMOVING THE TAILGATE
WARNING
Always properly secure cargo to
prevent shifting cargo or cargo falling
from vehicle, which could result in
compromised vehicle stability and serious
personal injury to vehicle occupants or
others. You can remove the tailgate for more
loading room.
Note:
Skip to Step 4 if your vehicle does
not have a rearview camera. 1. Locate and disconnect the rearview
camera in-line connector. It is under
the pickup box on the right-hand side
of the vehicle near the spare tire.
2. There is a tethered cap on the wire assembly. Install it on the in-line
connector that remains under the
pickup box.
3. Partially lower the tailgate. Carefully feed the tailgate harness up through
the gap between the pickup box and
the bumper and place it out of the way
under the pickup box.
4. Lower the tailgate. 5. Use a screwdriver to gently pry the
spring clip on each connector past the
head of the support screw. Disconnect
the cable.
6. Disconnect the other cable.
60
Super Duty (TFA) Canada/United States of America, enUSA, First Printing TailgateE163087 E163090 E163092
Page 64 of 507

7. Lift the tailgate to a 45-degree angle
from horizontal.
8. Lift the right side off its hinge.
9. Lift the tailgate to an 80-degree angle
from horizontal.
10. Remove the tailgate from the left side
hinge by sliding it to the right.
Reverse the steps to reinstall the tailgate.
TAILGATE STEP (If Equipped)
To reduce the risk of falling:
• Only operate the step when your
vehicle is on a level surface.
• Only operate the step in areas with
sufficient lighting.
• Always open the step panel to widen
the step.
• Always use the grab handle when
climbing on the step.
• Do not use the step with bare feet.
• Make sure the step is clean before use.
• Keep the step load, you plus the load,
below
350 lb (159 kg).
Opening the step
Note: Make sure to close and fully latch the
step before moving your vehicle. Never drive
with the step or grab handle open.
1. Lower the tailgate.
2. Pull the yellow lever on the grab handle
to the unlock position. 3. Raise the handle upright until you feel
it latch and see the lever in the lock
position. You only need to use the lever
when releasing the grab handle. 4. Rotate the center molding to unlatch
the step. Pull it toward you to extend
it.
5. Open the step panel to widen the step.
Note: Do not tow with the step or grab
handle.
Replace the slip resistance tape or grab
handle molding if it appears worn or
damaged.
Closing the step
1. Close the step panel then lift and fully close the step into the tailgate.
61
Super Duty (TFA) Canada/United States of America, enUSA, First Printing TailgateE163093 E163094
Page 65 of 507
2. Move the yellow lever on the grab
handle to the unlock position and lower
the handle.
BED EXTENDER (If Equipped)
Note: Do not use the bed extender when
driving off road.
Note: Make sure to engage the locking pins
and knobs fully before driving your vehicle.
Note: Make sure to secure all cargo.
Note: Do not exceed 150 pounds (68
kilograms) on the tailgate when your vehicle
is moving.
Note: Do not keep the bed extender in the
tailgate mode when you are not using it for
restraining cargo. Always keep the bed
extender in the grocery mode or the stowed
position with the tailgate closed.
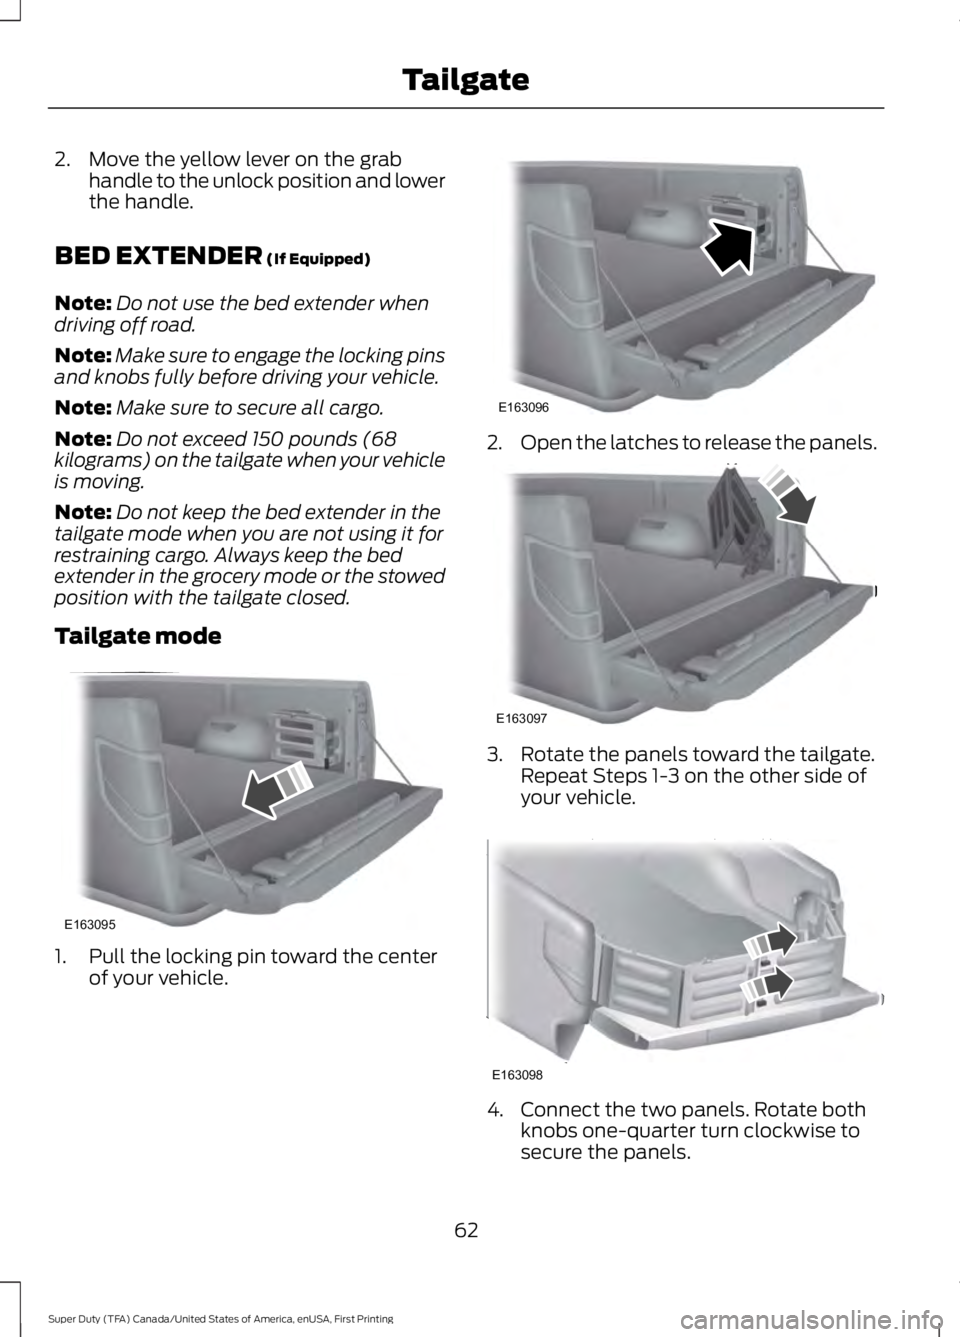
Tailgate mode 1. Pull the locking pin toward the center
of your vehicle. 2.
Open the latches to release the panels. 3. Rotate the panels toward the tailgate.
Repeat Steps 1-3 on the other side of
your vehicle. 4. Connect the two panels. Rotate both
knobs one-quarter turn clockwise to
secure the panels.
62
Super Duty (TFA) Canada/United States of America, enUSA, First Printing TailgateE163095 E163096 E163097 E163098
Page 66 of 507
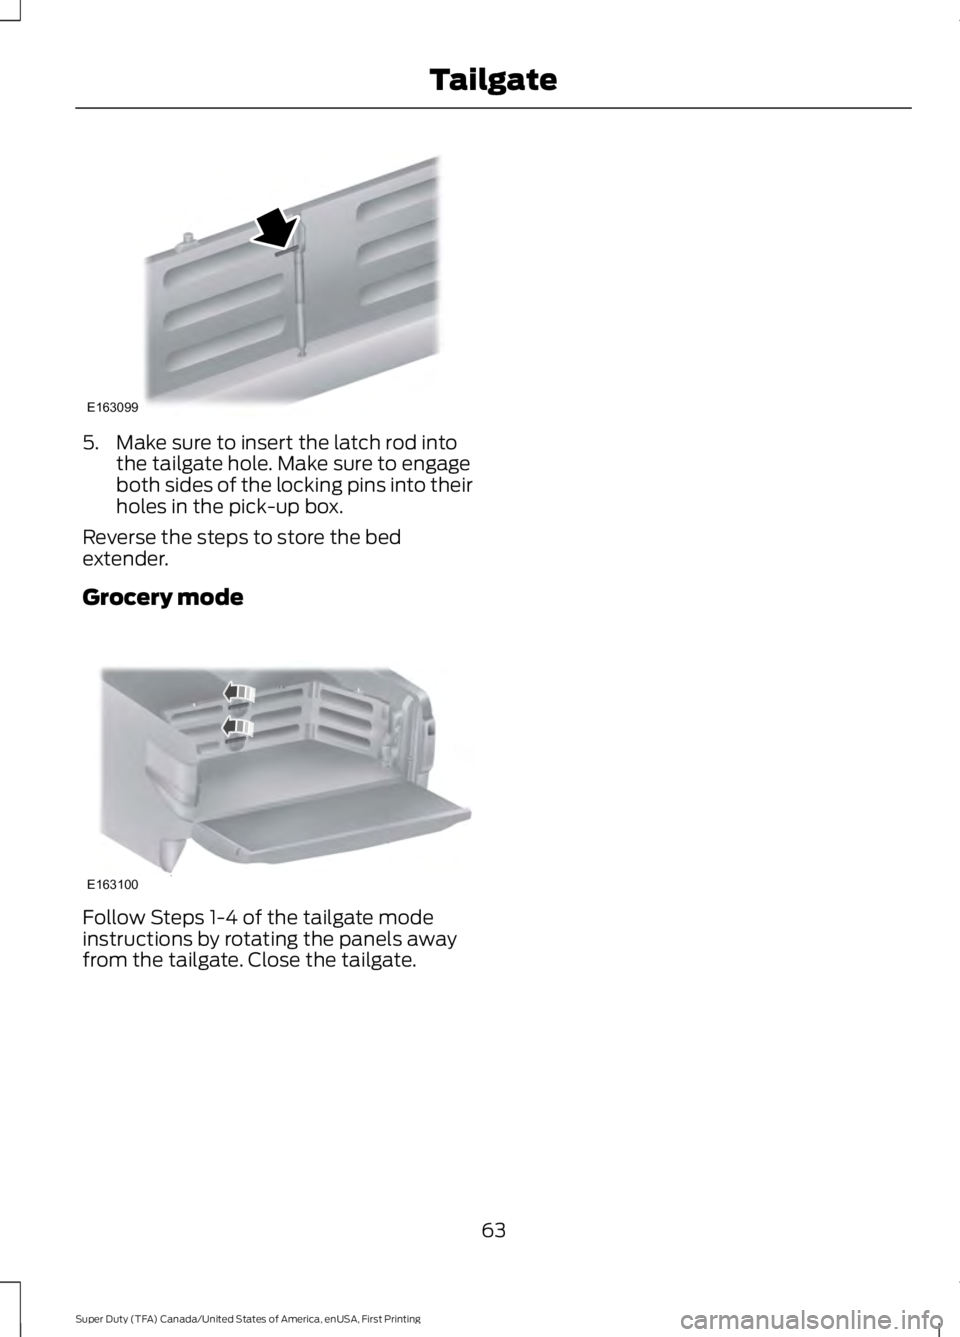
5. Make sure to insert the latch rod into
the tailgate hole. Make sure to engage
both sides of the locking pins into their
holes in the pick-up box.
Reverse the steps to store the bed
extender.
Grocery mode Follow Steps 1-4 of the tailgate mode
instructions by rotating the panels away
from the tailgate. Close the tailgate.
63
Super Duty (TFA) Canada/United States of America, enUSA, First Printing TailgateE163099 E163100
Page 183 of 507
The system detects certain objects while
the transmission is in reverse (R):
•
Your vehicle is moving toward a
stationary object at a speed of 3 mph
(5 km/h) or less.
• Your vehicle is not moving, but a
moving object is approaching the rear
of your vehicle at a speed of
3 mph
(5 km/h) or less.
• Your vehicle is moving at a speed of
less than 3 mph (5 km/h) and a moving
object is approaching the rear of your
vehicle at a speed of less than
3 mph
(5 km/h).
REAR VIEW CAMERA
(If Equipped) WARNINGS
The rear view camera system is a
reverse aid supplement device that
still requires the driver to use it in
conjunction with the interior and exterior
mirrors for maximum coverage. Objects that are close to either
corner of the bumper or under the
bumper, might not be seen on the
screen due to the limited coverage of the
camera system. Back up as slow as possible since
higher speeds might limit your
reaction time to stop the vehicle.
Use caution when using the rear
video camera and the tailgate is ajar.
If the tailgate is ajar, the camera will
be out of position and the video image may
be incorrect. All guidelines will be removed
when the tailgate is ajar. Use caution when turning camera
features on or off while in reverse
(R). Make sure your vehicle is not
moving. WARNINGS
When manual zoom is enabled
(Level 1, Level 2 or Level 3), the full
area behind your vehicle will not be
shown. Be aware of your surroundings
when using the manual zoom feature. The rear view camera system provides a
video image of the area behind your
vehicle.
During operation, lines appear in the
display which represent your vehicle
’s path
and proximity to objects behind your
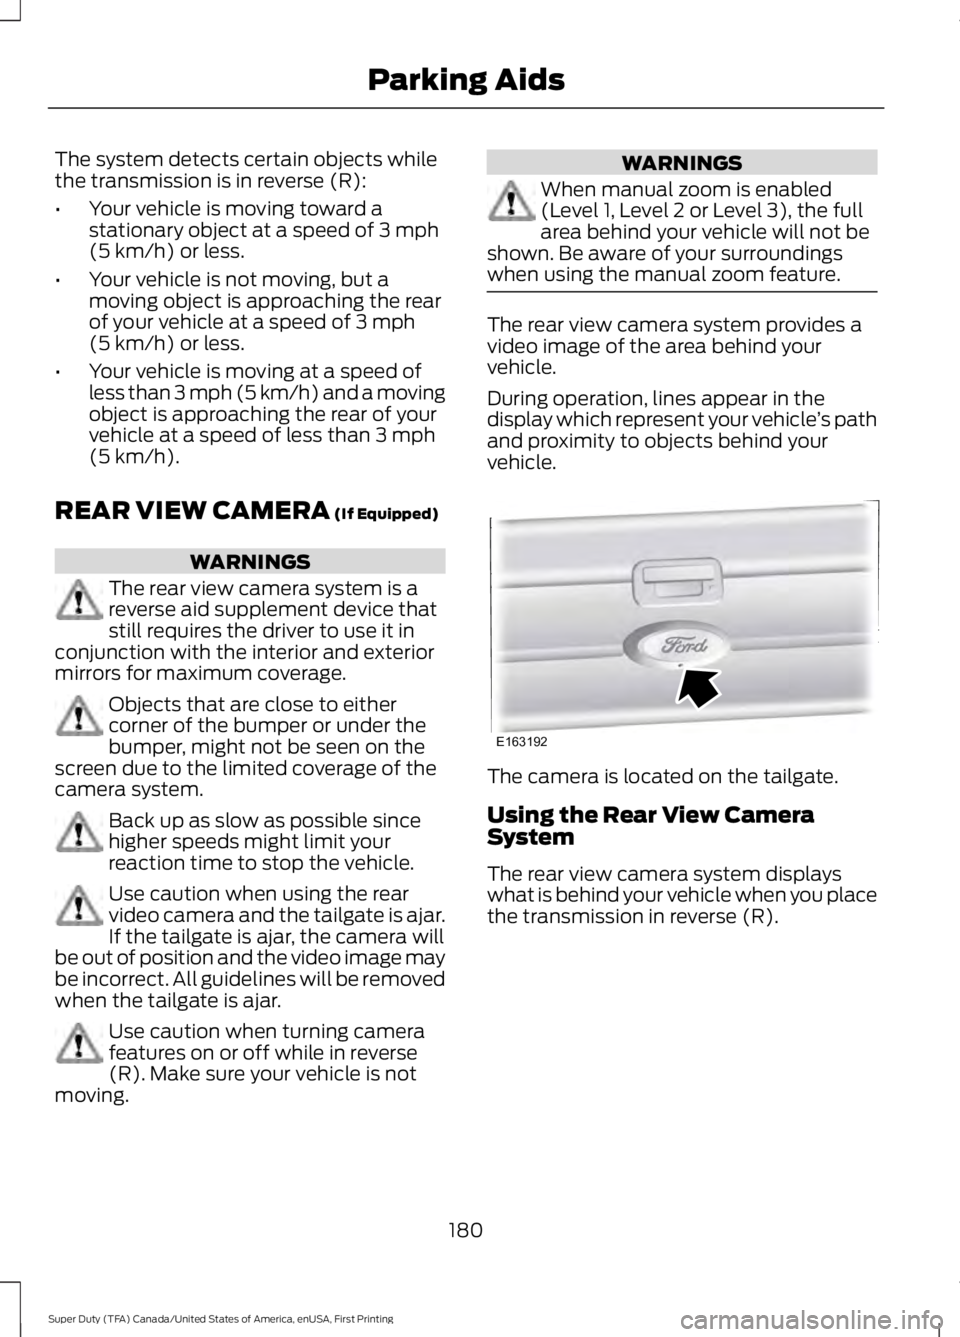
vehicle. The camera is located on the tailgate.
Using the Rear View Camera
System
The rear view camera system displays
what is behind your vehicle when you place
the transmission in reverse (R).
180
Super Duty (TFA) Canada/United States of America, enUSA, First Printing Parking AidsE163192
Page 254 of 507
2. Disconnect the electrical connector.
3.
Turn the bulb holder counterclockwise
and remove it.
Note: Do not touch the bulb glass.
Note: You cannot separate the bulb from
the bulb holder.
Replacing
Brake/Tail/Turn/Reverse Lamp
Bulbs
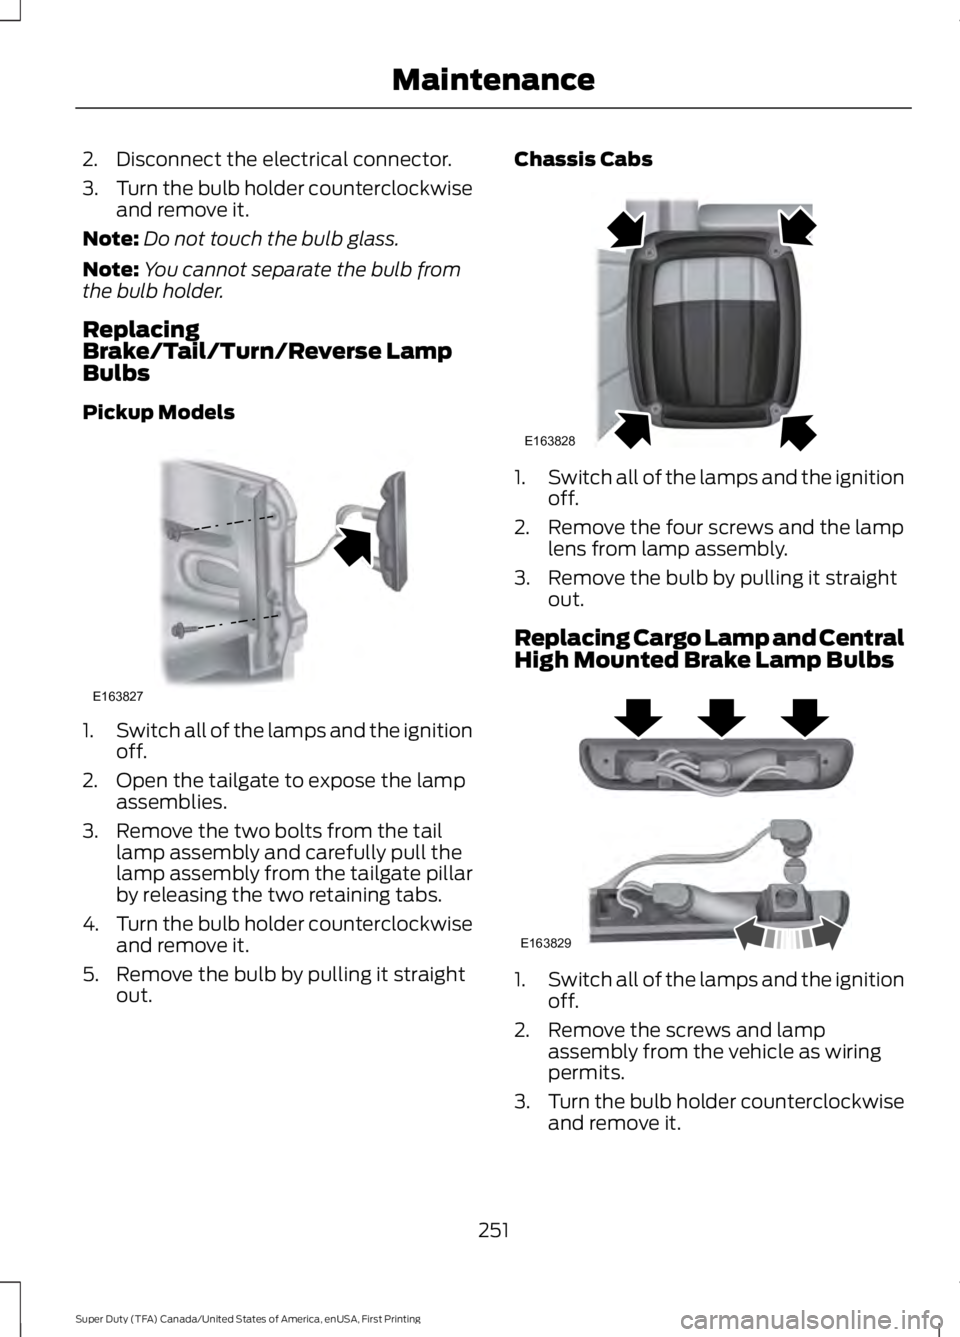
Pickup Models 1.
Switch all of the lamps and the ignition
off.
2. Open the tailgate to expose the lamp assemblies.
3. Remove the two bolts from the tail lamp assembly and carefully pull the
lamp assembly from the tailgate pillar
by releasing the two retaining tabs.
4. Turn the bulb holder counterclockwise
and remove it.
5. Remove the bulb by pulling it straight out. Chassis Cabs
1.
Switch all of the lamps and the ignition
off.
2. Remove the four screws and the lamp lens from lamp assembly.
3. Remove the bulb by pulling it straight out.
Replacing Cargo Lamp and Central
High Mounted Brake Lamp Bulbs 1.
Switch all of the lamps and the ignition
off.
2. Remove the screws and lamp assembly from the vehicle as wiring
permits.
3. Turn the bulb holder counterclockwise
and remove it.
251
Super Duty (TFA) Canada/United States of America, enUSA, First Printing MaintenanceE163827 E163828 E163829
Page 498 of 507

4
4WD
See: Four-Wheel Drive..................................... 158
A
A/C See: Climate Control.......................................... 110
About This Manual...........................................7
ABS See: Brakes........................................................... 169
ABS driving hints See: Hints on Driving With Anti-Lock
Brakes................................................................ 169
Accessories....................................................447 Exterior style........................................................ 447
Interior style......................................................... 447
Lifestyle................................................................. 447
Peace of mind..................................................... 447
Accessories See: Replacement Parts
Recommendation............................................. 11
Adjusting the Headlamps.........................247 Horizontal Aim Adjustment........................... 248
Vertical Aim Adjustment................................. 247
Adjusting the Pedals
....................................69
Adjusting the Steering Wheel...................66
Airbag Disposal
..............................................46
Air Conditioning See: Climate Control.......................................... 110
Alarm See: Anti-Theft Alarm........................................ 65
Anti-Theft Alarm
............................................65
Arming the Alarm................................................. 65
Disarming the Alarm........................................... 65
Appendices.....................................................472
Audible Warnings and Indicators.............87 Headlamps On Warning Chime...................... 87
Key in Ignition Warning Chime......................... 87
Parking Brake On Warning Chime.................88
Audio Control
..................................................66
Media........................................................................\
. 67
Seek, Next or Previous........................................ 67
Audio System.................................................317 General Information........................................... 317
Audio Unit - Vehicles With: AM/FM/CD/ SYNC..............................................................319 Audio Unit - Vehicles With: AM/FM/CD/
Touchscreen Display
................................322
Audio Unit - Vehicles With: AM/FM.......318
Autolamps.........................................................72 Autolamps - Programmable Exit
Delay..................................................................... 72
Automatic Climate Control.........................111
Automatic Transmission.............................151 Brake-Shift Interlock......................................... 155
If Your Vehicle Gets Stuck In Mud or Snow.................................................................. 156
Understanding the Shift Positions of a 6– Speed Automatic Transmission.........152
Understanding the Shift Positions of the 5– Speed Automatic Transmission..........151
Understanding your SelectShift Automatic ™ transmission......................... 154
Automatic Transmission Fluid Check............................................................240
Checking Automatic Transmission Fluid.................................................................... 241
Auxiliary Power Points.................................137 110 Volt AC Power Point.................................... 137
12 Volt DC Power Point...................................... 137
Locations................................................................ 137
Auxiliary Switches.......................................448
B
Bed Extender...................................................62 Grocery mode........................................................ 63
Tailgate mode........................................................ 62
Bonnet Lock See: Opening and Closing the Hood...........232
Booster Seats..................................................24 Types of Booster Seats...................................... 25
Brake Fluid Check........................................244
Brakes...............................................................169 General Information.......................................... 169
Breaking-In.....................................................207
Bulb Specification Chart
...........................252
C
California Proposition 65..............................11
Capacities and Specifications - 6.2L V8...................................................................307
Specifications..................................................... 308
495
Super Duty (TFA) Canada/United States of America, enUSA, First Printing Index